background image

Kramer Electronics Ltd. 


KDS-EN7, KDS-DEC7 

– Using KDS-EN7 Embedded Web Pages 

32 


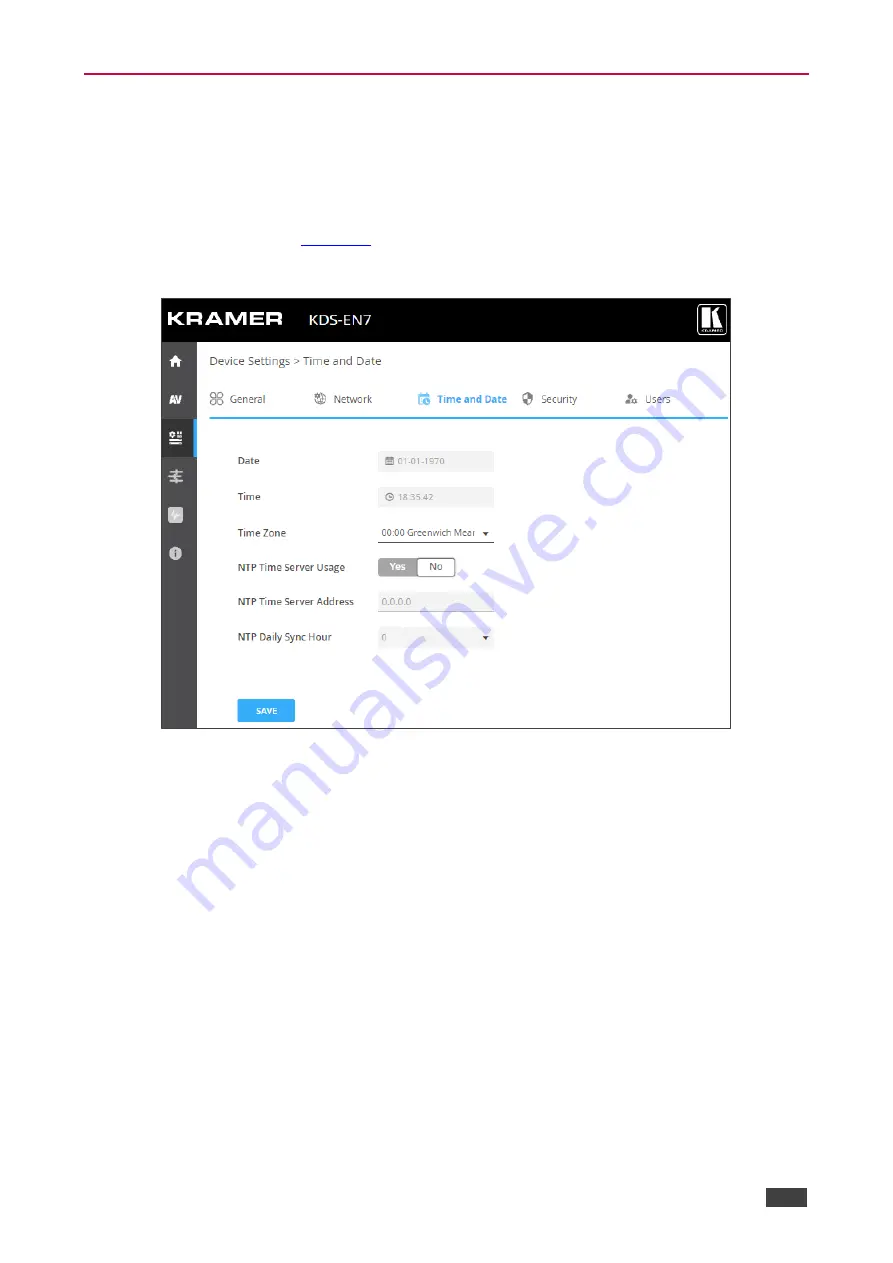
Defining KDS-EN7 Time and Date 

You can sync the device time and date to any server around the world. 

To sync device time and date to a server: 

1.  In the Navigation pane, click 

Device Settings

. The General tab in the Device Settings 

page appears (see 

Figure 17

). 

2.  Select the 

Time and Date

 tab. The Time and Date tab appears. 


Figure 19: Device Settings 

– Time and Date Tab 

3.  Next to Use Time Server (NTP), click 

YES 

to use time server (NTP). 

Network fields are enabled. 

4.  Type in server information: 


Enter the server address. 


Set daily sync hour. 

5.  Click 

SAVE

The devices date and time are synchronized to the server address entered. 

Summary of Contents for KDS-DEC7

Page 1: ...P N 2900 301543 Rev 1 www kramerAV com USER MANUAL MODELS KDS EN7 4K AVoIP Encoder KDS DEC7 4K AVoIP Decoder...

Page 2: ...and Date 32 Setting KDS EN7 Security 33 Defining KDS EN7 User Access 36 Defining KDS EN7 Gateway Settings 38 Viewing KDS EN7 Status 42 Viewing KDS EN7 Connections Status 43 Viewing KDS EN7 Advanced S...

Page 3: ...N7 Specifications 77 KDS DEC7 Specifications 78 Default Communication Parameters 79 Default EDID 79 Default Parameters 81 KDS DEC7 Default Parameters 82 Protocol 3000 84 Understanding Protocol 3000 84...

Page 4: ...les we recommend Kramer high performance high resolution cables to avoid interference deterioration in signal quality due to poor matching and elevated noise levels often associated with low quality c...

Page 5: ...cast one to one or multicast one to many configurations KDS EN7 encodes and streams the video signal and transmits USB IR RS 232 or CEC signals over an IP network KDS DEC7 decodes the video signal and...

Page 6: ...nd command streams to separate LAN for security and reliability purposes Flexible Connectivity Analog embedded audio inputs and outputs Typical Applications KDS EN7 is ideal for the following typical...

Page 7: ...set the device to its factory default values All LEDs flash LAN MEDIA 1G PoE RJ 45 Port Unicast connect for streaming either directly to a decoder or via LAN Multicast connect to multiple decoders or...

Page 8: ...essed Button Press and hold for 10 seconds to reset the device to its factory default values All LEDs flash LAN MEDIA 1G PoE RJ 45 Port Connect for streaming LAN SERVICE 1G RJ 45 Port Use optionally t...

Page 9: ...mperature air flow is compatible for the device Avoid uneven mechanical loading Appropriate consideration of equipment nameplate ratings should be used for avoiding overloading of the circuits Reliabl...

Page 10: ...ct and plug into the mains electricity Always switch off the power to each device before connecting it to your KDS EN7 and KDS DEC7 After connecting your devices connect their power and then switch on...

Page 11: ...type A ports 7 Control the display connected to KDS DEC7 from the encoder side via IR On KDS EN7 connect an IR sensor cable to the IR 3 5mm mini jack On KDS DEC7 connect the IR 3 5mm mini jack to an...

Page 12: ...on Flashes Green Slowly Device is in standby mode Flashes green fast FW is downloaded in the background Flashes Green very fast for 60sec A device identification command is sent Flag me Lights Yellow...

Page 13: ...tering On Using Menu Navigation Buttons Connect the device to the 24V DC power adapter and connect the adapter to the mains electricity The ON LED lights green and the LINK LED flashes indicating that...

Page 14: ...ng IP address Subnet mask and Gateway address LAN2 STATUS including IP address Subnet mask and Gateway address HDMI STATUS including video input resolution and HDCP settings status View Device channel...

Page 15: ...ss Enter to accept HDCP mode Defining Encoder Device Channel Number Set a device channel number from 1 to 999 To define the encoder channel number 1 Press the left or right arrows to access the CH DEF...

Page 16: ...version Device information is viewed Selecting the video input signal You can either select the streaming input or the local HDMI input signal to route to the HDMI output To select the streaming inpu...

Page 17: ...ddress via LCD screen menu KDS EN7 KDS DEC7 IP default static addresses are 192 168 1 39 for the Encoder and 192 168 1 40 for the Decoder By default DHCP is enabled and assigns an IP address to the de...

Page 18: ...CP is enabled and when a static IP address is used You can connect to KDS EN7 via Ethernet using either of the following methods When DHCP is enabled see for example KDS EN7 Network Settings on page 3...

Page 19: ...onnect the Ethernet port of KDS EN7 directly to the Ethernet port on your PC using a crossover cable with RJ 45 connectors This type of connection is recommended for identifying KDS EN7 with the facto...

Page 20: ...4 Highlight either Internet Protocol Version 6 TCP IPv6 or Internet Protocol Version 4 TCP IPv4 depending on the requirements of your IT system 5 Click Properties The Internet Protocol Properties wind...

Page 21: ...y IP address in the range 192 168 1 1 to 192 168 1 255 excluding 192 168 1 39 that is provided by your IT department Figure 11 Internet Protocol Properties Window 7 Click OK 8 Click Close Connecting E...

Page 22: ...plorer 9 Firefox 19 Opera 11 Mac PC Chrome 25 Firefox 19 Opera 11 iOS Chrome 25 Safari depends on the IOS version Opera 11 Android OS Chrome 25 Opera 11 Some features might not be supported by some mo...

Page 23: ...Internet browser 2 Type the IP number of the device in the Address bar of your browser For example the default IP number The Login window appears Figure 12 Login Window 3 Enter the Username and Passwo...

Page 24: ...APPLY Stream name is identical to Host name see General Device Settings on page 27 can include up to 24 characters and _ are allowed within the name by default the name is the model name and MAC addr...

Page 25: ...le disable HDCP support for the HDMI input Image Preview view the output video streaming preview Maximum Bit Rate select the maximum transmission bandwidth Select bandwidth 10Mbps 50Mbps 100Mbps 150Mb...

Page 26: ...ideo tab in the AV Settings page appears see Figure 14 2 Select the Audio tab The Audio tab appears Figure 15 AV Settings Audio Tab 3 Select IN or OUT to select the audio direction If IN is selected t...

Page 27: ...its priority order The device switches the highest priority audio input to the output Manual manually select the audio source The device switches an audio source only when selected manually 5 Set the...

Page 28: ...it if required To manage EDID 1 In the Navigation pane Select AV The Video tab in the AV Routing page appears see Figure 14 2 Select the EDID tab The EDID Management tab appears Figure 16 AV Settings...

Page 29: ...ed from the decoder to the encoder Custom download the EDID file from an external source To remove an EDID from the list Select an EDID file from the list Click REMOVE To upload an EDID file Click UPL...

Page 30: ...ough the device has only one MAC address you can configure up to two separate IP addresses for the two Ethernet ports in two subnets using one MAC address see KDS EN7 Network Settings on page 30 KDS E...

Page 31: ...ane Select Device Settings The General tab in the Device Settings page appears Figure 17 Device Settings General Tab 2 Lock Unlock the device front panel Click Off to enable device control from the fr...

Page 32: ...n file appears Select the file to import settings tar gz Click Open to import the file 4 To export settings click EXPORT The settings file is created settings tar gz The settings file is imported expo...

Page 33: ...face settings for each of the Ethernet ports To define interface settings 1 In the Navigation pane Select Device Settings The General tab in the Device Settings page appears see Figure 17 2 Select the...

Page 34: ...VLAN Tag Enter an integer number to specify a VLAN ID 1 4093 to P3K Gateway services This way the P3K Gateway service will have the VLAN packets tagged to Network DHCP mode Set DHCP to On default or O...

Page 35: ...click Device Settings The General tab in the Device Settings page appears see Figure 17 2 Select the Time and Date tab The Time and Date tab appears Figure 19 Device Settings Time and Date Tab 3 Next...

Page 36: ...enticated peer over the network This section describes the following actions Configuring HTTPS on page 33 Defining 802 1x Authentication on page 34 Contact your IT administrator for the network access...

Page 37: ...gure 21 Security Tab Server Certificate 5 Click APPLY HTTPS is configured Defining 802 1x Authentication To configure security 1 In the Navigation pane click Device Settings The General tab in the Dev...

Page 38: ...it certificate from the server for authentication To do so enter the Username click to upload the certificates and keys and enter the private key password assigned by IT administrator Set Server Certi...

Page 39: ...upon initial landing on operation page The default password is admin By default security is disabled Enabling User Access To enable security 1 In the Navigation pane click Device Settings The General...

Page 40: ...ser Access To enable security 1 In the Navigation pane click Device Settings The General tab in the Device Settings page appears see Figure 17 2 Select Users tab see Figure 24 Figure 26 Device Setting...

Page 41: ...General tab in the Device Settings page appears see Figure 17 2 Select Users tab see Figure 24 Figure 28 Device Settings Users Tab 3 Next to New Password enter the new password 4 Next to Confirm Passw...

Page 42: ...t and input To set CEC Gateway 1 In the Navigation pane click Control The Control Settings page appears Figure 29 Control Settings Page CEC Settings 2 Click Enable to enable CEC gateway or click Disab...

Page 43: ...t RS 232 Gateway 1 In the Navigation pane click Control The Control Settings page appears see Figure 29 Figure 30 Control Settings Page RS 232 Settings 2 Click Enable to enable RS 232 gateway or click...

Page 44: ...ontrol gateway to IR connected devices To set RS 232 Gateway 1 In the Navigation pane click Control The Control Settings page appears Figure 31 Control Settings Page IR Settings 2 Set IR direction IN...

Page 45: ...indication 3 View device internal heat status Normal for temperatures under 45 C green indication High for temperatures between 45 C and 60 C orange indication Overheat for temperatures higher than 60...

Page 46: ...ection information status To view Connections status 1 In the Navigation pane click Diagnostics The Status tab appears see Figure 32 2 Select the Connections tab Figure 33 Diagnostics Status Tab 3 Vie...

Page 47: ...ick Diagnostics The Status tab appears see Figure 32 2 Select the Advanced tab Figure 34 Diagnostics Advanced Tab 3 Define Syslog activity On to enable device system log locally Off default to disable...

Page 48: ...ronics Ltd KDS EN7 KDS DEC7 Using KDS EN7 Embedded Web Pages 45 Viewing the About Page View the web page hardware release firmware version and Kramer Electronics Ltd details in the About page Figure 3...

Page 49: ...t Explorer 9 Firefox 19 Opera 11 Mac PC Chrome 25 Firefox 19 Opera 11 iOS Chrome 25 Safari depends on the IOS version Opera 11 Android OS Chrome 25 Opera 11 Some features might not be supported by som...

Page 50: ...on page 66 Viewing KDS DEC7 Advanced Status on page 67 Viewing the KDS DEC7 About Page on page 68 To Browse the KDS DEC7 Web Pages 1 Connect the LAN port of the device Open your Internet browser 2 Ty...

Page 51: ...routing parameters To set AV routing parameters 1 In the Navigation pane Select Main AV Routing The AV Routing page appears see Figure 37 2 From the drop down list next to Input Selection set the inpu...

Page 52: ...me 0 to 100 Default is 80 0dB 100 12dB and 0 is mute 5 Mute unmute all audio outputs HDMI OUT AUDIO OUT and LAN output Play default or stop streaming of video audio IR RS 232 and USB signals 6 View th...

Page 53: ...igation pane Select Main AV Routing The AV Routing page appears see Figure 37 2 Select the OSD Configuration tab Figure 38 Main Page OSD Configuration Tab 3 Set the menu timeout in seconds 4 Define th...

Page 54: ...ion 8 Next to Display Device Information click On to display Device Information on the screen including device version IP address and MAC address etc or click Off 9 Click DISPLAY NOW when device infor...

Page 55: ...fault when a decoder that has the USB token remains inactive for 10 seconds another decoder can get the USB token from the encoder Enabled when Optimized for KVM is selected 5 Set Roaming Master Slave...

Page 56: ...Define the number of rows and columns for roaming slaves for example 2 rows and 2 columns Figure 41 Roaming Slave Status Window 2 Check a Master device to which the keyboard and mouse are connected 3...

Page 57: ...d Web Pages 54 Setting the Video Wall Configure the KDS DEC7 video wall To configure the KDS DEC7 video wall 1 In the Navigation pane Select Main AV Routing The AV Routing page appears see Figure 37 2...

Page 58: ...ver the video wall Check Fit In to stretch the video to fit the screen Fit Out to maintain the source video aspect ratio and fill the video to the screen Note that part of the video may be cut out 5 I...

Page 59: ...n AV Routing The AV Routing page appears see Figure 37 2 Select the Overlay tab Figure 44 Main Overlay Tab 3 Click image icon to upload an image The image format must be PNG the resolution up to 640x3...

Page 60: ...on pane Select Main AV Routing The AV Routing page appears see Figure 37 2 Select the Overlay tab see Figure 44 Figure 45 Main Page Text Overlay Tab 3 Enter the overlay text 4 Set the text size 5 Set...

Page 61: ...define Video settings 1 In the Navigation pane Select AV The Video page appears Figure 46 Video Settings 2 From the drop down list set the maximum output resolution Pass Through default the output vi...

Page 62: ...r off Shutdown CEC Delay On Video Signal Loss sec when video signal is lost define the delay time before a CEC shutdown command is sent to the unit Wake up CEC Delay on Video Signal Detection sec when...

Page 63: ...the Device Settings page appears Figure 47 KDS DEC7 Device Settings General Page 2 Perform the following actions for KDS DEC7 as described for KDS EN7 Locking Unlocking the Front Panel on page 28 Imp...

Page 64: ...Device Settings The General tab in the Device Settings page appears see Figure 47 2 Select the Network tab Figure 48 Device Settings General Page 3 Perform the following actions for KDS DEC7 as descr...

Page 65: ...ver around the world To define KDS DEC7 Time and Date 1 In the Navigation pane Select Device Settings The General tab in the Device Settings page appears see Figure 47 2 Select the Time and Date tab F...

Page 66: ...work Contact your IT administrator for the network access authentication To Configure security 1 In the Navigation pane Select Device Settings The General tab in the Device Settings page appears see F...

Page 67: ...y Settings KDS DEC7 enables configuring CEC RS 232 and or IR gateway Control Configuring CEC Settings KDS DEC7 sends CEC commands from a control system connected by LAN via the KDS DEC7 built in contr...

Page 68: ...S EN7 KDS DEC7 Using KDS DEC7 Embedded Web Pages 65 Viewing KDS DEC7 Status View the device status To view device status 1 In the Navigation pane click Diagnostics The Status tab appears Figure 52 Dia...

Page 69: ...on information status To view Connections status 1 In the Navigation pane click Diagnostics The Status tab appears see Figure 52 2 Select the Connections tab Figure 53 Diagnostics Page Connections Tab...

Page 70: ...ck Diagnostics The Status tab appears see Figure 52 2 Select the Advanced tab Figure 54 Diagnostics Page Advanced Tab 3 Define Syslog activity On to enable device system log locally Off default to dis...

Page 71: ...s Ltd KDS EN7 KDS DEC7 Using KDS DEC7 Embedded Web Pages 68 Viewing the KDS DEC7 About Page View the web page hardware release firmware version and Kramer Electronics Ltd details in the About page Fig...

Page 72: ...7 and PC are all connected to the same Network 2 Power all the devices in the system 3 Configure the Network switch as follows Jumbo Frames On at least 8000 bytes IGMP Snooping On IGMP Querier On IGMP...

Page 73: ...ith multiple hosts via USB from one master KDS DEC7 decoder connected to a keyboard and mouse see for example the following layout Figure 56 KVM Roaming Layout To configure KVM roaming 1 Access the en...

Page 74: ...coder For example pair ENC 1 to DEC 1 ENC 2 to DEC 2 ENC 3 to DEC 3 and ENC 4 to DEC 4 Figure 58 KDS DEC7 Setting Channel ID and Name 4 For the Decoder that has the keyboard and mouse connected open t...

Page 75: ...a 2x2 video wall set Row to 2 and Column to 2 Figure 60 Setting the decoder configuration 7 Check the physical location of the Master decoder lower left size in this example The MAC address is automat...

Page 76: ...the channel list Figure 62 KDS DEC7 Adding the encoder Channel ID and Name 3 Connect a USB keyboard to the USB A Target decoder 4 On the connected keyboard double click the Caps Lock The OSD Channel S...

Page 77: ...age set a unique Channel ID and name Figure 63 Setting Channel ID and Name on the KDS EN7 Devices 3 Make sure that all the encoders in the system share the same settings For example to configure fast...

Page 78: ...oblem Click ROLLBACK to update to the previous FW version If the device firmware version is lower than 0 6 3 contact Kramer tech support team at support kramerav com or go to our Web site at k kramera...

Page 79: ...mware 76 2 Next to Firmware Version click UPGRADE The Open window appears 3 Select the FW file and click Open The FW upgrade pop up window appears Wait for upgrade completion 4 Once completed refresh...

Page 80: ...Panel Restart and factory reset button Controls Embedded web pages P3K API commands via Ethernet front panel navigation buttons Power Consumption 12V DC 280mA Source 24V DC 5A optional purchased sepa...

Page 81: ...ontrols Embedded web pages P3K API commands via Ethernet front panel navigation buttons Power Consumption PoE on LAN PoE port 24V DC 530mA when using optional power source Source 24V DC 5A optional pu...

Page 82: ...Input signal type Digital Color bit depth Undefined Display type RGB color Screen size 890 x 500 mm 40 2 in Power management Not supported Extension blocs 1 CEA CTA EXT DDC CI n a Color characteristic...

Page 83: ...20p at 60Hz HDTV 16 9 1 1 720 x 480p at 60Hz EDTV 4 3 8 9 720 x 576p at 50Hz EDTV 4 3 16 15 NB NTSC refresh rate Hz 1000 1001 CE audio data formats supported LPCM 2 channel 16 bit at 32 44 48 kHz CE s...

Page 84: ...0 00 80 01 02 03 04 67 D8 5D C4 01 3C 80 00 E5 0E 60 61 65 66 E2 00 F9 E3 05 E0 00 66 21 56 AA 51 00 1E 30 46 8F 33 00 59 32 00 00 00 9E 00 00 00 00 00 00 00 00 00 00 00 00 00 00 00 00 00 00 00 00 00...

Page 85: ...yslog Yes Yes Off KDS DEC7 Default Parameters Page Name Tab Name Fields Editable Field Exportable Field Default Values Main AV Settings AV Routing Input Selection Yes Yes STREAM Preview Yes Yes Channe...

Page 86: ...s On P3K Gateway Port Yes Yes Media P3K Gateway 802 1Q Yes Yes Off P3K Gateway VLAN Tag Yes Yes N A P3K Gateway DHCP Yes Yes N A Daisy Chain Yes Yes Off IP Casting Mode Yes Yes Multicast TTL Yes Yes 6...

Page 87: ...nn Command Parameter CR LF Command parameters Multiple parameters must be separated by a comma In addition multiple parameters can be grouped as a single parameter using brackets and Command chain se...

Page 88: ...nput 2 CEC Gateway mode command to be to be sent to HDMI Output 3 CEC Gateway mode command to be sent to HDMI Loop Through Set CEC Gateway mode CEC GW PORT ACTIVE 1 CR CEC NTFY Notify about CEC comman...

Page 89: ...put 1 If not in CUSTOM mode return ERROR EDID ACTIVE 1 CR EDID LIST Get a list of currently existing EDID s Get only EDID LIST CR nn EDID LIST 0 DEFAULT CR LF idx xxxx Get EDID list EDID LIST CR Retur...

Page 90: ...puts mode HDCP mode 0 HDCP Off 1 HDCP On 3 HDCP Mirror Mode used by KDS 7 decoder to allow an HDCP 2 2 source connected to the encoder to play on an HDCP 1 4 TV display connected to the decoder Get th...

Page 91: ...Dante Streamer Audio Decoder 0 HDMI output 1 Analog output 2 Both 3 None 4 Dante Set audio source destination KDS AUD 1 CR KDS AUD Get audio source destination KDS AUD CR nn KDS AUD mode CR LF mode En...

Page 92: ...Set Command add Multicast KDS METHOD 1 CR nn KDS METHOD method CR LF method Streaming method 1 Unicast 2 Multicast Set current streaming method of encoder decoder KDS METHOD 1 CR KDS METHOD Get unicas...

Page 93: ...20 1440 x288p 50Hz 25 2880x576i 50Hz 26 2880x576i 50Hz 27 2880x288p 50Hz 28 2880x288p 50Hz 29 1440x576p 50Hz 30 1440x576p 50Hz 31 1920x1080p 50Hz 32 1920x1080p 23 97Hz 24Hz 33 1920x1080p 25Hz 34 1920x...

Page 94: ...1920x1080p 23 97Hz 24Hz 33 1920x1080p 25Hz 34 1920x1080p 29 97Hz 30Hz 35 2880x480p 59 94Hz 60Hz 36 2880x480p 59 94Hz 60Hz 37 2880x576p 50Hz 38 2880x576p 50Hz 39 1920x1080i 50Hz 40 1920x1080i 100Hz 41...

Page 95: ...VW BEZEL CR KDS VW PATTERN Set test pattern mode of video wall KDS VW PATTERN mode CR nn KDS VW PATTERN mode CR LF mode 0 OFF Disable test pattern 1 On Enable test pattern Set video wall test pattern...

Page 96: ...y at all Connection may logout after timeout LOGIN login_level password CR nn LOGIN login_level password ok CR LF or nn LOGIN err 004 CR LF if bad password entered login_level Level of permissions req...

Page 97: ...device NAME 0 CR NAME RST Reset machine DNS name to factory default NOTE Factory default of machine DNS name is KRAMER_ 4 last digits of device serial number NAME RST CR nn NAME RST ok CR LF Reset th...

Page 98: ...address NOTE For backward compatibility the id parameter can be omitted In this case the Network ID by default is 0 which is the Ethernet control port NET MAC id CR nn NET MAC id mac_address CR LF id...

Page 99: ...e Signal ID attribute AUDIO IR direction Direction of the port IN Input OUT Output Get audio analog port direction PORT DIRECTION both analog 1 audio CR PORTS LIST Get the port list of this machine NO...

Page 100: ...VERSION CR TIME Set device time and date NOTE The year must be 4 digits The device does not validate the day of week from the date Time format 24 hours Date format Day Month Year TIME day_of_week dat...

Page 101: ...stop_bits_mode 1 1 5 2 serial_type 232 485 0 232 1 485 485_term 485 termination state 0 disable 1 enable optional this exists only when serial_type is 485 Set baud rate to 9600 8 data bits parity to n...

Page 102: ...bottom 13 Matrix fast switch out_index Number that indicates the specific output 1 256 1 N N the total number of outputs h_value Horizontal correction values v_value Vertical correction values h_offs...

Page 103: ...el Audio level in dB range between 60 to 30 depending of the ability of the product Set the audio level of a specific signal to 10 X AUD LVL in analog_audio 5 audio 1 10 CR X AUD LVL Get audio level o...

Page 104: ...ype index CR nn X AV SW MODE direction_type port_format port_index signal_type index connection_mode CR LF The following attributes comprise the signal ID direction_type Direction of the port IN Input...

Page 105: ...Output BOTH Bi directional port_format Type of signal on the port HDMI USB_C ANALOG_AUDIO port_index The port number as printed on the front or rear panel signal_type Signal ID attribute VIDEO AUDIO G...

Page 106: ...direction_type1 port_type1 po rt_index1 signal_type1 index1 CR nn X ROUTE direction_type1 port_type1 port_index1 signal_type1 index1 direction_type2 port_type2 port_index2 s ignal_type2 index2 CR L F...

Page 107: ...Not enough space for data firmware FPGA ERR_FS_NOT_ENOUGH_SPACE 11 Not enough space file system ERR_FS_FILE_NOT_EXISTS 12 File does not exist ERR_FS_FILE_CANT_CREATED 13 File can t be created ERR_FS_...

Page 108: ...witching 10 Comment Default AV Channel Map Defines mapping between Channels ID and OSD Channel Name Used in OSD menu for easier video channel source selection AV Channel Map device json POST applicati...

Page 109: ...pe Form Value Note file octet stream binary Comment Default EDID Management EDID Repository Function EDID Management URL upload edid Method POST Content Type multipart form data Example Form Name Form...

Page 110: ...ed off timeout 2 Comment seconds Default Overlay Overlay image file Function Overlay File Name upload overlayimage Method POST Content Type multipart form data Example Form Name Form Value Type Form V...

Page 111: ...ficate octet stream binary password plaintext Base64 Encoded Comment Default Security IEEE 802 1X Provide interface for managing security IEEE 802 1X certificates Function Security URL security 802_1x...

Page 112: ...KM URL device json Method POST Content Type application json Example path usb km_usb json info usb_kvm_config km_roaming h 0 mac 00 15 25 08 01 11 v 0 h 1 mac 00 15 25 08 02 98 v 0 kvm_col 2 kvm_row 1...

Page 113: ...ized dealer from which it was purchased or any other party authorized to repair Kramer Electronics products this product must be insured during shipment with the insurance and shipping charges prepaid...

Page 114: ...nd a list of Kramer distributors visit our website where updates to this user manual may be found We welcome your questions comments and feedback The terms HDMI HDMI High Definition Multimedia Interfa...

Reviews: