


199
0-7
0-1
0-2
0-3
0-4
0-5
0-6
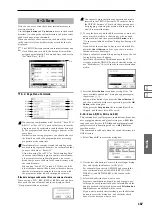
Media
Loop On/Off
[Off, On]
Specifies whether the WAVE file waveform will be looped.
On (checked):
The waveform will play repeatedly from
“LoopS” to the end; i.e., “sample start”
→
“sample end”
→
“LoopS”
→
“sample end”
→
“LoopS” ...
Off (unchecked):
The waveform will play once from “sam-
ple start”
→
“sample end”; i.e., one-shot playback.
If you change “Loop On/Off” from Off to On, the “sample
start” and “sample end” addresses will be set as the initial
values of “LoopS” and “End.”
LoopS
[000000000...]
End
[000000000...]
These parameters specify the loop start address and end
address that will be used when playing the WAVE file.
These points are valid only if Loop is on. The numerical val-
ues are sample addresses. The addresses you specify here
are shown as vertical lines in the “WAVE file waveform dis-
play.”
If “Loop On/Off” is On, the “LoopS” and “End” values
will be the initial values of “Edit Range Start” and “Edit
Range End”; when you press the SAMPLING [START/
STOP] key, only the region between “LoopS” and
“End” will play back. If you want to check the looping,
load the WAVE file into sample memory (RAM) and
check it in Sampling mode. If the size of the WAVE file
exceeds the capacity of sample memory (RAM) so that
you are unable to load it, use the page menu command
“Truncate” or “Cut” to extract the “LoopS” and “End”
region and create a new WAVE file that is small enough
to load.
▼
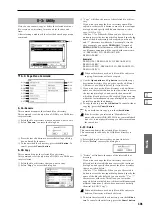
0–6: Page menu command
If you want use the page menu commands “Truncate”–
”Time Streych (Sustaining)” to edit Wave file data, first
use “Edit Range Start” and “Edit Range End” to specify
the range of editing, and then select and execute the
desired page menu command.
There is no compare function to return the edited data
to its state prior to editing. If you want to keep the orig-
inal Wave file, clear the “Overwrite” check box in the
page menu command dialog box before you execute the
command. If this box is checked, the edited result will
be overwritten onto the sample number of the original
file, changing the original data. Normally you should
use “Name” to specify a new filename, and execute
with “Overwrite” unchecked.
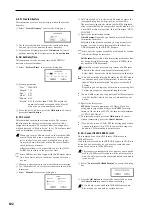
0–6A: Save WAVE Parameter
This command saves the state of the WAVE parameters
(“Loop On/Off,” “LoopS,” “End” 0–6b) to the WAVE file.
Execute this function after you have edited the WAVE
parameters.
These settings are valid only when the WAVE file is loaded
into a device (e.g., application) that uses these parameters.
1
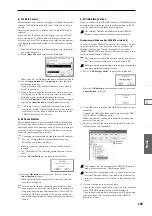
After editing the WAVE parameters, select “Save WAVE
Parameter”
to open the dialog box.
2
If you want to create a new Wave file, uncheck “Over-
write .WAV
”. If this is unchecked, a new Wave file will be
created in the same directory as the original file.
If you want to overwrite the original Wave file, check this
box.
Normally you should execute with “Overwrite .WAV”
unchecked.
3
If you are creating a new Wave file, use “Name” to spec-
ify a filename.
4
To save the file, press the OK button. If you decide not to
save, press the Cancel button.
0–6B: Truncate
This command deletes the unwanted data located before
and after the “Edit Range Start”–“Edit Range End” (0–6a)
region.
This is the same function as the Sampling mode, P1: Sample
Edit page menu command “Truncate”; here performed on a
WAVE file. (For details on this command and the procedure,
refer to “Sampling P1: 1–1A: Truncate.” For details on
“Overwrite. WAV” and “Name,” refer to “0–6A: Save WAVE
Parameter” steps
2
and
3
.)
0–6C: Cut
This command deletes the data in the “Edit Range Start”–
”Edit Range End” region. Data located after this region will
be moved forward.
This is the same function as the Sampling mode, P1: Sample
Edit page menu command “Cut”; here performed on a
WAVE file. (For details on this command and the procedure,
refer to “Sampling P1: 1–1B: Cut.” For details on “Over-
write. WAV” and “Name,” refer to “0–6A: Save WAVE
Parameter” steps
2
and
3
.)
0–6D: Clear
This command sets data values of zero for the data in the
“Edit Range Start”–“Edit Range End” region. The data that
precedes and follows this region will not move.
This is the same function as the Sampling mode, P1: Sample
Edit page menu command “Clear”; here performed on a
WAVE file.
(For details on this command and the procedure, refer to
“Sampling P1: 1–1C: Clear.” For details on “Overwrite.
WAV” and “Name,” refer to “0–6A: Save WAVE Parameter”
steps
2
and
3
.)
0–6E: Copy
This command copies the data from the “Edit Range Start”–
”Edit Range End” region into the buffer. The copied data can
be used by the “Insert,” “Mix,” and “Paste” commands in
the Media mode Edit WAVE page or the Sampling mode
Sample Edit page.
This is the same function as the Sampling mode, P1: Sample
Edit page menu command “Copy”; here performed on a
WAVE file.
0–6A
0–6B
0–6C
0–6D
0–6E
0–6F
0–6G
0–6H
0–6I
0–6J
0–6K
0–6L
0–6M
0–6N
0–6O
0–6P
Summary of Contents for TRITON Extreme
Page 1: ...2 E ...
Page 11: ...xii ...
Page 111: ...100 9 5 Page Menu Command 0 1A 0 1I 0 1J Program 9 5A ...
Page 185: ...174 ...
Page 215: ...204 ...
Page 281: ...270 ...
Page 349: ...338 ...
Page 350: ...339 ...
Page 351: ...340 ...
Page 352: ...341 ...
Page 353: ...342 ...


