124
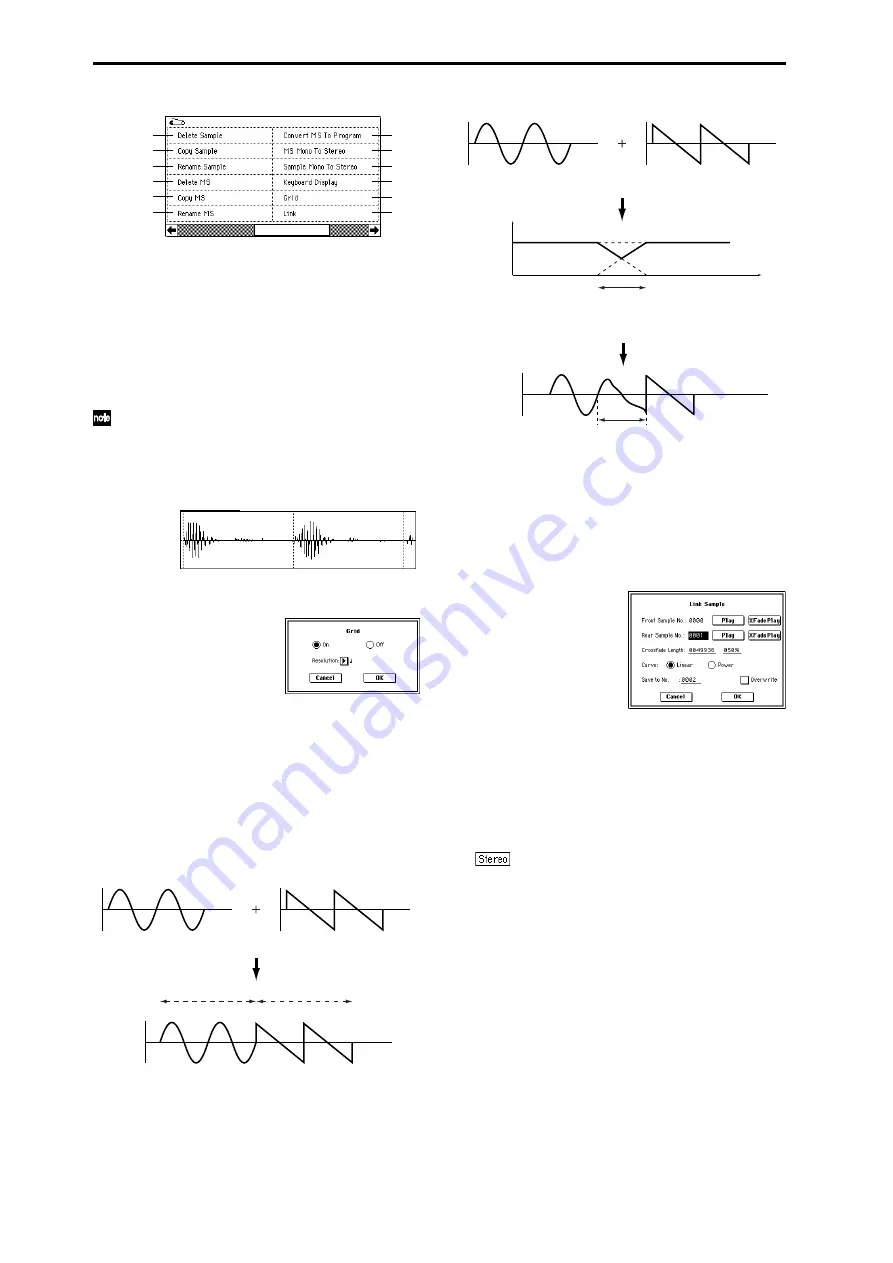
1–1M: Grid
This command displays a grid in the “sample waveform dis-
play.”
When you set the Grid to On and execute this command,
vertical dotted lines will appear in the “sample waveform
display” according to the specified resolution (“Resolution”)
and tempo (“Grid” 1–1c, 2–1c). Use the grid when you wish
to cut the sample data or determine waveform starting loca-
tions based on BPM values or beats.
The vertical dotted lines will be shown starting at the
“Start” (when Loop is off) or “Loop Start” (when Loop
is on) (P2: Loop Edit) addresses, and are calculated
according to the playback when the sample is played by
the currently selected key (displayed in gray) (
☞
“Key-
board & Index” 0–1a).
1
Use “Sample Select” (1–1b) to select a sample.
2
Select “Grid” to access the dialog box.
3
Use the On/Off Radio buttons to switch the grid on or
off.
4
In “Resolution,” select the desired resolution for the
grid. The grid that appears will be determined by this
setting and by the “Grid” (1–1c, 2–1c) setting in the page.
5
To execute the settings, press the OK button. To cancel,
press the Cancel button.
1–1N: Link
This command connects the currently selected sample with
another sample.
The volume of the two samples can be changed gradually at
the transition to gradually mix the samples with each other.
This is called crossfade, and can be used to produce a natu-
ral-sounding transition between the two sounds.
“Link” will be executed for all of the selected sample data,
regardless of the “Edit Range Start” and “Edit Range End”
settings.
1
Use “Sample Select” (1–1b) to select the sample that will
be placed in front by the Link command.
2
Select “Link” to access the dialog box.
3
The sample number selected for “Front Sample No. ” -
Sound A in the above example - will be displayed. When
the command is executed, this sample will be placed in
front.
When you press the Play button located beside this
parameter, the entire sample will be played. When the
sample has played to the end, playback will stop auto-
matically. If you want to stop playback mid-way through
the sample, press the Play button once again.
If you select one side of a stereo sample, it will
automatically be detected as a stereo sample, and the
other side of the sample will also be processed by the
Link command.
If the “Front” Sample is mono and the Rear Sample is ste-
reo, the L and R of the “Rear” Sample will be mixed to
mono before linking.
If the “Front” Sample is stereo and the “Rear” Sample is
mono, the identical sample will be placed in L and R of
the “Rear” Sample before linking.
4
Use “Rear Sample No.”- Sound B in the above example -
to select the sample number that will be linked.
When the command is executed, this sample will be
placed in back.
When you press the Play button located beside this
parameter, the entire sample will be played. When the
sample has played to the end, playback will stop auto-
matically. If you want to stop playback mid-way through
the sample, press the Play button once again.
0–1A
0–1B
0–1C
0–1D
0–1E
0–1G
0–1H
0–1I
0–1J
0–1F
1–1M
1–1N
SOUND A
SOUND B
LINK
SOUND A
SOUND B
SOUND A
SOUND B
SOUND A
SOUND B
CROSSFADE LINK
Volume
Time
Crossfaded portion
(Sound A gradually diminishes,
and sound B gradually increases)
Crossfaded portion
(This is called the “Crossfade
Length”)
Summary of Contents for TRITON Extreme
Page 1: ...2 E ...
Page 11: ...xii ...
Page 111: ...100 9 5 Page Menu Command 0 1A 0 1I 0 1J Program 9 5A ...
Page 185: ...174 ...
Page 215: ...204 ...
Page 281: ...270 ...
Page 349: ...338 ...
Page 350: ...339 ...
Page 351: ...340 ...
Page 352: ...341 ...
Page 353: ...342 ...


