183
Sequencer operating mode
Record mode: Step Backing Sequence page
Re
fe
rence
5.
Select the status of the Backing Sequence grouped tracks,
using the Kbd/Pad and Ch/Acc parameters. (Kbd/Pad stays
for Keyboard and Pads; Ch/Acc stays for Chord and
Accompaniment, i.e. the Style tracks). To record all you
play on the keyboard, plus the automatic accompaniment,
leave their status to Rec (see “Track status icons” on
page 177).
Warning:
Tracks set to REC are automatically overwritten
when starting recording. Set a track to the PLAY or MUTE
status, when you don’t want to delete it. For example, if you
are recording a keyboard part on an existing Style track, set
the Ch/Acc parameter to PLAY, and the Kbd/Pad track to
REC.
6.
Start recording by pressing the left
(
PLAY/STOP)
button (or the START/STOP button, if you want the Style
to start immediately).
• By pressing the left
(
PLAY/STOP) button (or the
START/STOP button), you can record a keyboard intro
with no Style playing. After a count-in (see “Metro (Metro-
nome)” on page 182), you can start recording.
Play a solo intro, then start the auto-accompaniment by
pressing the START/STOP button.
• By pressing the START/STOP button you can start the
Style right at the beginning of the Song.
Since you can use any Style control, you could start with the
usual combinations (INTRO, ENDING, FILL… see
“Selecting and playing a Style” on page 55 for more infor-
mation).
Note:
While in Backing Sequence mode, you can’t record the
SYNCHRO, TAP TEMPO/RESET, MANUAL BASS,
ACCOMPANIMENT VOLUME controls.
7.
Play your music. While recording you can even change the
Style, or stop it by pressing START/STOP or one of the
ENDINGs. While recording you can even start the style
again, by pressing START/STOP.
8.
When finished recording your performance, press the
(
PLAY/STOP) button in the PLAYER 1 section. You
will go back to the Sequencer Play Main page (see
“Sequencer Play - Main page” on page 173).
At this point, you may press the
(
PLAY/STOP) but-
ton in the PLAYER 1 section to listen to the new Song.
You may also edit the Song by pressing the MENU button
(see “Edit menu” on page 186).
9.
Save the song to a storage device (see “Save Song window”
on page 197).
Warning:
The recorded Song will be deleted when turning
the instrument off, switching to the Style Play or Song Play
mode, or entering Record again. If you wish to preserve it,
save the Song to a storage device.
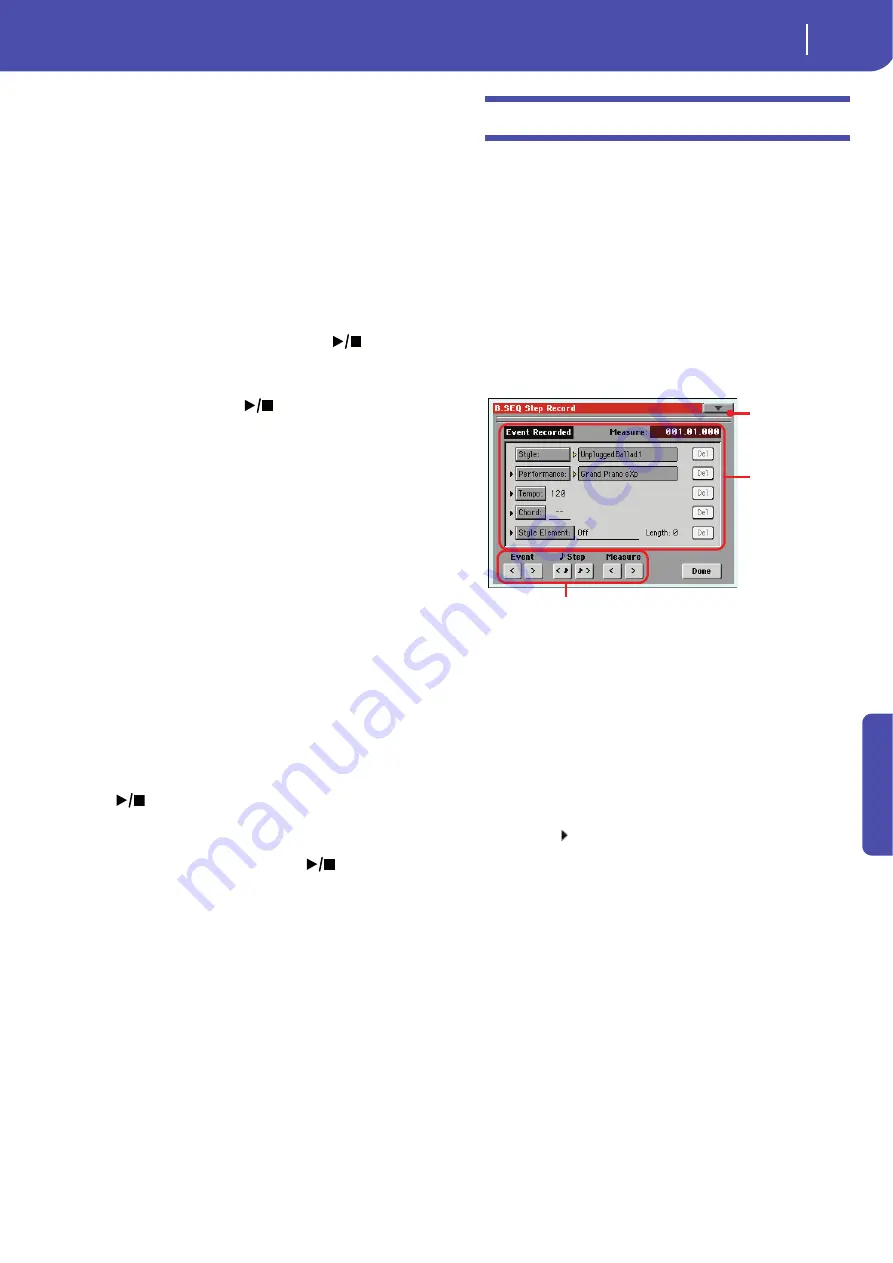
Record mode: Step Backing Sequence page
The Step Backing Sequence mode allows you to enter single
chords, to create or edit the Style (Chord/Acc) part of a Song.
This mode lets you enter chords even if you are not a keyboard
player, or fix any error made playing chords or selecting Style
controls, during a Backing Sequence (Quick Record) recording.
In this mode, you can only edit Songs created using the Backing
Sequence (Quick Record) recording mode. When saving a Song
created using the Backing Sequence (Quick Record) recording
mode, all Chord/Acc data is preserved, and can be loaded later,
to be edited again by using the Step Backing Sequence mode.
While in Sequencer mode, press the RECORD button and select
the “Step Backing Sequence” option. The Step Backing Sequence
window appears.
See “Step Backing Sequence procedure” on page 185 for infor-
mation on the record procedure.
Page menu icon
Touch the page menu icon to open the menu. See “Step Backing
Sequence page menu” on page 185 for more information.
Parameters area
Side arrow ( )
The small arrow next to a parameter means that its value is effec-
tive at the current position. For example, if you are at the
“003.01.000” position, and an arrow lights up next to the Chord
parameter, this means that a chord change happens at the
“003.01.000” position.
Measure
This parameter shows the current position of the Step Editor. To
go to a different position within the Song, use one of the follow-
ing systems:
•
Select this parameter, then use the VALUE controls to go to
a different measure.
•
Use the Measure buttons in the display to move to a differ-
ent measure. Use the Step buttons in the display to move in
steps of 1/8 (192 ticks). Use the Event buttons in the display
to jump to the next event.
The locator value is shown in the “measure.beat.tick” format.
Measure
Measure or bar number.
Parameters area
“Soft” transport buttons
Page menu icon
Summary of Contents for Pa3X 61-keys
Page 1: ...User s Manual ENGLISH OS Ver 1 1 MAN0010038 4 E ...
Page 9: ......
Page 10: ...6 Overview Overview Pa3X 76 keys Pa3X 61 keys ...
Page 40: ...36 Easy Mode The Song Play page in detail ...
Page 41: ......
Page 107: ......
Page 251: ......
Page 274: ...270 Index ...
Page 275: ......


