172
Lyrics, Score, Markers
Markers page
on page 157). If your song has the melody part assigned to the
same track, you can mute or unmute it by using this button, or the
assigned switch/pedal.
Selected track
Touch here to open a pop-up menu where to chose the track to
be shown from.
Hint:
The vocals part is often assigned to Track 4.
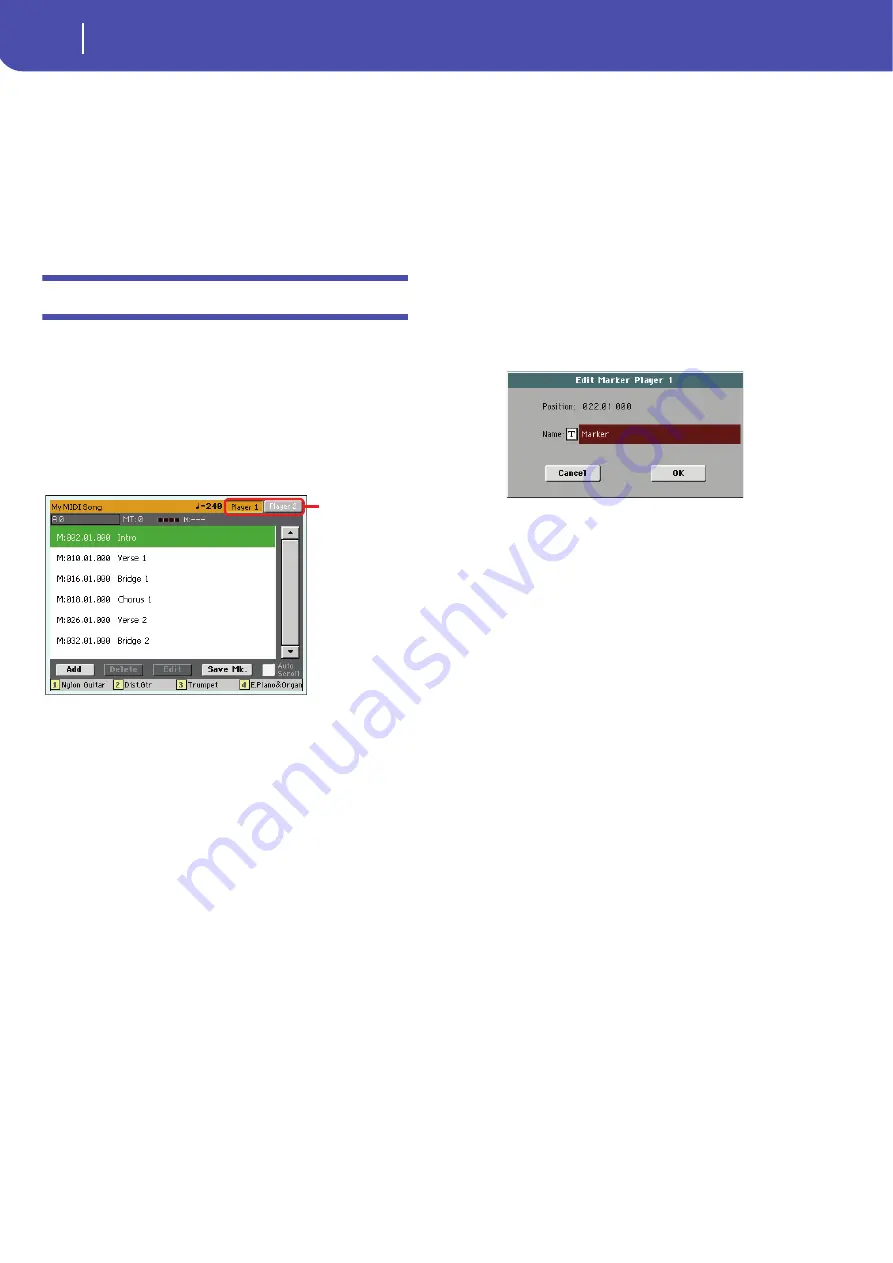
Markers page
Open the Marker page by pressing both the LYRICS and SCORE
buttons together. This page shows the Song Markers in the Song
Play and SongBook modes.
Standard Song Markers contained in a Standard MIDI File can
be read with the Pa3X, to quickly jump to a given position in the
Song. Additionally, you can set your own marker points on-the-
fly.
If both player are playing, you can choose the Marker page either
using the dedicated Player buttons in the top right corner of the
page, or by moving the X-FADER slider fully to the left (Player
1) or to the right (Player 2).
To exit from this page, press the EXIT/NO button.
Note:
It is not advisable to program them with a Jukebox file
assigned to Player 1, since pressing PLAY/STOP would delete the
markers.
How to add a marker:
1.
Press the LYRICS and SCORE buttons together to open the
Markers page.
2.
Touch the Player 1 (Player 2) button in the top right corner
of the display to see the markers contained in the corre-
sponding Song.
3.
Start the Song by pressing the PLAYER 1 (PLAYER 2)
PLAY/STOP button (however, markers can be added even
while the player is not running).
4.
When you reach the position you want to save as a marker,
touch the Add button in the display.
• If you touch Add within the first beats of the measure, the
beginning of the current measure is saved as a marker.
• If you touch Add within the last beat of the measure, the
beginning of the following measure is saved as a marker.
5.
Do the same for any following marker.
6.
Stop the Song by pressing the PLAYER 1 (PLAYER 2)
PLAY/STOP button.
How to jump to a saved marker:
1.
Start the Song again.
2.
When you want to jump to a saved marker, touch it in the
display. The Song will jump to the saved position at the
beginning of the next measure.
How to edit a marker:
1.
Touch the marker to be edited in the display.
2.
Touch the Edit button in the display to set the marker to
edit. The Edit Marker window will appear.
3.
While in Edit Marker window, you can edit the name and
position of the marker being edited.
4.
Save the markers (as described below).
How to delete a marker:
1.
Touch the marker to be deleted in the display.
2.
Touch the Delete button in the display to delete the selected
marker.
3.
Save the markers (as described below).
How to save the markers:
Touch the “Save Mk” button in the display to save all markers.
If you are not in the Lyrics/Score page, choose from the page
menu the “Save Song Marker Ply.1” or “Save Song Marker Ply.2”
(depending on the player where you created the markers). The
markers will be saved into the Standard MIDI File.
Auto Scroll
Check this parameter if you want the current marker to be
always visible in the display during playback, by making the list
of markers scroll automatically.
Don’t check this parameter, if you prefer to prevent the list from
scrolling. This is useful if you want a marker to remain in the
display, ready to be selected as soon as you want to jump to its
position, with no need to scroll the list to catch it out.
STS
Name of the four selected Single Touch Settings (STS). Touch
one of them to select it.
Touch here to see
the markers of the
corresponding
Player.
Summary of Contents for Pa3X 61-keys
Page 1: ...User s Manual ENGLISH OS Ver 1 1 MAN0010038 4 E ...
Page 9: ......
Page 10: ...6 Overview Overview Pa3X 76 keys Pa3X 61 keys ...
Page 40: ...36 Easy Mode The Song Play page in detail ...
Page 41: ......
Page 107: ......
Page 251: ......
Page 274: ...270 Index ...
Page 275: ......


