background image

125

Style Play operating mode

Effects: A/B FX Configuration

Re

fe

rence

How to use the Quarter Tone function with a
footswitch, EC5 switch or Assignable Switch

You can assign the “Quarter Tone” function to a footswitch, a
Korg EC5 switch, or an Assignable Switch, to program a custom
scale in realtime, for example to allow for those sudden scale
change typical of Arabic music. These changes are not saved any-
where, so the scale is easily “wiped-out” when selecting a differ-
ent Performance or STS, or when pressing the Quarter Tone
pedal again.

Note:

 While in Style Play mode, you can create a custom scale, to

be assigned to a Performance or STS, simply by selecting and edit-
ing a User scale, and saving any change to a Performance or STS.
See “How to create a custom scale by fine-tuning each note of the
User scale”
 above.

While in Global mode, you can create a custom scale and save it to
one of the four SC Presets, and recall it by touching one of the SC
Preset buttons in the display. Then, you can start your realtime
scale editing from the selected preset. See “How to use the Quarter
Tone function with the SC Presets”
 above.

1.  

Program a footswitch, one of the EC5 pedals, or an Assign-
able Switch, to be the Quarter Tone switch.

Simply go to the Global mode, and reach the “Controllers:
Pedal/Switch” or
 “Controllers: EC5” page. There, you will
find the “Pedal/Footswitch” and “EC5-A…E” parameters,
to which you can assign the Quarter Tone function.

While still in Global mode, select the Write Global-Global
Setup command from the page menu, to save these settings
to the Global (see “Write Global - Global Setup dialog box”
on page 220)
.

2.

Lower some note pitches.

Keep the Quarter Tone pedal pressed. The keyboard will
not play at this time. Press the notes you want to lower a
quarter tone. Release the pedal.

3.

Play with your new scale.

Notes you pressed on step 2 are now lowered of a quarter
tone.

4.

Reset the original scale.

Press and release the Quarter Tone pedal again, without
playing any note. All pitches will be reset, and the scale
selected by the Performance, STS will be recalled.

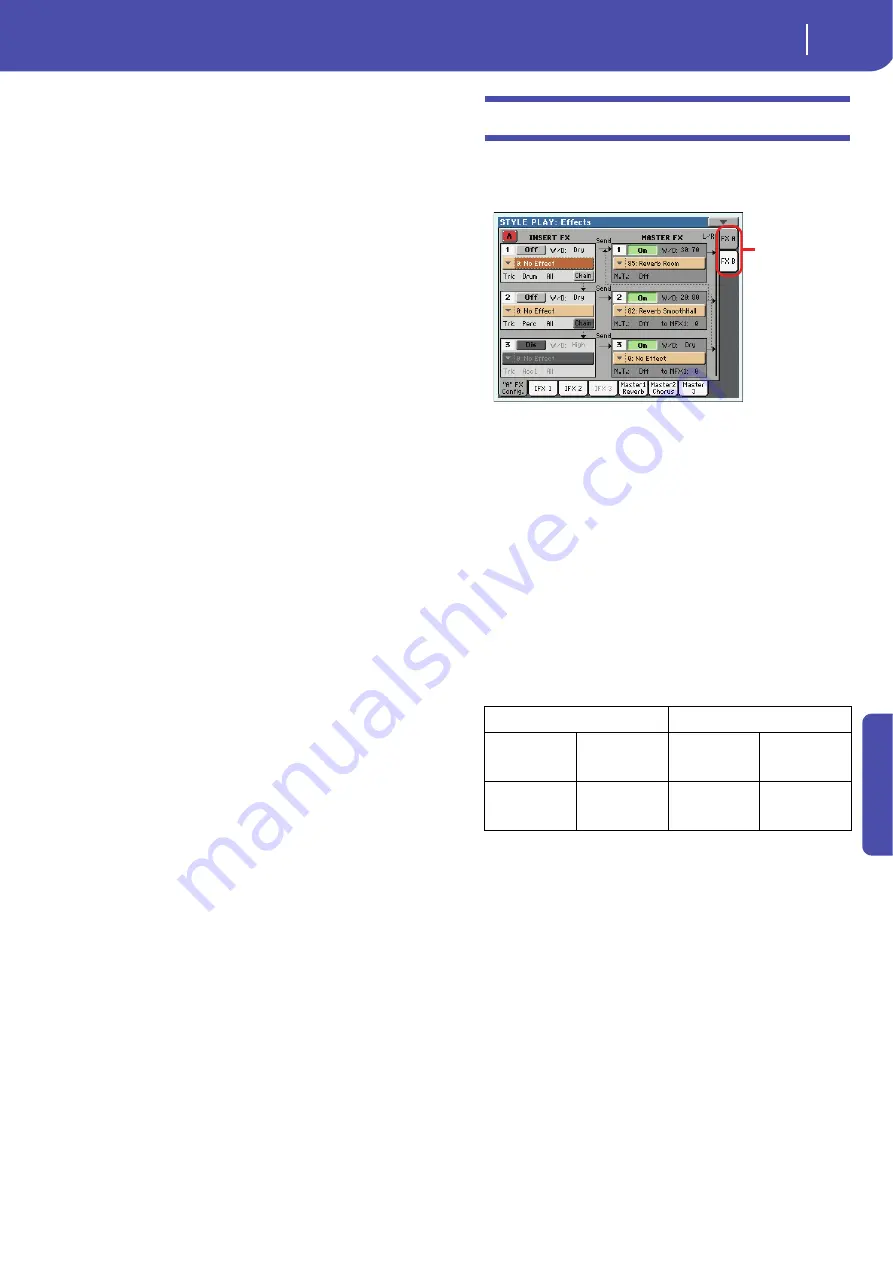
Effects: A/B FX Configuration

This page allows you to select the A (Style and Pads) and B (Key-
board) groups of effects. Please use the “FX A” and “FX B” side
tabs to switch from one group to the other one.

FX Groups: FX A and FX B

Pa3X includes two groups of effects (FX A and FX B). In Style
Play mode, the A group is reserved to the Style and Pad tracks,
the B group to the Realtime (Keyboard) tracks.

While there are virtually six FXs for group A, and four FXs for
group B, they cannot be all active at the same time (as you can
see in the following table). The maximum number of active FXs
is five FXs for the Style tracks, and three FXs for the Keyboard
tracks:

• Group A (Style) can include either three Insert FXs and two
Master FXs, or two Insert FXs and three Master FXs.

• Group B (Keyboard) can include either one Insert FXs and two
Master FXs, or no Insert FXs and three Master FXs.

If you need one more effect of a kind, please turn off the last one
of the effects of the other kind.

Double size FXs

You can assign “double size” effects to the Insert FX 1 of the A
group, or to the Master FX 2 of the A or B groups. This kind of
effect takes two FX processing units, so the following FX proces-
sor becomes unavailable.

To check for double size effects, see the list of the available effects
in the “Advanced Edit” manual in the Accessory Disk.

Vocoder

You can assign a Vocoder effect to the Master FX 2 of the B
group. When the Vocoder effect is selected, the MIC input signal
goes to the Vocoder and the Voice Processor is deactivated.

FX A (Style/Pad)

FXB (Keyboard)

IFX 1
IFX 2
IFX 3

MFX 1
MFX 2

IFX 1

MFX 1
MFX 2

IFX 1
IFX 2

MFX 1
MFX 2
MFX 3

MFX  1
MFX 2
MFX 3

FX group

Summary of Contents for Pa3X 61-keys

Page 1: ...User s Manual ENGLISH OS Ver 1 1 MAN0010038 4 E ...

Page 2: ...t is moving or you will risk to pinch them under the display When a cart is used use caution when moving the cart apparatus combina tion to avoid injury from tip over The lightning flash with arrowhead symbol within an equi lateral triangle is intended to alert the user to the presence of uninsulated dangerous voltage within the product s enclo sure that may be of sufficient magnitude to constitut...

Page 3: ...refully revised and checked through Due to our constant efforts to improve our products the specifications might differ to those in the manual Korg is not responsible for any eventual differences found between the specifications and the contents of the instruc tion manual the specifications being subject to change without prior notice Liability Korg products are manufactured under strict specifica...

Page 4: ...ot a toy so please don t let children play with the display Keep your keyboard up to date Your instrument can be constantly updated as new versions of the operating system are released by Korg You can download the operating system from www korg com Please read the instructions supplied with the operating system The BALANCE and X FADER sliders When turning the instrument on please be assured the BA...

Page 5: ...g Sounds 40 Selecting a Sound and playing it on the keyboard 40 Playing two or three Sounds at the same time 42 Playing different Sounds with your left and right hand 45 Changing the split point 46 Raising or lowering the Upper octave 48 Digital Drawbars 48 Selecting and saving Performances 51 Selecting a Performance 51 Saving your settings to a Performance 52 Selecting and playing Styles 55 Selec...

Page 6: ...ontrol 2 131 Keyboard Ensemble Key Velocity Range 131 Keyboard Ensemble Ensemble 132 Pad Switch Pad 133 Pad Switch Switch 133 Style Controls Drum Fill 134 Style Controls Keyboard Range On Off Wrap Around 135 Preferences Style Preferences 135 Preferences Style Play Setup 136 Page menu 137 Write Performance dialog box 138 Write Single Touch Setting dialog box 139 Write Style Settings dialog box 139 ...

Page 7: ...ols Clock Battery 207 Controllers Pedal Switch 208 Controllers Assignable Sliders 209 Controllers EC5 209 MIDI MIDI Setup General Controls 210 MIDI MIDI In Control 211 MIDI MIDI In Channels 212 MIDI MIDI Out Channels 212 MIDI Filters 213 Audio Setup Style Kbd 213 Audio Setup Player 1 214 Audio Setup Player 2 214 Audio Setup Drums 214 Audio Setup Audio In 215 Audio Setup Metro MP3 Speakers 216 Voic...

Page 8: ...ey model 255 Precautions 255 Backup 255 Installation 255 Formatting the Hard Disk and installing the Operating System 256 Replacing the Sample RAM backup battery 258 Precautions 258 Installation 258 Installing the Korg USB MIDI Driver 260 Connecting the Pa3X to a personal computer 260 KORG USB MIDI Driver system requirements 260 Please note before use 260 Windows Installing the KORG USB MIDI Drive...

Page 9: ......

Page 10: ...6 Overview Overview Pa3X 76 keys Pa3X 61 keys ...

Page 11: ...nes Volume controls and assignable sliders Use these sliders to control master and section volumes draw bars or assignable functions Press the SLIDER MODE button to choose the assigned functions MASTER VOLUME This slider controls the overall volume of the instrument both of the optional with the PaAS system integrated speakers the LEFT and RIGHT Audio Outputs and the PHONES output It does not cont...

Page 12: ...s STYLE PLAY to recall the Style Play mode If Key board tracks are not shown in the display press the TRACK SELECT button to see them This operating mode is automatically selected when turning the instrument on SONG PLAY Song Play mode where you can play back Songs in Standard MIDI File SMF or KAR and MP3 format Since the Pa3X is equipped with two players you can even play two Songs at the same ti...

Page 13: ...he USER button gives access to three User Style banks and twelve Favorite Style banks You can use User locations to load new Styles from an external device or save newly created or edited Styles Favorite locations too can be used to load new Styles from an external device or to save newly created or edited Styles but in addition you can edit the names of these Sound banks so that you can create a ...

Page 14: ...rt of the keyboard You can start the automatic accompaniment again by pressing this button again or one of the CHORD SCANNING buttons Off The bass track is automatically played by the Style Note When you press the MANUAL BASS button the Bass track volume is automatically set to its maximum value The volume is automatically set back to the original value when the MANUAL BASS button is deactivated C...

Page 15: ... trigger a fill in Press them twice LED blinking to let them play in loop and select any other Style element Fill Intro Variation to exit the loop or press the same button again Note This function can be automatically activated by playing the keyboard harder See Velocity Control on page 136 Note If the Auto Fill function is activated a Fill will be automati cally selected when choosing the corresp...

Page 16: ...d again the Style starts again Start Off Stop Off All Synchro functions are turned off Display and controls In the 76 key model the display tilt angle can be adjusted either using the motor or manually COLOR TOUCHVIEW GRAPHICAL DISPLAY Use this display to interact with the instrument To set the dis play brightness keep the MENU button pressed and turn the DIAL counter clockwise to decrease the bri...

Page 17: ...each with its own set of transport controls The Player 1 group is also used for the Sequencer mode SELECT Press this button to open the Song Select window and choose a Songs and Rewind and Fast Forward commands If you use them while the Song is in play they make it scroll back or forward When pressed once these buttons move the Song to the previous or following measure with a Standard MIDI File or...

Page 18: ... and UP buttons can be used to assign a different value to the selected parameter in the display or to scroll a list of files in the Song Select Search and Media pages VALUE DIAL Turn the dial clockwise to increase the value of the selected parameter Turn it counter clockwise to decrease its value When used while pressing the MENU button this con trol always acts as a Display Brightness control UP...

Page 19: ...mid level signal entering If the LED turns off too often the input gain is too low Use the MIC GAIN control and or the source device s volume to increase the input level Orange Slight overload in the signal path This is fine if it turns on only on signal peaks Red Clipping is occurring in the signal path Use the MIC GAIN control and or the source device s volume to lower the input level See Audio ...

Page 20: ... Power on battery fully charged Green flashing Power on battery charging Red Standby battery fully charged Red flashing Standby battery charging Red and green alternating even in standby mode Malfunctioning or batteries exhausted and to be replaced Please read the error messages in the General Controls Clock Battery page see page 207 Help The multi language context sensitive Help lets you learn ab...

Page 21: ...8 Chord Scan and Keyboard Split Use these buttons to choose chord recognition and keyboard splitting CHORD SCAN section In Style Play Song Play and Sequencer Backing Sequence mode use these buttons to define the way chords are recognized LOWER Chords are detected below the split point The number of notes you should play to form a chord is defined by the Chord Scan Mode parameter see Chord Recognit...

Page 22: ... OCTAVE but tons See Mixer Tuning Tuning on page 123 TRANSPOSE section These buttons transpose the whole instrument in steps of one semitone Master Transpose The transpose value is usually shown on the page header in the display Press both buttons together to reset the Master Transpose to zero Note You can also transpose MP3 files Keep in mind however that transposition always remains inside the r...

Page 23: ...olled via the MASTER VOLUME slider Note Speakers are automatically deactivated when connecting the headphones You can manually deactivate them by using the Speakers On Off parameter of the Audio Setup section of the Global mode see Speakers On Off on page 216 Audio Input Section Use these connectors to connect a microphone another key board synthesizer or a CD player MIC Only active when the Input...

Page 24: ...s tem Mono audio connection Connect a mono cable to either the LEFT or RIGHT OUTPUT alone Connect the other end of the cable to a mono channel of your mixer a powered monitor or a single chan nel of your CD LINE IN or TAPE AUX input of a hi fi system you will hear that channel only unless you can set the amplifier to Mono mode OUT 1 2 These are the sub outputs Use them to create a stereo sub mix o...

Page 25: ...nection on page 238 for more information MIDI over USB is supported so you can use this connector instead of the MIDI ports see What is MIDI Over USB on page 242 The drivers for PC and Mac needed for full use of this function are supplied in the Accessory Disk that comes with the instrument or can be downloaded from our web site www korg com HOST R This is a USB Type A Master Host connector USB 2 ...

Page 26: ...itches joystick and ribbon strip ensure total control for all the various levels of articulation of the sound Improved Style and Performance selection Over 400 Fac tory Styles with 4 Variations and 4 Fill In Break plus 15 Favorite and User Style banks for unlimited storage of your custom Styles and settings Style and Pad Record including the enhanced Guitar Mode 2 for even more realistic guitar pa...

Page 27: ...im for more Sounds Styles and other useful music materials Each Korg distributor can give you useful information Just give them a call for additional services In the English speaking world here are the relevant addresses USA KORG USA 316 South Service Road Melville New York 11747 USA Tel 1 516 333 9100 Fax 1 516 333 9108 Canada KORG CANADA a division of Jam Industries 21000 Trans Canadienne Baie D...

Page 28: ... of Style or Song type check the Write STS option in the Book Edit 1 page of the SongBook mode The parameter can be saved to the current Style Settings by selecting the Write Style Settings com mand from the page menu The parameter can be saved to the Global by selecting one of the available Write Global com mands from the page menu Several Global areas are available and a smaller symbol after the...

Page 29: ...d for two seconds to put the instrument in standby mode The STANDBY LED become red Factory and User PCM Samples are not removed from the bat tery backed Sample RAM memory While in standby mode the internal battery is recharged there fore PCM Samples will not be deleted as long as the instrument is connected to a power socket and the battery is charged Power off If you want to save power turn the i...

Page 30: ... use head phones with an impedance of 16 200 Ohms 50 Ohms suggested Use a headphone splitter to connect more than one pair of head phones Loudspeakers Connect the optional PaAS Amplification System to make it the integrated loudspeakers of the Pa3X adding a three way amplification system a pair of dual coil integrated speakers and a bass reflex box To install the amplification system see Installin...

Page 31: ...o Songs to choose from 1 Press the STYLE PLAY and SONG PLAY buttons together Their LEDs start blinking At this point if you don t press any other button all the Demo Songs will be played back 2 Select one of the available options to listen to a specified Demo Song 3 Stop the Demo by touching the STOP button on the display or by exiting the Demo mode by pressing any MODE button The music stand A mu...

Page 32: ...igned to any track in a Style Variation For each Style there are four Variations In general each Varia tion is a slightly different version of the others As you progress from Variation one to Variation four the arrangements will become more complex and more parts Tracks may be added This allows your performance to have a more dynamic arrange ment without losing the original feel of the Style Fill ...

Page 33: ...n mix two songs with the X Fader slider The LOGO decoder On the front panel of your Pa3X you have probably noticed five logos and may have even wondered what they stand for Well here is a quick explanation of each one RX Technology is the cutting edge engine that drives every aspect of the Pa3X from the synthesis to the display and how it all works together A variety of professional vocal effects ...

Page 34: ...button Overlapping windows Several windows like the Style Selection the Global the Media or the Lyrics overlap the current window After you select an item in the window or press the EXIT button the window closes and the underlying page is shown again The following example is the Sound Select window Dialog boxes Similar to selecting windows dialog boxes overlap the underlay ing page Touch one of th...

Page 35: ...le Play Song Play and Sequencer modes Editable names When the Text Edit button appears next to a name touch it to open the Text Edit window and edit the name The virtual keyboard works exactly as a personal computer s keyboard Some of the symbols are context sensitive and only appear when they can actually be used Lists and scrollbars Files on storage media as well as other kinds of data are shown...

Page 36: ...e corresponding button in the MODE section on the control panel Each operating mode is marked with a different color code that helps you understand at first sight where you are Three special modes Global Media and SongBook overlap the current operating mode that remains active in the background The SongBook mode can recall the Style Play or Song Play modes The Record mode can be accessed from the ...

Page 37: ...rectangle on the top right corner of the display to open the page menu Touch the Easy Mode menu item to make the checkmark appear At this point the Easy Mode has been activated and the ele ments in the display appear less cluttered Note The Easy Mode will remain active even after turning the instrument off and on again Turning the Easy Mode off The instrument will stay in this mode even after havi...

Page 38: ...te and cannot be heard If the icon does not appear the Sound is in play and can be heard See page 42 Sounds assigned to the right hand UP1 to UP3 and to the left hand LOW Touch the Sound s name to open the Sound Select window and choose a different Sound See page 104 Style name and info Touch the Style s name to open the Style Select window and choose a dif ferent Style See page 105 Tempo Use the ...

Page 39: ...the icon appears the Sound is in mute and cannot be heard If the icon does not appear the Sound is in play and can be heard See page 42 Sounds assigned to the right hand UP1 to UP3 and to the left hand LOW Touch the Sound s name to open the Sound Select window and choose a different Sound See page 104 Song assigned to Player 1 Touch it to open the Song Select window and choose a different Song See...

Page 40: ...36 Easy Mode The Song Play page in detail ...

Page 41: ......

Page 42: ...n a welcome screen is shown for a few seconds and then the main display appears 2 When you want to turn the Pa3X off keep the STANDBY button pressed for two sec onds and put it in standby mode The preferred way to turn the Pa3X off is to put it in standby mode so that the internal battery will continue charging and preserve the Sample RAM content intact If you prefer to save some power turn the Pa...

Page 43: ...ng the demos Quick Guide Playing the demos A variety of demo songs have been included to demonstrate the sonic power of the Pa3X 1 To open the Demo page press the STYLE PLAY and SONG PLAY buttons at the same time 2 Follow the instructions in the display That s it ...

Page 44: ...ge 42 for how to mute tracks 2 If you want to play the Sound on the whole keyboard be sure the keyboard is in Full Upper mode i e no SPLIT LED turned on If it is split in two parts press the SPLIT but ton to turn its LED off Playing Sounds Performance Select section Split button Sound Select section i A selected track is shown with a white back ground In this example the Upper 1 track is selected ...

Page 45: ...old box in the Global General Controls Interface page In this case press the EXIT but ton only if you don t make any selection but want to close the window i The selected Sound is highlighted Touch a Sound s name to select it Touch one of the side tabs to select a different Sound bank Touch one of the lower tabs to select a different Sound page A Previous and Next Page pair of button may appear in...

Page 46: ...f the con trol panel or touch the icon in the Upper 2 status box to set the Upper 2 track to play 2 Play the keyboard Please note how the icon appears in the Upper 2 and Upper 3 status boxes These tracks will not be heard After touching in this area the icon disappears The Upper 2 track will be set to play and will be heard Note how the Dark Pad sound assigned to the Upper 2 track has been layered...

Page 47: ...eyboard 5 Either press the UPPER 3 ON OFF button in the REAL TIME TRACKS section of the con trol panel or touch the bank icon in the Upper 3 status box to mute the Upper 3 track again As above after touching in this area the icon disappears The Upper 3 track will be set to play and will be heard Note how the StringEns2 sound assigned to the Upper 3 track has been added to the Dark Pad assigned to ...

Page 48: ...l panel or touch the bank icon in the Upper 2 status box to mute the Upper 2 track again 8 Play the keyboard Note how the StringEns2 sound assigned to the Upper 3 track has been muted again Only tracks Upper 1 and Upper 2 can be heard at this time Note how the Dark Pad sound assigned to the Upper 2 track has been muted again Only track Upper 1 can be heard at this time ...

Page 49: ...e sure the Lower track is set to play 3 Play the keyboard Hint You can select a dif ferent Sound for the Lower part by pressing the LOWER SOUND SELECT button in the REAL TIME TRACKS section of the control panel and follow ing the same procedure used for the Upper 1 track See page 40 Lower Upper If the Lower track is muted touch its icon to make it disappear from this area or press the LOWER ON OFF...

Page 50: ...turn its LED off 5 Play the keyboard Changing the split point If you are not comfortable with the selected split point you may set the split point to any key 1 Touch the Split tab to see the Split Point panel Full Upper Note how the keyboard once again plays the Upper tracks for the entire length of the keyboard Upper ...

Page 51: ...ard in the display then play the lowest note of the Upper section on the keyboard 3 As an alternative touch the Split Point parameter to select it and use the VALUE con trols to select the new split point 4 Touch the STS Name tab to go back to the STS Name panel Lower Upper ...

Page 52: ...nt Performance Digital Drawbars A special Sound in the Pa3X is the Digital Drawbars This sound emulates the classic tonewheel organs of the past You can use the Assignable Sliders of the Pa3X to adjust the position of each draw bar and then save these settings to a Performance see Saving your settings to a Performance on page 52 1 Mute all Upper tracks apart for the Upper 1 track Select the Upper ...

Page 53: ...s if they were organ drawbars the slider s DRAWBAR LED will be lit Move the Assignable Sliders to change the various drawbar settings Note You don t need to be in the Digital Drawbars page to use the Assignable Sliders to change the sound When a Drawbar Organ is assigned to a Keyboard track the sound can also be modi fied while in the main page provided that the DRAWBARS LED is turned on After you...

Page 54: ...ameters of the second page 7 When you have found some settings that you like you can save them to a Performance as described later in this section 8 Press the EXIT button to go back to the main page Check this checkbox to turn Per cussion on Percussion will make the sound more aggressive Experiment with the Percussion s settings Turn the Rotary effect on or off and listen to how much more lively i...

Page 55: ...s are supplied with each Style and SongBook entry and can be selected with the four dedicated buttons under the display Note As for Style tracks they are saved to a third object called the Style Settings Please note that settings saved in Performance 1 of bank 1 are automatically selected when the instrument is turned on This means you can save your preferred startup settings to Performance 1 1 Se...

Page 56: ... Style and its settings Sounds Effects Drawbar settings for the Style tracks Saving your settings to a Performance All the control panel settings plus the Keyboard track settings selected effects and Voice Processor Preset can be saved to a single Performance to be quickly recalled at a later time Note To open the Write Performance dialog box you can press the SHIFT one of the PERFORMANCE SELECT b...

Page 57: ...rformance menu item the Write Performance dialog box appears Touch the Text Edit symbol to open the Text Edit dialog box Use the alphabetic characters to enter text Use the and buttons or the DIAL to move the cursor Use the SHIFT button to switch between capitals and small characters Touch the Backspace symbol to delete just a single character Clear to delete the whole string When done touch OK to...

Page 58: ...used location overwrites any exist ing data at that location The old data are lost Make a backup of all your important data To select the target bank and Performance location select the bank and Performance parame ters and use the VALUE controls A B The selected Perfor mance location is high lighted Touch a Performance s name to select it Touch one of the side tabs to select a different Performanc...

Page 59: ...Single Touch Settings STS associated with the Style is also selected and Keyboard tracks Pads Effects and some other useful parameters are automatically configured Use the Style controls to start or stop the Style Selecting and playing a Style 1 Touch the Style area in the display The Style Select window appears Note You can also open the Style Select window by pressing one of the buttons in the S...

Page 60: ...nc with your playing on the key board Therefore it may be considered a more musical way of starting a Style 5 Play the keyboard 6 Press START STOP to stop the Style The Style Select window closes and the main screen appears again with the selected Style ready to go i For chord scanning to work either of both LEDs must be turned on Lower chords are recognized on the left of the split point Upper ch...

Page 61: ...ether to recall the saved Tempo value As an alternative keep the SHIFT button pressed and use the DIAL to change the Tempo The selected tempo will be shown in a small window Intro Variation Fill Break Ending When playing Styles you can select various Style Elements to make your playing richer A Style is made of three Intros or two Intros and a Count In up to four basic patterns Variations four Fil...

Page 62: ...e Fill See Fill Mode 1 4 Break on page 134 6 When you like to stop playing press one of the ENDING buttons to stop the Style with an Ending Single Touch Settings STS Each Style or SongBook entry may come with up to four Keyboard track and Voice Processor settings called the STS short for Single Touch Settings STSs are very similar to Performances but they are fine tuned to the Style or SongBook en...

Page 63: ...he display 2 Play the keyboard 3 Try all the other STSs and see how settings change with each of them 4 You can also link the STSs to the Variations First of all press the STS MODE button to make its LED flash 5 Then press the various VARIATION buttons and see how an STS is automatically selected when the corresponding Variation is selected 6 Press the STS MODE again to turn its LED on or off i Se...

Page 64: ...w to assign a different sound or pattern to the Pads by pressing SHIFT one of the PADs 3 Select a different Style and see how the sounds or patterns assigned to the PADS change You can even press more Pads at once and play two or more sounds or patterns at the same time Pressing STOP stops them all at the same time Keeping STOP pressed and pressing one of the PAD buttons only stops that sound or p...

Page 65: ...g so will let you see the internal mixer of the Pa3X and visualize the status and volume of each track 2 Use the Assignable Sliders be sure the VOLUME LED is turned on to adjust each Key board track s volume as well as grouped Style tracks In Normal view all Style tracks are seen as three grouped tracks To control the volume the VOL UME LED must be turned on If it is off repeatedly press the SLIDE...

Page 66: ...he TRACK SELECT button again Turning the Style tracks on off You may easily turn on or off any Style track while you are playing For example try muting all accompaniment tracks while drums and bass continue to play Note While in the Nor mal view of the Style Play mode you can see Style tracks grouped in just three grouped tracks To see each Style track as separate indi vidual tracks just press the...

Page 67: ... single Style track first press TRACK SELECT to switch to the Style Tracks view then repeat the above procedure 5 Press the TRACK SELECT button again to go back to the Normal view Adding harmony notes to your right hand melody with the ENSEMBLE function Chords played with your left hand may be applied to the right hand melody 1 Press the SPLIT button to turn its LED on and split the keyboard The E...

Page 68: ... the MENU button touching the Keyboard Ensemble section and then going to the Ensemble page 5 When the right harmonization type has been selected press the EXIT button to go back to the main page 6 Press the ENSEMBLE button again to turn its LED off The automatic harmonization will be turned off Notice how the right hand is automatically harmonized accord ing to the chords composed with your left ...

Page 69: ... flashing icon in the display 4 Play the chords in the Chord Scan area 5 When the Chord Sequence is done press the BASS INVERSION and MANUAL BASS RECORD buttons together again to stop recording 6 Press the MEMORY and BASS INVERSION PLAY STOP buttons to start playback The LED of the two buttons will start flashing The Chord Sequence will be played back in loop starting from the next measure Recorde...

Page 70: ...Y and BASS INVERSION PLAY STOP buttons together again to stop playback of the recorded Chord Sequence The last chord played by the Chord Sequence remains in memory The Chord Sequence will remain in memory up until you record a new Chord Sequence or you turn the Pa3X off ...

Page 71: ...een on an external video monitor provided you have the optional VIF4 Video Interface installed In addition to lyrics and chords you can also see the score and the markers of a Standard MIDI File Selecting a Song to play 1 Press the SONG PLAY button to switch to the Song Play mode Hint In Style Play mode you can pre select the Songs to be assigned to both play ers This way you will be ready to star...

Page 72: ...ghlighted Touch a Song s name to select it Use the scroll bar to see all Songs in the list Keep SHIFT pressed and touch the Up Down arrow to scroll to the next previous alphabetic sec tion As an alternative you can use the VALUE section Use the Open and Close buttons to browse through the folders Use the Device pop up menu to select one of the available mass storage devices Use the Sync P Synchron...

Page 73: ...HOME button Note In any case the player will automatically stop when the end of the Song is reached After pressing the PLAY STOP button the but ton s LED turns on and the measure counter begins to show the current measure number Press the REWIND button once to go back Keep it pressed to go back more Press the FAST FORWARD button once to go for ward Keep it pressed to go forward more Press the PLAY...

Page 74: ... use the Assignable Sliders when the VOLUME LED is turned on to adjust each track s volume Use the TRACK SELECT button to cycle between track groups To control the volume the VOLUME LED must be turned on If it is off repeatedly press the SLIDER MODE button to change it Please note that the SLIDER MODE status is saved with each Performance or STS The LED indicator of the controlled group of tracks ...

Page 75: ... your fin ger up down 4 Press the TRACK SELECT button once to see tracks 1 8 Track 1 8 view Note Changes to Song tracks will not be saved and will be reset each time you press the Home button They may also be reset while pressing the Rewind button To save changes you must edit the Song in Sequencer mode 5 Press TRACK SELECT once again to see tracks 9 16 Track 9 16 view i Keyboard tracks i In Track...

Page 76: ...ing to the Song switch from Normal view to Track 1 8 and Track 9 16 view to see which tracks are playing To see if a track is playing look at its name and see if it changes color Touch each track s channel strip to see each track s detail in the Track Info line Keyboard tracks Selected track Assigned Sound Touch it to open the Sound Select window Sound bank Program Change ...

Page 77: ...g a track Contrary to the above you may want to make a single track of a Standard MIDI File play alone This is called the Solo function 1 While the Song is playing keep the SHIFT button pressed and touch the track you want to listen to in Solo mode 2 To set all tracks back to the Play status keep the SHIFT button pressed again and touch the track that is currently in Solo mode Please remember that...

Page 78: ...use the X FADER 4 Start the player with the MP3 Song assigned 5 Press the ASSIGNABLE SWITCH 2 to activate the Vocal Remover and remove the origi nal singer s voice Listen to how the original singer s voice is reduced or totally removed 6 Keep the SHIFT button pressed and press the SONG PLAY button to open the Prefer ences General Setup page 7 Experiment with the various settings of the MP3 Vocal R...

Page 79: ...ayer with the Standard MIDI File Song assigned 3 Press the ASSIGNABLE SWITCH 3 to mute the Melody track The Melody track disappears If it is the wrong track continue to the following step to select a different track 4 Keep the SHIFT button pressed and press the SONG PLAY button to open the Prefer ences General Setup page 5 Choose a different Melody track 6 When done you can press the ASSIGNABLE SW...

Page 80: ...Select to confirm 3 Keep the SHIFT button pressed and press any of the two PLAY STOP buttons to start both Players at the same time Hint You don t need to start both players at the same time You can start the first Song then start the sec ond one when the first one is near to the end This way you can use the X FADER slider to gently crossfade between the end of one Song and the beginning of the fo...

Page 81: ...te up to four Pads and up to four STSs to each Standard MIDI File or MP3 file This way it is easy to recall a complete setup for Keyboard tracks effects and the Voice Processor for realtime playing over a Standard MIDI File or MP3 file Also you can link a text file to a Standard MIDI File MP3 file or to a Style to read the Lyrics in the display or on an external monitor even if there are no Lyrics...

Page 82: ...g mode Style Play or Song Play Up to four STSs will also be recalled Any TXT file associated with the entry can be seen in the Lyrics page The selected Style MID or KAR file or MP3 is shown in the higher part of the screen Displaying Artist or Genre For space matters either the Genre or Artist column can be seen in the display You cannot see both at the same time 1 Touch the page menu icon to open...

Page 83: ...ou can change the order entries are shown in the display 1 You can change the sorting order by touching one of the labels in a list of names You can do the same by touching the Type Name Genre Artist Key Number Tempo or Meter label 2 Each time you touch the same label again the order changes between ascending and descending Touch the Name label to alphabetically reorder the names in the list Each ...

Page 84: ...o the search criteria even more than one you want to enter For example you may want to find all songs containing the word love in the title in any posi tion in the string If so select the Name criterion and enter the word love Capitals are not rel evant for the search 3 Touch OK in the display and close the Text Edit dialog box The entered text is now the search criteria Available search criteria ...

Page 85: ...ge Once the Filter dialog box has been closed by touching OK the Filtered check box is automati cally checked and the filter is activated Only entries matching the entered criterion are seen in the Main List 5 To see the whole SongBook database again touch the Filtered check box again to make the check mark disappear ...

Page 86: ...en the Book Edit 1 tab to see the Book Edit 1 page and link a Musical Resource to the SongBook entry 6 Touch the New Song button in the display to add a new item to the SongBook list Entry s name Name of the Style MID or KAR or MP3 file memorized with the entry When checked current settings for Style tracks or the path for the MID KAR or MP3 file are saved with the entry If unchecked the original ...

Page 87: ...utomatically selected when selecting the entry 9 When done with this page touch the tab to go to the Book Edit 3 page where you can and set the Synchro and Memory parameters link a text file to the entry and choose the Harmony Control 10 After having filled up all the desired fields be as comprehensive as you can touch the Write button in the display to open the Write dialog box Database entry s p...

Page 88: ...ng list touch the Custom List tab to open the Custom List page and select one of the available Custom Lists To create a new list touch the List Edit tab to open the List Edit page and touch the New List button to create a new blank list Entry s name By default it is the same name of the associated Standard MIDI File of MP3 file or the associated Style The name can be up to 16 char acters long Sele...

Page 89: ...view filter on if any Touch this button to edit the view filter Use the scroll bar to see all Songs in the list Keep SHIFT pressed and touch the Up Down arrow to scroll to the next pre vious alphabetic sec tion As an alternative you can use the VALUE DIAL SongBook list Adds the highlighted entry to the Custom List Use the vertical arrows to move the selected entry up or down in the list Touch Del ...

Page 90: ...uch the Text Edit symbol to open the Text Edit dialog box Use alphabetic char acters to enter text Use the arrows or the DIAL to move the cur sor Use the SHIFT but ton to switch between capitals and small charac ters Touch Delete to delete just a single character Clear to delete the whole string When done touch OK to confirm the new name or Cancel to abandon all changes ...

Page 91: ...oesn t matter if it is based on a Style a Standard MIDI File or an MP3 file 1 Press the LYRICS button to open the Lyrics STS page and see the four STSs associated to the current SongBook entry 2 Select the desired STS by pressing the corresponding STS button on the control panel As an alternative touch its name in the display The STS is selected Keyboard tracks and Voice Processor settings may cha...

Page 92: ...microphone To sing along with the Pa3X you must first connect a suitable microphone to the MIC input the one that goes into the Voice Processor Both dynamic and condenser microphones are directly sup ported Phantom power is available to condenser microphones 1 Lower the Mic volume by using the dedicated MIC VOLUME knob on the control panel Note Lowering the Mic volume helps avoiding feed back Feed...

Page 93: ...ne and adjust the input gain and the Microphone volume until you achieve the correct settings Note You have a correct microphone volume setting when the AUDIO IN LED stays green most of the time The MIC VOLUME knob must be set accordingly to compen sate a too loud or weak incoming signal Touch this checkbox to turn phantom power on on the XLR MIC input and switch a condenser microphone on Mic pane...

Page 94: ...t Styles Performances Songs or Voice Processor settings Setting up your voice tone You can add pitch correction equalization compression and gate to the microphone signal to make your voice perfectly in tune tonally pleasant and dynamically even In case your microphone empha sizes them de essing will remove sibilants While these effects cannot be considered a replacement for some good training the...

Page 95: ...l further reduces the mud while adding warmth to the sound 5 Be sure that the Adaptive box in the Compress DeEss section is checked and use the Compress knob to adjust the amount of compression while singing and listening to your dynamics The Adaptive setting automatically adjusts the Compressor parameters In this mode the com pressor listens to your singing over time and adjusts the internal para...

Page 96: ... memories at will 1 Touch the Mic tab to see the Mic panel and select one of the available Voice Processor Presets Voice Processor Presets are settings for the various Voice Processor sections By selecting a Pre set all processing parameters may change A Voice Processor Preset is assigned to each Performance or STS When selecting a different Performance or STS the Voice Processor Preset may change...

Page 97: ...ng Play mode press the MENU button touch the Preferences item be sure the General Setup page is selected and choose a track from the Harmony Control parameter Usually harmony notes are contained in Track 5 Preset 3 is meant for use with an MP3 Song Choose this preset when playing an MP3 and the Pa3X will recognize chords by analyzing the file 2 Press the HARMONY button in the control panel to turn...

Page 98: ...nd the spread between them in the stereo panorama 1 Press the DOUBLE button in the control panel to turn its LED on 2 Sing into the microphone and listen to how other voices are added in unison to your melody line Doubling does not play chords it just adds the other voices in unison to the same note you sing 3 While singing adjust the level of the choir voices by using the HARMONY DOUBLE knob in t...

Page 99: ...and proud 4 To turn the TalkBack function off touch the Talk button again The background music returns to the original volume Locking the Voice Processor settings If you like the selected Voice Processor Preset you can lock them to prevent them from changing each time you select a Performance Style or STS that may be saved using different settings 1 While the Mic panel is shown in the display touc...

Page 100: ...accompani ment tracks Accessing the Backing Sequence Quick Record mode 1 Press the SEQUENCER button to switch to the Sequencer mode 2 Press the RECORD button to open the Song Record Mode Select dialog box Recording a new Song Standard MIDI File Style Select section Style Controls Style Elements Player 1 controls SEQUENCER button After pressing the SEQUENCER button the main page of the Sequencer mo...

Page 101: ...e STYLE but tons to open the Style Select window and select a different Style as seen on page 55 Track s status Rec means they are ready to record Play means they are recorded and you can hear them Mute means they cannot be heard Measure counter Nega tive numbers 2 1 are the precount after which you can start recording Style s Tempo Change it if you like Grouped tracks During Quick Record you cann...

Page 102: ...that while recording in Backing Sequence Record mode you cannot use the SYNCHRO TAP TEMPO RESET BALANCE controls 4 When finished recording your Song press the PLAY STOP button in the PLAYER 1 section to exit recording and return to the main page of the Sequencer mode 5 While in the main page of the Sequencer mode press the PLAY STOP button in the PLAYER 1 section to listen to the recorded Song The...

Page 103: ...n 2 If you are recording just one of the grouped tracks set the track to be preserved to the Play mode 3 Repeat the recording process and press the PLAY STOP button in the PLAYER 1 section to stop recording and to return to the main page of the Sequencer mode 4 While in the main page of the Sequencer mode press the PLAY STOP button in the PLAYER 1 section to listen to the recorded Song Again the B...

Page 104: ...cted a new Song file will be cre ated on the target device To deselect a selected Song touch anywhere else in the Song list or select the same storage device again Use the scroll bar to see all Songs in the list Keep SHIFT pressed and touch the Up Down arrow to scroll to the next pre vious alphabetic section As an alterna tive you can use the VALUE DIAL Use the Open and Close buttons to browse thr...

Page 105: ...ressed and press the RECORD button The MP3 Record dialog box will appear When not recording the shown status is Idle Note MP3 files recorded with lower sampling rates may not sound very good This is a problem that cannot be avoided with MP3 files 2 Choose the preferred MP3 audio quality option by means of the Quality pop up menu The higher the sound quality the larger the MP3 file that will be gen...

Page 106: ...alog box while still recording a red recorder icon will flash in the display During recording you can use this dialog box to see the Recording time file length and the remaining space on disk Maximum recording time depends on the available space in the selected device 8 Touch Stop to stop recording After touching Stop recording will stop and the following dialog box will appear 9 Touch the Text Ed...

Page 107: ......

Page 108: ... Global mode See page 206 Performance Select window Touch the Performance area whereas it appears in the display or one of the PERFORMANCE SELECT buttons on the control panel to open the Performance Select window Use the PER FORMANCE SELECT buttons to go directly to the selected bank Press EXIT to exit from this page and go back to the previous page without selecting any Performance Note Depending...

Page 109: ...d This way you do not need to touch one of the corresponding tabs in the display in order to select a different page Styles Touch one of these buttons in the display to select a Style Unless the Display Hold parameter see page 207 is turned on the window automatically closes shortly after you select a Style After selecting a Style from this window and another Style is playing the name of the new S...

Page 110: ...he available STSs In Style Play and Song Play mode In Lyrics mode Song Select window This page appears when you touch one of the Song areas in the display or one of the SELECT buttons in one of the PLAYER sections on the control panel Press EXIT to exit from this page and go back to the main page of the Song Play operating mode without selecting a Song While in this page select a Standard MIDI Fil...

Page 111: ...our folder contains more items only the first 127 will be considered Hint If you don t want to lose the list when turning the instrument off go to the Jukebox page and save it to disk as a JBX file Selecting a Song by its ID number Each Song in a folder on a device up to 9 999 has a progressive ID number assigned When the Show Song Number option is selected in the Song Select page menu see below y...

Page 112: ... For the correct display and printing of the list on a personal com puter use a fixed size i e non proportional character in your text editor Show Song Number Check this option to make the Song s progressive ID number appear in the list next to each Song Show Song Extension Check this option to make the file extension mid kar jbx mp3 appear in the list at the end of each Song s name Create New Fol...

Page 113: ...n case you are lost among the directories touch the Root button to go to the root of the selected device When you see the directory containing the file you are looking for touch it then touch the Select button to select it and close the Media window The name of the selected directory will be shown in the title bar of the Search win dow 4 Type the name of the file to be searched There is no differ ...

Page 114: ...w at any time by press ing the EXIT or SEARCH button Notes on searching Wildcards During search the string entered will be search as a whole word or as part of a word For example if you entered love Pa3X will find Love and LoveSong or any other word containing the string love You can use the wildcards any single character and any sequence of characters to search exactly that string For exam ple lo...

Page 115: ...he STS MODE LED is blinking selecting a Variation also select the corresponding STS When the STYLE CHANGE LED is on selecting a Perfor mance also selects a Style the one memorized with the Perfor mance Current track settings can be saved either to a Performance an STS or a Style Setup depending on the page menu command you select MasterVolumeandBalance While the MASTER VOLUME slider controls the g...

Page 116: ...ion is shown no chord recogni tion mode has been selected by using the CHORD SCAN but tons see page 17 Page menu icon Touch the page menu icon to open the menu See Page menu on page 137 for more information Style area This is where the Style name is shown together with its Tempo and Meter Time Signature parameters Style name Currently selected Style Touch the Style name to open the Style Select wi...

Page 117: ... where Keyboard tracks are shown Sound name Name of the Sound assigned to the corresponding Keyboard track If the track is already selected white background touch the Sound name to open the Sound Select window If the track is not selected dark background first select it then touch the Sound name to open the Sound Select window You can also open the Sound Select window by using the SOUND SELECT but...

Page 118: ...tatus On Style tracks always use the original Sounds recorded in each Style Element If you assign a different Sound to a Style track this parameter is automatically set to Off Off You can assign different Sounds to each Style track and save them in a Performance or Style Settings The selected Sounds are the same for all Style Elements there are no different Sounds for each Style element Selected T...

Page 119: ...e Play Setup The vol ume of the separate Style tracks Style Tracks view can be memo rized to the current Style Settings Sliders and volume of the tracks You can change the volume of each track by using the Assignable Sliders in the control panel To make them act as volume con trols be sure the VOLUME LED over the SLIDER MODE but ton is lit The Assignable Sliders correspond to the virtual sliders i...

Page 120: ... same These controls allows you to globally set the balance between the Drum Percussion Bass and Accompaniment tracks For exam ple if you prefer Drums and Bass to be prominent to make them have more punch you can lower the grouped Accompaniment tracks Changes are not memorized to a Performance or to the current Style Settings They can be memorized to the Global Style Play Setup i e the preferences...

Page 121: ...ad Touch the box to make the Pad Select window appear see Pad Select win dow on page 105 Note Each Style or SongBook entry can change the Pad assign ment Pads lock icon When locked assignments to the pads remain unchanged when selecting a different Style or SongBook entry This lock is reset when turning the instrument off unless you write Global settings to memory see Write Global Global Setup dia...

Page 122: ...e microphone input might not work whichever the status of the switches in this page See Audio Setup Audio In on page 215 VP Preset Use this pop up menu to select one of the available Voice Proces sor Presets Selecting a Preset may change all the above parame ters as well as other Voice Processor parameters Presets can be freely edited see Voice Processor Preset Easy Preset on page 99 VP lock icon ...

Page 123: ...rious Style Play edit sections When in the menu select an edit section or press EXIT or STYLE PLAY to exit the menu and return to the main page To return to the main page you can also select the Main Page menu item When in an edit page press EXIT or the STYLE PLAY button to return to the main page of the Style Play operating mode Each item in this menu corresponds to an edit section Each edit sect...

Page 124: ... a separate output no FX is sent to any output To program the output status for each track see Audio Setup Style Kbd on page 214 On When checked the direct dry signal coming from the track is sent to the output mixed with the Master FXs Off When unchecked the direct dry signal coming from the track is removed from the audio output and only sent to the Master FXs The effected sig nal will still be ...

Page 125: ... just set the Dry parameter to Off see Dry above You can assign to the Master FXs any kind of available effects but we found it convenient to arrange them in the following way for most of the Styles STS and Performances included with the Pa3X A Master 1 Reverb processor for the Style and Pad tracks A Master 2 Modulating FX processor for the Style and Pad tracks A Master 3 Freely assignable B Maste...

Page 126: ...ammed in the previous page Use the TRACK SELECT button to switch from the Keyboard to the Style tracks and vice versa Reset All Tracks button Touch this button to reset i e flatten equalization for all tracks both Realtime and Style tracks Track Reset buttons Use these buttons to reset i e flatten equalization for the cor responding track Bypass Check any of these checkboxes to bypass the equaliza...

Page 127: ...Mode parameter see page 136 The remaining tracks if any use the basic scale set in Global mode see Main Scale on page 203 With the Quarter Tone button non pressed With the Quarter Tone button pressed Note A different Scale can be associated to each Performance or STS Note Quarter Tone selection can be received by MIDI i e by an external sequencer or controller Conversely selection of Quarter Tone ...

Page 128: ...the User scale is selected the keyboard diagram becomes active You can then change each note tuning in cents of a semi tone within a range of 99 cents referred to Equal tuning This way you can create a custom scale that you can save to a Perfor mance or STS After having selected the User scale touch a note in the key board diagram and use VALUE controls to adjust the selected note tuning in cents ...

Page 129: ...arter tone Release the pedal 3 Play with your new scale Notes you pressed on step 2 are now lowered of a quarter tone 4 Reset the original scale Press and release the Quarter Tone pedal again without playing any note All pitches will be reset and the scale selected by the Performance STS will be recalled Effects A B FX Configuration This page allows you to select the A Style and Pads and B Key boa...

Page 130: ...or Perc the Category parameter on the right is also considered Note If the Chain parameter is turned on on the IFX 1 effect this parameter cannot be edited for the following IFX effects Category Drum Perc category of instruments inside the Drum or Percus sive instrument set You can apply effects to each separate cate gory Bass Drums Snare Drums Cymbals instead of applying them to the drum kit as a...

Page 131: ... Accessory Disk Amt Amount Volume of the effect that is added to the dry uneffected signal Track Controls Mode This page lets you connect each track to the internal sound gen erator and to external MIDI devices This is very useful to let a Style track drive an external expander or play a digital piano with one of Pa3X s Keyboard tracks In addition here you can set the polyphony mode for each track...

Page 132: ... the leftmost lowest note Play Mute icon Track s play mute status Play status The track can be heard Mute status The track cannot be heard Track Controls Drum Edit In this page you can adjust the volume and edit the main param eters for each family of Drum and Percussion instrument for the selected track A list of families is shown below These parameters can be accessed only on tracks set to the D...

Page 133: ...t the Volume parameter and use the VALUE controls to turn the volume completely off You ll notice how all snares stops sounding 6 Touch the Reset Track button in the display to recall the original Snare s volume Track Controls Easy Edit In this page you can edit the main parameters of the Sounds assigned to each track Hint Use the TRACK SELECT button to cycle between the track groups After selecti...

Page 134: ...active on any track set to this status Joystick X This enables disables the left right movement of the Joystick Pitch Bend and sometimes a Sound parameter s control for Pitch Bend settings see Mixer Tuning Tuning on page 123 Joystick Y This enables disables the front rear movement of the Joystick Y Modulation and sometimes a different Sound parameter s control Y Various controls or non active Expr...

Page 135: ...nge is useful to create a set of Keyboard tracks playing in different zones of the keyboard For example you may have french horns and woodwinds playing in the center range of the keyboard while only woodwinds play on the higher range Velocity range is useful to create a sound made of up to three dynamic layers assigning each of the Upper tracks to a different dynamic range As an example you may as...

Page 136: ...n trills them If three or more notes are played only the last two are trilled You can set the trill speed by using the Tempo parameter see below Repeat The played note is repeated in sync with the Tempo parameter see below When playing a chord only the last note is repeated Echo As the Repeat option but with the repeated notes fading away after the time set with the Feedback parameter see below Au...

Page 137: ...cks 18 0 0 0 18 0 Gain value of the High Middle or Low band Pad lock icon This lock avoids selecting a different Style or SongBook entry changes also the Hit or Sequence Pads assigned to the Pads This lock is reset when turning the instrument off unless you write Global settings to memory see Write Global Global Setup dialog box on page 220 For more information on parameter locks see General Con t...

Page 138: ...same Variation playing before selecting a Fill will be selected again V1 V2 V3 V4 The specified Variations will be alternatively selected when one of them is selected For exam ple with the V1 V2 option if Variation 1 is selected Variation 1 and Variation 2 will be alter natively selected after the end of the Fill Var Up Var Down The next higher lower numbered Variation is selected in cycle After V...

Page 139: ...ous general parameters for the Style play mode Settings can be saved to a Performance or STS Chord Recognition Mode This parameter defines how chords are recognized by the auto accompaniment engine Please note that when in Full or Upper Chord Scan mode the Fingered 3 or Expert mode is selected and you must always play at least three notes to let a chord be recognized Note This parameter is the sam...

Page 140: ... when raising the hand from the keyboard Fixed Arr Lower When the MEMORY LED is on recognized chords are kept in memory and the Lower sound is held until the next note or chord is played When the LED is off the Lower sound is cut when raising the hand from the keyboard on the contrary the chord is kept in memory so the accompaniment continues to play up until you select a different Style Lock icon...

Page 141: ... the Backing icon appears in the Lower track Sound s area Off No Bass Sound is added when the Style is not running The Lower track can be heard only if it is not muted Page menu Touch the page menu icon to open the menu Touch a command to select it Touch anywhere in the display to close the menu without selecting a command Write Performance Select this command to open the Write Performance dialog ...

Page 142: ...go to the page of the single effect you want to paste IFX 1 IFX 2 IFX 3 Master 1 Master 2 Master 3 4 Choose the Paste FX command from the page menu To copy all effects 1 Select the source Performance Style or STS then go to the Effects A B FX Config page to copy all effects 2 Choose the Copy FX command from the page menu 3 Select the target Performance Style or STS then go to the page of the Effec...

Page 143: ...aved at the target location is shown Use the VALUE controls to select a dif ferent location Write Style Settings dialog box Open this window by selecting the Write Style Settings item from the page menu Here you can save Style track settings to the Style Settings of the current Style Parameters saved in the Style Settings are marked with the symbol through the user s manual Keep the SHIFT button p...

Page 144: ...banks While in Style Record mode you can write the new or edited Style in the Favorite banks as an alternative to the User Style banks See the Style Record chapter for more information on saving a Style While in Media mode you can load any Style into the Favorite banks as an alternative to the User Style banks See the Media chapter for more information on the Load operations Renaming the Favorite ...

Page 145: ...DI OUT and USB port the MIDI Clock messages generated by Player 1 For MIDI Clock messages to be sent the Clock Send parameter must be activated see Clock Send on page 210 Tempo Lock If you don t want the Tempo to change when selecting a new Song turn on the Tempo Lock function by using the TEMPO LOCK buttons on the control panel When the LED of this but ton is turned on you can still manually chan...

Page 146: ...nd you will be able to play it in Song Play mode with the correct Sounds Keyboard Pad and Player tracks The Pa3X is equipped with a double player Each Song can play up to a maximum of 16 tracks for a total of 32 tracks In addition you can play the keyboard with four additional Key board tracks Upper 1 3 and Lower When the Volume panel is shown in the main page of the Song Play mode see illustratio...

Page 147: ...o you might see a 7 transpose value Just Fifth Up shown in the display but the MP3 will actually play 5 semitones lower Just Fourth Down Note Transpose may be automatically changed when selecting a different Performance It may also be changed when loading a Standard MIDI File generated with an instrument of the Korg Pa series To avoid transposing lock the Master Transpose parameter in the Global s...

Page 148: ...File or Kara oke file has been selected Current measure number Tempo This parameter only appears when a Standard MIDI File or Kara oke file has been selected Metronome Tempo Select this parameter and use the TEMPO and TEMPO buttons to change the Tempo As an alternative touch this parameter and drag with your finger Hint While in the main page the Tempo parameter of Player 2 can be on focus while P...

Page 149: ...table Name of the corresponding track Sound bank s icon This picture illustrates the bank the current Sound belongs to Keyboard track status Play mute status of the current track Touch this icon to change the status No icon Play status The track can be heard Mute status The track cannot be heard Panels The lower half of the main page contains the various panels you can select by touching the corre...

Page 150: ...on are shown on the Selected Track Info area see above Touch it a second time to open the Sound Select win dow STS Name panel Select this panel to see the name of the four available STSs See STS Name panel on page 115 for details Volume panel Touch the Volume tab to select this panel This is where you can set the volume of each track and mute unmute tracks Note The volume of Keyboard tracks may be...

Page 151: ...heard Saving the track s status The status of Keyboard tracks may be saved to a Performance or STS and can be changed when choosing a different Perfor mance or STS see Write Performance on page 137 and Write Single Touch Setting on page 137 The status of the Song tracks can be saved as a general setting into the Global Song Play Setup by choosing the Write Global Song Play Setup command from the p...

Page 152: ...ay to create a Jukebox list is to touch the Play All button in the Song Select window see page 107 Warning If you delete a Song included in the Jukebox list cur rently in play the player will stop and the No Song message will appear At this point you can select the JukeBox tab to open the Jukebox panel and select a different Song As an alternative you can select the next Song by pressing SHIFT FAS...

Page 153: ...ENU button to open the Song Play edit menu This menu gives access to the various Song Play edit sections for the currently selected player see Songs area on page 145 When in the menu select an edit section or press EXIT or SONG PLAY to exit the menu When in an edit page press the EXIT or SONG PLAY button to go back to the main page of the Song Play operating mode Each item in this menu corresponds...

Page 154: ...annot be saved when saving to a Perfor mance or STS Note The play mute status of a Song track may be reset when selecting a Song made on a Pa Series instrument Use the TRACK SELECT button to switch from the Keyboard to the Song tracks and vice versa Upper Volume Link This parameter allows you to define if changing the volume for one of the Upper tracks proportionally changes also the volume for th...

Page 155: ... section see Effects A B FX Configuration on page 154 This page lets you set the level of the track s direct uneffected signal going to the Master FX processors The Master FX proces sors are connected in parallel with the dry direct signal so you can decide the amount of direct signal will be sent to the Master FX processors In case you do not want to hear the direct signal just set the Dry parame...

Page 156: ...or each individual track Use the TRACK SELECT button to switch from the Keyboard to the Song tracks and vice versa Note The EQ is different for Player 1 and Player 2 Hint Track EQ can be memorized in the general preferences for the Song Play mode they are named Song Play Global Setup This will help adapting the Pa3X s sound to personal taste for any Standard MIDI File you will ever play excluding ...

Page 157: ...ol This page lets you reset or bypass track equalization pro grammed in the previous page Use the TRACK SELECT button to switch from the Keyboard to the Song tracks and vice versa Track Reset buttons Use these buttons to reset i e flatten equalization for the cor responding track Reset All Tracks button Touch this button to reset i e flatten equalization for all tracks both Realtime and Song track...

Page 158: ...ts FX A B side tabs Use these side tabs to choose the FX group A or B to edit FX Name Use this pop up menu to choose one of the available effects For a list of the available effects see the Advanced Edit manual in the Accessory Disk Insert FX Track Use this pop up menu to choose the Song track the correspond ing Insert FX is assigned to Choosing either P1 Player 1 or P2 Player 2 tracks makes no di...

Page 159: ...lume of the effect that is added to the dry uneffected signal Track Controls Mode These parameters let you set the Internal External and the Poly Mono status of Song tracks See Track Controls Mode on page 127 Parameters Note These parameters can be saved to the Global Song Play Setup by selecting the Write Global Song Play Setup command from the page menu Track Controls Drum Edit These parameters ...

Page 160: ...on to move the selected item up or down in the list Add Adds a Song at the end of the current list You can add up to 127 Songs in a list When this button is pressed a standard file selec tor opens up in the display Note A Jukebox list can include only Songs contained in the same folder Hint Instead of a single Song you can select a Jukebox file and add its whole content to the current Jukebox list...

Page 161: ...unction assignable to an Assignable Switch Footswitch or EC5 pedal Voice Processor Harmony Mode Harmony Control This parameter allows you to choose if notes or chords for the Voice Processor s Harmonizer should be received from a Song track the keyboard or none of them Whether actual notes or recognized chords are received by the Harmonizer depends on the Harmony Type parameter of the Global Voice...

Page 162: ...transfer of MIDI data to the MIDI OUT or USB port may cause a delay to the Song s start Therefore we suggest to turn this function off when Pa3X is hooked to other instruments Get Hard Disk Path Touch this button to see the current file path of the Song assigned to each of the players This lets you know where cur rently selected Songs are located in the storage device If you save these paths to th...

Page 163: ...section Parameters contained in other sections like Dry or FX Send are not copied Please note that these parameters can change the way effects change the sound To copy a single effect 1 Select the source Song Performance Style or STS then go to the page of the single effect you want to copy IFX 1 IFX 2 IFX 3 Master 1 Master 2 Master 3 or go to the Effects A B FX Config page to copy all effects Thi...

Page 164: ...e of the entries the associated Style Standard MIDI File or MP3 file is automatically recalled Also STSs and Pads may be recalled if present List Header The List Header may change depending on the type of data associated with the selected entry When a Style is associated to the entry the currently selected entry s name is shown on the left N and the associated Style is shown on the right Style Whe...

Page 165: ...entry by means of an unique number Numbers associated with each entry can be programmed in the Book Edit 2 page see Book Edit 3 on page 166 To see the numbers while in the Book page select the Show Song Numbers now Key command from the page menu After you select this command the Num column appears To see the Key column again select the Show Key now Song Numbers command from the page menu To select...

Page 166: ... menu Selecting SongBook entries via MIDI When you are ready to remotely select SongBook entries switch to the Style Play or Song Play mode At this point Pa3X must receive on the special Control channel the NRPN Control Change messages 99 MSB with value 2 and 98 LSB with value 64 in fast succession as an initializa tion string This string must be sent only once unless another NRPN control is sent ...

Page 167: ...d is useful to browse through the list and select an entry different than the following one in the list List Edit This page is only available after checking the Enable List Edit command in the page menu see page 168 Use this page to edit the available Custom Lists A Custom List is a set of SongBook entries created by selecting items from the Main List To add entries to a Custom List first create o...

Page 168: ...ry Header Name Name of the selected song entry The name is assigned after you touch the Write button to save the entry to the SongBook list Number Song Selection Number Here you can select a unique number up to 9 999 to be associ ated to the current SongBook entry By typing this number by using the Numeric Keypad after pressing the SONGBOOK but ton again you will be able to quickly recall an entry...

Page 169: ... the entry shown on top of the page see Entry Resource above You can select a different resource by going back to the Style Play or Song Play mode and selecting resources from there Then press the SONGBOOK button to return to the Book Edit page When you touch Write a link to the selected resource s is saved with the entry provided the Write option is selected when sav ing The resource s will be re...

Page 170: ...included with the associated resource Note Even if you can edit this value the starting value of a Stan dard MIDI Files is always considered and overrides this value Note You can edit this value even if an MP3 is associated to the SongBook entry However this is just an indicative value Meter Info Basic meter time signature of the Style or starting meter of the Standard MIDI File associated with th...

Page 171: ... Harmony Control Only editable if a Standard MIDI File is assigned to the SongBook entry The Voice Processor will get the chord notes from the track selected with this parameter Hint Go to the Voice Processor Preset section of the Global mode to try different Voice Processor Presets while creating or editing a Song Unchanged The Harmony Control set by the previous entry is not changed Off No Song ...

Page 172: ...pear to make the List Edit page available Export as text file Only available when a SongBook list or Custom list is selected Select this command to open the Export dialog box and save the Song Book or Custom List as a text file The selected filtering will be applied to the exported list assuming the Filter button is checked The dialog box is a little different depending on the page where you selec...

Page 173: ...3 file Hint If you do not want to see the TXT file or the CDG file and prefer to see the Lyrics data rename the TXT or CDG file or move it to a different folder Viewing lyrics and chords in the Style Play mode Lyrics can be associated to a Style as a TXT file When in this page you can see lyrics contained in a TXT file linked to the latest selected Style based SongBook entry see Linked TXT on page...

Page 174: ... with the matching MP3 file The text will scroll automatically while the Song is playing back Note When a CDG file is loaded with the Song it overrides any included Lyrics data Text files loaded with Standard MIDI Files and MP3 files When a TXT file exists in the same directory as a Standard MIDI File or MP3 file and shares exactly the same name it will be loaded with the MID or MP3 file and can b...

Page 175: ...ey Signature event is found at position 001 01 000 of the Song s Master track the correct key signature is also shown Currently selected staff marker This red vertical line shows the approximate position of the play back by indicating the current staff in play Current measure indicator This red triangle shows the current measure in play Lyrics button Touch this button to make the lyrics if availab...

Page 176: ...current measure is saved as a marker If you touch Add within the last beat of the measure the beginning of the following measure is saved as a marker 5 Do the same for any following marker 6 Stop the Song by pressing the PLAYER 1 PLAYER 2 PLAY STOP button How to jump to a saved marker 1 Start the Song again 2 When you want to jump to a saved marker touch it in the display The Song will jump to the...

Page 177: ...er mode For this just two settings are needed Select the Song track where you are recording chords for the Voice Processor see Harmony Track on page 196 Select the desired Voice Processor Preset in the Voice Pro cessor Preset section of the Global mode see the Voice Processor chapter in the Advance Manual Sequencer Play Main page Press the SEQUENCER button to access this page from another operatin...

Page 178: ...ton to go back to the beginning the Song returns to this point Metro Check this box to turn the metronome on during playback Tempo Tempo mode Use this menu to select the Tempo change mode Manual In this mode you can change the Tempo using TEMPO VALUE section controls The Song will be played back using the manually selected tempo Auto The Tempo recorded to the Song will be used Selected track info ...

Page 179: ...Tracks 1 8 view shows Song tracks 1 8 The Song Tracks 9 16 view shows Song tracks 9 16 Slider Mode button status Usually the function assigned to the Assignable Sliders depends on the status of the SLIDER MODE button While in Sequencer mode you cannot save the SLIDER MODE status to a Perfor mance or STS since Performances and STSs are disabled while in this mode For details about the various Slide...

Page 180: ...cer page While in Sequencer mode press the RECORD button and select the Multitrack Sequencer option The Multitrack Sequencer page appears See Multitrack recording procedure on page 178 for informa tion on the record procedure Page header See Page header on page 173 Page menu icon See Page menu icon on page 174 Page sub header This area shows some performing info on the Song Song name Name of the S...

Page 181: ...ount before starting recording On2 Metronome on with a two bar precount before starting recording Tempo Select this parameter and use the TEMPO or VALUE controls to set the tempo Note You can always change the Tempo when other parameters are selected by keeping the SHIFT button pressed and rotating the DIAL Meter This is the basic meter or time signature of the Song You can edit this parameter onl...

Page 182: ...ast one track must already be recorded 9 When finished recording press PLAY STOP to stop the sequencer Select a different track and go on recording the whole Song 10 When finished recording the new Song either press the RECORD button or select the Exit from Record com mand from the page menu see page 197 Warning Save the Song to a storage device to avoid losing it when turning the instrument off N...

Page 183: ...ext Measure Goes to the next measure and fills the remaining space with rests Done Exits the Step Record mode Step Record procedure Here is the general procedure to follow for the Step Recording 1 Press the SEQUENCER button to enter Sequencer mode 2 Press the RECORD button and select the Multitrack Sequencer option to enter the Multitrack Record mode From the page menu select the Overdub Step Reco...

Page 184: ...ering a chord made of notes with different velocity values You can make the upper or lower note of a chord for example louder than the remaining ones to let the most important stand out from the chord Here is how to insert a three note chord 1 Edit the first note s Velocity value 2 Press the first note and keep it pressed 3 Edit the second note s Velocity value 4 Press the second note and keep it ...

Page 185: ... with this parameter thus playing perfectly in time High No quantization applied 1 32 1 8 Grid resolution in musical values For example when you select 1 8 all notes are moved to the nearest 1 8 division When you select 1 4 all notes are moved to the nearest 1 4 division Chord Acc Track Kbd Pad Track These parameters let you define grouped track status during recording This status is reflected by ...

Page 186: ...page 174 for more information Track volume status area This area is where you can set the volume of each single Key board track and mute unmute tracks Virtual sliders track volume Graphical display of each track s volume See Sliders and vol ume of the tracks on page 175 for more information Assignable Sliders function See Slider Mode button status on page 175 for more informa tion Individual track...

Page 187: ... Song by pressing the MENU button see Edit menu on page 186 9 Save the song to a storage device see Save Song window on page 197 Warning The recorded Song will be deleted when turning the instrument off switching to the Style Play or Song Play mode or entering Record again If you wish to preserve it save the Song to a storage device Recordmode StepBackingSequencepage The Step Backing Sequence mode...

Page 188: ...e considered The lack of a chord means that the accompaniment will not play at the current position apart for the Drum and Percussion tracks To select the option select the Name part of the Chord parameter then use VALUE controls to select the very last value C B Off Note If you replace a chord with a different one please remember that the Lower track if recorded will not be automatically changed ...

Page 189: ...e starting from the current position to the end of the Song To delete all events of the same type from the whole Song go back to the M001 01 000 position and select one of these commands Note All events on the very first tick M001 01 000 like Perf Style Tempo Chord Style Element selection cannot be deleted Step Backing Sequence procedure Here is the general Step Backing Sequence recording procedur...

Page 190: ... is in Sequencer mode Edit section This identifies the current edit section corresponding to one of the items of the edit menu see Edit menu on page 186 Page menu icon Touch this icon to open the page menu see Page menu on page 196 Parameters area Each page contains various parameters Use the tabs to select one of the pages For detailed information on the various types of parameters see sections s...

Page 191: ...oup is reserved to the Song and Pad tracks the B group to the Realtime Keyboard tracks However Songs created in Sequencer mode could also assign the B group to the Song tracks Parameters All parameters in this page are the same found in the same page of the Song Play mode see Mixer Tuning FX Send on page 151 Mixer Tuning EQ Gain In this page you can set the three band equalization EQ for each indi...

Page 192: ...e selected tracks via the Track Assign parameter The remaining tracks if any use the basic scale set in Global mode see Main Scale on page 203 Note Quarter Tone selection and activation of the Sub Scale on each track of a Song can be received by MIDI i e by an external sequencer or controller Conversely selection of Quarter Tone set tings or activation of the Sub Scale on each track of the Song ca...

Page 193: ...ad tracks the B group to the Realtime Keyboard tracks However Songs created in Sequencer mode could also assign the B group to the Song tracks Parameters All parameters in this page are the same found in the same page of the Song Play mode see Effects A B FX Configuration on page 154 Effects IFX 1 3 Master 1 3 These pages contain the editing parameters for the effect proces sors Here is an example...

Page 194: ...vent The value format is the same as the Position value Edit it in the same way Note If you change a length of 000 00 000 to a different value you can t go back to the original value This rather uncommon zero length value may be found in the drum and percussion tracks of Songs made in Backing Sequence mode Track Use this pop up menu to select the track to edit Track 1 16 One of the ordinary tracks...

Page 195: ...e VALUE controls or touch the parameter again to open the numeric keypad to change the event s position 6 Select the Type parameter and use the VALUE controls to change the event type Select the Value 1 and 2 parame ters and use the VALUE controls or touch the parameter again to open the numeric keypad to modify the selected value 7 In the case of a Note event select the Length parameter and use t...

Page 196: ...ning of the Song the Start will be positioned at 1 01 000 and the End at 5 01 000 Bottom Top Note Use these parameters to set the bottom and top note of the key board range to quantize If you select the same note as the Bot tom and Top parameters you can select a single percussive instrument in a Drum track Note These parameters are available only when a Drum track is selected Song Edit Transpose ...

Page 197: ...degree to which the velocity data will be adjusted toward the curve you specify in Curve 0 100 Intensity value With a setting of 0 the veloc ity will not change With a setting of 100 the velocity will be changed the most Curve Only available in Advanced mode Use this parameter to select one of the six curves and to specify how the velocity will change over time Start End Vel Value Only available i...

Page 198: ...rting at the beginning of the Song the Start will be positioned at 1 01 000 and the End at 5 01 000 Bottom Top Note Use these parameters to set the bottom and top of the keyboard range to delete If you select the same note as the Bottom and Top parameters you can select a single note or a single percus sive instrument in a Drum track Note These parameters are available only when the All or Note op...

Page 199: ...n external sequencer After having chosen a track to convert touch Execute to com plete the operation Track Use these parameters to select the track containing the notes or RX Noises you want to convert RX Note Velocity Use this parameter to adjust the volume level of the RX Noises in the selected track s Add RX Noises to Guitar track Use this parameter to automatically analyze the Standard MIDI Fi...

Page 200: ... Off No track sends notes to the Harmony module of the Voice processor Chords can still be received from the MIDI IN Ply 1 Track 1 16 Chords are sent from one of Player 1 tracks Page menu Touch the page menu icon to open the menu Touch a command to select it Touch anywhere in the display to close the menu without selecting a command Write Global Player Setup Select this command to open the Write G...

Page 201: ...X command from the page menu 3 Load the target Song then go to the page of the single effect you want to paste IFX 1 IFX 2 IFX 3 Master 1 Master 2 Master 3 4 Choose the Paste FX command from the page menu To copy all effects 1 Load the source Song then go to the Effects A B FX Con fig page to copy all effects 2 Choose the Copy FX command from the page menu 3 Load the target Song then go to the pag...

Page 202: ... the Song Note If a file is selected just touch the storage device name to deselect it If a file has been selected in the display prior to touching Save the name of the selected file will be automatically assigned to the Song In any of the above situations touch the Text Edit button to edit the Song name Warning If a file with the same name is already in the current directory a message will warn y...

Page 203: ...d use the Edit mode Transpose function see Song Edit Transpose on page 192 when only the Song has to be transposed Note The Master Transpose value is always shown on the page header Save Song procedure 1 If you are in Record mode stop the sequencer and exit from the Record mode Then go back to the main page of the Sequencer Play mode see Sequencer Play Main page on page 173 2 Select the Save Song ...

Page 204: ...arately written to memory to avoid writing all global parameters at once when not needed Global Setup containing global parameters not linked to any single operating mode Style Play Setup containing global parameters for the Style Play mode not linked to the single Performance STS or Style Song Play Setup containing global parameters for the Song Play mode not linked to the single Song Sequencer S...

Page 205: ...t one of the available pages For detailed information on the vari ous types of parameters see sections starting below Tabs Use tabs to select one of the edit pages of the current edit section General Controls Basic This page contains various general parameters setting the status of the keyboard the fade in out and the accelerando ritardando Keyboard Settings Velocity Curve This parameter sets the ...

Page 206: ...the speed defined by the Time parameter To change Pitch Bend values for each Upper track see the PB Sensitivity parameter in the Style Play mode see page 123 Time Time needed to notes affected by the Glide to return to the nor mal pitch General Controls Transpose Control This page is where you can select to which tracks the Master Transpose is applied to and adjust some related parameter Transpose...

Page 207: ...e Mode on page 136 Style Play mode See Scales in the Assignable parameters chapter of the Advanced Edit Manual for a list of available scales Note You cannot select a User scale in Global mode Key This parameter is needed by some scales to set the preferred key see Scales in the Advanced Edit Manual SC Preset buttons Touch these buttons to recall the corresponding presets Each pre set contains a c...

Page 208: ... to modify the Master Transpose When open changing a Style may also change the Master Transpose See Master transpose on page 112 Hint In order to avoid having the Master Trans pose setting change when selecting a new Perfor mance or STS use the general Master Transpose Lock the first parameter in this page Note When the Master Transpose Lock is closed this parameter has no effect However the Maste...

Page 209: ...iding Performance STS settings for this track Whether Sound or Perfor mance STS effect parameters will be considered it depends on the status of this lock If the Upper 1 FX Lock is turned on when assigning a new Sound to the Upper 1 track Per formance STS parameters are left untouched selected effects and FX Send values are not changed If the Upper 1 FX Lock is turned off when assigning a new Soun...

Page 210: ...ument off then on again How to select the Help language 1 Since Pa3X must be restarted at the end of this procedure be sure to first save all unsaved data 2 While in this page select a language from the pop up menu 3 The Change word will start flashing in red Touch it 4 You will be asked if you want to save the Global and select the new language Touch Yes to confirm The Global will be automaticall...

Page 211: ...rformances into the first loca tion of each bank This way by turning on this parameter you will select your preferred Performance at the touch of a single button Also note that by turning the Factory Style and Pad Protect parameter off you can do the same with the Styles General Controls Clock Battery Date Time The Pa3X includes a battery backed system calendar and clock This allows for automatica...

Page 212: ...sages appear in this page Unplugged battery The battery is disconnected Please check if it can be reinserted Battery is damaged please replace it The battery is damaged or exhausted and can no longer be recharged Please replace it with the same type and model Controllers Pedal Switch This page lets you select a function to the Assignable Pedal Foot switch and select the polarity for the Damper and...

Page 213: ...ocedure Ribbon Sensivity Use this parameter to adjust the sensitivity of the ribbon control ler Controllers Assignable Sliders This page lets you program the first eight Assignable Sliders Two sets are available Assignable A and Assignable B Two other modes Volume and Drawbars are hard wired to the vol ume and drawbars control You can assign the preferred set by using the SLIDER MODE button on the...

Page 214: ...is automati cally deactivated when turning the Pa3X off Note In Song Play mode only the Tempo of Player 1 will be sent to the MIDI OUT or USB Device port Off The Pa3X does not send the MIDI Clock signal You cannot slave another instrument to the Pa3X even when connected to the MIDI OUT or USB Device port On The Pa3X sends the MIDI Clock signal You can slave another instrument to the Pa3X Tempo Sta...

Page 215: ...t for the Upper tracks For example if you select the 1 value a received C4 will play a C5 on the Pa3X This parameter may be useful to many MIDI accordion players whose MIDI interface may transmit on an unexpected octave 2 2 Octave transpose value Lower Octave Transp Transpose Octave transposition of data received on the MIDI IN or USB Device port for the Lower track For example if you select the 1...

Page 216: ...tely select Styles Performances STS Style Elements and SongBook entries See tables on page 183 and following for more infor mation on the received data MIDI MIDI Out Channels In this page you can assign Pa3X tracks to any of the MIDI channels sent to the MIDI OUT and USB Device ports Channels You can assign to each channel one of the following tracks Off No track assigned Lower Lower track Upper 1...

Page 217: ...e audio outputs Tracks Use these parameters to assign an audio output OUTPUT sec tion on the back of the instrument to each track Left Right The selected track is connected to the Left Right outs in stereo The track is also sent to the Internal FX processors You can use the MASTER VOLUME slider to set the volume The track is also sent to the S PDIF Digital Out However the MASTER VOLUME slider has ...

Page 218: ...n on the available audio outputs Audio Setup Drums This page lets you route Drum Kit Sounds to the audio outputs See Audio Setup Style Kbd on page 213 for more information about the available audio outputs Drum Kit Output This parameter lets you decide if Drum Kit Sounds will be sent to the single output or output pair defined for the track they are assigned to or each drum category will be sent t...

Page 219: ...r is sup plied to the balanced XLR jack only and not to the 1 4 MIC jack When disconnecting a microphone from the XLR jack the phantom power is automatically turned off Phantom power is also automatically turned off each time you turn the Pa3X off Mic On Off The status of this switch depends on the input routing see above On When the switch appears closed i e non inter rupted the Mic input is acti...

Page 220: ...oid it is sent to the audience through the Left Right outputs Note The selected Metronome Mode must not be Off in order for the click to be sent to an audio output during playback See Tracks on page 213 for detailed information on the avail able outputs Left Right Left and Right outputs Out 1 2 Sub Outputs 1 and 2 Out 1 Sub Output 1 Out 2 Sub Output 2 MP3 Player Max Volume Use this parameter to se...

Page 221: ...ay of the Pa3X is duplicated mirrored to the external display MaxxAudio MaxxEQ MaxxEQ is a full spectrum frequency equalization positioned at the end of the signal chain just before the Left Right audio outputs It gives you the power to design EQ curves and shape your sound Based on Waves professional audio equalizers MaxxEQ features seven fully programmable bands with fully adjustable gain freque...

Page 222: ...eakers can reproduce These harmonics are added back to the rest of the audio replac ing the original low frequencies Your loudspeakers then repro duce the harmonic series which are perceived by the brain as the original low frequencies Finally MaxxBass uses dynamic com pression to focus and clarify the lower frequencies The result is larger more powerful sound with extended bass response up to 1 5...

Page 223: ...ication System Touch Panel Calibration From time to time for example after loading a new operating system calibrating your Color TouchView display may be nec essary to make pointing more precise If so use this page 1 When in this page first touch exactly inside the set of arrows in the upper left corner of the display 2 The arrows will subsequently move to the other corners of the display Touch ex...

Page 224: ...eset dialog box on page 221 for more information Write Global Auto Select Setup Choose this command to save the preferred Styles Sounds and Performances assigned to the control panel STYLE and PER FORMANCE buttons via the Auto Select functions see page 207 This way the next time you will turn the Pa3X on the preferred Styles and Performances will be still assigned to the relevant but tons Write Gl...

Page 225: ... s manual Name Name of the VP Preset to be saved Touch the Text Edit button next to the name to open the Text Edit window and mod ify the name Voice Preset One of the 128 available Voice Preset locations where to save current VP Preset settings Write Global Maxx Preset dialog box Open this dialog box by selecting the Write Global Maxx Preset item from the page menu Here you can save current settin...

Page 226: ...tem is highlighted You can deselect all items in any of the following ways Touch an empty area in the file list if available Touch the Device pop up icon and select the current device again Searching files By using the Search function you can search files and musical resources in all internal and external devices For more informa tion see the Searching files and musical resources chapter on page 1...

Page 227: ... with the Full Resources Backup function of the Media Utility page PKG Operating System and Musical Resource files GBL Global Setup VOC Voice Processor Presets MXP MaxxAudio Presets PRF Performance PCG Sound Korg Pa Series KMP Multisample PCM Sample AIF AIFF audio files WAV WAVE audio files STY Style PAD Pad SBD SongBook SBL SongBook s Custom List JBX Jukebox MID Standard MIDI File SMF MP3 MP3 fil...

Page 228: ...BANK02 PRF 2 1 Jazz Brass 2 32 Jazz Strings BANK PRF BANK16 PRF 16 1 Rock Brass 16 32 Rock Strings VPPRESET VOC MXPRESET MXP SONGBOOK LISTDB SBL SONGDB SBD SOUND USER01 PCG USERDK PCG STYLE BANK01 STY 1 1 Pop 1 1 40 Pop 40 BANK STY USER01 STY U1 1 User 1 U1 40 User 40 USER02 STY U2 1 User 1 U2 40 User 40 USER03 STY U3 1 User 1 U3 40 User 40 BANK15 STY 15 1 Contemp 1 15 40 Contemp 40 1 Piano 1 128 ...

Page 229: ...lected order Scrollbar Use the scrollbar to scroll the list Touching the arrows will scroll one step at a time while touching the bar will scroll one page at a time Touching the arrows while SHIFT is kept pressed jumps to the previous or next alphabetical section or file folder type depending on the selected display order Device pop up menu Use this menu to select one of the available storage devi...

Page 230: ...d its content will appear in the display 3 If the folder you are looking for is inside another folder select this latter and touch the Open button to open it Touch the Close button to go back to the parent folder 4 Select the SET folder containing the data you wish to load and touch Load to confirm the selection Warning When loading a SET folder containing PCM data all existing PCM data in memory ...

Page 231: ... will be deleted and overwritten 7 Select the target bank and touch OK to load the source bank Warning After confirming all User data contained in the bank in memory is deleted Note If Sounds or Drum Kits based on external PCM sam ples are deleted choose the Delete command from the page menu of the Sampling mode to delete the unused samples see the Advanced Edit addendum in the Accessory Disk Note...

Page 232: ... is not possible to load Pa3X data into a Pa1X Loading Pa80 60 50 data You can load Pa80 60 50 data exactly as if they were Pa3X data The only difference is that the SOUND folder of Pa3X is called PROGRAM in the Pa80 60 50 Therefore to load Sounds from Pa80 60 50 disks you must accomplish one of the follow ing operations Either rename the PROGRAM folder SOUND by using a personal computer before lo...

Page 233: ...in this page only data allowed for saving are shown All other files are hidden Here are the various types of files contained in the internal memory The file folder type contains and will create on the target device All All the User data in memory A SET folder Style The FAVORITE 01 12 Styles and the USER 01 03 Styles A STYLE folder inside a SET folder Sound The USER Sounds and Drum Kits A SOUND fol...

Page 234: ...Cancel to abort Warning After confirming all data of the selected type in the target folder is deleted Saving all data of a specified type In addition to the above you can save all data of a specified type by selecting the corresponding folder 1 If saving to an external device connect the device to one of the USB Host ports 2 The full content All of the internal memory is already shown Select it a...

Page 235: ... will appear in the display 6 At this point you can Touch the New SET button and create a new SET folder see Creating a new SET folder on page 232 or Select an existing SET folder and touch Save to con firm 7 A dialog box appears asking you to select one of the avail able User or Favorite User Style locations inside the folder In the above dialog box the previously selected bank of Styles will be ...

Page 236: ...ted Style will be saved to location 01 inside the bank U01 inside the selected folder 9 Touch OK to confirm or Cancel to abort Warning After confirming the same item in the target folder is deleted Creating a new SET folder Pa3X proprietary data must be saved in special folders with the SET extension These special folders can be saved inside ordi nary folders When saving you can save onto existing...

Page 237: ...ata already exists at the target location the Overwrite dialog box will appear see Overwriting existing files or folders on page 234 During Copy a dialog box shows the progress of the opera tion Copying a single file or folder You can copy a single file or folder from the root or a generic folder to a different one You can t copy single files or folders from inside a SET folder 1 If copying from o...

Page 238: ...der is not overwritten The source file or folder is not copied The procedure will continue with the other files and folders Yes The file or folder is overwritten The procedure will continue with the other files and folders Yes to All The file or folder is overwritten Any following duplicate file or folders will be overwritten as well without this dialog box appearing again The procedure will conti...

Page 239: ...button in the display to confirm format ting 4 The If you confirm all data in the media will be lost Are you sure message appears in the display Touch Yes to confirm or No to cancel Note When formatting the hard disk or an external USB device an additional warning appears to avoid accidental data loss Utility This page includes a set of backup and restore utilities Full Resources Backup This comma...

Page 240: ...case you are restoring from an external USB device con nect the device to one of the USB Host ports 2 Select the Full Restore Resources command then touch Execute The source device appears 3 If needed select a different device by using the Device pop up menu 4 Browse through the files to find the backup file 5 When the backup file BKP file is in the display select it and touch the Restore command ...

Page 241: ...Styles will be left untouched When Off you can load or save User Styles or Pads even into the Factory Style banks from POP to CONTEMP and Factory Pad banks named Hit and Sequence in the Pad Select win dow This way you customize personalize your Factory Style and Pad banks Please note that the Save All procedure always saves only the USER and FAVORITE Style banks Note This parameter is automaticall...

Page 242: ...r In this case Pa3X is the B USB device called Device or Slave while the personal computer is the A USB device called Host or Master The MEDIA LED will start blinking while the personal computer reads the internal storage memory of the Pa3X When finished the icon of the hard drive will appear among the other stor age devices connected to the computer Caveat Do not modify SET folders or you will no...

Page 243: ...it window Enter the new name then touch OK to confirm and close the Text Edit window Object s info Select this command to see the size of any selected file or folder Also the number of files and directories folders it contains are shown Note The single file size is always shown to the right of the file name in any file list Device Info Select this command to see various info on the selected device...

Page 244: ... lose data forever in case of damage You can backup your data to a personal computer and from there to a CD or DVD The internal hard drive can be backed up on a personal computer s hard drive by using the USB Device connection Do not leave a USB device connected to the USB ports while carrying the instrument or it may be damaged Keep the memory devices or the instrument away from sources of magnet...

Page 245: ...l samples and multisamples Warning Before deleting be sure to have a copy of any important data you don t want to lose 3 To exit from the Sampling mode choose the Exit from Record command from the page menu Create a new SET of samples 1 Press the MEDIA button to access the Media mode Go to the Load page 2 Open a first SET folder containing some of the PCM sam ples to merge Open the SOUND folder th...

Page 246: ...ed to say the note has been released In some case a Note On with value 0 is used instead Together with the Note On message a Velocity value is always sent This value tells the instrument how loud the note must play After Touch This message is generated by pressing on the key board after the note has been struck It usually activates vibrato or other sound parameters Pitch Bend PB You can generate t...

Page 247: ... The notes that arrive to a Global channel are used for the chord recognition of the automatic accompaniment If the SPLIT LED is turned on only the notes below the split point will be used These notes will be combined with the ones of the special Chord 1 and Chord 2 channels The Chord 1 and Chord 2 channels You can set two special Chord channels see page 212 to send to the Pa3X notes for the chord...

Page 248: ...al Protect function see Global Protect on page 237 5 To save the assigned MIDI Setup for the selected operative mode into the Global select the Write Global Style Play Setup the Write Global Song Play Setup the Write Global Player Setup or the Write Global Global Setup command from the page menu 6 If needed press one of the buttons in the MODE section to go to the desired operative mode Connecting...

Page 249: ...ort of the computer Notes generated by the computer i e a song played by its sequencer are sent through the MIDI OUT of the MIDI interface to the MIDI IN connector of the Pa3X or go from the USB port of the computer to the USB port of the Pa3X The Local Off When the Pa3X is connected to an external sequencer we rec ommend you to set the Pa3X in Local Off mode see Local Control On on page 210 to av...

Page 250: ...nder or sequencer connected Pa3X s MIDI OUT To hear only the expander s sounds you can lower the MASTER VOLUME control on the Pa3X or set the Keyboard tracks to the External status see Track Controls Mode on page 189 The Player Any Player s track can drive a channel on an external instru ment To set each track s MIDI output channel see MIDI MIDI Out Channels on page 212 To hear only the expander s...

Page 251: ......

Page 252: ...ap b from the connector c on the back of the instrument a by gently pulling it and making it turn down 2 Now locate the front d1 and the rear d2 side of the speaker box to be sure you will place it in the right way 3 Lift the speaker box d by making the back side d2 look toward you and the front side d1 toward the Pa3X Align its extruding guide e to the matching slot f on the back of the instrumen...

Page 253: ...peaker box d is perfectly aligned to the stop pers delimiters and the fixing pin j is over the corre sponding hole k on the back of the instrument a tilt down the speaker box d to make the fixing pin j enter the hole k 6 Use the SPEAKER LOCK slider l next to the display to lock or later unlock the speaker box d When the box is locked you must see the closed lock icon This will firmly join the spea...

Page 254: ...me no responsibility for any damage or injury resulting from its improper installation or use Be sure to disconnect the instrument from the AC plug before opening it To prevent your body s static electricity from damaging the board s components touch an unpainted metallic component before proceeding with the installation Installation For installation you will need a cross point screwdriver not sup...

Page 255: ...m inside the slot 5 Place the video board a over the four spacers inside the instrument and make the video connector l protrude from the back of the instrument by making it pass through the corresponding hole Attach the video card a to the four spacers by using the four previously removed screws b Connect the power cable g to the circuit board as shown in the illustration 6 Replace the cover f to ...

Page 256: ...ed cables at a store that sells television equipment 2 Turn the instrument on and press the GLOBAL button to gain access to the Global edit mode Go to the Video Inter face Video Out page and select the video standard PAL or NTSC 3 Select the Write Global Global Setup command from the page menu to save the settings in memory The Write Global Global Setup dialog box will appear Touch OK to confirm 4...

Page 257: ... you will need a cross point screwdriver not sup plied 1 From the bottom of the instrument remove the two fixing screws b and keep them apart Open the cover a to gain access to the inside of the RAM slot 2 Before removing the RAM module slide the switch d to the OFF position and remove the protective duct tape e from the RAM module c Be careful not to tear away the duct tape from the main board 3 ...

Page 258: ...le is correctly inserted If not extract it and repeat the operation 6 Place the duct tape e in the same position it was before replacing the RAM module and slide the switch d to the ON position 7 Close and secure the compartment cover a by using the two previously removed screws b ...

Page 259: ...e to disconnect the instrument from the AC plug before opening it To prevent your body s static electricity from damaging the board s components touch an unpainted metallic component before proceeding with the installation Backup Before installing or replacing the hard disk please bakup or save your User data to an USB storage device If you do not know how to do please read the relevant instructio...

Page 260: ...e the cover g to close the instrument being careful not to damage the cable by following in reversal the opening instructions 7 When the installation is finished please connect the power cord and turn the instrument on again You must now for mat the hard disk before accessing it for data storage Formatting the Hard Disk and installing the Operating System When the installation is finished you must...

Page 261: ...B storage device the Package not found dialog box appears warning you of the missing file Touch the OK button to close the dialog box If the USB storage device contains both the Pa3X_OS pkg and the Pa3X_RES pkg files the following message appears Please select the Pa3X_RES pkg file and touch OK 7 The Wait Please message appears while formatting the hard disk While the operating system file is bein...

Page 262: ...from its improper installation or use Be sure to disconnect the instrument from the AC plug before opening it To prevent your body s static electricity from damaging the board s components touch an unpainted metallic component before proceeding with the installation Installation For installation you will need a cross point screwdriver not sup plied 1 Extract the battery from its package 2 From the...

Page 263: ... the new battery g to the connector f and place it into the empty battery slot e 5 Replace the cover c to the original position Attach the cover to the bottom of the instrument by using the six fix ing screws a and the three flat head fixing screws b you had previously removed ...

Page 264: ...yright to all software included in this product is the property of Korg Inc The license agreement for this software is provided separately You must read this license agreement before you install this soft ware Your installation of this software will be taken to indicate your acceptance of this agreement Windows Installing the KORG USB MIDI Driver Please connect the Pa3X to the computer via an USB ...

Page 265: ...pkg in the KORG USB MIDI Driver folder inside the CD ROM to run the installer Install it according to the instructions appearing on screen Driver s ports After installation the following ports will be shown in you MIDI application e g sequencer among the other MIDI devices Pa3X KEYBOARD This allows for reception of MIDI messages from the Pa3X keyboard and controller s data to the MIDI application ...

Page 266: ... of the Global mode Style Play mode Style Play Selects the Style Setup page Preferences section Memory Selects the Style Preferences page Preferences sec tion Variation or Fill Selects the corresponding Style Element in the Drum Fill page Style Controls section Chord Scan either Selects the Chord Recognition parameter in the Split panel Main Page Split Selects the Key Velocity page Keyboard Ensemb...

Page 267: ...ness Decay Time 1 76 77 78 O O Vibrato Rate Depth Delay 1 98 99 O O NRPN LSB MSB 1 2 100 101 O O RPN LSB MSB 1 3 120 121 X O All sounds off Reset all controllers 1 Program Change O 0 127 O 0 127 1 True 0 127 System Exclusive O O 4 System Common Song Position X X Song Select X X Tune X X System Real Time Clock O O 5 Commands O O 5 Aux Messages Local On Off X X All Notes Off X O 123 124 Active Sense...

Page 268: ...oad the appropriate Drum Kits 226 Have the Styles or Performances been modified Load the appropriate data Styles or Performances 226 Sound does not stop Make sure that the damper switch calibration parameter is set correctly 209 The selected Style or Song cannot start Make sure that the Clock parameter is set to Internal If you are using the MIDI Clock of another device you must set the MIDI Clock...

Page 269: ...5 Is the device inserted correctly Is the write protect tab of the disk in the protect position Cannot load data from a device Is the device inserted correctly Does the device contain data compatible with the Pa3X 223 The message Over Current Condition Detected on USB port please remove the USB media appears in the display The USB device is probably defective due to a short circuit and cannot be u...

Page 270: ...50 preloaded Styles freely reconfigurable Favorite User Styles 12 Favorite banks plus 3 User banks for a total of 1200 available Style locations Arranger Tracks Eight Style tracks 4 Single Touch Settings 4 Pads and one Style Performance per Style Guitar Track Mode 2 Parallel and Fixed NTT Style Edit Style Record with Step Record Track and Event Edit functions Guitar Mode 2 Import Export SMF Patter...

Page 271: ...Inputs 3 Inputs 1 Mic XLR jack combo connector with gain control and 48V Phantom Power 2 Balanced Unbalanced Line jacks Headphone 1 Front jack connection Pedals 1 Damper 1 Assignable Footswitch Pedal EC5 Power Supply AC Universal Voltage ACCESSORIES Supplied Accessories Manual AC Power Cable Music Stand Accessory Disk OPTIONS Amplification and Speakers Pa AS Pa Amplification System for Pa3X 3 Chan...

Page 272: ...MIDI 243 Global 200 221 Write Global Setup 220 MIDI Setup 220 221 Sequencer Setup 197 Song Play Setup 159 Style Play Setup 139 Voice Processor Preset 221 Voice Processor Setup 221 Global channel 243 H Harmony track Voice Processor 157 167 196 in SongBook entries 167 MIDI channel 211 I Inputs 26 215 Intro 11 J Jukebox 148 156 K Keyboard Mode Split 17 Lock 205 L Local Off 210 245 Lower Lock 205 M Ma...

Page 273: ...it Keyboard Mode 17 Lock 205 Split Point 118 243 Standard MIDI File 141 173 243 STS See Single Touch Setting Style Ending 11 Fill 11 Intro 11 Selecting 9 105 Style Performance 111 Variation 11 Style Performance Selecting see Style Writing 139 Style Play mode 111 140 Synchro Start Stop 12 T Talk On Off 118 Tap Tempo 11 Tempo Value section 15 Touch Panel Calibration 219 Track Select 13 Tracks Drum P...

Page 274: ...270 Index ...

Page 275: ......

Page 276: ... KORG Italy 2012 All rights reserved PARTNUMBER MAN0010038 Address KORG ITALY SpA Via Cagiata 85 I 60027 Osimo An Italy Web www korg com www korg co jp www korg co uk ...

Reviews: