background image

85

Selecting elements

Pad Select window

Re

fe

rence

Performance Select page menu

Touch the page menu icon to open the menu. Touch a command
to select it. Touch anywhere in the display to close the menu
without selecting a command.

The commands are the same seen for the Style Select window’s
page menu.

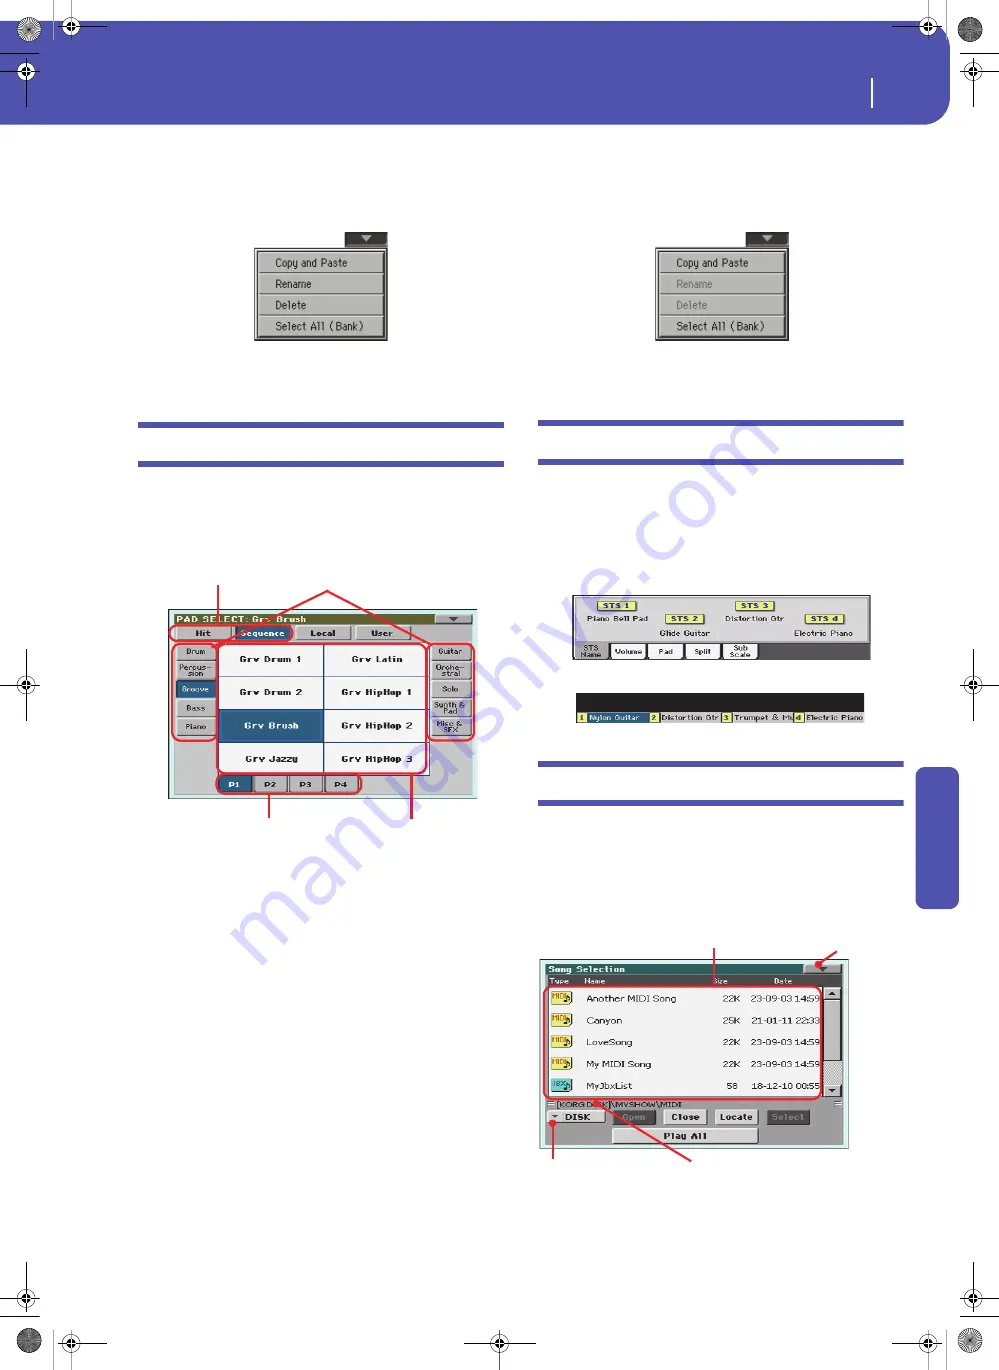
Pad Select window

Touch the Pad area whereas it appears in the display, to open the
Pad Select window.

Press  EXIT  to  exit  from  this  page  and  go  back  to  the  previous
page without selecting any Pad.

Pad sets

Selected set of Pads. 

Hit

 are single-note, pre-programmed fac-

tory Pads. 

Sequence

 are sequence-based, pre-programmed fac-

tory Pads. 

Local

 are like Factory Pads, but contain Pads

customized for the music of your Country. 

User

 can be either

single-note or sequence-based Pads, and can be user-created or
modified.

Side tabs (banks)

Use these tabs to select a bank of Pads.

Lower tabs (pages)

Use these tabs to select one of the available pages in the selected
bank. 

Pad

Touch one of these buttons in the display to select a Pad. Unless
the “Display Hold” parameter (see page page 148) is turned on,
the window automatically closes short after you select a Pad.

Pad Select page menu

Touch the page menu icon to open the menu. Touch a command
to select it. Touch anywhere in the display to close the menu
without selecting a command.

The commands are the same seen for the Style Select window’s
page menu.

STS Select

To select one of the four STS associated with the current Style or
the selected SongBook Entry, use the four STS buttons on the
control panel.

As an  alternative,  touch the STS  name tab in the  main page of
the Style Play or Song Play mode, where you can see the name of
the available STSs.

The STS’s name can also be seen in the Lyrics page:

Song Select window

This page appears when you touch the Song name in the display,
or press the SONG button in the SELECTION sections on the
control panel.

Press EXIT to exit from this page and go back to the main page
of the Song Play operating mode without selecting a Song.

While in this page, you can select a Standard MIDI File, Kara-
oke, MP3 or Jukebox file.

Side tabs (banks)

Lower tabs (pages)

Pad sets

Pads

Song path

Directory

Storage device

Page menu

Pa300 User Manual v150 (English).book  Page 85  Saturday, March 29, 2014  5:29 PM

Summary of Contents for Pa300

Page 1: ...User Manual ENGLISH OS Ver 1 5 2 E Pa300 User Manual v150 English book Page I Saturday March 29 2014 5 29 PM ...

Page 2: ...Pa300 User Manual v150 English book Page II Saturday March 29 2014 5 29 PM ...

Page 3: ...nterference in a residential installation This equipment generates uses and can radiate radio frequency energy and if not installed and used in accordance with the instructions may cause harmful interference to radio communications However there is no guarantee that interference will not occur in a particular installation If this equipment does cause harmful interference to radio or television rec...

Page 4: ...ered trademarks are the property of their respective holders Open Source notice Portions of this product s software are copyright 2007 The FreeType Project www freetype org All rights reserved Disclaimer The information contained in this manual have been carefully revised and checked through Due to our constant efforts to improve our products the specifications might differ to those in the manual ...

Page 5: ... and playing Styles 45 Selecting and playing a Style 45 Tempo 47 Intro Variation Fill Break Ending 48 Single Touch Settings STS 49 The Pads 50 Adjusting the balance between the Style and the keyboard 50 Adjusting the volume of the separate tracks 51 Turning the Style tracks on off 52 Adding harmony notes to your right hand melody with the ENSEMBLE function 53 Song Play 55 Selecting a Song to play ...

Page 6: ...rd mode Step Record page 128 Record mode Backing Sequence Quick Record page 130 Record mode Step Backing Sequence page 133 Edit menu 135 Edit page structure 135 Mixer Tuning Volume Pan 136 Mixer Tuning FX Send 136 Mixer Tuning EQ Gain 136 Mixer Tuning EQ Control 136 Mixer Tuning Tuning 137 Mixer Tuning Sub Scale 137 Effects A B FX Configuration 137 Effects Master 1 2 138 Track Controls Mode 138 Tr...

Page 7: ...unds dialog box 226 Copy Expression dialog box 227 Copy Key Range dialog box 227 Copy Chord Table dialog box 227 Overdub Step Recording window 228 Sound Edit 229 The MIDI channel 229 How to select oscillators 229 Sounds Drum Kits 229 Main page 229 Edit menu 231 Edit page structure 231 Basic Sound Basic 231 Basic OSC Basic 233 Basic Vel Key Zone 235 Basic Damper Mode 235 Basic Damper Trigger 236 Ba...

Page 8: ...trols 360 MIDI Presets 361 Installing the Korg USB MIDI Driver 362 Connecting Pa300 to a personal computer 362 KORG USB MIDI Driver system requirements 362 Please note before use 362 Windows Installing the KORG USB MIDI Driver 362 Mac OS X Installing the KORG USB MIDI Driver 363 Shortcuts 364 Troubleshooting 365 Technical specifications 366 MIDI Implementation Chart 367 Index 369 Pa300 User Manual...

Page 9: ...Pa300 User Manual v150 English book Page 5 Saturday March 29 2014 5 29 PM ...

Page 10: ...s Four Stereo Master FX with 125 effect types Final 4 band Parametric EQ Edit Sound to create and edit new Sounds Styles and Songs Over 300 Factory Styles with 4 Variations and 4 Fill In Break plus 8 Favorite and 3 User Style banks for unlimited storage of your custom Styles and settings Style and Pad Record including the enhanced Guitar Mode 2 for even more realistic guitar parts Guitar Mode 2 tr...

Page 11: ... a safety copy of your data Making a safety copy In case you like to customize your Musical Resources Sounds Performances and Styles we suggest you use the Media Utility Backup Resources command to make frequent backup copies into compact archives Also you can use the Media Save All command to save files that you can separately reload one by one Restoring a safety copy To restore a backup use the ...

Page 12: ... PHONES AUDIO OUT connector Joystick lever The joystick is on the left side of the front panel JOYSTICK This joystick triggers different functions depending on the direction it is moved towards X Move the joystick towards the left to lower the pitch or towards the right to raise it This effect is called the Pitch Bend Y Move the joystick forward to trigger Modulation Y Move the joystick backward t...

Page 13: ...al slider appears in the display for more accurate adjustment Note This does not work in the Sequencer mode Mode selection Each of these buttons recalls one of the instrument s operating modes When selected each mode excludes all the others STYLE PLAY Style Play mode where you can play Styles eight tracks of auto matic accompaniments and play up to four Keyboard tracks and four Pad tracks In the m...

Page 14: ...an area where to save data DISK KORG DISK RECORD This button sets the instrument to the Style Pad Record or Song Record mode depending on the current operating mode Accompaniment Memory Manual Bass These buttons let you turn all Accompaniment tracks on off decide what should remain in memory and how to play the bass ACCOMP Accompaniment In Style Play and Sequencer Backing Sequence mode use this bu...

Page 15: ...ocations to temporarily load new Styles from an external device Favorite locations too can be used to load new Styles from an external device but in addition you can edit the names of these Style banks so that you can create a custom set of Styles By keeping this button pressed for about one second the Write Current Style Settings dialog box will appear SOUND Use this button to open the Sound Sele...

Page 16: ...stop running with an Ending Press them twice LED blinking to let them play in loop and select any other Style element Intro Variation to exit the loop Style Controls Use these buttons to start stop the accompaniment START STOP Starts or stops the Style You can reset all frozen notes and controllers on the Pa300 and any instrument connected to its MIDI OUT or the USB Device port by using the Panic ...

Page 17: ...omati cally configure Keyboard tracks and effects at the touch of a fin ger By keeping one of these buttons pressed for about one sec ond the Write Single Touch Setting dialog box will appear Note STS contained inside Factory Styles are usually write pro tected unless you uncheck the Factory Style and Pad Protect option in the Global Mode Preferences Media page Player Controls Pa300 is equipped wi...

Page 18: ...in the Style or Standard MIDI File With MP3 files the original speed of the file is recalled value reset to 0 TEMPO LOCK This button turns the Tempo Lock function on or off On When you select a different Style or Performance or select a different Song the Tempo will not change You can still manually change it by using the TEMPO buttons or select the Tempo value and change it by using the VALUE dia...

Page 19: ...he MENU button By keeping one of these buttons pressed for about one sec ond the Write Performance dialog box will appear Transpose Section Use these buttons to transpose the Sounds of the single tracks or the instrument as a whole UPPER OCTAVE Use these buttons to transpose the Upper tracks in steps of one whole octave 12 semi tones max 3 octaves The octave transposi tion value is always shown in...

Page 20: ...nstrument can be dangerous To completely disconnect the instrument from the power unplug the power plug from the power socket on the wall Note To avoid wasting power Pa300 will by default automatically enter standby mode after two hours of non active use playing pressing buttons or using the touch screen Please save your data Performances Styles Songs and so on before taking a prolonged pause You ...

Page 21: ... audio signal sound to a mixer a PA system a set of powered moni tors or your hi fi system You can select the type of connection by using the Level parameter in the Global Audio EQ MP3 Out put page see page 161 When the Headphone option is assigned to the Level parame ter you can connect headphones You can use headphones with an impedance of 16 200 Ohms 50 Ohms suggested When the Line Out option i...

Page 22: ...riation is a slightly different version of the others As you progress from Variation one to Variation four the arrangements will become more complex and more parts Tracks may be added This allows your performance to have a more dynamic arrangement without losing the original feel of the Style Fill in Break During a performance a drummer may often perform a fill such as when transitioning from a ve...

Page 23: ... can be a big help in getting a song recorded quickly The sequencer can also behave as a tradi tional 16 track linear sequencer where each track is recorded individually one at a time Player The Player lets you playback your performances or any Standard MIDI File or MP3 file The LOGO decoder On the front panel of your Pa300 you have probably noticed a series of logos and may have even wondered wha...

Page 24: ...wer area of the display Overlapping windows Several windows like the Style Select or Pad Select the Global the Media or the Lyrics overlap the current window After you select an item in the window or press the EXIT button the win dow closes and the underlying page is shown again The fol lowing example is the Sound Select window Dialog boxes Similar to selecting windows dialog boxes overlap the und...

Page 25: ... Play and Sequencer modes Editable names When the Text Edit button appears next to a name touch it to open the Text Edit window and edit the name The virtual keyboard works exactly as a personal computer s keyboard Some of the symbols are context sensitive and only appear when they can actually be used Lists and scrollbars Files on storage media as well as other kinds of data are shown as lists Us...

Page 26: ... overlap the current operating mode that remains active in the background The Song Record mode can be accessed from the Sequencer mode and allows for creating new Songs Selected highlighted items Any operation on parameters data or list entries is executed on highlighted items First select the parameter or item then exe cute the operation Non available grayed out parameters When a parameter or com...

Page 27: ...ning the Easy Mode on Touch the little rectangle on the top right corner of the display to open the page menu Touch the Easy Mode menu item to make the checkmark appear At this point the Easy Mode has been activated and the ele ments in the display appear less crowded Turning the Easy Mode off Reverse the above operation when you want to deactivate the Easy Mode Easy Mode The page menu Pa300 User ...

Page 28: ...e heard See page 35 Sounds assigned to the right hand UP1 to UP3 and to the left hand LOW Touch the Sound s name to open the Sound Select window and choose a different Sound Style name and info Touch the Style s name to open the Style Select window and choose a different Style Tempo Use the TEMPO buttons to change it Length of the accompaniment pat tern and current beat Performance or STS Touch it...

Page 29: ...d cannot be heard If the icon does not appear the Sound is in play and can be heard See page 35 Sounds assigned to the right hand UP1 to UP3 and to the left hand LOW Touch the Sound s name to open the Sound Select window and choose a different Sound Song assigned to the Player Touch it to open the Song Select window and choose a different Song Tempo Use the TEMPO buttons to change it Meter or Time...

Page 30: ...26 Easy Mode The Song Play page in detail Pa300 User Manual v150 English book Page 26 Saturday March 29 2014 5 29 PM ...

Page 31: ...Pa300 User Manual v150 English book Page 27 Saturday March 29 2014 5 29 PM ...

Page 32: ...strument on a welcome screen is shown for some seconds then the main display appears 2 When you want to put Pa300 to standby keep the POWER button pressed for about one second and release it when the screen appears dimmed After having pressed the POWER button the display brightness will be dimmed At this point the shutdown procedure will begin and last for a few seconds Please do not disconnect th...

Page 33: ...e not pressed 1 Connect the Damper pedal to the PEDAL DAMPER connector on the back of the instru ment 2 Press the GLOBAL button to access the Global mode Global mode is where you can set some global parameters like this one or the Master Tuning These settings are not tied to any specific operative mode so they are programmed in these sep arate pages 3 Touch the Controllers button to access the Con...

Page 34: ...ation button to make the Damper Pedal Footswitch Calibration dialog box appear 7 Fully press the Damper pedal down and while continuing to press touch the Push button to confirm the maximum value 8 When the following dialog box appears release the pedal 9 Touch the Push button in the display to confirm the minimum value Check if the pedal is working properly In case it isn t repeat the procedure 1...

Page 35: ...the STYLE PLAY and SONG PLAY buttons together The LED of the two buttons will start blinking Pa300 will be set in Demo mode At this point if no other button is pressed a selection of the best Demo Songs will be played back 2 In case you want to listen to a specified Demo Song select one of the available options on the display Full Songs Solo Instruments Styles Playing the Demo Demo buttons Pa300 U...

Page 36: ...d stopping the Demo 3 Choose one of the Demo To stop it touch the STOP button on the display 4 Exit from the Demo mode by pressing any one of the MODE buttons Pa300 User Manual v150 English book Page 32 Saturday March 29 2014 5 29 PM ...

Page 37: ...e also page 35 for how to mute tracks 2 If you want to play the Sound on the whole keyboard be sure the keyboard is in Full Upper mode i e the SPLIT LED is turned off If it is split in two parts press the SPLIT button to turn its LED off Playing Sounds Performance section Split button Sound Select button i A selected track is shown with a white back ground In this example the Upper 1 track is sele...

Page 38: ... case press the EXIT but ton only if you don t make any selection but want to close the window i The selected Sound is highlighted Touch a Sound s name to select it Touch one of the side tabs to select a different Sound bank Touch one of the lower tabs to select a different Sound page A Previous and Next Page pair of button may appear in this area when more than six pages are available As an alter...

Page 39: ...n appears in the Upper 2 and Upper 3 status boxes These tracks will not be heard After touching in this area the icon disappears The Upper 2 track will be set to play and will be heard Note how the Dark Pad Sound assigned to the Upper 2 track has been layered with the Grand Piano RX assigned to the Upper 1 track As above after touch ing in this area the icon disap pears The Upper 3 track will be s...

Page 40: ... 8 Play the keyboard Note how the Strings Ens 2 GM Sound assigned to the Upper 3 track has been muted again Only tracks Upper 1 and Upper 2 can be heard at this time Note how the Dark Pad Sound assigned to the Upper 2 track has been muted again Only track Upper 1 can be heard at this time Pa300 User Manual v150 English book Page 36 Saturday March 29 2014 5 29 PM ...

Page 41: ... and split the keyboard in the Lower left hand and Upper right hand parts 2 Be sure the Lower track is set to play 3 Play the keyboard Lower Upper If the Lower track is muted touch its icon to make it disappear from this area If the Bass Lower Backing function is turned on and the Style is not running the Lower track will always play Note how the keyboard is split in two parts each playing differe...

Page 42: ...the full keyboard playing mode by pressing the SPLIT button to turn its LED off 5 Play the keyboard Full Upper Note how the keyboard once again plays the Upper tracks over the entire length of the keyboard Upper Pa300 User Manual v150 English book Page 38 Saturday March 29 2014 5 29 PM ...

Page 43: ...ouch the Split Point parameter to select it and use the VALUE dial to select the new split point When you change the split point the Global parameter is automatically unchecked This is because you are setting a local or temporary split point and not the global one used across the whole instrument To change the global split point go to the Global Mode Preferences Style page and set the Split Point ...

Page 44: ... all Upper tracks at the same time Note The Octave Trans pose value for each of the keyboard track is shown under the Sound s name 2 Press both UPPER OCTAVE buttons together to reset the octave to the value saved in the current Performance i Each time you press this button the pitch will be lowered by one octave Each time you press this button the pitch will be raised by one octave Pa300 User Manu...

Page 45: ...TS Four STSs are supplied with each Style or SongBook Entry and can be selected with the four dedicated buttons under the display Please note that settings saved in the My Setting Performance are automatically selected when the instrument is turned on exit from standby This means you can save your preferred startup settings to this Performance see below for more information Selecting a Performance...

Page 46: ...can access by pressing the MENU button while in Style Play and Song Play mode can be saved into a single Per formance to be quickly recalled at a later time Hint To open the Write Performance dialog box you can also choose the Write Performance command you can find in the page menu 1 Keep one of the PERFORMANCE buttons pressed for about one second to open the Write Performance dialog box After pre...

Page 47: ...ake a backup of all your important data Touch the Text Edit symbol to open the Text Edit dialog box Use the alphabetic characters to enter text Use the and buttons or the DIAL to move the cursor Touch the Shift key to switch between capitals and small characters Touch the Backspace symbol to delete just a single character Clear to delete the whole string When done touch OK to confirm the new name ...

Page 48: ...e changes to the Sounds transposition or other parameters you can return to the startup situation by pressing the MY SETTING button in the control panel Press the MY SETTING button to recall the startup settings Saving the startup parameters into the My Setting Performance You can save the startup settings Sounds and other settings including most of the settings on the control panel and the select...

Page 49: ...to the STS buttons Selecting a Style also selects the four Pads it contains Pads are single sounds or single track patterns that can be triggered with the dedicated PAD buttons Use the Style controls to start or stop the Style Selecting and playing a Style 1 Touch the Style area in the display The Style Select window appears Hint You can also open the Style Select window by pressing the STYLE butt...

Page 50: ... Style 5 Play the keyboard Note The chord scan area depends on the status of the SPLIT LED and the Chord Recognition parameter see Global Mode Preferences Style 6 Press START STOP to stop the Style After pressing the EXIT button the Style Select window closes and the main screen appears again with the selected Style ready to go For the accompaniment tracks to play the LED of this button meaning Ac...

Page 51: ...e the TEMPO or buttons to change the Tempo value Press the TEMPO and buttons together to recall the saved Tempo value As an alternative keep the SHIFT button pressed and use the VALUE dial to change the Tempo The selected tempo will be shown in a small window If you like to keep the currently selected Tempo value unchanged turn on the LED of the TEMPO LOCK button When the Tempo Lock function is tu...

Page 52: ... buttons to set the corresponding Intro to play 3 Play the keyboard 4 Be sure the LED of the AUTO FILL button is turned on When the Auto Fill function is turned on a Fill is automatically performed before switching to a different variation 5 While playing press one of the VARIATION buttons to select a different variation of the basic pattern If you turned the Auto Fill function on in the previous ...

Page 53: ...ery similar to Performances but they are fine tuned to the Style they are associ ated to 1 In case it is not shown touch the STS Name tab to see the STS Name panel 2 Press one of the four STS buttons under the display or touch the name of an STS in the STS panel in the display 3 Play the keyboard 4 Try all the other STSs and see how settings change with each of them When the Ending is fin ished th...

Page 54: ...uitar arpeggio press the same PAD button again to stop it 4 Select a different Style and see how the sounds or patterns assigned to the PADS change 5 Press more PAD buttons at once to play two or more sounds or patterns at the same time 6 Press STOP to stop all the Pads at the same time Adjusting the balance between the Style and the keyboard Balancing between the Keyboard and Style tracks may be ...

Page 55: ...display to adjust each Keyboard track s volume 3 To separately adjust each Style track press the TRACK SELECT button to change the track s view Hint As an alternative you can change each track s volume by touching a track s area to select it then using the VALUE dial to change the volume 4 To return to the Keyboard Tracks view press the TRACK SELECT button again i In Style view all separate Style ...

Page 56: ... the Play button to set the track to Mute Hint To turn all Accom paniment tracks including the Bass track off while you are not in the Main page press the ACCOMP button on the control panel to turn its LED off 3 To set the tracks back to the Play status touch the Mute icon on the muted track 4 To mute unmute each single Style track first press TRACK SELECT to switch to the Style Tracks view then r...

Page 57: ...gle notes in the right hand 4 To select a different harmonization style keep the SHIFT button pressed and press the ENSEMBLE button to open the Ensemble page This is a fast shortcut to recall this page The longer procedure would have consisted in access ing the Edit mode by pressing the MENU button touching the Keyboard Ensemble section and then going to the Ensemble page Notice how the right hand...

Page 58: ...ype has been selected press the EXIT button to go back to the main page 6 Press the ENSEMBLE button again to turn its LED off The automatic harmonization will be turned off While in an Edit page press EXIT to go back to the Main page of the cur rent operating mode Pa300 User Manual v150 English book Page 54 Saturday March 29 2014 5 29 PM ...

Page 59: ...yrics and chords with Standard MIDI Files and Karaoke files you can also see the score in traditional notation Selecting a Song to play 1 Press the SONG PLAY button to switch to the Song Play mode Hint In Style Play mode you can pre select the Song to be assigned to the Player This way you will be ready to start it as soon as you switch to Song Play mode Song Play Player controls The SONG PLAY but...

Page 60: ...will automatically close the Song Select window i The selected Song is high lighted Touch a Song s name to select it Use the scroll bar or the VALUE DIAL to see all the Songs in the list Keep SHIFT pressed and touch the Up Down arrow to jump to the next previous alphabetic section Use the Open and Close buttons to browse through the folders Use the Device pop up menu to select one of the available...

Page 61: ...of the Song is reached After pressing the START STOP button the but ton s LED turns on and the measure counter begins to show the current measure number Press the REWIND button once to go back Keep it pressed to go back more Press the FAST FORWARD button once to go for ward Keep it pressed to go forward more Press the START STOP button to stop the Song at the current position Press it again to res...

Page 62: ...he Virtual Sliders on the display to adjust each track s volume Use the TRACK SELECT button to cycle between track groups 3 In Normal view you can adjust each Keyboard track s volume Hint As an alternative you can change each track s volume by touching a track s area to select it then using the VALUE dial to change the volume Use the TRACK SELECT button to cycle between differ ent groups of tracks...

Page 63: ...SELECT again to return to the Normal view Keyboard tracks 7 Press the START STOP button to start the Song 8 While listening to the Song switch from Normal view to Track 1 8 and Track 9 16 view to see which tracks are playing To see if a track is playing look at the label with its name and see if it is changing color i In Track 1 8 view the first 8 tracks of the selected Song are shown In Track 9 1...

Page 64: ...ying back a Standard MIDI File you may wish to mute one or more tracks for example to sing along with the Song or play an instrumental part live on the keyboard To mute unmute Song tracks you simply touch the Play Mute icon in the Volume panel Selected track Assigned Sound Touch it to open the Sound Select window Sound bank Program Change Octave Transpose Sound bank icons Touch to open the Sound S...

Page 65: ...FT button pressed and touch the track you want to listen to in Solo mode 2 To set all tracks back to the Play status keep the SHIFT button pressed again and touch the track that is currently in Solo mode Please remember that you can also use the Solo function in Style Play and Sequencer mode The Solo command can also be selected from the page menu Pa300 User Manual v150 English book Page 61 Saturd...

Page 66: ...gBook as well as edit the existing ones Korg already supplies some hundred Entries as standard Furthermore the SongBook allows you to create various custom lists that may suit your different types of show Selecting the desired Entry from the Main List A large database is already included with the instrument and you can later customize it You may browse through this database in a variety of ways 1 ...

Page 67: ... four Pads will also be recalled Any TXT file associated with the Entry can be seen in the Lyrics page The selected Style MID KAR or MP3 file will be shown in the top area of the screen Displaying Artist or Genre For space matters either the Genre or Artist column can be seen in the display You cannot see both at the same time 1 Touch the page menu icon to open the page menu Note The Artist and Ke...

Page 68: ...order changes between ascending and descending Searching for Entries The SongBook database may be really huge You can however look for say specific artists or song titles using the filtering functions 1 Touch the Filter button in the display to open the Filter dialog box Touch the Name label to alphabetically reorder the names in the list Available search criteria Genre and Artist are both consid ...

Page 69: ... OK in the display and close the Text Edit dialog box The entered text is now the search criteria 4 Touch OK to close the Filter dialog box and return to the SongBook page Once the Filter dialog box has been closed by touching OK the Filtered check box is automati cally checked and the filter is activated Only Entries matching the entered criterion are seen in the Main List 5 To see the whole Song...

Page 70: ... by selecting different Sounds and Effects or editing any other relevant parameter Please note that changes to Standard MIDI File tracks will not be saved as SongBook data Only the data included in the Standard MIDI File will be used 4 When ready keep the SONGBOOK button pressed for about one second to create a new SongBook Entry with the current settings 5 Touch the Text Edit button to assign a n...

Page 71: ...next to the field s you want to edit Set all the other parameters You can write the Genre and Artist name Select the Meter Time Signature and Key of the Song You can specify a Tempo value matching the Song s Tempo by using the TEMPO controls and a Master Transpose value by using the TRANSPOSE controls on the control panel Name of the Entry Name of the Style or Song file linked to the Entry If chec...

Page 72: ...age This text will be seen in the same way of ordinary Lyrics in the display Synchro for Style and Memory for Style and Songs On Off status Entry s name By default it is the same name of the associated Style Stan dard MIDI File of MP3 file The name can be up to 16 characters long Select Rename Overwrite to replace an existing Entry This option is automati cally selected when editing an existing En...

Page 73: ...o open the List Edit page and touch the New List button to create a new blank list 3 Touch the Book tab to open the Book page and see the full database Use the various sorting searching and filtering options seen above to find the Entries you are looking for Touch the Add to List button when the desired Entry has been selected After you check the Enable List Edit item the List Edit page becomes av...

Page 74: ...selected Entry Touch New List to create a new Custom List Touch Del List to delete the current Custom List Warning Del List will delete the current Custom List Touch Write to save the current Custom List Select an Entry to be edited from the list List name Scrollbar Touch the Text Edit symbol to open the Text Edit dialog box Use alphabetic char acters to enter text Use the arrows or the VALUE DIAL...

Page 75: ...e Select button in the display to confirm selection the selected Entry turns green Press the PLAY button to start playing back the selected Song Use the List pop up menu to select one of the available Custom Lists Touch Next to select the next Entry in the list This command can also be assigned to a foot switch Touch Select to set the highlighted Entry to play if different than the one auto matica...

Page 76: ...Style and Sounds with which to record your Song 1 Select a Style with which you want to record 2 Select the Sounds by choosing a Performance or STS That s all You are ready to access Record mode Accessing the Backing Sequence Quick Record mode 1 Press the SEQUENCER button to switch to the Sequencer mode Recording a new Song Standard MIDI File Style Controls Style Elements Player controls SEQUENCER...

Page 77: ...t dialog box 3 Select the Backing Sequence Quick Record option and touch OK to enter the Backing Sequence Record mode Press the RECORD button to open the Song Record Mode Select dialog box After having chosen the Backing Sequence Quick Record option the Backing Sequence Record page appears Pa300 User Manual v150 English book Page 73 Saturday March 29 2014 5 29 PM ...

Page 78: ...ANCE controls Touch the Style parame ter or the STYLE button to open the Style Select window and select a dif ferent Style Track s status Rec means they are ready to record Play means they are recorded and you can hear them Mute means they cannot be heard Measure counter The negative number 1 is the precount after which you can start recording Style s Tempo Change it if you like Grouped tracks Dur...

Page 79: ...AYER section to listen to the recorded Song The Backing Sequence Song has been converted to an ordinary Song in Standard MIDI File or MID format If you like it you can save it You can then read it in Song Play mode or transfer it to any external sequencer 6 If you want to edit the Song press MENU to access Edit mode After pressing the START STOP button the main page of the Sequencer mode will appe...

Page 80: ...and the Ch Acc track to Play 3 Press the START STOP button to start recording the selected track With the above example chords will play as recorded you can record what you play on the key board and the Pads 4 Repeat the recording procedure and press the START STOP button in the PLAYER section to stop recording and return to the main page of the Sequencer mode 5 While in the main page of the Seque...

Page 81: ... page appears If a Song is selected highlighted it will be overwritten If no Song is selected a new Song file will be cre ated on the target device To deselect a Song select the same storage device again Use the scroll bar to see all Songs in the list Keep SHIFT pressed and touch the Up Down arrow to scroll to the next pre vious alphabetic section As an alterna tive you can use the VALUE DIAL Use ...

Page 82: ...types of data Styles Songs Lyrics There are some pages where the Search function is not available since there are no relevant data to search for that page for example the pages of the Global mode Here is the general procedure 1 Press the SEARCH button to open the Search window 2 If needed touch the Type pop up menu and choose the type of item you are looking for When choosing Files Songs or Lyrics...

Page 83: ...his window and carry on other operations The search will continue in the back ground After you have touched the Search button its name changes to Stop If needed touch this button to stop the ongoing search The name of the button reverts to Search Any file found will remain in the display until you do a new search The time needed to complete a search depends on the size of the device s and the numb...

Page 84: ...T or SEARCH but ton Notes about searching Wildcards During search the string entered will be search as a whole word or as part of a word For example if you entered love Pa300 will find Love and LoveSong or any other word containing the string love You can use the wildcards any single character and any sequence of characters to search exactly that string For example love will find MyLove but not Lo...

Page 85: ...Pa300 User Manual v150 English book Page 81 Saturday March 29 2014 5 29 PM ...

Page 86: ...select it Touch anywhere in the display to close the menu without selecting a command Copy and Paste Use this command to copy the selected Style to a different selec tion 1 Select the Style to be copied To select more items keep the SHIFT button pressed and touch all the item to be selected for copying Hint You can deselect one of the selected items by touching it while still keeping the SHIFT but...

Page 87: ...abs to select one of the available pages in the selected bank Previous Next tabs Scroll the lower tabs to the left or the right when additional tabs are available but cannot be seen in the display Sounds Touch one of these buttons in the display to select a Sound Unless the Display Hold parameter see page 148 is turned on the window automatically closes shortly after you select a Sound Program Cha...

Page 88: ... PERFORMANCE buttons The latest selected Performance for that bank will be selected Side tabs banks Use these tabs to select a bank of Performance Each tab corre sponds to one of the PERFORMANCE buttons on the control panel Lower tabs pages Use these tabs to select one of the available pages in the selected bank If you press again the same PERFORMANCE button on the con trol panel the next page in ...

Page 89: ...Display Hold parameter see page page 148 is turned on the window automatically closes short after you select a Pad Pad Select page menu Touch the page menu icon to open the menu Touch a command to select it Touch anywhere in the display to close the menu without selecting a command The commands are the same seen for the Style Select window s page menu STS Select To select one of the four STS assoc...

Page 90: ...ng is already playing it stops and the new Song is ready to play You will return to the main page Play All When you touch this button all Standard MIDI Files and MP3 files contained in the current directory are added to a new Juke box list that is automatically assigned to the Player The order in which they are played depends on the current sorting method i e how the files are shown in the display...

Page 91: ...the target it will be overwritten without waiting for any confirmation A file containing the list of all valid files contained into the root of the disk will generate a Root txt file The list will include the progressive number assigned to each Song the file names the total number of files in the list To correctly display and print the list on a personal computer use a fixed size i e non proportio...

Page 92: ...cludes four Pads Each time you select a Style the four Pads it contains are assigned to the four PAD buttons The Style and the Pads will play using the same Tempo value Master Volume and Balance While the MASTER VOLUME knob controls the general vol ume of the instrument you can use the BALANCE knob to bal ance the Style s Accompaniment and Pad tracks against the Keyboard tracks Factory Favorite an...

Page 93: ... are recognized by using the Chord Recognition parameter in the Global Style page see page 152 Page menu icon Touch the page menu icon to open the menu See Page menu on page 108 for more information Style area This is where the Style name is shown together with its Tempo and Meter Time Signature parameters Style name Currently selected Style Touch the Style name or press the STYLE button in the SE...

Page 94: ...pressing the SOUND button in the SELECTION section on the control panel For more information about the Sound Select window see Sound Select window on page 83 Keyboard track octave transpose Non editable Octave transpose of the corresponding track To individually edit the octave transpose for each track go to the Mixer Tuning Tuning edit page see page 98 You can also transpose all Upper tracks by u...

Page 95: ...s in the display You can also change the volume by touching a track s slider then using the VALUE DIAL Changing the Play Mute status Play mute status of the current track Select the track then touch this area to change its status Play status The track can be heard Mute status The track cannot be heard Saving the track s volume and play mute status Each set of tracks can be saved into a different m...

Page 96: ... or Style Settings or the ones saved in each Style Element Note When assigning a Sound to a Style track the Original Style Sounds parameter is automatically turned off to allow its use Note This parameter can be saved with the Performance or Style Settings On Style tracks always use the original Sounds recorded inside each Style Element If you assign a different Sound to a Style track this paramet...

Page 97: ... Sound belongs to Touch an icon a first time to select the corresponding track detailed information are shown on the Selected Track Info area see above Touch it a second time to open the Sound Select win dow Pad panel Touch the Pad tab to select this panel This is where you can assign a different Hit or Sequence Pad to each of the four pads and see at a glance how pads are programmed For more opti...

Page 98: ...TSs On You are editing the global split point The global split point is considered when selecting a Perfor mance or STS that does not contain a local split point Off You are editing the local split point memorized in the current Performance or STS Bass Inversion Use this parameter to turn the Bass Inversion function on or off On The lowest note of a chord played in inverted form will always be det...

Page 99: ... icon to open the page menu see Page menu on page 108 Parameters area Each page contains various parameters Use the tabs to select one of the available pages For detailed information on the vari ous types of parameters see sections starting below Tabs Use tabs to select one of the edit pages of the current edit section Mixer Tuning Volume Pan This page lets you set the volume and pan for each of t...

Page 100: ...s A B FX Configuration on page 100 This page lets you set the level of the track s signal going to the Master FX processors The Master FX processors are connected in parallel with the dry direct signal so you can decide the amount of direct signal that will be sent to the Master FX proces sors In case you do not want to hear the direct signal just set the Dry parameter to Off see Dry above You can...

Page 101: ...age Use the TRACK SELECT button to switch from the Keyboard to the Style tracks and vice versa Reset All Tracks button Touch this button to reset i e flatten equalization for all tracks both Keyboard and Style tracks Track Reset buttons Use these buttons to reset i e flatten equalization for the cor responding track Bypass Check any of these checkboxes to bypass the equalization for the correspond...

Page 102: ...cks play in the Equal tuning This page is where you can program the sub scale for the selected tracks a different sub scale can be associated to each Performance or STS Track selection is general and can be done with the Scale Mode parameter of the Global Mode Prefer ences Style page see page 153 The remaining tracks will use the basic scale set in the Global Tuning Scale page see Main Scale on pa...

Page 103: ...r scale When the User scale is selected the keyboard diagram becomes active You can then change each note tuning in cents of a semi tone within a range of 99 cents referred to Equal tuning This way you can create a custom scale that you can save to a Perfor mance or STS After having selected the User scale touch a note in the key board diagram and use VALUE DIAL to adjust the selected note tuning ...

Page 104: ...Notes you pressed on step 2 are now lowered of a quarter tone 4 Reset the original scale Press and release the Quarter Tone pedal again without playing any note All pitches will be reset and the scale selected by the Performance or STS will be recalled Effects A B FX Configuration This page allows you to select the A Style and Pads and B Key board groups of effects Please use the FX A and FX B sid...

Page 105: ... for each track Int Ext Internal External Internal The track plays the sounds generated by the internal sound engine It does not play an exter nal hardware or software instrument connected to the USB Device port External The track plays an external hardware or soft ware instrument connected to the USB Device port The connected device must receive on the MIDI channel associated with this track on t...

Page 106: ... s play mute status Play status The track can be heard Mute status The track cannot be heard Track Controls Drum Edit In this page you can adjust the volume and edit the main param eters for each family of Drum and Percussion instrument for the selected track A list of families is shown below These parameters can be accessed only on tracks set to the Drum mode see above Use them on tracks with a D...

Page 107: ...o the other tracks during editing Note All values are offsets referred to the value of the original Sound Easy Sound Edit parameters Use these knobs to adjust the offset value 64 0 63 Offset value 0 means no change to the original value memorized in the Sound while any other value means a decrease or increase to the original value Portamento knob and switch Use the Time knob to adjust the speed of...

Page 108: ...toff value Keyboard Ensemble Key Velocity Range This page lets you program a key and dynamic velocity range for each of the Keyboard tracks Key range is useful to create a set of Keyboard tracks playing in different zones of the keyboard For example you may have French Horns and Woodwinds playing in the center range of the keyboard while only Woodwinds play on the higher range Velocity range is us...

Page 109: ...e or more notes are played only the last two are trilled You can set the trill speed by using the Tempo parameter see below Repeat The played note is repeated in sync with the Tempo parameter see below When playing a chord only the last note is repeated Echo As the Repeat option but with the repeated notes fading away after the time set with the Feedback parameter see below AutoSplit1 If more than...

Page 110: ...e 155 You can only assign this function to a volume type pedal not to a switch type one Assign the KB Expression option to the pedal Play Mute icon Track s play mute status Play status The track can be heard Mute status The track cannot be heard Pads Pad This page lets you select a different hit sound or sequence for each of the four PAD buttons Assignments can be saved into the current Style Sett...

Page 111: ...e Keyboard Range included in each Style tracks Keyboard Range On Off This parameter is an on off switch for the Key Range parameter memorized inside each Style Element track On The Keyboard Range is considered see Style Element Track Controls Keyboard Range on page 218 in Style Record mode When a track goes over the lower or higher Keyboard Range point it is automatically transposed to stay in the...

Page 112: ... copy a single effect Master 1 Master 2 or both effects of an FX group A or B You can copy them between different elements for example between Styles and Performances or STSs and Songs Note This operation only copies the parameters of the Effects section Parameters contained in other sections like Dry or FX Send are not copied Please note that these parameters are rele vant in the overall sound of...

Page 113: ...you cannot write an STS over a Factory Style The Write Single Touch Setting command in the page menu is greyed out and cannot be selected All original settings of the Factory Styles will be left untouched Name Name of the STS to be saved Touch the Text Edit button next to the name to open the Text Edit window Current Style Non editable Settings are saved in one of the four STSs belong ing to the c...

Page 114: ...the Copy Paste operations While in Style Record mode you can write the new or edited Style in the Favorite banks as an alternative to the User Style banks See the Style Record chapter for more information on saving a Style While in Media mode you can load any Style into the Favorite banks as an alternative to the User Style banks See the Media chapter for more information on the Load operations Re...

Page 115: ...st the Keyboard tracks Track parameters Changes to Keyboard tracks can be saved to a Performance You can then recall different settings by just selecting a single Perfor mance Settings for Song tracks like Pan Volume and FX Sends depend on each individual Standard MIDI File Changes to Song tracks made in Song Play mode cannot be saved to a Standard MIDI File and are only intended for realtime cont...

Page 116: ... tracks can be seen by touching the Volume tab To switch between Keyboard tracks Normal view and Song tracks Song Tracks views use the TRACK SELECT button Pressed a first time you will see tracks 1 8 a second press will show tracks 9 16 pressed again will go back to Keyboard tracks Page header This line shows the current operating mode transposition and recognized chord Operating mode name Name of...

Page 117: ... be ready to play To select a Song you can also press the SONG button in the SELECTION section of the control panel Press it a second time to select a Song by dialing in its ID number see Selecting a Song by its ID number on page 86 Meter This parameter only appears when a Standard MIDI File or Kara oke file has been selected Current Song s meter time signature Measure number This parameter only a...

Page 118: ...r more information about the Sound Select window see Sound Select window on page 83 Keyboard track octave transpose Non editable Octave transpose of the corresponding track To individually edit the octave transpose for each track go to the Mixer Tuning Tuning edit page of the Song Play mode see Mixer Tuning Tuning on page 98 for more details You can also transpose all Upper tracks by using the UPP...

Page 119: ...eaving the track status unchanged even when playing a different Standard MIDI File You can leave for exam ple the bass track in mute and let your bassist play it live for the whole show However an exception to the above is when reading a Standard MIDI File created with a Pa Series instrument These files do include special commands to force the Play Mute status of each track Track names Under the s...

Page 120: ... again Song list Use this list to browse through the Songs in the Jukebox list Use the scrollbar to scroll the list Selected Song Name of the Song currently in play You can select a different Song from the list and touch the Select button in the display to select it for playback Select button Touch this button to select the Song highlighted in the list and assign it to the player If a Song is alre...

Page 121: ... selecting a Song created on a Pa Series instrument Use the TRACK SELECT button to switch from the Keyboard to the Song tracks and vice versa Parameters The parameters shown in this page are the same already seen for the Style Play mode See Mixer Tuning Volume Pan on page 95 for details Mixer Tuning FX Send Pa300 is equipped with two groups of effect processors A and B In Song Play mode these grou...

Page 122: ...encer page see Save Trk FX on page 154 This will help adapting the Pa300 s sound to personal taste for any Standard MIDI File you will ever play excluding those saved by a Pa Series instrument that may override the general preferences Need a lighter Bass track Save the right equalization and the Bass will stay light with all the subsequent Songs Parameters The parameters shown in this page are the...

Page 123: ...th a MIDI message generated by an inter nal physical controller or a MIDI message coming from a Song track Effects Master 1 2 These pages contain the editing parameters for the effect proces sors Here is an example of the FX A page with the Reverb Hall effect assigned Parameters The parameters shown in this page are the same already seen for the Style Play mode See Effects Master 1 2 on page 101 f...

Page 124: ...button You can play a Jukebox file by assigning it to the Player after having selected it in the Song Select page just as if it was an ordinary Song see Jukebox panel on page 116 In this page you can create edit and save a Jukebox file A Juke box list can contain Standard MIDI Files Karaoke files and MP3 files If a Jukebox file is already selected you will enter this page with that file ready to b...

Page 125: ...t is selected Select this com mand to save the current Jukebox list as a text file to a storage device Here is how it works 1 While a Jukebox file is assigned to the player select the Export Jukebox List command from the page menu 2 A dialog box will appear asking you to select either the internal memory or a storage device connected to the USB Host port 3 Select an option and touch OK to confirm ...

Page 126: ... touch one of the tracks to solo it Do the same on a soloed track to deactivate the Solo function Copy Paste FX Use this command to copy a single effect or both effects of an FX group A or B See Copy Paste FX on page 108 for detailed instructions Easy Mode Easy Mode allows you to use the Style Play and Song Play modes with an easier to use user interface It is recommended to begin ners and to prof...

Page 127: ...iles Sequencer Play Main page Press the SEQUENCER button to access this page from another operating mode In this page you can load a Song and play it back using the PLAYER transport controls Note When switching from Style Play to Sequencer mode the Sequencer Setup is automatically selected and various track parameters may change To return to this page from any of the Sequencer edit pages press the...

Page 128: ...mpo mode Use this menu to select the Tempo change mode Manual In this mode you can change Tempo by using the TEMPO buttons The Song will be played back using the manually selected tempo Auto Tempo recorded in the Song will be used Selected track info area This line lets you see the Sound assigned to the selected track Not only it is shown on the main page but also in several edit pages Track name ...

Page 129: ...he track can be heard Mute status The track cannot be heard Track names Under the sliders a label for each track is shown Use the TRACK SELECT button to switch between tracks 1 8 and 9 16 Entering Record mode To enter Record mode press the RECORD button while you are in Sequencer mode The following dialog box will appear Select one of the three available recording options and touch OK or Cancel if...

Page 130: ...rack must already be recorded Start from When checked the measure shown by this parameter is a tem porary start point of the song instead of measure 1 When you press the START STOP button to stop recording or use the REWIND button to go back to the beginning the Song returns to this point Resolution Use this parameter to set the quantization during recording Quantization is a way of correcting tim...

Page 131: ...you can prepare your recording parameters For more details see Record mode Multitrack Sequencer page on page 126 3 Be sure the Overdub or Overwrite recording options is selected see Rec mode Recording mode on page 126 4 Set the Tempo There are two ways of changing Tempo Use the TEMPO buttons to change the tempo Touch the Tempo parameter and use the VALUE DIAL to change Tempo 5 Use the TRACK SELECT...

Page 132: ... new series of mea sures with a different Meter see Song Edit Cut Insert Mea sures on page 142 Free Memory Available memory for recording Duration Relative duration of the inserted note The percentage is always referred to the step value 50 Staccato 85 Ordinary articulation 100 Legato Velocity Set this parameter before entering a note or chord This will be the playing strength i e velocity value o...

Page 133: ...n page 129 6 After inserting a new event you may go back by touching the Back button in the display This will delete the previ ously inserted event and set the step in edit again 7 When finished recording touch the Done button in the display A dialog box appears asking you to either cancel discard or save the changes If you touch Cancel exit is canceled and you can continue editing If you choose N...

Page 134: ...enu icon See Page menu icon on page 123 Page sub header See Page sub header on page 126 Recording parameters area Style This parameter shows the selected Style Either touch it or press the STYLE button in the SELECTION section to open the Style Select window and select a different Style see Style Select win dow on page 82 Free memory Percentage of remaining memory for recording Step Time Step Time...

Page 135: ...e four Key board tracks and the four Pads After finishing recording they will be saved as Song tracks 1 8 as in the following table Tempo Metronome Tempo Select this parameter and use the VALUE DIAL to change Tempo You can always change Tempo using the TEMPO buttons Meter Non Editable This parameter shows the meter or time signa ture of the selected Style for reference PERF or STS Performance or S...

Page 136: ...ys for Chord and Accompa niment i e the Style tracks To record all you play on the keyboard plus the automatic accompaniment leave their status to Rec see Track status icons on page 127 Warning Tracks set to REC are automatically overwritten when starting recording Set a track to the PLAY or MUTE status when you don t want to delete it For example if you are recording a keyboard part on an existin...

Page 137: ...r Style This is the latest selected Style To insert a Style change at the current position touch the Style name to open the Style Select window or follow the standard selecting procedure using the STYLE button in the SELECTION section Note Any Style Change inserted after the beginning of the mea sure i e to a position other than Mxxx 01 000 will be effective at the following measure For example if...

Page 138: ...e even if the Measure parameter is not selected Done button Done Touch this button to exit the Step Backing Sequence mode All changes will be saved to memory Hint Save the Song to a storage device by selecting the Save Song command from the page menu to avoid losing it when the instrument enters standby Step Backing Sequence page menu Touch the page menu icon to open the menu Touch a command to se...

Page 139: ...touch ing the Done button in the display 6 Press START STOP in the PLAYER section to lis ten to the result of your editing If it is fine save the Song to a storage device Edit menu From any page press the MENU button to open the Sequencer edit menu This menu gives access to the various Sequencer edit sections When in the menu select an edit section or press EXIT to exit the menu When in an edit pa...

Page 140: ... and Pad tracks the B group to the Keyboard tracks However Songs created in Sequencer mode could also assign the B group to the Song tracks Parameters All parameters in this page are the same found in the same page of the Style Play mode see Mixer Tuning FX Send on page 117 Mixer Tuning EQ Gain In this page you can set the three band equalization EQ for each individual track Use the TRACK SELECT b...

Page 141: ...e status The track cannot be heard Effects A B FX Configuration This page allows you to select the effects for the A Song and B Keyboard FX groups You can use the FX A and FX B side tabs to switch from one group to the other one Songs created in Sequencer mode on a Pa Series instrument can also use the B FX group The effect types and the FX matrix are the same seen for the Style Play mode see Effe...

Page 142: ...rter beat 384 ticks You can edit this parameter to move the event to a different posi tion You can edit a position in either of the following ways a select the parameter and use the VALUE DIAL to change the value or b select the parameter then touch it again the numeric key pad will appear Enter the new position by dialing in the three parts of the number separated by a dot Zeroes at the beginning...

Page 143: ... the display to delete the event selected in the display Note The End of Track event cannot be deleted Event Edit procedure Here is the general event editing procedure 1 While in the Event Edit page press START STOP in the PLAYER section to listen to the Song Press it again to stop the Song 2 Select the Filter page and turn Off the filter for the event types you wish to see in the display see Even...

Page 144: ...e Note RX Noise Notes and RX Noises Program Program Change events Control Control Change events Tempo Meter Tempo and Meter time signature changes Mas ter Track only After Touch Mono Channel Aftertouch events Poly After Touch Poly Aftertouch events Pitch Bend Pitch Bend events Pa Controls Controls exclusive to Pa300 like the Scale set tings These controls are recorded to the Master Track and saved...

Page 145: ...ity Here you can change the Velocity value for the notes An Advanced mode is available allowing you to select a velocity curve for the selected range This is useful to create fade ins or fade outs After setting the various parameters touch Execute to start the operation Track Use this parameter to select a track All All tracks selected Track 1 16 Selected track Value Velocity change value Start En...

Page 146: ...to delete All All events Measures will not be removed from the Song and will remain empty Note All notes in the selected range Dup Note All duplicate notes When two notes with the same pitch are encountered on the same tick the one with the lowest velocity is deleted After Touch After Touch events Pitch Bend Pitch Bend events Prog Change Program Change events excluding the bundled Control Change 0...

Page 147: ...and To Measure 4 the first four measures are copied To Measure This parameter is the first of the target measures Repeat Times Number of times the copy must be executed Copies will be con secutive Song Edit Move Here you can shift a track forward or backward by just a few ticks or whole measures After setting the various parameters touch Execute to complete the operation Track Use these parameters...

Page 148: ...145 Save Song Select this command to save the new or edited Song to a storage device as a Standard MIDI File The file is automatically added the MID extension After selecting this command the Save Song page appears see Save Song window on page 145 Warning Turning the instrument off will delete the Song from memory Save your Song to a storage device to avoid losing it Warning The Song is also lost ...

Page 149: ... See Song Select win dow on page 85 for details Save Song window The recorded Song is lost when the instrument enters standby The Song is also lost when you overwrite it in Record mode or if you confirm the warning message when switching to the Style Play or Song Play mode You must save to a storage device any Song you wish to preserve This window appears when you select the Save Song command from...

Page 150: ...the Master Transpose is a global parameter loading a Song with a non standard transposition may result in unwanted transposing when loading other Songs that do not contain their own transposition data To transpose a Song it is advisable to use the Transpose function in the Edit section of the Sequencer mode see Song Edit Transpose on page 141 You may also lock the Master Transpose to avoid unwante...

Page 151: ...s in the Lock page of the Global mode see General Controls Lock on page 149 Main page There is no main page in the Global edit mode When pressing EXIT you exit the Global mode and the underlying operating mode in the background is recalled Edit menu From any page of the Global mode press the MENU button to open the Global edit menu This menu gives access to the vari ous Global edit sections When i...

Page 152: ...erface This page contains parameters related to user interface Language Language Use this pop up menu to select one of the available languages for the on screen keyboard Note Some of the characters can only be used when editing Song Book Entry names Change button To apply the selected language to the onscreen keyboard touch this button and restart the instrument as described below How to select a ...

Page 153: ...values to be changed when choosing a different Performance Style or STS Locks All the available locks listed below Lock them to prevent changes due to selecting different elements These locks are also found in various other pages next to the locked parameter Hint To save the status of parameters that have to remain unchanged set them and save the MY SETTING Performance automatically selected when ...

Page 154: ...Master 2 FX Send value on the Upper 2 Upper 3 and Lower tracks will be set to zero to avoid these tracks sound in the wrong way This way the Upper 1 track usually the most important one for solo playing will sound with the needed effect while the other Keyboard tracks will just sound dry Pad When locked selecting a Style or SongBook Entry will not change the Pad assignment See Pads Pad on page 106...

Page 155: ...atus General Controls Date Power This page is where you can set a time stamp and turn the Auto Power function on or off Set Date Time for Save This function lets you specify a date to be recorded as the date stamp for the files being saved This is useful for keeping track of when you created and saved your data File date stamps are shown when you use the Media functions or when reading data with a...

Page 156: ...eyboard mode SPLIT LED turned off the Chord Recognition mode is automatically set as in the fol lowing table One Finger You can compose a chord using a simplified chord playing technique Play a single note for a Major chord to be recog nized Play the root note plus a white key on the left for a 7th For example play C3 B2 for a C7 Play the root note plus a black key on the left for a Minor chord Fo...

Page 157: ... Sound even if it is muted while the chord root is played by the Bass Sound When you start the Style the normal behavior is restored When the Bass Lower Backing function is active the Backing icon appears in the Lower track Sound s area Off No Bass Sound is added when the Style is not running The Lower track can be heard only if it is not muted Style Tracks Global Volume In Style Play mode the vol...

Page 158: ...en this option is checked you cannot write any STS Single Touch Setting or Style Settings onto the Factory Styles The Write Single Touch Setting and Write Current Style Set tings command in the page menu are greyed out and cannot be selected All original settings of the Factory Styles will be left untouched When Off you can load User Styles or Pads into the Factory Style banks and Factory Pad bank...

Page 159: ... button to calibrate and choose the polarity of the pedal footswitch 1 Connect the pedal or footswitch to the PEDAL DAMPER connector on the back of the instrument 2 Go to this page and touch the Calibration button in the display The following dialog box appears 3 You are asked to set the pedal to the maximum value Press the footswitch or press the pedal to the maximum position usually front presse...

Page 160: ...with the new transpose setting applied Note that if you play a Keyboard track prior to a new chord the Keyboard track will play in the new key as the Style will continue to play in the old key until a new chord is entered Transpose applies to Player This checkbox lets you turn the Master Transpose on or off for the onboard Player Transpose applies to Midi In notes This checkbox lets you turn the M...

Page 161: ...save up to four Quarter Tone Scale SC Presets SC Preset buttons Touch these buttons to recall the corresponding presets Each pre set contains a custom detuning of each note of the scale shown in the upper scale diagram It also memorizes the selected degree s of the scale shown in the lower scale diagram When no preset is selected the default scale is automatically recalled This scale assigns a 50 ...

Page 162: ...r is always set to Internal when the instru ment enters standby Internal Internal i e the clock generated by the Pa300 Arranger and Player internal metronome External USB External from the USB Device port In Style Play or Sequencer mode the Pa300 is slaved to an external device connected to its USB Device port The Start Stop command as well as the metro nome tempo cannot be selected from the contr...

Page 163: ...eft unchanged 40 127 All received velocity values are converted to the selected value MIDI MIDI In Channels In this page you can assign Pa300 tracks to any of the MIDI channels received on the USB Device port All these parameters can be saved into a MIDI Preset Channels You can assign to each channel one of the following tracks Off No track assigned Lower Keyboard s Lower track Upper 1 3 One of th...

Page 164: ...izer from the Pa300 using the Lower track to play chords even if the track is muted Control On this special channel the Pa300 sends mes sages corresponding to the selected SongBook Entry MIDI Filters Use this page to set up to 8 filters for the MIDI data received or sent by the Pa300 on the USB Device port All these parameters can be saved into a MIDI Preset Midi In Filters Selected MIDI IN filter...

Page 165: ...ncy and Q parameters All these parameters can be saved into a Master EQ Preset EQ Preset Use this pop up menu to choose one of the available EQ Presets and automatically reconfigure the EQ parameters On Off This is the on off switch for the EQ section Diagram Use these indicators to check the EQ curve and the level of the audio entering and coming out of the Master EQ If the input level is too hig...

Page 166: ...the display Hint To be more accurate you can use a pen cap or a tablet stylus Do not use anything sharp like a pencil or you will risk to damage the display 2 The arrows will subsequently move to the other corners of the display Touch exactly inside them 3 Finally touch Save to confirm the new calibration In case you want to exit and cancel the calibration press EXIT before completing the procedur...

Page 167: ...log box on page 163 for more infor mation Write Master EQ Preset Choose this command to save the Master EQ settings to one of the available Master EQ Presets See Write Master EQ Preset dialog box on page 164 for more information Write Quarter Tone SC Preset dialog box Open this dialog box by selecting the Write Quarter Tone SC Preset item from the page menu Here you can save the current scale sett...

Page 168: ...ve current settings for the Master EQ edit section see starting from page 161 Name Name of the Master EQ Preset to be saved Touch the Text Edit button next to the name to open the Text Edit window and modify the name Master EQ Preset One of the available locations where to save current Master EQ settings Pa300 User Manual v150 English book Page 164 Saturday March 29 2014 5 29 PM ...

Page 169: ...ted Selecting and deselecting files While a file list is shown in the display you can select any item by touching it The selected item is highlighted You can deselect all items in any of the following ways Touch an empty area in the file list if available Touch the Device pop up icon and select the current device again Searching files By using the Search function you can search files and musical r...

Page 170: ... created with the Full Resource Backup func tion of the Media Utility page GBL Global Setup QTP Quarter Tone Scale Presets MPR MIDI Presets AUD Master EQ Presets PRF Performance PCG Sound Korg Pa Series STY Style PAD Pad SBD SongBook SBL SongBook s Custom List JBX Jukebox MID Standard MIDI File SMF MP3 MP3 file TXT Plain text file Extension File type PKG Operating System and Musical Resource files...

Page 171: ...gs BANK PRF BANK8 PRF 8 1 Rock Brass 8 40 Rock Strings SONGBOOK LISTDB SBL SONGDB SBD SOUND USER01 PCG USERDK PCG STYLE BANK01 STY 1 1 Pop 1 1 40 Pop 40 BANK STY USER01 STY U1 1 User 1 U1 40 User 40 USER02 STY U2 1 User 1 U2 40 User 40 USER03 STY U3 1 User 1 U3 40 User 40 BANK15 STY 15 1 Contemp 1 15 40 Contemp 40 1 Piano 1 128 SynBrass22 1 Standard Kit 128 Orchestral Kit USER02 PCG 1 SopranoSax 1...

Page 172: ... the scrollbar to scroll the list Touching the arrows will scroll one step at a time while touching the bar will scroll one page at a time Touching the arrows while SHIFT is kept pressed jumps to the previous or next alphabetical section or file folder type depending on the selected display order Device pop up menu Use this menu to select one of the available storage devices Commands Commands may ...

Page 173: ...p menu to select the source device When the device is selected its content will appear in the display 3 If the folder you are looking for is inside another folder select this latter and touch the Open button to open it Touch the Close button to go back to the parent folder 4 Select the SET folder containing the data you wish to load and touch Load to confirm the selection Loading all data of a spe...

Page 174: ...e User or Favorite User Style banks in memory In the example above the previously selected Style bank will be loaded into the bank USER 1 in memory The Styles already existing in memory will be deleted and overwritten 7 Select the target bank and touch OK to load the source bank Warning After confirming all User data contained in mem ory are deleted Loading a single item You can load a single item...

Page 175: ...puter before loading a SET folder or First load the SET folder then separately load the PCG file from the PROGRAM folder Loading i Series data Pa300 is compatible with the Styles of the older i Series instru ments You can load them as if they were ordinary Pa300 data 1 Copy the old i Series data into an USB device or transfer them to the internal storage memory of the Pa300 2 Press MEDIA to go to ...

Page 176: ...s asking you to enter a name for the new SET folder 3 Touch the Text Edit button to open the Text Edit window Enter the name then touch OK to confirm and close the Text Edit window Note The SET file name extension is added automatically 4 Touch OK to create the new folder and exit the dialog box The file folder type contains and will create on the target device All All the User data in memory A SE...

Page 177: ...ion turned off In the dialog box above check all data type you wish to save to a storage device 6 Touch OK to confirm or Cancel to abort Warning After confirming all data of the selected type in the target folder is deleted Saving all data of a specified type In addition to the above you can save all data of a specified type by selecting the corresponding folder 1 If saving to an external device c...

Page 178: ... can Touch the New SET button and create a new SET folder see Creating a new SET folder on page 172 or Select an existing SET folder and touch Save to con firm 7 A dialog box appears asking you to select one of the avail able User or Favorite User Style locations inside the folder In the above dialog box the previously selected bank of Styles will be saved to bank User 01 inside the selected folde...

Page 179: ...ve pages in this page you may see all types of files and not only Pa Series supported files assuming the Hide Unknown Files option is turned off see page 154 Copying a folder s content If nothing is selected while a folder is open in the display you can copy the folder s content without copying the folder itself Note During the Copy procedure you can t open a SET folder You can however open any ge...

Page 180: ...an option for the SHIFT button To select more files or folders consecutively 1 Touch the Mode button to choose the option for the SHIFT button 2 Select the first file or folder to be selected 3 Press and keep the SHIFT button pressed 4 Select the last file or folder to be selected 5 Release the SHIFT button To select more files or folders discontinuously 1 Touch the Mode button to choose the optio...

Page 181: ...e of the internal volume When formatting the internal disk the label cannot be edited Touch the Text Edit button to open the Text Edit window Enter the name then touch OK to confirm and close the Text Edit window Note When changing the name to a device containing Standard MIDI Files or MP3 files used in the SongBook the links are bro ken We suggest to give the device the same name it had before fo...

Page 182: ...ckup file Touch the Text Edit button to open the Text Edit window Enter the name and confirm by touching OK 6 Touch OK to start the backup 7 When finished save the removable storage device in a safe place Resource Restore This command restores data from a backup of the internal Fac tory and User data created with the Full Resource Backup command Hint This command cannot be used to load single item...

Page 183: ... shows the installed Operating System version From time to time check our web site www korg com to see if a newer free version has been released USB Use this page to enable or disable the USB Device port for file transfer The USB Device port allows you to access the internal storage memory from a personal computer by just connecting the Pa300 to the computer s USB interface This way you can exchan...

Page 184: ...rom the computer s desk top touch the Disable button on the display of Pa300 Caveat Do not disconnect the USB communication before the personal computer has really finished transferring files Sometimes the on screen indicator tells the procedure has been completed BEFORE it has really finished Disconnecting USB communication or disconnecting the USB cable before data transfer has been completed ma...

Page 185: ...es or USB memory sticks connected to the USB Host port Here are some precautions when handling these devices Internal memory write protection You can protect your internal memory from writing by using the software protection found in Global mode see Media Pro tect on page 154 Precautions Do not remove a device or move the instrument while the device is operating In order to avoid losing data in ca...

Page 186: ... may include the song s author name genre original key tempo and meter time signature When selecting one of the entries the associated Style Standard MIDI File or MP3 file is automatically recalled together with any TXT lined to the entry Also the STSs and Pads may be recalled List Header The List Header shows the selected entry s name on the left N and the associated Style Standard MIDI File or M...

Page 187: ... a SongBook Entry by means of an unique number Numbers associated with each entry can be programmed in the Book Edit 2 page see Book Edit 3 on page 188 To see the numbers while in the Book page select the Show Song Numbers now Key command from the page menu After you select this command the Num column appears To see the Key column again select the Show Key now Song Numbers command from the page me...

Page 188: ...hoose a MIDI Preset to quickly configure the Con trol channel Go to the Global MIDI General Controls page and choose a MIDI Preset where to save your settings Then choose a MIDI channel as the Control channel Go to the Global MIDI Midi Out Channel page and assign the Control option to one of the sixteen available MIDI channels usually one of the higher numbered ones for example 16 When done save t...

Page 189: ... the selected entry appears on the left upper side of the display N Hint This command is useful to browse through the list and select an entry different than the one following in the list List Edit This page is only available after checking the Enable List Edit command in the page menu see page 190 Use this page to edit the available Custom Lists A Custom List is a set of SongBook Entries created ...

Page 190: ... Style or Song to the SongBook Entry and choose to save STSs to the Entry Hint Use the Filter in the Book page to quickly find an entry to be edited The Book Edit 1 page with a Style based entry The Book Edit 1 page with a Song based entry Header Name Name of the selected entry The name is assigned after you touch the Write button to save the entry to the SongBook list Number Song Selection Number...

Page 191: ...omatically checked and cannot be modified A reference to the associated resource will be saved with the new entry STS Write Current When saving a SongBook Entry and this parameter is checked you can save the STSs of the associated Style into the entry or the current Keyboard track settings into a new STS All STS All four STSs are saved to the current SongBook Entry The source STSs are those contai...

Page 192: ...ays con sidered and overrides this value Note You can edit this value even if an MP3 is associated to the SongBook Entry However this is just an indicative value Meter Info Basic meter time signature of the Style or starting meter of the Standard MIDI File associated with the entry This may change if a Meter Change event is included with the associated resource M Transp Master Transpose Master Tra...

Page 193: ...k Edit 3 page contains two buttons Reset Touch this buttons to unlink the text file from the entry Browse Touch this button to open a standard File Selec tor and select a TXT file to be linked to the current SongBook Entry After selection the name of the linked text file appears above the two buttons Info Use the Info page to see the name of the selected entry the asso ciated resource s the total ...

Page 194: ...ges are selected Select this command to open the Export dialog box and save the Song Book or Custom List as a text file The selected filtering will be applied to the exported list assuming the Filter button is checked The dialog box is a little different depending on the page where you selected this command Selected from the Book page Selected from the Custom List page Touch the Text Edit button t...

Page 195: ...SongBook Entry over riding iv Lyrics events contained in the Standard MIDI File or MP3 file Hint If you do not want to see the TXT file or the CDG file and prefer to see the Lyrics data rename or delete the TXT or CDG file or move it to a different folder Viewing lyrics with the Styles Lyrics can be associated to a Style as a TXT file When in this page you can see Lyrics contained in a TXT file li...

Page 196: ...if the file MYSONG TXT exists in the same directory as the MYSONG MID or MYSONG MP3 file it is loaded together with the matching MID or MP3 file However unlike ordinary Lyrics the text will not scroll automat ically while the Song is playing back You must scroll it with the scrollbar or the VALUE DIAL As an alternative you can use the footswitch with the Text Page Up or Text Page Down functions as...

Page 197: ...e chord symbols if available appear or disappear Chords are shown either according to the English A B C or Italian Do Re Mi system depending on the selected language see General Controls Interface on page 148 Note button Touch this button to make the note name appear or disappear next to each note Note names are shown either according to the English A B C or Italian Do Re Mi system depending on th...

Page 198: ...pending on the selected Style Element it determines which Chord Variation CV should be played for the scanned chord Which Chord Variation corresponds to each scanned chord is a setting of the Style the Chord Variation Table Each Style Element contains a Chord Variation Table whose prototype is the following After deciding what CV to play the arranger triggers the right sequence for each track Sinc...

Page 199: ...always Gtr Guitar tracks When a chord is recognized the arranger triggers single notes strumming and arpeggios on a virtual guitar keeping care of the way notes are played on the guitar keyboard Note that inside a Guitar track you can also have some parts typical of an Acc track a useful addition for short free form passages What to record in a Style Recording a Style means recording tracks inside...

Page 200: ...e is a delay before you can actually listen to the Style This delay is higher with a Style containing more MIDI events Note While in Record mode the footswitch is disabled On the contrary volume expression type pedals can be used Exit by saving or deleting changes When finished editing you can save your Style or Pad in mem ory or abort any change To save changes select the Write Style Pad command ...

Page 201: ...Style Record Pad Record Page header This line shows the current operating mode and transposition Operating mode name Name of the current operating mode Master Transpose Master Transpose value in semitones This value can be changed using the TRANSPOSE buttons on the control panel Control function CC Allowed Note On RX Noise On Pitch Bend Channel After Touch Modulation 1 Breath 2 Pan 10 Expression 1...

Page 202: ...uantization value means triplet Pad Sync Pad only This parameter allows you to set a synchronization mode for the Pad s pattern Off No synchronization The sequence will start as soon as you press the PAD button Continued The pattern will start immediately in sync with the arranger s or active player s tempo Depend ing on the current position of the beat counter it might not start from its very beg...

Page 203: ...t this parameter only when the Style Ele ment or Pad is empty i e before you begin recording anything Selected track info area This line lets you see the Sound assigned to the selected track Track name Name of the selected track Drum Acc5 Style track Sound name Sound assigned to the selected track You can touch the name to open the Sound Select window and select a different Sound Sound bank Bank t...

Page 204: ...ote in CMaj C is transposed to the missing notes Parallel Fifth The 5th note in CMaj G is transposed to the missing notes Parallel i Series All original patterns must be programmed on the Maj7 or min7 chords When loading old Korg i Series Styles this option is automatically selected Parallel No Transpose The chord is not modified and is moved to the new key unchanged The pattern plays exactly the ...

Page 205: ...es Style only Under the sliders a label for each track is shown Drum Acc5 Shown Style tracks Main page Record 2 Cue Style only While in the main page touch the Record 2 Cue tab to see this page Most parameters in this page are the same as in Main page Record 1 In addition here you can see and select Sounds for each Style track and the Cue mode for the Style Element Sounds area This area lets you s...

Page 206: ...e sure the Guitar tracks is associated to the right channel Go to the Global MIDI MIDI IN Channels page and assign the corresponding Style track usually Acc1 Acc5 to the same channel of the Guitar track on the external sequencer Then go to the Style Record Style Track Controls Type Ten sion Trigger page and set the track as a track of type Gtr see Track Type on page 220 Guitar Mode allows for easy...

Page 207: ...strings and RX Noises you can choose a Capo capotasto Note that this might pre vent some single strings to sound depending on the composed chord You can always see which strings are playing and which are not as described in Diagram on page 205 Recording a regular pattern Together with strums and arpeggios you can record regular pat terns exactly as if the track was of Acc type see Track Type on pa...

Page 208: ... 3 Strings Bass IV VI 1 39 3 Strings Bass IV VI 2 40 3 Strings Bass IV VI 3 41 3 Strings Bass IV VI 4 42 3 Strings Bass IV VI 5 43 3 Strings MiddleBas III V 0 44 3 Strings MiddleBas III V 1 45 3 Strings MiddleBas III V 2 46 3 Strings MiddleBas III V 3 47 3 Strings MiddleBas III V 4 48 3 Strings MiddleBas III V 5 49 3 Strings MiddleTreble II IV 0 50 3 Strings MiddleTreble II IV 1 51 3 Strings Middl...

Page 209: ...listening during recording During playback in Style Play mode the chord will follow chord recognition Capo Fret A capo from the Italian capotasto head of fingerboard is a movable bar attached to the fingerboard of the guitar to uni formly raise the pitch of all the strings Its use makes the strings shorter therefore changing the timbre and position of the chords but not its shape 0 Open string no ...

Page 210: ... keyboard and not from the arranger 10 At this point if you want to do a Realtime Recording go on reading Realtime Record procedure below Otherwise if you prefer to do a Step Record jump to Step Record pro cedure on page 207 Realtime Record procedure 1 Select the track to record Its status icon will turn to Record For more details see Tracks volume status area on page 201 Note When entering the Re...

Page 211: ...is reached the End of Loop event is shown and the recording restarts from the 001 01 000 position Any note exceeding the pattern length inserted at its end will be reduced to fit the total length of the pattern At this point you may go on inserting new events in over dub mode the previously inserted events will not be deleted This is very useful when recording a drum or per cussion track where you...

Page 212: ...ze Transpose Velocity Delete to the other pages or vice versa the Style if in play is automatically stopped Edit page structure Most edit pages share some basic elements Other pages have a slightly different structure Operating mode This indicates that the instrument is in Style Pad Record mode Edit section This identifies the current edit section corresponding to one of the items of the edit menu...

Page 213: ...ouch this icon to open the page menu See Page menu on page 225 Page sub header This area shows some performing info on the Song Selected track Style only Name of the track in edit Use the Track pop up menu to select one of the Style tracks SE CV Style Element Chord Variation Selected Style Element Style only and Chord Variation This parameter cannot be edited To select a different Style Element an...

Page 214: ...u Use this pop up menu to select the track to edit inside the cur rent Chord Variation Drum Acc5 Style track Go Meas While the Style is not running touch this button to open the Go to Measure dialog box When in this dialog box select a target measure and touch OK The first event available in the target measure will be selected Insert Touch the Insert button in the display to insert a new event at ...

Page 215: ...and to cancel all changes Touch the Text Edit button to enter the Text Edit dialog box Enter a name and confirm by selecting OK Select a target memory location where to save the Style Pad The name of the Style Pad already existing at the selected location is shown after the Bank Location number Warning If you select an existing Style Pad and confirm writing the older Style Pad is deleted and repla...

Page 216: ...elect the same note as the Bottom and Top parameters you can select a single percussive instrument in a Drum or Percussion track Note These parameters are available only when a Drum or Per cussion track is selected Execute Touch this button to execute the operation set in this page Track status icon Status of tracks Touch this icon to change the status Play status The track can be heard Mute statu...

Page 217: ...ill be changed Drum Acc5 Selected track E CV Style Element Chord Variation Use these parameters to select the Style Element Style only and Chord Variation for editing Value Velocity change value 127 Start End Tick Use these parameters to set the starting and ending points of the range to be modified If a Chord Variation is four measures long and you want to select it all the Start will be position...

Page 218: ...e measure use the Cut function see Style Pad Edit Cut on page 214 After setting the various parameters touch Execute Track Style only Use this parameter to select a track All All tracks selected After deletion the selected Chord Variation will remain empty Drum Acc5 Selected track E CV Style Element Chord Variation Use these parameters to select the Style Element Style only and Chord Variation for...

Page 219: ...All All Style Elements i e the whole Style When E Track All and CV All the whole Style is deleted and all parameters are set to the default status Var1 CountIn Single Style Element V1 CV1 CI CV2 Single Chord Variation Execute Touch this button to execute the operation set in this page Track status icon Status of tracks Touch this icon to change the status Play status The track can be heard Mute st...

Page 220: ...to fit the remaining 2 measures Note Avoid copying to a Chord Variation with a different meter time signature for example a 4 4 Chord Variation onto a 3 4 one Style Pad Edit Copy from Pad Here you can copy a Chord Variation from a Pad Furthermore you can copy a whole Pad Warning The Copy operation deletes all data at the target loca tion overwrite After setting the various parameters touch Execute...

Page 221: ...track of them and let you access Event Edit only on the tracks containing the messages Press the START STOP button to start playback and look at the indicators When one of them lights up you can enter Event Edit on the corresponding track and edit or remove the Expression messages Expression Use these knobs to set the Expression CC 11 value for the cor responding track This value can be seen at th...

Page 222: ...n the control panel to select a Style Element VARIATION1 ENDING3 To copy the settings of this page to another Style Element use the Copy Keyboard Range command from the page menu see Copy Key Range dialog box on page 227 Top Bottom Use these parameters to set the bottom and top of the keyboard range for the corresponding track of the current Style Element Volume area Use these controls to set the ...

Page 223: ...repitching notes already playing There will be no break in the sound This is very useful on Guitar and Bass tracks Track Type Use this parameter to set the type of the Pad track Drum Drum track This type of track is not transposed by the arranger and is used for Drum Kits or for tracks that you don t want to be transposed when playing a different chord Bass Bass track This type of track always pla...

Page 224: ...is type of track cannot be transposed and is used for Drum Kit made of Percussion sounds It is NOT affected by the Drum Mapping Bass Bass track This type of track always plays the root when changing chord Acc Accompaniment track This type of track can be used freely for melodic or harmonic accompani ment patterns Gtr Guitar track This type of track uses Guitar Mode to create guitar strumming see M...

Page 225: ...g The Standard MIDI File to be imported must be pro grammed as if it was one of Pa300 s Chord Variations When importing an SMF parameters like CV Length Meter Tempo Changes Program Changes and Expression are recog nized These parameters will be imported as the header of the Style Element containing the Chord Variation provided the Initialize parameter is checked or the Style Element is empty Hint ...

Page 226: ...a Style As an alternative to importing single Chord Variations you can import a whole Style as an SMF separated by Markers i e a sin gle SMF containing all the Chord Variations Variation 1 Varia tion 2 etc each one separated by a Marker the same events used in Song Play mode 1 While in this page touch the Select button and choose the Standard Midi File to be imported 2 Keep the SHIFT button presse...

Page 227: ...tion 4 Chord Variation 3 Examples of non accepted names V1cv2 v1CV2 intro i1cv2 v1cv1 chorus The order of the Chord Variations inside the SMF is not relevant They can be freely placed inside the SMF At the end of this page you can find a screenshot of a test file cre ated in Steinberg Cubase just as an example of how a SMF sepa rated by Markers can look like Considering analogies between actual wo...

Page 228: ...rd Variations to indi vidual Standard MIDI Files you can export a whole Style as an SMF separated by Markers i e a single SMF containing all the Chord Variations Variation 1 Variation 2 etc each one sepa rated by a Marker the same events used in Song Play mode 1 While in this page keep the SHIFT button pressed 2 Without releasing the SHIFT button touch the Execute button in the display 3 Release t...

Page 229: ...hile the Style Element Track Control edit section is selected use this command to open the Copy Expression dialog box and copy all Expression values assigned to the current Style Element tracks to a different Style Element See Copy Expression dialog box on page 227 for more infor mation Copy Keyboard Range Only available in some edit pages While the Style Element Track Control edit section is sele...

Page 230: ...ither the User or the Favorite banks Copy Key Chord dialog box Style only Open this window by choosing the Copy Key Chord item from the page menu Here you can copy Key Chord settings of the currently selected track to all other tracks of the same Chord Variation or to the whole Style This function is useful to speed up pattern programming and to avoid having different tracks in different keys with...

Page 231: ... from the page menu Here you can copy all Key board Range values for the current Style Element tracks to a dif ferent Style Element From Style Element Non editable Currently selected Style Element To Style Element Target Style Element All Settings will be copied to all Style Element of the Style in edit Var1 CountIn Single Style Element where to copy settings to Copy Chord Table dialog box Style o...

Page 232: ... mode before actually starting recording see step 6 on page 206 for more information Free Memory Remaining memory for recording Duration Relative duration of the inserted note The percentage is always referred to the step value 25 Staccatissimo 50 Staccato 85 Ordinary articulation 100 Legato Velocity Set this parameter before entering a note or chord This will be the playing strength i e velocity ...

Page 233: ...croll arrow until the hidden oscillator is shown in the display When oscillators cannot be select since the parameter contained in the current page are global and valid for the whole Sound these buttons are greyed out and cannot be selected Sounds Drum Kits Pa300 features two different types of Sounds Ordinary Sounds These are normal instrument Sounds like pianos strings basses Drum Kits These are...

Page 234: ... of the Vibrato LFO LFO Speed Speed of the Vibrato LFO LFO Delay Delay time before the Vibrato LFO begins after the sound starts Resonance Use the Filter Resonance to boost the cutoff fre quency Voice Assign Mode Poly The Sound will play polyphonically allowing you play chords Mono The Sound will play monophonically producing only one note at a time Legato This parameter is available when the Mono...

Page 235: ...ture All edit pages share some basic elements Operating mode This indicates that the instrument is in Sound mode Edit section This identifies the current edit section corresponding to one of the items of the edit menu see Edit menu on page 231 Page menu icon Touch this icon to open the page menu see Page menu on page 254 Selected oscillator Use these buttons to select the oscillator to edit Parame...

Page 236: ...yed repeatedly the pre vious note will be silenced before the next note is sounded so that the notes do not overlap Off When the same note is played repeatedly the pre vious note will not be silenced before the next note is sounded Legato This parameter is only available when the selected mode is Mono It is the same found on the main page of the Sound mode See Legato on page 230 for information on...

Page 237: ...lternate Modulation Source see below PseudoRandom Only works when more than one Offset point is available in the multisample Randomly selects one of the available Offset points including Attack and Off Level These parameters specify the level of each multisample 0 127 Multisample level Note Depending on the multisample high settings of this parame ter may cause the sound to distort when a chord is...

Page 238: ...the above for use with a different and paral lel group of Oscillators Having two Cycle Trig ger Modes allows for cycling stereo multisamples Random As the above but with a random selection of Oscillators within the assigned group After Touch Trigger On The Oscillator starts playing when an After Touch message with a value of at least 90 is received The Velocity value is the same as the lat est Not...

Page 239: ...of 20 may be converted to a Scaled Velocity value of 127 All values included between the mini mum and maximum value are scaled accordingly As a consequence you can create an RX Sound of guitar by assigning the guitar fret noise to the 10 20 velocity range When a dynamics value between 10 20 is received the real velocity value is scaled to the Scaled Velocity values and plays louder 0 127 Assigned ...

Page 240: ... certain pitch Starting from that pitch it is as if the Damper was always pressed down Note This parameter only affects the Normal Damper mode It has no effect on the Resonance Halo mode C 1 G9 Note starting from which the Damper is always pressed down In an acoustic piano this is usually set to G6 Basic Damper Trigger Here you can set the notes triggered by pressing and releasing the Damper Pedal...

Page 241: ...erent percussive sample for each key and layer Drum Kits use only one oscillator Key Key Key in edit To select a key you can press a key on the keyboard while this parameter is selected Layers Number of layers assigned to the selected key Depending on the number of selected layers you can have a different number of velocity switches Assign Use this parameter to turn the sample on off On The sample...

Page 242: ...n from the offset location pre determined for each sample NoAtk The initial portion of the multisample is ignored AMS Activates the Alternate Modulation Source see below PseudoRandom Only works when more than one Offset point is available in the multisample Randomly selects one of the available Offset points including Attack and Off AMS Int ensity Only available when the AMS option is selected in ...

Page 243: ...rs when you edit a Drum Kit Here you can set various parameters for the different percussive sample assigned to the selected key and layer Key See Key on page 237 Voice Assign Mode Single Trigger Use this parameter to set the sample as a single triggered one On When the same key note is played repeatedly the previous note will be stopped before the new note is triggered so that they will not overl...

Page 244: ... as you play higher notes and neg ative values will cause the pitch to fall as you play higher notes With a value of 0 there will be no change in pitch and the C4 pitch will sound regardless of the keyboard location you play The diagram shows how the Pitch Slope and pitch are related 1 0 2 0 Pitch slope value Pitch Bend Mode The Pitch Bend can work in different ways depending on the selected optio...

Page 245: ...ter value Pitch EG The Pitch EG Envelope Generator is unique to all oscillators Velocity Intensity This parameter specifies the depth and direction of the modula tion that the pitch EG specified on Pitch Pitch EG will apply to the pitch With a setting of 12 00 the pitch will change a maxi mum of 1 octave 12 00 12 00 Parameter value Pitch EG AMS Alternate Modulation Source This parameter selects th...

Page 246: ...nt of pitch change will depend on the Intensity AMS1 2 Intensity parameter see below For example with an Inten sity setting of 12 00 a Level setting of 99 would raise the pitch one octave and a Level setting of 99 would lower the pitch one octave Start Level Specifies the amount of pitch change at note on 99 99 Parameter value Attack Level Specifies the amount of pitch change when the attack time ...

Page 247: ... Source list on page 256 Intensity AMS Intensity This parameter specifies the depth and direction of the effect that AMS will have on the Time parameters With a setting of 0 the pitch EG times will be just as specified by the Time set tings The alternate modulation value at the moment that the EG reaches each point will determine the actual value of the EG time that comes next For example the deca...

Page 248: ... This parameter specifies the depth and direction of the effect that Res Mod by AMS Resonance modulated by AMS will have on the resonance level specified by Resonance Resonance A For example if Velocity has been selected changes in keyboard velocity will affect the resonance With positive values the resonance will increase as you play more strongly and as you play more softly the resonance will ap...

Page 249: ...ing to the keyboard location pitch 99 99 Parameter value Filter EG Velocity to A This parameter specifies the depth and direction of the effect that velocity will have on the time varying changes created by the filter EG as set on Filter Filter EG to control the filter A cutoff frequency With positive values playing more strongly will cause the fil ter EG to produce greater changes in cutoff frequ...

Page 250: ...e that will control modulation of the filter A cutoff frequency see AMS Alternate Modulation Source list on page 256 Intensity Intensity to AMS2 Specifies the depth and direction of the effect that the selected source will have see Intensity Intensity to AMS1 on page 246 Filter Filter LFO Here you can use the filter LFO to apply cyclic modulation to the cutoff frequency of the filter for the selec...

Page 251: ... the change in cutoff frequency at the time of note on 99 99 Level value Attack This parameter specifies the change in cutoff frequency after the attack time has elapsed 99 99 Level value Break Break Point This parameter specifies the change in cutoff frequency after the decay time has elapsed 99 99 Level value Sustain This parameter specifies the change in cutoff frequency that will be maintained...

Page 252: ...rten the EG times The direction of change is specified by At Attack Time Swing Dc Decay Time Swing Sl Slope Time Swing and Rl Release Time Swing With a setting of 0 the times specified by Frequency Cutoff Frequency A will be used If AMS1 2 is set to Velocity positive values of this parame ter will cause EG times to lengthen as you play more strongly and negative values will cause EG times to short...

Page 253: ... Note Number positive values of this parameter will cause the sound to move toward the right as the note numbers increase beyond the C4 note i e as you play higher and toward the left as the note numbers decrease i e as you play lower Negative values of this parameter will have the opposite effect 99 99 Parameter value Amp Amp Mod These settings allow you to apply modulation to amp for each oscill...

Page 254: ...me varying changes in the vol ume of the selected oscillator Diagram The diagram on top of the page shows the Amplitude envelope line Level These parameters are the level of the envelope segment Start This parameter specifies the volume level at note on If you want the note to begin at a loud level set this to a high value 0 99 Level value Attack This parameter specifies the volume level that will...

Page 255: ...e no modulation Intensity This parameter specifies the depth and direction of the effect that AMS1 will have For example if AMS1 T is Amp KTrk the Amp Keyboard Track settings see Keyboard Track ing on page 249 will control the EG Time parameters With positive values of this parameter positive values of Ramp Ramp Setting will cause EG times to be lengthened and negative values of Ramp Ramp Setting ...

Page 256: ... to 0 Here are offset settings and pitch change produced by vibrato 99 99 Offset value Key Sync This parameter specifies if the LFO is synchronized to key strokes On The LFO will start each time you play a note and an independent LFO will operate for each note Off The LFO effect that was started by the first played note will continue to be applied to each newly played note In this case Delay and F...

Page 257: ...the values you specified for Frequency see page 252 and Frequency Modulation see page 252 will be ignored Base Note When MIDI Tempo Sync is On these parameters set a note length relative to q Tempo and the multiple Times that will be applied to it These parameters will determine the fre quency of the LFO1 For example if Base Note is q quarter note and Times is 04 the LFO will perform one cycle eve...

Page 258: ...ators When this function is activated the Solo OSC n indicator n oscillator number blinks on the page header While in this sit uation you can select a different oscillator to be soloed Swap LFO Select this command to replace LFO1 with LFO2 and vice versa Copy Oscillator Select this command to copy all settings between oscillators See Copy Oscillator dialog box on page 255 for more information Copy...

Page 259: ...ank of Sounds Use the VALUE controls to select a dif ferent bank Sound Target Sound location in the selected bank Use the VALUE con trols to select a different location Select Touch this button to open the Sound Select window and select a target location Copy Oscillator dialog box Open this window by selecting the Copy Oscillator item from the page menu Here you can copy all settings between oscil...

Page 260: ...oard tracking within the same oscillator Amp KTrk 0 Amp Keyboard Track 0 Amp keyboard tracking within the same oscillator Note Number Note number Velocity Velocity Poly AT Poly After Touch Polyphonic After Touch received transmitted via MIDI or contained in Standard MIDI Files Channel AT Channel After Touch After Touch Channel After Touch received transmitted via MIDI or contained in Standard MIDI...

Page 261: ...fter Touch 2 The effect will be controlled by the joystick Y vertically down ward and by after touch In this case the effect of after touch will be only half of the specified intensity received transmitted via MIDI or contained in Standard MIDI Files Note Number Amp Key Low Key High AMS Amp KTrk AMS Intensity positive value Ramp Low 50 Ramp High 50 Depth and direction of modulation zero max max ex...

Page 262: ...ocity value is always sent This value tells the instrument how loud the note must play Pitch Bend PB You can generate this message acting on the joystick X direction The pitch is translated up or down Program Change PC When you select a Sound a Program Change message is generated on the channel Use this message together with Control Change 00 and 32 to remotely select Pa300 data from a sequencer o...

Page 263: ...compatible with the GM2 standard The Global channel Any channels with the Global option assigned see MIDI MIDI In Channels on page 159 can simulate the Pa300 integrated keyboard When the Pa300 is connected to a master keyboard transmission should take place over the Global channel of the Pa300 The MIDI messages received over a Global channel and not over a standard channel are affected by the stat...

Page 264: ...sequencer are sent from the USB port of the computer to the USB port of Pa300 The Local Off When Pa300 is connected to an external sequencer we recom mend you to set the Pa300 in Local Off mode see Local Con trol On on page 158 to avoid that the notes are simultaneously played by the keyboard and by the MIDI events sent by the external sequencer When Pa300 is in Local Off the keyboard of Pa300 tra...

Page 265: ...Pa300 User Manual v150 English book Page 261 Saturday March 29 2014 5 29 PM ...

Page 266: ...3 Bank Ballad 1 Modern Ballad 1 0 1 0 2 Modern Ballad 2 1 3 Moonlight Ballad 2 4 Soft Ballad 3 5 Funky Ballad 4 6 Guitar Ballad 5 7 Easy Ballad 6 8 Organ Ballad 7 9 Folk Ballad 8 10 Orchestral Bld 9 11 Groove Ballad 10 12 Blues Ballad 11 13 Analog Ballad 1 12 14 Analog Ballad 2 13 15 Rock Ballad 1 14 16 Rock Ballad 2 15 17 Waltz Ballad 16 18 6 8 Slow 17 19 6 8 Ballad 1 18 20 6 8 Ballad 2 19 Bank B...

Page 267: ...ugged Gtr 3 14 16 Unplugged Gtr 4 15 17 Slide Blues 16 18 Unplugged Rock 17 Name CC00 CC32 PC 19 Unplugged Latin 18 20 Unplugged Swing 19 21 3 4 Acoustic Bld 20 Bank Country 1 Easy Country 0 6 0 2 Country Blues 1 3 Country Strum 2 4 Country QuikStep 3 5 Country Beat 1 4 6 Country Beat 2 5 7 Country Ballad 1 6 8 Country Ballad 2 7 9 Finger Picking 8 10 3 4 Country 9 11 Modern Country 10 12 Country ...

Page 268: ...18 Organ Swing 17 19 Organ Blues 18 20 Swing Quintet 19 21 Medium Swing 20 22 Vocal Swing 21 Name CC00 CC32 PC Bank Movie Show 1 Orchestral Movie 0 11 0 2 Broadway 1 3 Show Time 2 4 Ritz Swing 3 5 Hollywood 1 4 6 Hollywood 2 5 7 Tap Dance 6 8 Movie Ballad 7 9 Movie Swing 8 10 Safari Swing 9 11 Western Movie 10 12 Mystery Man 11 13 Cartoon Time 12 14 Horror Movie 13 15 Love Movie 14 16 Artie s Them...

Page 269: ...pa 22 24 Mad Ska 23 25 Celtic Dream 24 26 Celtic Waltz 25 27 Celtic Ballad 26 28 Scottish Reel 27 Name CC00 CC32 PC Bank Contemporary 1 Funky R B 0 14 0 2 AM PM 1 3 Contemporary Bld 2 4 Island View 3 5 Fast Smooth Jazz 4 6 Slow Smooth Jazz 5 7 Slow Jazzy 6 8 Take Beat 7 9 Swing HipHop 8 10 Slow Mood 9 11 Hip Hindi Hop 10 12 Soft HipHop 11 13 New Age 12 14 Kyoto Lounge 13 15 Jazzy Funk 14 16 Slow F...

Page 270: ... Piano 121 8 4 DW8000 EP 121 11 5 FM Pad EP 121 15 5 White Pad EP 121 13 5 Thin E Piano 121 9 4 Dyno Tine EP 1 121 10 4 Dyno Tine EP 2 121 22 4 Tine E Piano 121 19 4 Studio EP 121 7 4 Pro Dyno EP 121 5 4 Pro Stage EP 121 6 4 Bell E Piano 1 121 23 4 Bell E Piano 2 121 24 4 Factory Mallet Bell Vibraphone 1 121 2 11 Marimba 121 7 12 Marimba Key Off 121 2 12 Xylophone 121 1 13 Glockenspiel 121 2 9 Cel...

Page 271: ...2 121 30 25 Name CC00 CC32 PC Steel Gtr RX 121 35 25 Jazz Gtr RX 121 7 26 Soft Jazz Guitar 121 5 26 Single Coil Pro 121 14 27 Nylon Guitar RX 121 18 24 Natural Nylon 121 19 24 RealFolk Gtr RX 121 34 25 Real 12 Strings 121 33 25 Nylon Gtr Pro1 121 8 24 Nylon Gtr Pro2 121 11 24 Nylon Slide Pro 121 14 24 Steel Guitar Pro 121 19 25 12 Strings Pro 121 17 25 Steel 12 Strings 121 5 25 Real Steel Gtr 121 ...

Page 272: ...Horns 121 15 48 Strings Glock 121 18 48 Octave Strings 121 8 48 Pizz Ensemble 121 1 45 Name CC00 CC32 PC Pizz Section 121 2 45 Spiccato Strings 121 4 49 Symphonic Bows 121 10 48 Analog Strings 1 121 5 50 Synth Strings 1 121 6 50 Scat V Bass1 121 17 52 Scat V Bass2 121 18 52 Wuuh Choir 121 8 52 Oh Ah Voices 121 9 52 Femal Male Scat 121 14 52 Take Voices 1 121 4 52 Ooh Slow Voice 121 3 52 Scat Voice...

Page 273: ...1 1 64 Soprano Pro 121 2 64 Sweet Alto Sax1 121 5 65 Sweet Alto Sax 2 121 6 65 Name CC00 CC32 PC Soft Alto Sax 121 7 65 Alto Sax Pro 121 8 65 Tenor SaxNoise1 121 1 66 Tenor Sax Noise2 121 6 66 Baritone Sax Pro 121 3 67 Baritone Sax 121 4 67 Tenor Sax Expr 1 121 7 66 Tenor Sax Expr 2 121 8 66 Jazz Tenor 121 10 66 Alto Sax Expr 121 9 65 Baritone Growl 121 1 67 Cool Sax Ens 121 11 65 Sax Ensemble 121...

Page 274: ...21 10 81 Digital PolySix 121 7 90 A Leadload 121 11 87 Noisy Stabb 121 8 90 Name CC00 CC32 PC Mega Synth 121 9 90 Dark Element 121 3 95 Metallic Rez 121 4 84 Synth Pianoid 121 12 81 Arp Angeles 121 2 88 Big Raw 121 8 87 Caribbean 121 2 96 OB Lead 121 10 87 Port Whine 121 12 80 2VCO Planet Lead 121 13 80 VCF Modulation 121 3 101 Factory Ethnic Sitar 121 8 104 Fiddle 121 1 110 Mandolin Ens 1 121 26 ...

Page 275: ...1 120 0 5 Standard Kit RX2 120 0 1 Standard Kit RX3 120 0 2 Standard Kit RX4 120 0 6 Ambient Kit RX 120 0 3 Name CC00 CC32 PC Pop Std Kit RX 120 0 4 Electro Kit RX1 120 0 75 Electro Kit RX2 120 0 76 Brush Kit RX1 120 0 42 Brush Kit RX2 120 0 43 Brush Kit RX3 120 0 44 HipHop Kit RX 120 0 72 Jazz Kit RX1 120 0 33 Jazz Kit RX2 120 0 34 Jazz Kit RX3 120 0 35 Techno Kit RX 120 0 73 House Kit RX1 120 0 ...

Page 276: ...21 32 16 Techno Org Bass 121 6 17 Name CC00 CC32 PC Legacy Guitar Nylon Bossa 121 4 24 Nylon Vel Harm 121 10 24 Spanish Guitar 121 6 24 Nylon Guitar 121 15 24 Brazilian Guitar 121 9 24 Steel Folk Gtr 121 9 25 Guitar Strings 121 7 24 Finger Key Off 121 7 25 Club Jazz Gtr 2 121 3 26 Pop Steel Slide 121 23 25 Finger Tips 121 8 25 Country Nu 121 11 27 Reso Guitar 121 12 25 Tel Midddle 121 26 27 Clean ...

Page 277: ...ide 121 8 95 Korgmatose 121 13 90 Reoccuring Astra 121 6 95 Name CC00 CC32 PC Astral Dream 121 1 95 Reso Down 121 2 97 Crimson 5ths 121 1 86 Freedom Pad 121 7 89 Noble Pad 121 5 97 Mellow Pad 121 4 95 Lonely Spin 121 1 100 Synth Ghostly 121 2 100 Farluce 121 11 90 Bell Choir 121 7 98 Dance ReMix 121 10 91 Elastick Pad 121 7 97 Legacy Synth Lead Motion Raver 121 1 101 Synchro City 121 2 84 Wild Arp...

Page 278: ...0 0 Ac Piano Wide 121 1 0 Ac Piano Dark 121 2 0 Bright Piano GM 121 0 1 Name CC00 CC32 PC Bright PianoWide 121 1 1 E Grand Piano GM 121 0 2 E Grand Wide 121 1 2 Honky Tonk GM 121 0 3 Honky Wide 121 1 3 E Piano 1 GM 121 0 4 Detuned EP 1 121 1 4 EP 1 Veloc Mix 121 2 4 60 s E Piano 121 3 4 E Piano 2 GM 121 0 5 Detuned EP 2 121 1 5 EP 2 Veloc Mix 121 2 5 EP Legend 121 3 5 EP Phase 121 4 5 Harpsichord ...

Page 279: ...3 Tremolo Str GM 121 0 44 Pizzicato Str GM 121 0 45 Harp GM 121 0 46 Yang Chin 121 1 46 Name CC00 CC32 PC Timpani GM 121 0 47 GM Ensemble Strings Ens 1 GM 121 0 48 Strings Brass 121 1 48 60 s Strings 121 2 48 Strings Ens 2 GM 121 0 49 Synth Strings1GM 121 0 50 Synth Strings 3 121 1 50 Synth Strings2GM 121 0 51 Choir Aahs GM 121 0 52 Choir Aahs 2 121 1 52 Voice Oohs GM 121 0 53 Humming 121 1 53 Syn...

Page 280: ... Koto GM 121 0 107 Taisho Koto 121 1 107 Kalimba GM 121 0 108 Name CC00 CC32 PC Bag Pipes GM 121 0 109 Fiddle GM 121 0 110 Shanai GM 121 0 111 GM Percussive Tinkle Bell GM 121 0 112 Agogo GM 121 0 113 Steel Drums GM 121 0 114 Woodblock GM 121 0 115 Castanets 121 1 115 Taiko Drum GM 121 0 116 Concert BassDrum 121 1 116 Melodic Tom GM 121 0 117 Melodic Tom 2 121 1 117 Synth Drum GM 121 0 118 Rhythm ...

Page 281: ... 32 Brush Kit GM 120 0 40 Orchestra Kit GM 120 0 48 SFX Kit GM 120 0 56 Standard Kit1 XG 127 0 0 Standard Kit2 XG 127 0 9 Room Kit XG 127 0 8 Rock Kit XG 127 0 16 Electro Kit XG 127 0 24 Analog Kit XG 127 0 25 Jazz Kit 1 XG 127 0 32 Jazz Kit 2 XG 127 0 48 Brush Kit XG 127 0 40 Classic Kit XG 127 0 17 User 1 User Sounds 0 127 121 64 0 127 User 2 User Sounds 0 127 121 65 0 127 User DK User Drum Kits...

Page 282: ...m 120 0 41 Brush Kit 2 Legacy Drum SFX 120 0 42 Brush Kit RX1 Factory Drum SFX 120 0 43 Brush Kit RX2 Factory Drum SFX 120 0 44 Brush Kit RX3 Factory Drum SFX 120 0 48 Orchestra Kit GM GM Drum 120 0 49 Orchestra Kit Legacy Drum SFX 120 0 50 Bdrum Sdrum Kit Legacy Drum SFX 120 0 51 Arabian Kit 1 Factory Drum SFX 120 0 56 SFX Kit GM GM Drum 120 0 57 SFX Kit 2 Factory Drum SFX 120 0 58 Synth Kit Fact...

Page 283: ...Rik 2 10 Timpani 4 11 Sticks 11 Cuica 2 11 Darbuka 8 11 Rik 3 11 Orchestra Tutti 12 Rim Shot 12 Jingle Bell 12 Davul 12 Sagat 1 12 13 Hi Tom Flam 13 Long Guiro 13 Douf Rim Ak 13 Sagat 2 13 14 Mid Tom Flam 14 Short Guiro 14 Dragon Gong 14 Tef 1 14 15 Low Tom Flam 15 Open Bells 15 Hollo 1 15 Tef 2 15 16 Tom Flam End 16 Rain Stick 16 Hollo 2 16 Tef 3 16 17 Drum Single A 17 Tamb Acc 1 17 17 Tef 4 17 1...

Page 284: ...mp 2 3 Drum 8 Bt Easy 3 Perc Latin 1 3 Grv Brush 3 Bass Pick Busy 3 Piano Accomp 3 4 Drum 8 Bt Medium 4 Perc Latin 2 4 Grv Jazzy 4 Bass Finger Easy 4 Piano Accomp 4 5 Drum Rock 1 5 Perc Latin 3 5 Grv Latin 5 Bass Finger Med 5 Piano Accomp 5 6 Drum Rock 2 6 Perc Mix 6 Grv HipHop 1 6 Bass Finger Walk 6 Piano Accomp 6 7 Drum Brush 1 3 4 7 Perc Soft 7 Grv HipHop 2 7 Bass Latin 7 Piano Accomp 7 8 Drum ...

Page 285: ... 4 4 11 Synth Seq 11 11 Nature River 12 Gtr Steel Mute 1 12 French Horns 1 12 Solo Gtr Funk 12 Synth Portam 1 12 Nature Storm 13 Gtr Steel Mute 2 13 French Horns 2 13 Solo Piano 1 13 Synth Portam 2 13 Metronome 3 4 14 Guitar Country 14 Strings 1 14 Solo Piano 2 14 Synth Portam 3 14 PreCount 3 4 15 Gtr Nylon Strum1 15 Strings 2 15 Solo Piano 3 15 Synth Portam 4 15 Metronome 4 4 16 Gtr Nylon Strum2 ...

Page 286: ...Speaker 56 L C R Delay 57 Stereo CrossDelay 58 St Multitap Delay 59 St Mod Delay 60 St Dynamic Delay 61 St AutoPanningDly 62 Tape Echo 63 Auto Reverse 64 Sequence BPM Dly 65 L C R BPM Delay 66 Stereo BPM Delay 67 St BPM Mtap Delay 68 St BPM Mod Delay 69 St BPMAutoPanDly 70 Tape Echo BPM 71 Reverb Hall 72 Reverb SmoothHall 73 Reverb Wet Plate 74 Reverb Dry Plate 75 Reverb Room 76 ReverbBrightRoom 7...

Page 287: ...ll occur at each note on In the case of Gate 1 and Gate 1 Dmpr the trigger occurs only for the first note on Modulation source Note Off No modulation Gate1 Gate1 Dmpr Gate2 Gate2 Dmpr Note Nr Note Number Velocity Note Velocity Expo Velocity Exponential Note Velocity AfterTouch After Touch JS X Joystick Left Right JS Y CC 01 Joystick Forward JS Y CC 02 Joystick Backward MIDI CC 04 MIDI CC 12 MIDI C...

Page 288: ...gh EQ g Output Level 0 100 Sets the output level of the compressor Src Off Tempo Selects the modulation source for the compressor output level Amt 100 100 Sets the modulation amount for the compressor output level h Wet Dry Dry 1 99 99 1 Wet Sets the Balance between the wet and dry signal Src Off Tempo Selects a modulation source for Wet Dry Amt 100 100 Sets the modulation amount for Wet Dry Left ...

Page 289: ... low range mid range and high range in a different way from the EQ e Low Offset dB f Mid Offset dB g High Offset dB These parameters set the gain of the trigger signal For example if you do not want to apply compression to the high range reduce the High Offset value down below the Thresh old level In this way the high range limiter will not respond and compression will not be applied Input Level O...

Page 290: ...l or use the input signal as a trigger b Envelope Select L R Mix L Only R Only Selects the control signal left and right linked left only or right only Src Off Tempo Selects the source that will control the gate when Envelope Src D mod c Threshold 0 100 Sets the level at which gating is applied Polarity Switches the polarity of gating d Attack 1 100 Sets the attack time Release 1 100 Sets the rele...

Page 291: ...the center frequency of Band 3 Q 0 5 10 0 Sets the bandwidth of Band 3 Gain dB 18 0 18 0 Sets the gain of Band 3 h Band4 Cutoff Hz 500 20 00k Sets the center frequency of Band 4 Q 0 5 10 0 Sets the bandwidth of Band 4 Gain dB 18 0 18 0 Sets the gain of Band 4 i Wet Dry Dry 1 99 99 1 Wet Balance between the wet and dry signal Src Off Tempo Table Dynamic Modulation sources on page 283 Amt 100 100 Am...

Page 292: ...y L msec 0 0 50 0 Sets the delay time for the Enhancer left channel d Enhancer Delay R msec 0 0 50 0 Sets the delay time for the Enhancer right channel e Enhancer Depth 0 100 Sets the determines to what degree the Enhancer effect is applied Src Off Tempo Selects the modulation source of the Enhancer width Amt 100 100 Sets the modulation amount of the Enhancer width f EQ Trim 0 100 Sets the 2 band ...

Page 293: ...p Mode Auto D mod LFO Selects the control from auto wah modulation source and LFO Src Off Tempo Selects the modulation source for the wah when Sweep Mode D mod Respon 0 100 Sets the response speed when Sweep Mode Auto or D mod c Envelope Sens 0 100 Sets the sensitivity of auto wah Envelope Shape 100 100 Sets the sweep curve of auto wah d LFO Frequency Hz 0 02 20 00 Sets the speed of the LFO Src Of...

Page 294: ...otes that specify the LFO speed Times x1 x32 Sets the number of notes that specify the LFO speed h Output Level 0 100 Sets the output level of the effect sound Src Off Tempo Selects the modulation source that will control the effect output level Amt 100 100 Sets the modulation amount of the effect output level i Wet Dry Dry 1 99 99 1 Wet Balance between the wet and dry signal Src Off Tempo Table D...

Page 295: ...Src Off Tempo Selects the modulation source of the cutoff Amt 100 100 Sets the modulation amount of the cutoff c Resonance 0 100 Sets the resonance amount Src Off Tempo Selects the source that will modulate the amount of resonance Amt 100 100 Sets the amount by which the resonance will be modulated d LFO Waveform Triangle Sine Selects the LFO Waveform Phase degree 180 180 Sets the LFO phase differ...

Page 296: ...monics are added e Envelope Sens 0 100 Sets the sensitivity with which very low harmonics are added Envelope Shape 100 100 Sets the oscillator s volume envelope curve f Wet Dry Dry 1 99 99 1 Wet Balance between the wet and dry signal Src Off Tempo Table Dynamic Modulation sources on page 283 Amt 100 100 Amount of modulation source FX Amt Note No OSC Mode Fixed Note Key Follow Sine Oscillator Fixed...

Page 297: ...od Max Voice Bottom Voice Center Voice Top U I A A O E JS X Ribbon JS Y JS Y etc Zero Max Talking Modulator Control a Pre LPF Off On Selects whether the harmonic noise caused by a decrease in sampling frequency is generated or not High Damp 0 100 Sets the ratio of cut of the high range b Sampling Freq Hz 1 00k 48 00k Sets the sampling frequency Src Off Tempo Selects the modulation source of the sa...

Page 298: ...ion sources on page 283 Amt 100 100 Amount of modulation source Left Right FX Amt FX Amt Stereo In Stereo Out Analog Record Simulation Pre EQ Pre EQ EQ Trim EQ Trim a Wah Off On Switches Wah on off Src Off Tempo Selects the modulation source that switches the Wah on and off Sw Toggle Moment Selects the switching mode for the modulation source that switches the Wah on and off b Wah Sweep Range 10 1...

Page 299: ... entire volume level to increase Use the Output Level parameter to adjust the volume level The Output Level param eter uses the signal level input to the 3 Band EQ If clipping occurs at the 3 Band EQ adjust the Output Level parameter 19 St Guitar Cabinet Stereo Guitar Cabinet This simulates the acoustical character of a guitar amp s speaker cabinet a Trim 0 100 Sets the input level b Type Selects ...

Page 300: ...Trim Trim Right FX Amt FX Amt Stereo In Stereo Out Cabinet Simulator Cabinet Simulator a Amp Type Selects the amplifier type LA STUDIO An amp that is typical of the LA sound JAZZ A combo amp favored by jazz bassists GOLD PANEL An amp distinctive for its eye catching gold panel and clean sound SCOOPED An amp typical of 80 s sounds VALVE2 A tube amp suitable for rock VALVE A tube amp with the ULTRA ...

Page 301: ...Amt 100 100 Amount of modulation source Amp Type Cabinet Type LA STUDIO LA 4x10 LA 1x18 JAZZ JAZZ 1x15 GOLD PANEL MODERN 4x10 SCOOPED METAL 4x10 VALVE2 CLASSIC 8x10 VALVE CLASSIC 8x10 CLASSIC COMBI 1x12 1x18 Left Right FX Amt Volume FX Amt FX Amt 100 Mono In Mono Out FX Amt 0 Stereo In Stereo Out D mod Bass Amp Model1 Cabinet Simulator a Tube1 Low Cut Hz Thru 21 8 00k Sets the cutoff frequency for...

Page 302: ...setting is the closest mic position and the Far setting is the farthest Mic Pre Amp Saturation In Out Saturation 0 Saturation 50 Saturation 100 Bias 0 In Out Satulation 50 Bias 0 Bias 50 Bias 100 Mic Pre Amp Bias a Mic Type Vintage Dynamic Multi Condenser Percussion Condenser Drums Dynamic Vocal Dynamic Multi Dynamic Vocal Condenser Vocal Tube Kick Dynamic Selects the type of mic b Mic Position Cl...

Page 303: ...ets the number of notes that specify the LFO speed d L Pre Delay msec 0 0 50 0 Sets the delay time for the left channel R Pre Delay msec 0 0 50 0 Sets the delay time for the right channel e Depth 0 100 Sets the depth of LFO modulation Src Off Tempo Selects the modulation source for the LFO modulation depth Amt 100 100 Sets the modulation amount of the LFO modulation depth f EQ Trim 0 100 Sets the ...

Page 304: ...low and high range g Feedback 100 100 Sets the feed back amount of the chorus block High Damp 0 100 Sets the high range damping amount of the chorus block h Low Level 0 100 Sets the low range output level High Level 0 100 Sets the high range chorus output level i Wet Dry Dry 1 99 99 1 Wet Balance between the wet and dry signal Src Off Tempo Table Dynamic Modulation sources on page 283 Amt 100 100 ...

Page 305: ... e Tap4 270 msec 0 1000 Sets the Tap4 LFO phase 270 degrees delay time Depth 0 30 Sets the Tap4 chorus depth Level 0 30 Sets the Tap4 output level Pan L6 L1 C R1 R6 Sets the Tap4 stereo image f Tap1 Feedback 100 100 Sets the Tap1 feedback amount Src Off Tempo Selects the modulation source of Tap1 feedback amount and effect balance Amt 100 100 Sets the Tap1 feedback amount and modulation amount g W...

Page 306: ... Amount of modulation source Polysix Ensemble Left Right FX Amt FX Amt FX Amt 100 Mono In Mono Out FX Amt 0 Stereo In Stereo Out a Delay Time msec 0 0 50 0 Sets the delay time from the original sound b LFO Waveform Triangle Sine Selects the LFO Waveform LFO Shape 100 100 Changes the curvature of the LFO Waveform c LFO Phase degree 180 180 Sets the LFO phase difference between the left and right d ...

Page 307: ...eed e MIDI Sync Off On When this is on the LFO speed is set by BPM Base Note and Times instead of Frequency BPM MIDI 40 00 300 00 MIDI syncs to the system tempo 40 300 sets the tempo manually for this individual effect Base Note r w Selects the type of notes that specify the LFO speed Times x1 x32 Sets the number of notes that specify the LFO speed f Step Base Note r w Selects the type of notes to...

Page 308: ...ts the modulation amount of the LFO modulation depth h Resonance 100 100 Sets the resonance amount High Damp 0 100 Sets the resonance damping amount in the high range j Wet Dry Wet 1 99 Dry 99 1 Wet Balance between the wet and dry signal Src Off Tempo Table Dynamic Modulation sources on page 283 Amt 100 100 Amount of modulation source Left Right Resonance LFO Shape LFO Phase LFO Tri Sine FX Amt FX...

Page 309: ...Tempo Table Dynamic Modulation sources on page 283 Amt 100 100 Amount of modulation source EG Attack Decay EG D mod Sweep Mode D mod Phaser Phaser Left Right Resonance FX Amt FX Amt High Damp Stereo In Stereo Out a AUTOFADE Src Off Tempo Selects the modulation source that starts AutoFade b Fade In Delay msec 00 2000 Sets the fade in delay time Fade In Rate 1 100 Sets the rate of fade in c LFO Wave...

Page 310: ...equency Hz 1 0 Amount 3 0 LFO Frequency 1 0 3 0 4 0Hz LFO Frequency 1 0Hz Gate1 Signal AUTOFADE Fade In Dealy a AUTOFADE Src Off Tempo Selects the modulation source that starts AutoFade Fade In Delay msec 00 2000 Sets the fade in delay time Rate 1 100 Sets the rate of fade in b LFO Frequency Mod D mod AUTOFADE Switches between D mod and AUTOFADE for the LFO frequency modulation Wet Dry Mod D mod A...

Page 311: ... of resonance intensity LFO D mod Invert Off On Reverses the Voice 1 and 2 control when LFO D mod is selected b LFO Frequency Hz 0 02 20 00 Sets the speed of the LFO D mod Src Off Tempo Selects the modulation source that controls resonance intensity c MIDI Sync Off On When this is on the LFO speed is set by BPM Base Note and Times instead of Frequency BPM MIDI 40 00 300 00 MIDI syncs to the system...

Page 312: ...O speed d MIDI Sync Off On When this is on the LFO speed is set by BPM Base Note and Times instead of Frequency BPM MIDI 40 00 300 00 MIDI syncs to the system tempo 40 300 sets the tempo manually for this individual effect Base Note r w Selects the type of notes that specify the LFO speed Times x1 x32 Sets the number of notes that specify the LFO speed e Pitch Depth 0 100 Sets the pitch variation ...

Page 313: ...c LFO Sample Cycle Hz Duration sets the length of the sampled grain and the LFO Sample Cycle controls how often a new grain is sampled In between Sample Cycles the current grain is repeated continu ously Max Zero Scratch D mod Max JS X Ribbon JS Y JS Y etc Zero Max Scratch Source Recorded Sound Scratch Source Start Playback Position End a Duration 0 100 Sets the duration of the grain Src Off Tempo...

Page 314: ...this is on the LFO speed is set by BPM Base Note and Times instead of Frequency BPM MIDI 40 00 300 00 MIDI syncs to the system tempo 40 300 sets the tempo manually for this individual effect Base Note r w Selects the type of notes that specify the LFO speed Times x1 x32 Sets the number of notes that specify the LFO speed e Depth 0 100 Sets the depth of LFO modulation Src Off Tempo Selects the modu...

Page 315: ...ce between the wet and dry signal Src Off Tempo Table Dynamic Modulation sources on page 283 Amt 100 100 Amount of modulation source Left Right FX Amt FX Amt Stereo In Stereo Out LFO Phase LFO Shape Pan Pan LFO Tri Sin Depth a Type Phs Trml Phs LR Trml LR Selects the type of the tremolo and phaser LFOs Phaser Tremolo Phaser Tremolo Spin Phaser Tremolo LR Phaser LR Tremolo Phaser LR Tremolo Spin Ph...

Page 316: ...d dry signal Src Off Tempo Table Dynamic Modulation sources on page 283 Amt 100 100 Amount of modulation source a OSC Mode Fixed Note Key Follow Switching between specifying the oscillator frequency and using a note number Pre LPF 0 100 Sets the damping amount of the high range input to the ring modulator b Fixed Frequency Hz 0 12 00k Sets the oscillator frequency when OSC Mode is set to Fixed Src...

Page 317: ... Feedback 100 100 Sets the feedback amount High Damp 0 100 Sets the damping amount in the high range d Input Level Dmod 100 100 Sets the modulation amount of the input level Src Off Tempo Selects the modulation source for the input level e Wet Dry Dry 1 99 99 1 Wet Balance between the wet and dry signal Src Off Tempo Table Dynamic Modulation sources on page 283 Amt 100 100 Amount of modulation sou...

Page 318: ... OVER Displays an error message when the delay time exceeds the upper limit e Delay Base Note r w Selects the type of notes to specify the delay time Times x1 x32 Sets the number of notes to specify the delay time f Feedback Position Pre Post Switches the feedback connection g Feedback 100 100 Sets the feedback amount High Damp 0 100 Sets the damping amount in the high range h Input Level Dmod 100...

Page 319: ...the modulation source that will control vibrato depth Amt 100 100 Sets the modulation amount for controlling the vibrato depth f Custom Speed Hz 0 02 20 00 Sets the vibrato speed Src Off Tempo Selects the modulation source for controlling the vibrato speed Amt 20 00 20 00 Sets the modulation amount for controlling the vibrato speed g Wet Dry Dry 1 99 99 1 Wet Balance between the wet and dry signal...

Page 320: ...arker and lighter as it feeds back g Spread This parameter sets the pan width of the effect sound The stereo image is widest with a value of 50 and the effect sound of both channels is output from the center with a value of 0 Mic Spread Microphone Microphone Mic Distance Mic Distance Rotary Speaker Top View Rotary Speaker Mic Placement a L Delay Time msec 0 2730 Sets the delay time of TapL Level 0...

Page 321: ...level i Spread 50 50 Sets the width of the stereo image of the effect sound j Wet Dry Dry 1 99 99 1 Wet Balance between the wet and dry signal Src Off Tempo Table Dynamic Modulation sources on page 283 Amt 100 100 Amount of modulation source Delay Delay Stereo Cross Left Right Feedback FX Amt FX Amt Stereo In Stereo Out Input Level D mod Input Level D mod High Damp Low Damp High Damp Low Damp Spre...

Page 322: ... is set by BPM Base Note and Times instead of Frequency BPM MIDI 40 00 300 00 MIDI syncs to the system tempo 40 300 sets the tempo manually for this individual effect Base Note r w Selects the type of notes that specify the LFO speed Times x1 x32 Sets the number of notes that specify the LFO speed g L LFO Phase deg 180 180 Sets the phase obtained when the left LFO is reset L Depth 0 200 Sets the d...

Page 323: ...left channel L Feedback 100 100 Sets the feedback amount for the left channel b R Delay Time msec 0 0 1360 0 Sets the delay time for the right channel R Feedback 100 100 Sets the feedback amount for the right channel c High Damp 0 100 Sets the damping amount in the high range Low Damp 0 100 Sets the damping amount in the low range d LFO Waveform Triangle Sine Selects the LFO Waveform LFO Shape 100...

Page 324: ...put level Pan L 1 99 R Sets the stereo image of tap2 FB Amt 100 100 Sets the Tap2 feedback amount f Tap3 Level 0 100 Sets the Tap3 output level Pan L 1 99 R Sets the stereo image of tap3 FB Amt 100 100 Sets the Tap3 feedback amount g Feedback 0 100 Sets the amount of feedback for Taps 1 2 and 3 Src Off Tempo Selects the modulation source of feedback amount Amt 100 100 Sets the feedback amount h Hi...

Page 325: ...verse Time Reverse Time Envelope Select Input Reverse Reverse a BPM MIDI 40 00 300 00 MIDI syncs to the system tempo 40 300 sets the tempo manually for this individual effect b Rhythm Pattern x eee 3 Selects a rhythm pattern c Tap1 Pan L 1 99 R Sets the panning of Tap1 Tap2 Pan L 1 99 R Sets the panning of Tap2 Tap3 Pan L 1 99 R Sets the panning of Tap3 Tap4 Pan L 1 99 R Sets the panning of Tap4 d...

Page 326: ...tion source for the input level h Spread 0 50 Sets the width of the stereo image of the effect sound i Wet Dry Dry 1 99 99 1 Wet Balance between the wet and dry signal Src Off Tempo Table Dynamic Modulation sources on page 283 Amt 100 100 Amount of modulation source C Delay Left Right Feedback Spread FX Amt FX Amt FX Amt 100 Mono In Stereo Out FX Amt 0 Stereo In Stereo Out Input Level D mod High D...

Page 327: ...amp Delay Delay Feedback Tap1 Level Mode Mode 1 2 1 2 Tap1 1 Tap2 2 a Modulation Mode LFO D mod Switches between LFO modulation control and modulation source control b D mod Modulation L R L R Reversed L R control by modulation source Src Off Tempo Selects the modulation source that controls delay time Response 0 30 Sets the rate of response to the modulation source c LFO Waveform Triangle Sine Se...

Page 328: ... right channel delay time Feedback 100 100 Sets the feedback amount for the right channel d High Damp 0 100 Sets the damping amount in the high range Low Damp 0 100 Sets the damping amount in the low range e LFO Waveform Triangle Sine Selects the LFO Waveform Shape 100 100 Changes the curvature of the LFO Waveform LFO Phase 180 180 Sets the LFO phase difference between the left and right f Panning...

Page 329: ...o the Tap 1 delay time the depth of pitch variation e Tap3 Position 0 100 Sets the position of Tap 3 relative to the Tap 1 delay time the depth of pitch variation f Tap1 Level 0 100 Sets the Tap1 output level Pan L 1 99 R Sets the stereo image of tap1 FB Amt 100 100 Sets the Tap1 feedback amount g Tap2 Level 0 100 Sets the Tap2 output level Pan L 1 99 R Sets the stereo image of tap2 FB Amt 100 100...

Page 330: ...ulate nuances such as the type of walls of a room a Reverb Time sec 0 1 10 0 Sets the reverberation time High Damp 0 100 Sets the damping amount in the high range b Pre Delay msec 0 200 Sets the delay time from the dry sound Pre Delay Thru 0 100 Sets the mix ratio of non delay sound c EQ Trim 0 100 Sets the EQ input level d Pre LEQ Fc Low Mid Low Selects the cutoff frequency low or mid low of the ...

Page 331: ... the gain of High EQ h Wet Dry Dry 1 99 99 1 Wet Balance between the wet and dry signal Src Off Tempo Table Dynamic Modulation sources on page 283 Amt 100 100 Amount of modulation source Left Right FX Amt FX Amt FX Amt 100 Mono In Stereo Out FX Amt 0 Stereo In Stereo Out EQ Trim EQ Trim LEQ HEQ Pre Delay Reverb Reverb Level ER Level ER Level Pre Delay Thru ERs ERs Reverb Room Type Time Level Loude...

Page 332: ...e order of the parametric equalizer and wah connection b E B1 Cutoff Hz 20 1 00k Sets the center frequency of Band 1 Q 0 5 10 0 Sets the bandwidth of Band 1 Gain dB 18 18 Sets the gain of Band 1 c E B2 Cutoff Hz 50 5 00k Sets the center frequency of Band 2 Q 0 5 10 0 Sets the bandwidth of Band 2 Gain dB 18 18 Sets the gain of Band 2 d E B3 Cutoff Hz 300 10 00k Sets the center frequency of Band 3 Q...

Page 333: ... for the chorus flanger j Wet Dry Dry 1 99 99 1 Wet Balance between the wet and dry signal Src Off Tempo Table Dynamic Modulation sources on page 283 Amt 100 100 Amount of modulation source Left Right FX Amt FX Amt 100 Mono In Stereo Out FX Amt 0 Stereo In Stereo Out Trim Parametric 4Band EQ Chorus Flanger FX Amt Chorus Flanger Feedback LFO Tri Sine Cho Flng FX Amt Normal Wet Invert Output Mode P4...

Page 334: ...amic Modulation sources on page 283 Amt 100 100 Amount of modulation source Left Right FX Amt FX Amt FX Amt 100 Mono In Mono Out FX Amt 0 Stereo In Stereo Out Trim Parametric 4Band EQ Multitap Delay Feedback High Damp Delay 2 1 Mt Dly FX Amt COMPRESSOR a C Sensitivity 1 100 Sets the sensitivity b C Attack 1 100 Sets the attack level Output Level 0 100 Sets the compressor output level c C EQ Trim 0...

Page 335: ...Overdrive Hi Gain Switches between overdrive and high gain distortion Drive 1 100 Sets the degree of distortion d O Output Level 0 50 Sets the overdrive output level Src Off Tempo Selects the modulation source for the overdrive output level Amt 50 50 Sets the modulation amount of the overdrive output level e O Low Cutoff Hz 20 1 00k Sets the center frequency for Low EQ shelving type Gain dB 18 18 ...

Page 336: ...ametric EQ i Wet Dry Dry 1 99 99 1 Wet Balance between the wet and dry signal Src Off Tempo Table Dynamic Modulation sources on page 283 Amt 100 100 Amount of modulation source Left Right FX Amt FX Amt FX Amt 100 Mono In Mono Out FX Amt 0 Stereo In Stereo Out Routing Compressor Trim Parametric 4Band EQ Output Level Envelope Control Comp COMPRESSOR a C Sensitivity 1 100 Sets the sensitivity b C Att...

Page 337: ... source Left Right FX Amt FX Amt FX Amt 100 Mono In Stereo Out FX Amt 0 Stereo In Stereo Out Routing Compressor LEQ HEQ EQ Trim Comp Output Level Envelope Control Phaser Phaser Resonance LFO Tri Sine Phaser FX Amt Normal Wet Invert Output Mode COMPRESSOR a C Sensitivity 1 100 Sets the sensitivity b C Attack 1 100 Sets the attack level Output Level 0 100 Sets the compressor output level c C EQ Trim...

Page 338: ...ets the gain of Band 1 f E B2 Cutoff Hz 50 5 00k Sets the center frequency of Band 2 Q 0 5 10 0 Sets the bandwidth of Band 2 Gain dB 18 18 Sets the gain of Band 2 g E B3 Cutoff Hz 300 10 00k Sets the center frequency of Band 3 Q 0 5 10 0 Sets the bandwidth of Band 3 Gain dB 18 18 Sets the gain of Band 3 h E B4 Cutoff Hz 500 20 00k Sets the center frequency of Band 4 Q 0 5 10 0 Sets the bandwidth o...

Page 339: ...ic Modulation sources on page 283 Amt 100 100 Amount of modulation source Left Right FX Amt FX Amt FX Amt 100 Mono In Stereo Out FX Amt 0 Stereo In Stereo Out Routing Chorus Flanger Feedback Cho Flng FX Amt Normal Wet Invert Output Mode Limiter Limiter Gain Adjust Envelope Control LEQ HEQ EQ Trim Chorus Flanger LFO Tri Sine LIMITER a L Ratio 1 0 1 50 0 1 Inf 1 Sets the signal compression ratio Thr...

Page 340: ...rder of the limiter and multitap delay i Wet Dry Dry 1 99 99 1 Wet Balance between the wet and dry signal Src Off Tempo Table Dynamic Modulation sources on page 283 Amt 100 100 Amount of modulation source Left Right FX Amt FX Amt FX Amt 100 Mono In Mono Out FX Amt 0 Stereo In Stereo Out Routing Multitap Delay Feedback High Damp Delay 2 1 Mt Dly FX Amt Limiter Limiter Gain Adjust Envelope Control E...

Page 341: ... Exciter Exciter Limiter Limiter Gain Adjust Envelope Control EXCITER a X Exciter Blend 100 100 Sets the intensity depth of the Exciter effect b X Emphasis Frequency 0 70 Sets the frequency range to be emphasized c X Trim 0 100 Sets the EQ input level d X Pre LEQ Gain dB 15 15 Sets the gain of Low EQ Pre HEQ Gain dB 15 15 Sets the gain of High EQ CHORUS FLANGER e F LFO Frequency Hz 0 02 20 00 Sets...

Page 342: ...t Right FX Amt FX Amt FX Amt 100 Mono In Stereo Out FX Amt 0 Stereo In Stereo Out LEQ HEQ EQ Trim Exciter Exciter Phaser Phaser Resonance LFO Tri Sine Phaser FX Amt Normal Wet Invert Output Mode EXCITER a X Exciter Blend 100 100 Sets the intensity depth of the Exciter effect b X Emphasis Frequency 0 70 Sets the frequency range to be emphasized c X Trim 0 100 Sets the EQ input level d X Pre LEQ Gai...

Page 343: ...ve Hi Gain Switches between overdrive and high gain distortion Drive 1 100 Sets the degree of distortion b O Output Level 0 50 Sets the overdrive output level Src Off Tempo Selects the modulation source for the overdrive output level Amt 50 50 Sets the modulation amount of the overdrive output level e O Low Cutoff Hz 20 1 00k Sets the center frequency for Low EQ shelving type Gain dB 18 18 Sets th...

Page 344: ... page 283 Amt 100 100 Amount of modulation source Left Right FX Amt FX Amt FX Amt 100 Mono In Stereo Out FX Amt 0 Stereo In Stereo Out Routing Overdrive Hi Gain 3 Band PEQ Output Level Mode Overdrive Hi Gain Drive Driver Phaser Phaser Resonance LFO Tri Sine Phaser FX Amt Normal Wet Invert Output Mode OD HI GAIN a O Drive Mode Overdrive Hi Gain Switches between overdrive and high gain distortion Dr...

Page 345: ...of the wah and amp simulation g Wet Dry Dry 1 99 99 1 Wet Balance between the wet and dry signal Src Off Tempo Table Dynamic Modulation sources on page 283 Amt 100 100 Amount of modulation source FX Amt Left Right FX Amt FX Amt FX Amt 100 Mono In Mono Out FX Amt 0 Stereo In Stereo Out Routing Amp Simulation Amp Simulation Filter Wah Auto Wah Wah D mod Envelope Sweep Mode D mod Auto LFO LFO DECIMAT...

Page 346: ...he wet and dry signal Src Off Tempo Table Dynamic Modulation sources on page 283 Amt 100 100 Amount of modulation source Left Right FX Amt FX Amt FX Amt 100 Mono In Mono Out FX Amt 0 Stereo In Stereo Out Decimator Routing Pre LPF High Damp Output Level Decimator Resolution Compressor Comp Output Level Envelope Control AMP SIM a A Amplifier Type SS EL84 6L6 Selects the type of guitar amplifier TREM...

Page 347: ...Out LEQ HEQ EQ Trim Multitap Delay Feedback High Damp Delay 2 1 Chorus Flanger Cho Flng FX Amt Mt Dly FX Amt Chorus Flanger Feedback LFO Tri Sine PHASER a P LFO Frequency Hz 0 02 20 00 Sets the speed of the LFO LFO Waveform Triangle Sine Selects the LFO Waveform b P Manual 0 100 Sets the frequency to which the effect is applied Depth 0 100 Sets the depth of LFO modulation Resonance 100 100 Sets th...

Page 348: ... Balance 0 100 Sets the reverb effect balance d R PreLEQ Fc Low Mid Low Selects the cutoff frequency low or mid low of the low range equalizer Pre HEQ Fc High Mid High Selects the cutoff frequency high or mid high of the high range equalizer e R PreLEQ Gain dB 15 0 15 0 Sets the gain of Low EQ Pre HEQ Gain dB 15 0 15 0 Sets the gain of High EQ GATE f G Envelope Select D mod Input Switches between ...

Page 349: ...bove which the compressor is applied c Attack 1 100 Sets the attack time d Release 1 100 Sets the release time e Low Offset dB 40 0 Sets the low range gain of trigger signal f Mid Offset dB 40 0 Sets the mid range gain of trigger signal g High Offset dB 40 0 Sets the high range gain of trigger signal h Gain Adjust dB Inf 38 24 Sets the output gain Src Off Tempo Selects the modulation source for th...

Page 350: ...f the dry sound mixed to the distortion Speaker Simulation Off On Switches the speaker simulation on off j Wet Dry Dry 1 99 99 1 Wet Balance between the wet and dry signal Src Off Tempo Table Dynamic Modulation sources on page 283 Amt 100 100 Amount of modulation source Left Right FX Amt FX Amt FX Amt 100 Mono In Mono Out FX Amt 0 Stereo In Stereo Out Amp Simulation 3 Band EQ Output Level Direct M...

Page 351: ... 2x12 BLACK 2x12 TWEED 1x12 TWEED 1x12 TWEED 4x10 TWEED 4x10 a Amp Type Selects the type of the amplifier STUDIO COMBO A tube combo ideal for the Motown sound VOX AC100 A 100W tube amp AC100 made by Vox UK MAJOR A 200W tube amp made in the UK b Drive Gain 0 100 Sets the input gain c Volume 0 100 Sets the output level Src Off Tempo Selects the modulation source for the output level Amt 100 100 Sets...

Page 352: ...p3 LFO phase 60 degrees delay time Depth 0 30 Sets the Tap3 chorus depth Status Always On Always Off On Off Dm Off On Dm Selects on off or modulation source for the control of Tap3 output e Tap4 240 msec 0 2000 Sets the Tap4 LFO phase 240 degrees delay time Depth 0 30 Sets the Tap4 chorus depth Status Always On Always Off On Off Dm Off On Dm Selects on off or modulation source for the control of T...

Page 353: ...st Delay Pitch Shifter Delay Pitch Shifter a Mode Slow Medium Fast Switches Pitch Shifter mode L R Pitch Normal Up Down Determines whether or not the L R pitch shift amount is inverted b Pitch Shift 1 2tone 24 24 Sets the pitch shift amount in steps of a semitone Src Off Tempo Selects the modulation source of pitch shift amount Amt 24 24 Sets the modulation amount of pitch shift amount c Fine cent...

Page 354: ...ickly the horn rotation speed changes Horn Ratio Stop 0 50 2 00 Adjusts the high frequency horn rotation speed Standard value is 1 00 Stop stops the rotation h Rotor Acceleration 0 100 Sets how quickly the rotor speed changes Rotor Ratio Stop 0 50 2 00 Adjusts the low frequency rotor rotation speed Standard value is 1 0 Stop stops the rotation i Mic Distance 0 100 Distance between the microphone a...

Page 355: ...nt in the high range g Low Damp 0 100 Sets the damping amount in the low range h Input Level Dmod 100 100 Sets the modulation amount of the input level Src Off Tempo Selects the modulation source for the input level i Spread 50 50 Sets the width of the stereo image of the effect sound j Wet Dry Dry 1 99 99 1 Wet Balance between the wet and dry signal Src Off Tempo Table Dynamic Modulation sources ...

Page 356: ...been set to Auto the loop time is also reset The effect is off when a value for the modulation source specified for the RST Control Src parameter is 63 or smaller and the effect is on when the value is 64 or higher 123 LCR BPM Long Dly The L C R delay enables you to match the delay time with the song tempo a Time Over You can set the delay time up to 10 920msec If the delay time exceeds this limit...

Page 357: ...ck e R Feedback 100 100 Sets the feedback amount for the right channel R Amt 100 100 Sets the modulation amount of the right channel feedback f High Damp 0 100 Sets the damping amount in the high range g Low Damp 0 100 Sets the damping amount in the low range h Input Level Dmod 100 100 Sets the modulation amount of the input level Src Off Tempo Selects the modulation source for the input level i W...

Page 358: ... Punch Recording on off Style Upper1 Mute Style Upper2 Mute Style Upper3 Mute Style Lower Mute Style Drum Mute Style Percussion Mute Style Bass Mute Style Acc1 Mute Style Acc2 Mute Style Acc3 Mute Style Acc4 Mute Style Acc5 Mute Style Acc 1 5 Mute Song Melody Mute Mute of Song track 4 usually the Melody track in Standard MIDI Files Song Drum Bass Mode Mute of all tracks apart for track 2 usually B...

Page 359: ...keys are tuned as in the Equal tun ing Stretch Simulates the stretched tuning of an acoustic piano Basically an equal tuning the lowest notes are slightly lower while the highest notes are slightly higher than the standard User User scale i e scale programmed by the user for the Style Play Backing Sequence and Song Play modes The user scale can be saved to a Perfor mance Style Settings STS or Song...

Page 360: ... T T T T T Major 2 note 4 note T T Major 6th 3 note T 4 note T T Major 7th 2 note T T constituent notes of the chord can be used as tension 3 note T T Sus 4 2 note 3 note Sus 2 3 note T T T T 2 note T T T 4 note T T T T T Dominant 7th 4 note T T Dominant 7th Sus 4 3 note T T 3 note Flat 5th 4 note T T Major 7th Sus 4 T 4 note Major 7th 5 T T T T 4 note Dominant 7th 5 Pa300 User Manual v150 English...

Page 361: ...ote T 3 note T T Diminished 4 note Diminished 7th 4 note T T Diminished Major 7th 4 note T T T Minor 7th 5 3 note T T Augmented 4 note T T T T Augmented 7th 4 note T T T T Augmented Major 7th No 3rd no 5th No 3rd 1 note 2 note 3 note T T Minor 2 note T 4 note T T Minor 6th Pa300 User Manual v150 English book Page 357 Saturday March 29 2014 5 29 PM ...

Page 362: ... speed 77 Lfo1 Dpt Vibrato depth 78 Lfo1 Dly Vibrato initial delay 79 FilterEgþ 80 Gen pc 5 Sound Controller 1 81 Gen pc 6 Sound Controller 2 82 Gen pc 7 83 Gen pc 8 84 Port ctl 85 90 Undef ctl 91 Fx 1 depth A B Master FX 1 reverb send level 92 Fx 2 ctl 93 Fx 3 depth A B Master FX 2 modul send level 94 Fx 4 ctl 95 Fx 5 ctl 96 Data Inc 97 Data Dec 98 NRPN Lsb See tables below 99 NRPN Msb See tables...

Page 363: ...ndix The following NRPN messages are recognized by Pa300 in Style Play and Song Play mode only NRPN CC 99 MSB CC 98 LSB CC 06 Data Entry SongBook Entry 2 64 0 99 Pa300 User Manual v150 English book Page 359 Saturday March 29 2014 5 29 PM ...

Page 364: ...nk Select LSB CC 32 and Program Change messages on the Control channel see MIDI MIDI In Channels on page 159 If a Style is already selected just send the Program Change message Note The above Control Change and Program Change numbers are given according to the 0 127 numbering system PC Style Element PC Style Element PC Style Element PC Style Element PC Style Element 80 Intro 1 81 Intro 2 82 Intro ...

Page 365: ...r 10 11 Ply Tr 11 Ply Tr 11 Ply Tr 11 12 Ply Tr 12 Ply Tr 12 Ply Tr 12 13 Ply Tr 13 Ply Tr 13 Ply Tr 13 14 Ply Tr 14 Ply Tr 14 Ply Tr 14 15 Ply Tr 15 Ply Tr 15 Ply Tr 15 16 Ply Tr 16 Ply Tr 16 Ply Tr 16 MIDI OUT Channel 1 Upper 1 Upper 1 Ply Tr 1 Upper 1 2 Upper 2 Upper 2 Ply Tr 2 3 Upper 3 Upper 3 Ply Tr 3 4 Lower Lower Ply Tr 4 5 Ply Tr 5 6 Ply Tr 6 7 Ply Tr 7 8 Ply Tr 8 9 Ply Tr 9 10 Ply Tr 10 ...

Page 366: ...SB MIDI Driver Please connect Pa300 to the computer via an USB cable only after having installed the KORG USB MIDI Driver Tools 1 Insert the included Accessory Disc into the optical drive of your Windows PC 2 Open the folder DVD ROM USB MIDI Driver Win KORG USB MIDI Driver v n nn and double click on KORG USB MIDI Driver Tools Setup v n nn exe to run the installer n nn meaning the version number 3 ...

Page 367: ...ver pkg to run the installer 5 Follow the instructions appearing on screen 6 When installation is completed eject the virtual drive and connect the DEVICE USB port of your Pa300 to one of the USB ports of your Mac by using a standard USB cable Driver s ports After installation the following ports will be shown in you MIDI application e g sequencer among the other MIDI devices Pa300 KEYBOARD This a...

Page 368: ...Upper Octave either Selects the Mixer Tuning Tuning page Transpose either Selects the Global Tuning Transpose Controls page Style Play mode Variation Selects the corresponding Variation in the Style Play Controls Drum Map page Ensemble Selects the Ensemble Type parameter in the Style Play Keyboard Ensemble Ensemble page Pad any Selects the Style Play Pad Pad page Song Play mode Ensemble Selects th...

Page 369: ...ted Style or Song cannot start Make sure that the Clock parameter is set to Internal If you are using the MIDI Clock of another device like a sequencer you must set the MIDI Clock parameter to USB and make sure that the external device trans mits MIDI Clock data 158 Does not respond to MIDI messages Make sure that the USB cable is connected correctly 258 Make sure that the external device is trans...

Page 370: ...ols Jukebox function Compatible with SMF formats 0 and 1 and MP3 Lyrics compatible with CDG Score Sequencer Quick Record Backing Sequence Multitrack and Step Record functions Full featured sequencer 16 tracks Up to 100 000 events SMF format SongBook Fully programmable music database based on Styles SMF Karaoke MP3 with automatic selection of Style Play and Song Play modes User definable custom lis...

Page 371: ...th Delay 1 80 81 O O Sound Controller 1 2 1 98 99 O O NRPN LSB MSB 1 2 100 101 O O RPN LSB MSB 1 3 120 121 X O All sounds off Reset all controllers 1 Program Change O 0 127 O 0 127 1 True 0 127 System Exclusive O O 4 System Common Song Position X X Song Select X X Tune X X System Real Time Clock O O 5 Commands O O 5 Aux Messages Local On Off X X All Notes Off X O 123 124 Active Sense O O Reset X X...

Page 372: ...368 MIDI Implementation Chart Pa300 User Manual v150 English book Page 368 Saturday March 29 2014 5 29 PM ...

Page 373: ...19 Style Play mode 96 100 137 Ending 12 Ensemble 105 F Fade Sound parameter LFO 252 Favorite Styles 110 Filter Cutoff Frequency 244 Filter Type 244 Filter Cutoff 246 Filter EG 246 Filter LFO 246 Footswitch 155 Format 177 G General MIDI 259 Global 147 164 Global channel 259 I Intro 12 J Jukebox 116 120 K Keyboard Mode Split 14 Lock 150 L Level Sound parameter Trim 244 LFO Waveform LFO waveform 252 ...

Page 374: ...1 113 SongBook 182 190 Sound Editing 103 120 138 Selecting 83 Writing 255 Sound mode 229 257 Split Keyboard Mode 14 Lock 150 Split Point 94 259 Standard MIDI File 111 123 259 Style Ending 12 Intro 12 Recording 194 228 Selecting 11 82 Variation 12 Style Play mode 88 110 Style Record mode 194 228 Style Settings Selecting see Style Writing 109 Sync Key Sync LFO 252 MIDI Tempo LFO 253 Synchro Start St...

Page 375: ...371 Index Index Style Play 95 Master 88 111 Pa300 User Manual v150 English book Page 371 Saturday March 29 2014 5 29 PM ...

Page 376: ...372 Index Pa300 User Manual v150 English book Page 372 Saturday March 29 2014 5 29 PM ...

Page 377: ...Pa300 User Manual v150 English book Page III Saturday March 29 2014 5 29 PM ...

Page 378: ...ly 2014 All rights reserved Address KORG ITALY SpA Via Cagiata 85 I 60027 Osimo An Italy Web www korg com www korg co jp www korg co uk Pa300 User Manual v150 English book Page IV Saturday March 29 2014 5 29 PM ...

Reviews: