background image

Using the sequencer

En-

22

Using the sequencer

Recording MIDI and audio

Auto Song Setup

The


Auto


Song


Setup


feature


copies


the


current


Program


or


Combination


into


a


Song,


and


then


puts


the


system


in


record

ready


mode.


When


inspiration


strikes,


you


can


use


this


function


to


start


recording


immediately.


To


do


so


from


Program


mode:

1. Hold


down


the


ENTER


key


and


press


the


SEQUENCER


REC/WRITE


key.


The


Setup


to


Record


dialog


box


will


open


and


ask


“Are


you


sure?”

2. Press


OK.

The


system


switches


to


Sequencer


mode,


with


record


already


enabled.

3. Press


the


START/STOP


key


to


start


the


sequencer


and


begin


recording.


With


the


default


settings,


there


will


be


a


two


measure


count

down


before


recording


starts.


4. Play


what


you’d


like


to


record,


and


then


press


START/STOP


to


stop


recording.

The


sequencer


will


automatically


return


to


the


beginning


of


the


Song


(beat


1


of


measure


1,


as


shown


in


the


upper


right

hand


corner:


001


:


01


.


000).

5. Press


START/STOP


to


hear


what


you


recorded.

Since


you


started


in


Program


mode,


your


playing


will


have


been


recorded


on


Track


1.


If


you


used


the


Drum


Track,


it


will


have


been


recorded


on


Track


10.


For


Combinations,


more


tracks


are


used


as


needed.

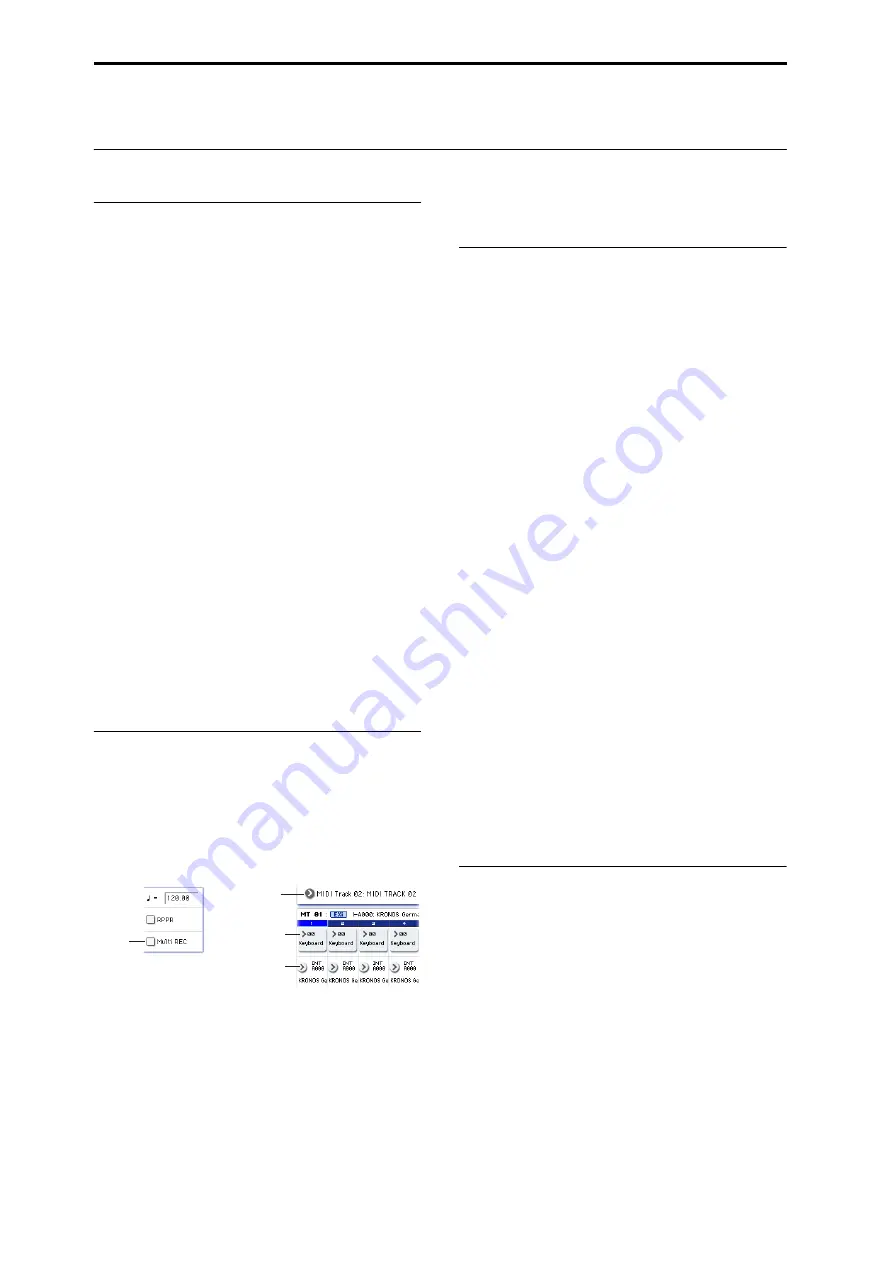
Adding another MIDI track

1. If


KARMA


was


on,


press


the


front

panel


KARMA


button


to


turn


it


off.

2. Turn


off


the


Multi


REC


check

box,


in


the


upper


right


of


the


display.

Auto


Song


Setup


turns


this


on


to


record


the


Program’s


Drum


Track,


or


multiple


channels


in


a


Combination.

3. Below


the


Song


name,


open


the


Track


Select


popup


and


select


MIDI


Track


02.

This


controls


both


the


track


that


you


play


from


the


keyboard,


and


(with


Multi


REC


turned


off)


the


track


that’s


recorded.

4. Using


the


Category


or


Bank/Program


Select


popup


menus,


select


a


Program


for


Track


02.

5. Press


LOCATE


to


go


back


to


the


start


of


the


Song.

6. Press


REC/WRITE


to


enable


recording,


and


then


press


START/STOP


to


start.

7. Play


what


you’d


like


to


record,


and


then


press


START/STOP


when


you’re


done.

Adding an audio track

Continuing


from


above,


let’s


record


an


audio


overdub.

1. Connect


a


dynamic


microphone,


guitar,


bass,


other


synth,


etc.


to


AUDIO


INPUT


1.

For


more


details


on


connecting


different


types


of


mics


and


guitars,


see


“MIC/LINE


switches”


on


page 11.

2. If


you’re


using


a


mic,


set


the


input’s


MIC/LINE


switch


to


MIC;


otherwise,


set


it


to


LINE.

3. Go


to


the


Audio


Track


Mixer


tab


of


the


Sequencer


P0:


Play/Rec


page.

4. Turn


the


Multi


REC


check

box


on


again.

In


general,


Multi


REC


is


the


best


choice


when


recording


audio.

5. Press


Track


1’s


PLAY


button


once,


so


that


it


turns


red


and


says


REC.

Note


that


the


Input


is


already


set


to


1


by


default.


Next,


we


need


to


set


the


level.


6. Press


the


Preference


tab.

This


takes


you


to


the


Preference


page,


which


includes


a


meter


for


the


record

enabled


audio


tracks.

7. Keeping


an


eye


on


the


meter,


adjust


the


rear

panel


LEVEL


knob


until


the


level


is


high


but


not


clipping.

Use


the


rear

panel


LEVEL


knob,


and


not


the


on

screen


slider.


If


the


signal


clips,


you’ll


see


the


message


“ADC


OVERLOAD!”


appear


over


the


meter.


8. Press


LOCATE


to


go


back


to


the


start


of


the


Song.

9. Press


REC/WRITE


to


enable


recording,


and


then


press


START/STOP


to


start.

10.Play


what


you’d


like


to


record,


and


then


press


START/STOP


when


you’re


done.

Un-saved audio files

When


you


record


audio


tracks,


they’re


initially


stored


in


a


folder


named


“TEMP”


on


the


internal


disk.


If


you


then


turn


off


the


power


before


saving


the


Song,


the


Song


will


be


lost,


but


the


audio


files


will


still


be


on


the


disk.


The


next


time


that


you


start


up,


you’ll


see


the


following


message:

There


are


un

saved


audio


files


from


your


previous


recording


session.

Do


you


want


to


restore


these


files,


or


delete


them


from


the


disk?

[Restore]


[Delete]

Since


the


Song


was


not


saved,


all


the


track


audio


event


data


and


region


data


is


gone,


but


you


can


still


restore


the


WAVE


files


and


use


them


to


create


a


new


song.

If


you


want


to


keep


this


data,


press


Restore.


If


you


want


to


delete


this


data,


press


Delete.

Multi REC

Track Select

Bank/Program
Select Popup

Category
Select Popup

Summary of Contents for Kronos X

Page 1: ...ds 16 Playing sounds in Set Lists 16 Playing Programs and Combinations 17 Using controllers to modify the sound 18 Using KARMA 20 Using the Drum Track 21 Using the sequencer 22 Recording MIDI and audi...

Page 2: ...from tip over The lightning flash with arrowhead symbol within an equilateral triangle is intended to alert the user to the presence of uninsulated dangerous voltage within the product s enclosure tha...

Page 3: ...ations which may occur through your use of this product KARMA Kay Algorithmic Realtime Music Architecture Technology has been licensed from Stephen Kay and is pro tected by U S Patents 5 486 647 5 521...

Page 4: ...bars pressing the Inc and Dec buttons or spinning the Value dial The top of the Help page has breadcrumb links which show the hierarchy of pages above the current one Touch any of these links to jump...

Page 5: ...three band EQs one for each MIDI and audio track Finally many of the synth engines feature specialized signal processing The CX 3 PolysixEX and EP 1 include dedicated effects and you can process live...

Page 6: ...ks 1 8 HDR 1 8 or 9 16 HDR 9 16 EXT EXT External lets you use the control surface to transmit MIDI messages to external MIDI devices RT KNOBS KARMA RT KNOBS KARMA lets you modulate sounds and effects...

Page 7: ...d decimal buttons to enter the value and then press the ENTER button to confirm the entry The button inverts the sign of the parameter value the decimal button inserts a decimal for entering fractiona...

Page 8: ...lumes of different components of the sound For more information on how Vector Synthesis works see Using Vector Synthesis in the Playing and editing Programs chapter of the OG 10 Drum Track The Drum Tr...

Page 9: ...rward the song When you press and hold this button the button will light and the playback will fast forward Fast forward is disabled during recording and while the Song is stopped In Disk and Sampling...

Page 10: ...the Sampling mode Recording Audio Input page If Trigger is set to Sampling START SW sampling will begin immediately If Trigger is set to Note On sampling will begin as soon as you play a note on the...

Page 11: ...or effects unit before connecting them Use the MIC setting switch in out position only when connecting a microphone Note that some microphones such as condensers may require external phantom power wh...

Page 12: ...minimum position 3 Connect the KRONOS to your mixer or monitor system Connect the KRONOS s AUDIO OUTPUT MAIN L MONO and R jacks to your mixer or amplified monitor speakers If you re monitoring throug...

Page 13: ...items such as Multisamples or FX Presets To enter a parameter value touch the desired value Pin Many popup menus have a Pin in the upper left This controls what happens after you select a value Touch...

Page 14: ...without making changes press the Cancel button After pressing either OK or Cancel the dialog box will close Text edit button Pressing this button brings up an on screen keyboard for changing the name...

Page 15: ...D Record patterns and assign them to keys using RPPR Real time Pattern Play Recording Set List mode Set Lists make it simple to play and organize any of the sounds loaded into the KRONOS without regar...

Page 16: ...nd that you re playing The Set List name is in smaller text at the top left hand corner of the screen With the factory settings Set List 000 will appear when you turn on the power To select Set Lists...

Page 17: ...me sound in multiple Slots within the same Set List For instance you might have a favorite piano sound which you use in a number of different songs You can create any number of Slots which use this sa...

Page 18: ...1 and EP 1 Banks can contain either HD 1 Programs or EXi Programs but not both This assignment is fixed for the Internal banks but can be set separately for each of the User banks with the Set Progra...

Page 19: ...HD 1 Programs support a certain set of parameters each EXi also has its own set of parameters The PolysixEX works particularly well with Tone Adjust so let s take a look at it now 1 In Program mode pr...

Page 20: ...display You can move between entirely different settings of all these controls simply by pressing a KARMA SCENE switch Each scene independently remembers any edits that you make via the sliders and sw...

Page 21: ...tern section This area contains a few parameters for adjusting the basic sound of the Drum Track 3 Press the Program popup button The Category Program Select dialog appears By default the Drum categor...

Page 22: ...ord and then press START STOP when you re done Adding an audio track Continuing from above let s record an audio overdub 1 Connect a dynamic microphone guitar bass other synth etc to AUDIO INPUT 1 For...

Page 23: ...o The factory preset Template Songs let you get up and running quickly with matched sets of sounds and effects for various styles of music You can also create your own Template Songs with your favorit...

Page 24: ...ant HD 1 Programs can only be written to HD 1 Banks and EXi Programs can only be written to EXi Banks For more information on the default Bank types and on how to change them please see Program Bank C...

Page 25: ...ectories for these files will be created automatically NOTE When saving Combinations remember to also save the Programs it uses as well as the Drum Kits and Wave Sequences used by the Programs Similar...

Page 26: ...sure that the Global Basic Setup page s Memory Protect settings are turned off unchecked If they are on you won t be able to load the data Loading individual banks from a PCG file 1 Go to the Load pa...

Page 27: ...location to Clear All 13 Press the OK button to load the data Playing the demo songs 1 Press the SEQ button the LED will light to enter Sequencer mode If you haven t done anything with Sequencer mode...

Page 28: ...052 x 362 x 134 mm 41 42 14 25 5 28 73 Keys 1243 x 411 x 145 mm 48 94 16 18 5 71 88 Keys 1455 x 411 x 145 mm 57 28 16 18 5 71 Weight 61 Keys 12 5 kg 27 56 lbs 73 Keys 20 3 kg 44 75 lbs 88 Keys 23 0 kg...

Page 29: ...purchased this product via the internet through mail order and or via a telephone sale you must verify that this product is intended to be used in the country in which you reside WARNING Use of this p...

Reviews:

Related manuals for Kronos X