Korg electribe sampler Parameter Manual Download Page 6

6

5.  SAMPLE EDIT

Here you can edit or modify a sample.

TIP 

After editing each item, press the Write button to save the 
sample.

SELECT SAMPLE

Selects the sample that you’ll edit.

RENAME

Edits the name of the sample.

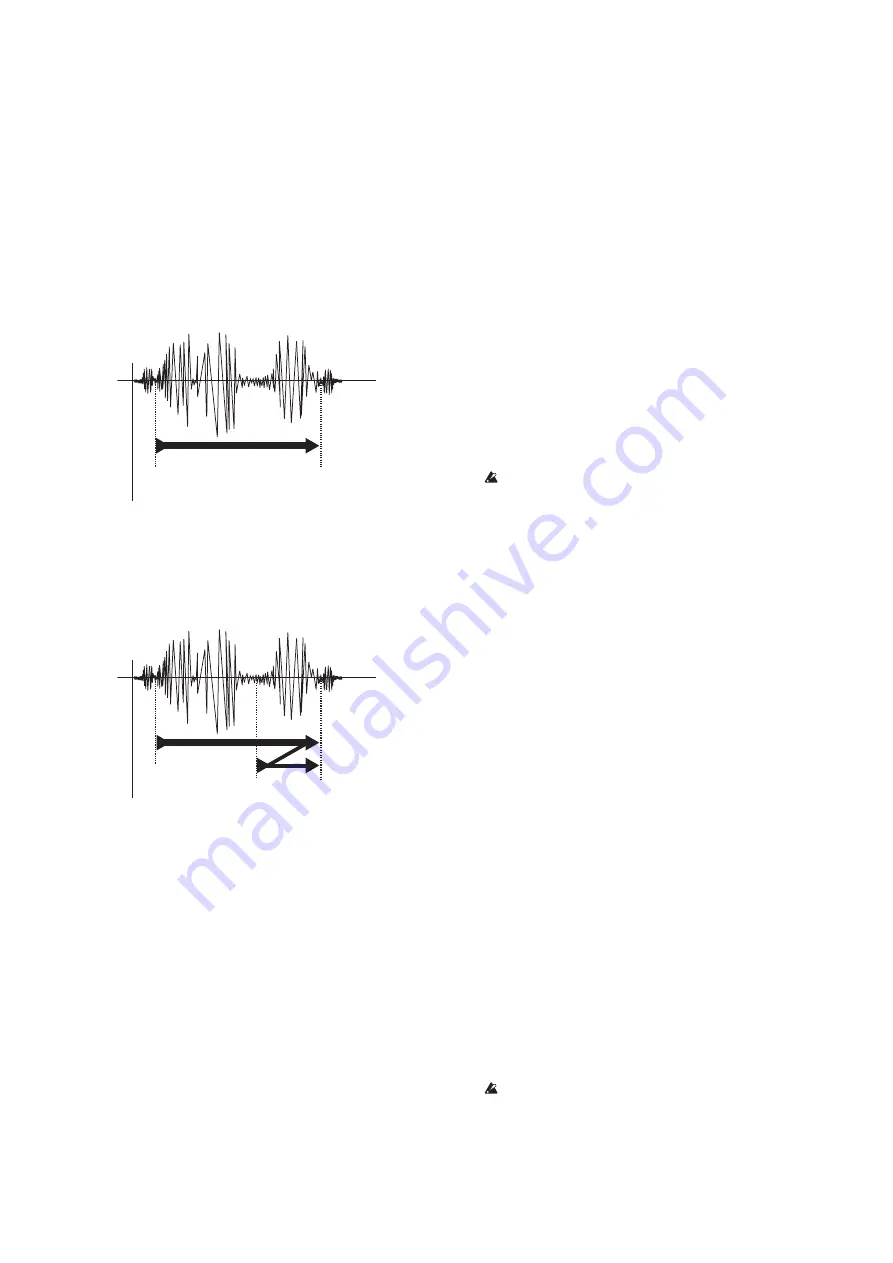
START POINT .......................................................................................

Specifies the playback start point.

END POINT...........................................................................................

Specifies the playback end point.

START

END

0

LOOP START POINT .............................................................................

Specifies the loop start point. The sample playback is looped from 
the point you specify here until the END POINT. If you set this to 
the same value as END POINT, the sample plays as a one-shot 
sample (used for non-looped samples such as drums).

START

END

LOOP START

0

SAMPLE TUNE ................................................................... [-63...+63]

Adjusts the pitch of the sample.

TIME SLICE

Divides the sample by beats.
(

About time slice)

CLEAR SLICE

Cancels the result of the TIME SLICE (divide sample) operation.

PLAY LEVEL ............................................................. [Normal, +12 dB]

Changes the playback level of the sample. For a resampled sample, 
this is automatically set to “+12 dB” in order to reproduce the 
volume at which it was recorded.

TIP 

In some cases, setting the play level to +12 dB may make the 
sound more likely to distort.

DELETE SAMPLE

Deletes the sample.

TIP 

In some cases, deleting preset samples or user samples might 
not increase the available sampling time. In this case, defrag-
ment the memory as described in “EXPORT ALL SAMPLE” on 
page 9.

TIP 

It will no longer be possible to select the preset sample num-
bers with the Oscillator knob. If you want to use the preset 
samples again, execute FACTORY RESET.

TIP 

You can hear a preview playback by pressing a trigger pad.

TIP 

The Filter, Modulation, Amp/EG, and Insert FX sections are 
disabled while you’re editing a sample.

TIP 

When editing a sample, Voice Assign is set to Mono 2.

About time slice

What is time slice? 

Time slice is a function by which a sample that contains clear at-
tacks, such as a rhythm phrase, can be divided into beats and 
assigned to steps. For example, this function can detect the attacks in 
a rhythm phrase consisting of kick, snare, and hi-hat, and divide the 
sampled phrase into notes.
By assigning a time-sliced sample to each step, you can obtain a 
natural-sounding performance even if you change the BPM.
You can also assign individual time-sliced samples to parts as 
one-shot samples.

Creating a time-sliced sample

1. 

In the SAMPLE EDIT screen, use the Value knob to select a 
monaural sample that you want to time-slice.

  You can’t time-slice stereo samples. 

2. 

Access the TIME SLICE screen, and press the Menu/Enter 
button. Time slice is executed automatically, and the number of 
steps and the beat are displayed.

TIP

  The start point and end point is automatically specified for 

each of the divided samples produced when you time-slice. 
You can’t change these points. When you time-slice a 
sample, it is no longer possible to play the entire sample in 
its original condition.

3. 

Turn the Value knob to specify the number of steps into which 
you want to divide the sample. Hold down the Shift button and 
turn the Value knob to specify the beat. You can specify the beat 
as one of four choices: 16, 32, 8 Tri, or 16 Tri. 

TIP

  When using a time-sliced sample in a pattern, the steps to 

which the time slices are assigned will change if the beat 
setting of the pattern differs from this setting.

4. 

Press the Menu/Enter button to make the display indicate 
“Threshold:” and specify the sensitivity at which the time slices 
are detected; this adjusts the way in which the notes are divided. 
As you use the Value knob to change the threshold, the way in 
which the notes are divided will change. You can adjust the 
sensitivity in a range of 0–32. Lower values produce a higher 
sensitivity, causing the time slices to be detected in greater 
detail. The trigger pads are illuminated to indicate the position 
of each sliced note. You can press a trigger pad to hear the note 
that’s assigned to the corresponding location.

TIP

  If you specify a number of steps greater than 16 in step 3, 

you can use the step buttons to change the region of time-
sliced steps that are shown.

5. 

Hold down the Shift button and press a trigger pad to enable/
disable the corresponding region. Make settings for regions that 
could not be detected, or delete regions that you don’t want.

TIP

  If you change the sensitivity, it may take a little time for the 

divisions to change. Depending on the volume and type of 
the sample, there may be cases in which changing the 
sensitivity does not change the divisions.

  If the beat is set to 8 Tri or 16 Tri, steps 13–16 are not used.

6. 

When you have finished making all adjustments, press the Write 
button to save the sample.

TIP

  If you decide to cancel before finishing the operation, press 

the Exit button. 

Summary of Contents for electribe sampler

Page 1: ...3 ...

Page 2: ...IT 5 4 PART UTILITY 5 5 SAMPLE EDIT 6 6 GLOBAL PARAMETERS 7 7 DATA UTILITY 9 8 EVENT REC PLAY 10 9 Appendix 11 Shortcut list 11 OSC Type List 12 Modulation Type List 15 Filter Type List 16 Scale List 16 MFX Type List 17 IFX Type List 17 Groove Type List 17 Pattern List 18 ...

Page 3: ...assigned to the touch pad and trigger pads Refer to the Scale List for details of the available scale types CHORD SET 1 5 Controls the density of the chord that s produced when you strike a trigger pad in chord scale mode TIP The range depends on the scale that s selected GATE ARP 1 50 Selects the pattern type for the gate arpeggiator ALTERNATE 13 14 Off On Enables alternate operation for triggeri...

Page 4: ...to However retriggering will occur when a one shot sample is sounded Mono2 The part plays monophonically single notes The EG is retriggered each time you press the trigger pad Poly1 The part can play chords that share a single EG filter amp and insert effect pseudo polyphonic A maximum of four voices can be sounded The EG is not retriggered until you release all trigger pads However retriggering w...

Page 5: ...You can record up to four note numbers in each target step You can change this in steps of an octave by holding down the Shift button and turning the Value knob You can also change the target step by pressing a trigger pad TIP If the display indicates NOTE pressing a step button does not change the trigger on off setting TIP Even if you change the note number of a step whose trigger is off that st...

Page 6: ...ing a time sliced sample 1 In the SAMPLE EDIT screen use the Value knob to select a monaural sample that you want to time slice You can t time slice stereo samples 2 Access the TIME SLICE screen and press the Menu Enter button Time slice is executed automatically and the number of steps and the beat are displayed TIP The start point and end point is automatically specified for each of the divided ...

Page 7: ...LOCK MODE Internal Auto External USB External MIDI External Sync Selects the clock to which the electribe sampler s tempo is synchro nized If you select an external clock the electribe sampler s sequencer and other tempo synchronized settings such as Delay Time are all synchronized to the external device Internal The electribe sampler s internal clock is the basis for synchronization Choose this s...

Page 8: ...ue does not change until the knob position matches the actual value of the parameter that you re editing the value shown in the main display With the Catch setting the knob and value change in tandem only after the knob position has reached the actual value this prevents the sound from changing in an unnaturally sudden way With the Jump setting moving the knob causes the actual value to change imm...

Page 9: ...e e2spat file that was exported by the EXPORT PATTERN function SELECT SOURCE Card Sync In Selects the import source You can select either the memory card or data input from the Sync In jack If importing from the memory card specify an e2pat format file IMPORT ALL PATTERN From the memory card this function imports all patterns and global parameters contained in an e2sallpat file that was exported b...

Page 10: ...selected sample to the memory card as a WAV file EXPORT ALL SAMPLE This function exports all preset samples and user samples to the memory card as the single file KORG electribe sampler Sample e2sSample all This exported file is automatically loaded the next time that you turn on the power restoring the state of all samples TIP If you execute EXPORT ALL SAMPLE after deleting samples the file is ex...

Page 11: ...dulation knob Change the waveform while keeping the modulation destination 10 Part edit Part Mute button Defeat muting for all parts 11 Pad mode Chord button Show the Chord Set setting page 12 Trigger pads Trigger pad 1 Show the SWING setting page Trigger pad 2 Show the LENGTH setting page Trigger pad 3 Show the CLEAR MFX MOTION page Trigger pad 4 Show the KEY setting page Trigger pad 5 Show the S...

Page 12: ...ht Cymbal 153 Ride Hummy Cymbal 154 Ride Bell Cymbal 155 Ride Nine Cymbal 156 Ride Zed Cymbal 157 Brass 1 Hits 158 Brass 2 Hits 159 Brass 3 Hits 160 Brass 4 Hits 161 Brass 5 Hits 162 Bash Hits 163 Crock Hits 164 Thump Hits 165 Crusoe Hits 166 Jazzy Hits 167 Oldies Hits 168 R B Piano Hits 169 PianoUp Hits 170 Lounge Hits 171 Vibe Hits 172 Trap Hits 173 DirtySouth Hits 174 Orchestra 1 Hits 175 Orche...

Page 13: ...Down FX 290 Digi Yeah FX 291 Digi Yah FX 292 HeliumVox FX 293 Beep FX 294 SynSiren1 FX 295 SynSiren2 FX 296 Class FX 297 SquDown FX 298 Glitch 1 FX 299 Glitch 2 FX 300 Glitch 3 FX 301 Glitch 4 FX 302 Eight Lo Tom 303 Eight Mid Tom 304 Eight Hi Tom 305 Nine Lo Tom 306 Nine Hi Tom 307 Zed Lo Tom 308 Zed Hi Tom 309 STD Floor Tom 310 STD Lo Tom 311 STD Hi Tom 312 Rim Nine Perc 313 Rim Eight Perc 314 C...

Page 14: ... 397 A Guitar PCM 398 NylonGuitar PCM 399 E BassFinger PCM 400 E BassPick PCM 401 WahBass PCM 402 AcousticBass PCM 403 RecordBass PCM 404 RaggaBass PCM 405 DubBass PCM 406 Flute PCM 407 Flute16Voice PCM 408 SopranoSax PCM 409 AltoSax PCM 410 SaxGrowl PCM 411 BrassEns PCM 412 StringsEns PCM 413 BigString PCM 414 MelloVox PCM 415 DigiVox PCM 416 Kalimba PCM 417 MusicBox PCM 418 DrumHit PCM 419 Gamel...

Page 15: ... 28 LFOTri Level LFO triangle Amp Level 29 LFOTri Pan LFO triangle Pan 30 LFOTri IFX LFO triangle IFX Edit 31 LFOTriB Filter LFO triangle Filter Cutoff 32 LFOTriB Pitch LFO triangle Oscillator Pitch 33 LFOTriB OSC LFO triangle Oscillator Edit 34 LFOTriB Level LFO triangle Amp Level 35 LFOTriB Pan LFO triangle Pan 36 LFOTriB IFX LFO triangle IFX Edit 37 SawUpB Filter LFO up saw Filter Cutoff 38 Saw...

Page 16: ...an C D E F G A B 6 Mixolydian C D E F G A B 7 Aeolian C D E F G A B 8 Locrian C D E F G A B 9 Harm Harmonic minor C D E F G A B 10 Melo Melodic minor C D E F G A B 11 Major Blues C D E E G A 12 minor Blues C E F G G B 13 Diminished C D E F F G A B 14 Com Dim Combination Diminished C D E E F G A B 15 Major Penta Pentatonic C D E G A 16 minor Penta Pentatonic C E F G B 17 Raga 1 Bhairav C D E F G A ...

Page 17: ...Crusher 6 Ring Modulator 7 Sustainer 8 Limiter 9 Low EQ 10 Mid EQ 11 High EQ 12 Radio EQ 13 Exciter 14 Low Pass Filter 15 High Pass Filter 16 Band Plus Filter 17 Talk Filter 18 Delay 1 4 19 Delay 3 16 20 Delay 1 8 21 Delay 1 16 22 Roller 1 32 23 One Delay 24 Short Delay 25 Ring Delay 1 26 Ring Delay 2 No Name 27 Chorus 28 Flanger LFO 29 Flanger 30 Flanger 31 Phaser LFO 1 32 Phaser LFO 2 33 Phaser ...

Page 18: ... CoCo Party1 KORG Inc 94 0 64 CoCo Party2 KORG Inc 94 0 No Pattern Name Author BPM Advisory 65 Harp On One KORG Inc 86 0 66 TypeRocs KORG Inc 97 0 67 Ironworks KORG Inc 94 0 68 Get Funky1 KORG Inc 112 0 69 Get Funky2 KORG Inc 83 0 70 Braziery KORG Inc 125 0 71 MondoBeats1 KORG Inc 125 0 72 MondoBeats2 KORG Inc 125 0 73 Rocka Baby1 KORG Inc 123 0 74 Rocka Baby2 KORG Inc 123 0 75 Feline KORG Inc 111...

Page 19: ...n 120 0 193 Init Pattern 120 0 194 Init Pattern 120 0 195 Init Pattern 120 0 196 Init Pattern 120 0 No Pattern Name Author BPM Advisory 197 Init Pattern 120 0 198 Init Pattern 120 0 199 Init Pattern 120 0 200 Init Pattern 120 0 201 Init Pattern 120 0 202 Init Pattern 120 0 203 Init Pattern 120 0 204 Init Pattern 120 0 205 Init Pattern 120 0 206 Init Pattern 120 0 207 Init Pattern 120 0 208 Init Pa...

Page 20: ......

Reviews: