20
3. Basic operation (Quick Start)
○ ○ ○ ○ ○ ○ ○ ○ ○ ○ ○ ○ ○ ○ ○ ○ ○ ○ ○ ○ ○ ○ ○ ○ ○ ○ ○ ○ ○ ○ ○ ○ ○ ○
Pattern Set 1
Pattern Set 3
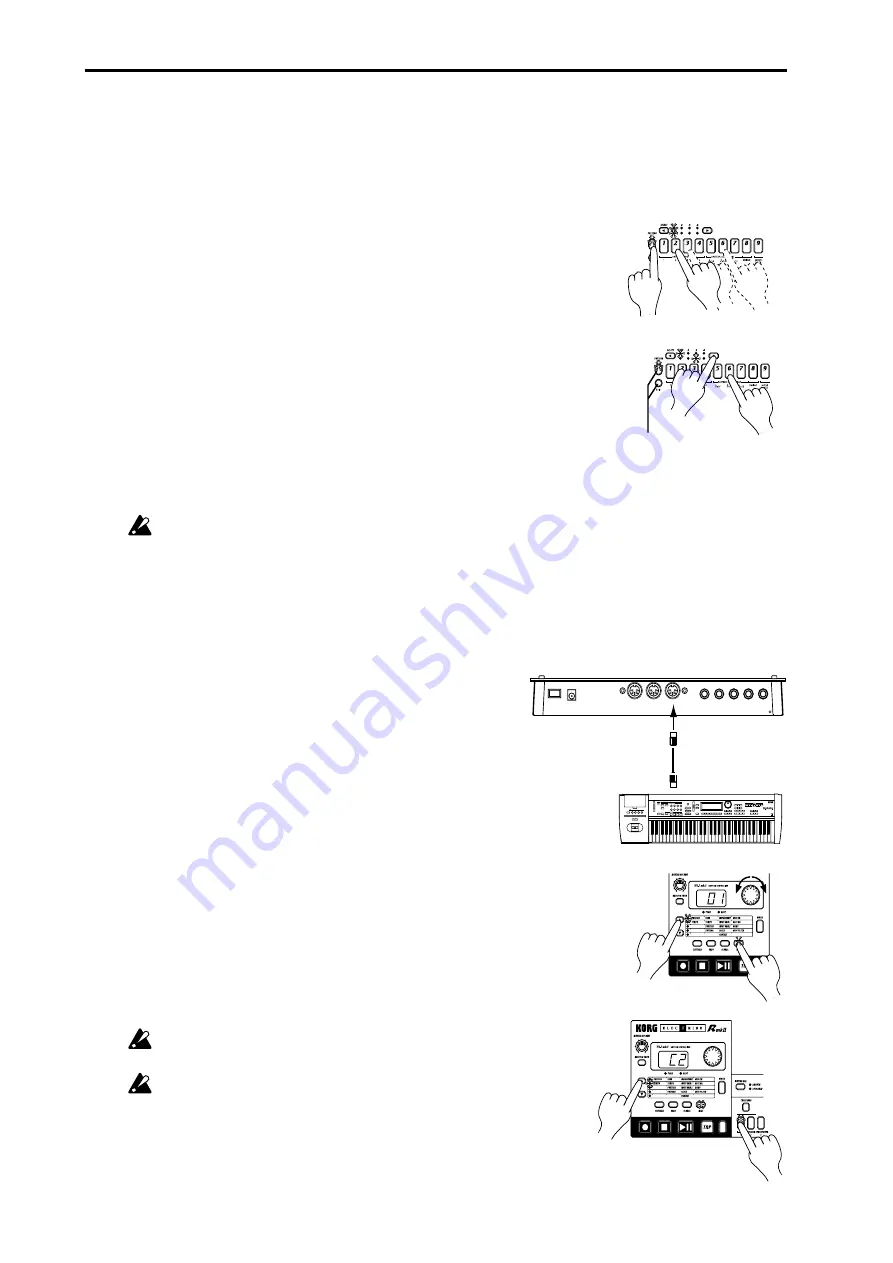
Hold down the Shift key
and press the Pattern Set key
to hold the Pattern Set function.
MIDI keyboard etc.
MIDI cable
Set the MIDI channel
Check the Part Note Number
MIDI IN
MIDI OUT
3
1
2
5
4
Playing with Pattern Set
What is Pattern Set?
Pattern Set is a function that lets you register a favorite pattern to each of the sixteen step keys, and use the
step keys to switch patterns. You can use this function to play a performance simply by selecting patterns
one after the other
When you hold down the PATTERN SET key (the key will blink) and
press one of the sixteen step keys, the pattern registered for that key will
be selected. At this time you can use the SELECT keys to change the
pattern set group indicated by the red select LEDs (lower line) 1...4, to
use 16 x 4 (total of 64) pattern sets.
If during playback you hold down the PATTERN SET key and press
another step key, the pattern registered for that key will begin playing
when the currently-playing pattern finishes playing. (Refer to p.31 "Pat-
tern Set.")
If you hold down the SHIFT key and press the PATTERN SET key, the
Pattern Set function will be held. (The PATTERN SET key will blink.)
To defeat this "hold" condition, press the PATTERN SET key once again.
You can register new pattern sets. (Refer to p.31, "Registering a pattern
for Pattern Set.")
If you switch patterns during playback, the change will occur when
each pattern finishes playing. (Refer to p.22 "The timing at which pat-
terns will changed.")
Using the ER-1
mk
II as a tone generator module
Read this section when you wish to use the ER-1
mk
II
with other connected MIDI equip-
ment. Use a MIDI cable to connect the MIDI OUT connec-
tor of your MIDI keyboard etc. to the MIDI IN connector
of the ER-1
mk
II
.
1. Press the MIDI mode key to enter MIDI mode.
2. Use the cursor [
▲
][
▼
] keys to make the parameter select
LEDs indicate MIDI CH.
3. Set the channel of the transmitting device to match the
channel of the ER-1
mk
II
. (Refer to p.40 "MIDI channel
settings.")
4. Use the cursor [
▲
][
▼
] keys to make the parameter select
LEDs indicate NOTE NO. (Refer to p.40 "Setting the
MIDI note number for each part.")
5. Press the desired part key, and the note number for that
part will appear in the display.
When you transmit the corresponding note from the trans-
mitting device, the sound of that part will be played.
For details on the ER-1
mk
II's MIDI functionality, refer to
p.42 "About MIDI."
If you wish to save the settings of MIDI mode or Global
mode, you must perform the Write operation in either of
these modes. (Refer to p.39 "Saving the settings you
modify in Global mode ," or p.41 "Saving the settings
you modify in MIDI mode .")
Summary of Contents for Electribe ER-1 mkII
Page 47: ...47 8 Appendices 8 Appendices ...


