background image

bizhub C554e/C454e/C364e/C284e/C224e

3-21

3.2

Scan-to-Send function

3

Checking the cable connection

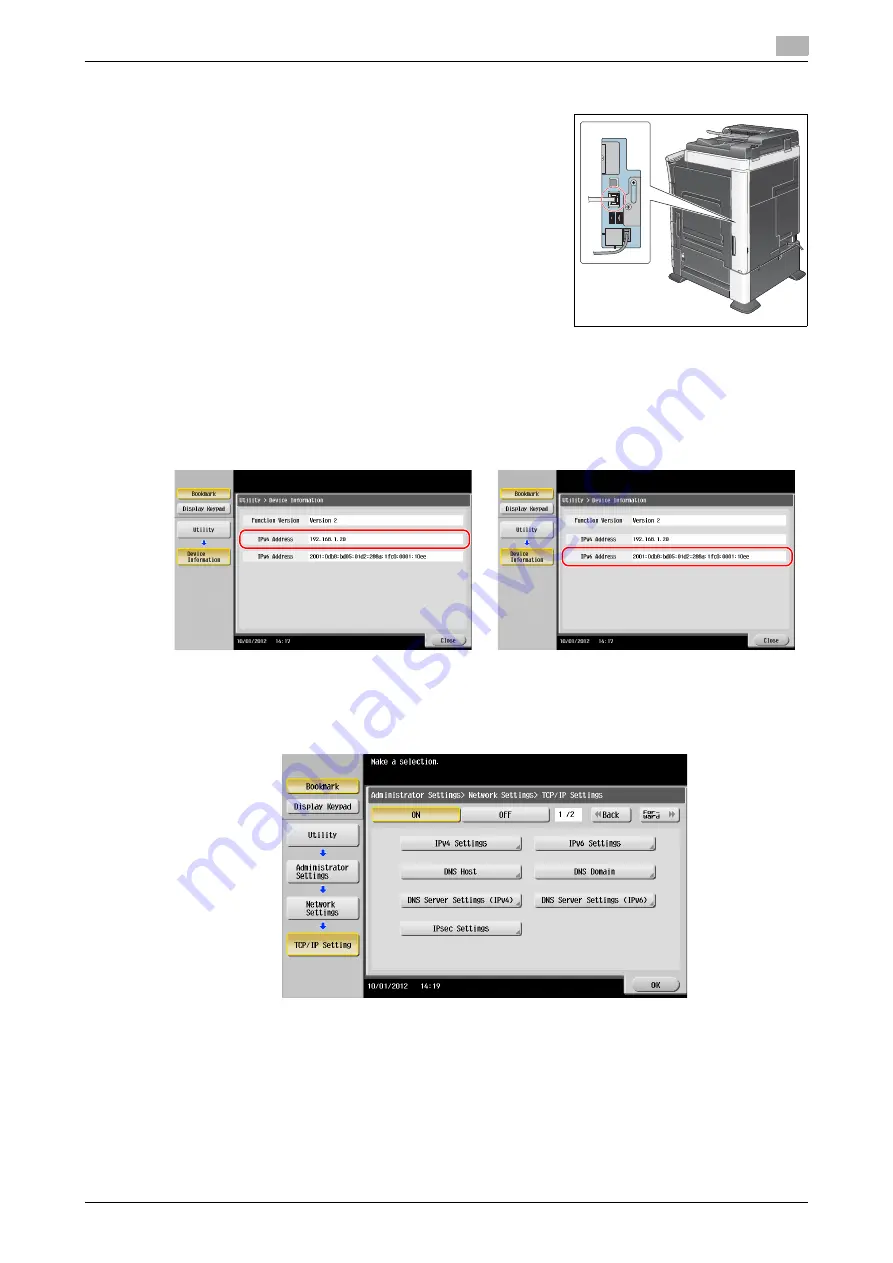
Check that a LAN cable is connected to the LAN port of this ma-
chine and the green LED is on.

Checking network settings of this machine

Tap [Utility], and select [Device Information].

Check that the IP address is displayed.

If no IP address is displayed, you need to configure the network.

-

Tap [Utility], and select [Administrator Settings] - [Network Settings] - [TCP/IP Settings]. Configure the 
required settings to suit your environment. For details, refer to the [User's Guide Online] on the DVD.

d

Reference

In Mac OS X10.6 or earlier, the default settings are available during general use, but you need to change set-
tings depending on your network environment. For details, refer to the [User's Guide Online] on the DVD.

For IPv4 environment

For IPv6 environment

Summary of Contents for bizhub C224e

Page 1: ...bizhub C554e C454e C364e C284e C224e QUICK GUIDE ...

Page 2: ......

Page 3: ...er safety 1 9 Internal laser radiation 1 10 CDRH regulations 1 10 For European users 1 10 For Denmark users 1 11 For Finland Sweden users 1 11 For Norway users 1 11 Laser safety label 1 12 Ozone release 1 12 Acoustic noise for European users only 1 12 For EU member states only 1 12 Telephone Cable For users in countries subject to class B regulations 1 13 1 5 Caution notations and labels 1 14 1 6 ...

Page 4: ...2 28 2 4 1 Name of parts 2 28 2 5 Touch Panel 2 30 2 5 1 Main Menu 2 30 Layout of main menu 2 30 Customizing the main menu 2 31 2 5 2 Operating the Touch Panel 2 31 Tap 2 31 Double tap 2 31 Flick 2 32 Drag 2 32 Pan 2 32 Long tap 2 32 Drag Drop 2 33 Pinch in Pinch out 2 33 Rotation 2 33 Precautions on using the Touch panel 2 34 2 5 3 How to display the keypad 2 34 How to move the keypad 2 35 How to...

Page 5: ... 3 13 Checking the cable connection 3 13 Checking network settings of this machine 3 14 Checklist 3 14 Checking computer information 3 15 Configuring your computer 3 15 Registering destinations 3 16 Sending the original 3 18 3 2 3 Sending data to your Mac computer SMB Send 3 20 Preparation flow 3 20 Operation flow 3 20 Checking the cable connection 3 21 Checking network settings of this machine 3 ...

Page 6: ...trieving a registered destination 3 55 Retrieving a destination 3 55 Specifying a destination 3 56 3 6 Using a USB memory device 3 57 3 6 1 Printing data in a USB memory device 3 57 Printing data 3 57 3 6 2 Saving the scanned data in the USB memory device External memory 3 59 Specifying functions to be permitted for external memory 3 59 Saving data in the USB memory device 3 61 3 7 Using the guida...

Page 7: ...1 Introduction ...

Page 8: ......

Page 9: ... is an ENERGY STAR Product An ENERGY STAR product has a special feature that allows it to automatically switch to a low power mode after a period of inactivity An ENERGY STAR product uses energy more efficiently saves you money on utility bills and helps protect the environment Environmental benefits of power management Electricity consumption of a device depends on both its properties and the way...

Page 10: ...nada This product is certified by the following model name in Canada Konica Minolta branded model bizhub C554e bizhub C454e and C302300 bizhub C364e bizhub C284e and bizhub C224e For México This product is certified by the following model name in México Konica Minolta branded model bizhub C554e bizhub C454e and C302300 bizhub C364e bizhub C284e and bizhub C224e For Europe This product is certified...

Page 11: ...ution could cause injury or damage to property A triangle indicates a danger against which you should take precaution This symbol warns against cause burns A diagonal line indicates a prohibited course of action This symbol warns against dismantling the device A solid circle indicates an imperative course of action This symbol indicates you must unplug the device Disassemble and modification WARNI...

Page 12: ...vice represent ative if an extension cord is required CAUTION The outlet must be near the equipment and easily accessible Otherwise you can not pull out the power plug when an emergency occurs Power plug WARNING Do not unplug and plug in the power cord with a wet hand as an electrical shock could result Plug the power cord all the way into the power outlet Failure to do this could result in a fire...

Page 13: ...n could result Do not place this product on an unstable or tilted bench or in a location sub ject to a lot of vibration and shock It could drop or fall causing personal in jury or mechanical breakdown Do not let any object plug the ventilation holes of this product Heat could accumulate inside the product resulting in a fire or malfunction Ventilation CAUTION Using this product in a poorly ventila...

Page 14: ...ble to magnetism such as preci sion equipment and data storage devices otherwise they may malfunction They could cause these products to malfunction When moving the machine CAUTION Whenever moving this product be sure to disconnect the power cord and other cables Failure to do this could damage the cord or cable resulting in a fire electrical shock or breakdown When moving this product always hold...

Page 15: ...e FCC and are subject to FCC control Any changes made by the purchaser or user without first contacting the manufacturer will be subject to penalty under FCC regulations This device must be used with a shielded interface cable The use of non shielded cables is likely to result in interference with radio communications and is prohibited under FCC rules INTERFERENCE CAUSING EQUIPMENT STANDARD ICES 0...

Page 16: ... United States and is reported to the Center for Devices and Radiological Health CDRH of the U S Food and Drug Administration of the U S Department of Health and Human Services DHHS This means that the device does not produce hazardous laser radiation The label shown on page 1 12 indicates compliance with the CDRH regulations and must be attached to la ser products marketed in the United States 7 ...

Page 17: ...nrin teho on 15 mW ja aallonpituus on 770 800 nm 7 VARNING Om apparaten används på annat sätt än i denna bruksanvisning specificerats kan användaren utsät tas för osynlig laserstrålning som överskrider gränsen för laserklass 1 Det här är en halvledarlaser Den maximala effekten för laserdioden är 15 mW och våglängden är 770 800 nm 7 VAROITUS Avattaessa ja suojalukitus ohitettaessa olet alttiina näk...

Page 18: ...rsque une utilisation prolongée de l appareil est effectuée Pour avoir la certitude de travailler dans un environnment réunissant des conditions de confort santé et de sécurité il est préférable de bien aérer la pièce ou se trouve l appareil Acoustic noise for European users only Der höchste Schalldruckpegel beträgt 70 dB A oder weniger gemäß EN ISO 7779 For EU member states only This symbol means...

Page 19: ...lephone Cable For users in countries subject to class B regulations Connect a telephone cable with a ferrite core to the telecommunication port of this machine Connect the modular jack on the ferrite core equipped end of the telephone cable to the telecommunication port ...

Page 20: ...ing positions Be very careful that an accident does not occur when operations such as removing paper jams and staple jams are performed NOTICE Do not remove caution labels or notations If any caution label or caution notation is soiled please clean to make legible If you cannot make them legible or if the caution label or notation is damaged please contact your service representative ...

Page 21: ...r pan European single terminal connection to the public switched telephone network PSTN However due to differences between the individual PSTNs provided in different countries the approval does not of itself give an unconditional assurance of successful operation on every PSTN network terminal point In the event of problems you should contact your equipment supplier in the first instance ...

Page 22: ... 505 LU 204 100 3 8 2548 49 1 16 1246 61 1 8 1553 36 1 4 921 15 3 16 386 34 11 16 881 49 1244 9 3 8 238 16 7 8 428 32 3 16 818 7 5 16 185 Unit inch mm 9 11 16 246 bizhub C554e C454e PC 210 FS 534 SD 511 LU 301 80 3 8 2041 49 1 16 1246 61 1 8 1553 36 1 4 921 15 3 16 386 25 7 8 658 38 11 16 982 15 13 16 401 16 7 8 428 32 3 16 818 Unit inch mm 9 11 16 246 bizhub C554e C454e PC 210 FS 533 MK 730 52 7 ...

Page 23: ... 26 660 36 7 8 937 Unit inch mm 48 13 16 1240 61 1550 35 11 16 906 15 11 16 398 16 7 8 428 31 15 16 812 9 11 16 246 bizhub C364e C284e C224e DF 624 PC 210 FS 533 36 7 8 937 6 11 16 170 43 9 16 1107 Unit inch mm 48 13 16 1240 61 1550 35 11 16 906 15 11 16 398 16 7 8 428 31 15 16 812 9 11 16 246 bizhub C364e C284e C224e DF 624 PC 210 JS 506 MK 730 34 1 8 867 11 5 8 295 45 3 4 1162 Unit inch mm 48 13...

Page 24: ...llow the recommendation listed below Copies that are to be kept for a long time should be kept where they are not exposed to light in order to prevent them from fading Adhesive that contains solvent e g spray glue may dissolve the toner on copies Color copies have a thicker layer of toner than normal black and white copies Therefore when a color copy is folded the toner at the fold may peel off Da...

Page 25: ...ncies Internal revenue stamps canceled or uncanceled Passports Immigration papers Motor vehicle licenses and titles House and property titles and deeds General Identification cards badges or insignias Copyrighted works without permission of the copyright owner In addition it is prohibited under any circumstances to copy domestic or foreign currencies or works of art without permission of the copyr...

Page 26: ...Legal restrictions on copying 1 1 20 bizhub C554e C454e C364e C284e C224e 1 9 ...

Page 27: ...2 About This Machine ...

Page 28: ......

Page 29: ...hine procedures and setting methods used to configure each function It in troduces important functions that make it easier to use this machine This guide also contains notes and precautions that should be followed in order to use this machine Please be sure to read this manual before using this machine 2 1 2 User s Guide Online The DVD which includes the User s Guide is provided with this machine ...

Page 30: ...n Searches for the required operations of this machine based on the output result functions and operation images Item Specifications Supported Operating Systems Windows XP SP3 Windows Vista SP2 Windows 7 SP1 Mac OS X10 4 10 5 10 6 10 7 Supported Web browsers Windows Internet Explorer 6 x 7 x 8 x 9 x Firefox 3 x 4 x ESR 10 0 or later Mac OS Safari 3 1 or later 4 x 5 x We recommend that you use the ...

Page 31: ...hub C554e C454e C364e C284e C224e 2 5 2 2 About this machine 2 2 2 About this machine 2 2 1 Optional components bizhub C554e C454e Various optional components can be added to meet your office requirements ...

Page 32: ...ze paper 15 Paper Feed Cabinet PC 210 Can load up to 500 sheets respectively into the top and bottom trays 16 Paper Feed Cabinet PC 110 Can load up to 500 sheets into the top tray The bottom tray is a storage box 17 Desk DK 705 Used to place this machine on the floor 18 Saddle Stitcher SD 511 Used to add the bind fold function to the Finisher FS 534 19 Finisher FS 534 Sorts groups or staples outpu...

Page 33: ...tion LK 110 Supports advanced functions such as a function that converts a file into a DOCX or XLSX type a function that generates highly func tional and high quality data and the E mail RX Print function For details on the available functions refer to the User s Guide Online on the DVD 42 i Option LK 111 Supports the ThinPrint function that is one of the advanced func tions 43 Upgrade Kit UK 204 ...

Page 34: ...About this machine 2 2 8 bizhub C554e C454e C364e C284e C224e 2 2 2 2 2 Optional components bizhub C364e C284e C224e Various optional components can be added to meet your office requirements ...

Page 35: ...he floor 15 Desk DK 510 Used to place this machine on the floor 16 Paper Feed Cabinet PC 410 Can load up to 2500 sheets of 8 1 2 e 11 A4 size paper 17 Paper Feed Cabinet PC 210 Can load up to 500 sheets respectively into the top and bottom trays 18 Paper Feed Cabinet PC 110 Can load up to 500 sheets into the top tray The bottom tray is a storage box 19 Finisher FS 534 Sorts groups or staples outpu...

Page 36: ...ction 38 Upgrade Kit UK 208 Used to return this machine from the Power Save mode via the wireless network using an Android tablet terminal If you are using Original Cover or Reverse Automatic Docu ment Feeder Upgrade Kit UK 209 is required to connect an Android tablet terminal to this machine If you are using Dual Scan Document Feeder Upgrade Kit UK 209 dual scan board is already installed on this...

Page 37: ...o load standard size paper 7 Lower Front Door Open this door to replace consumables or to maintenance this ma chine 8 Upper Front Door Open this door to replace a Toner Cartridge 9 Data Indicator Flashes blue while this machine is receiving a job If a job is current ly spooled this indicator lamp lights up blue 10 Status Indicator This indicator lights up white in phases according to the warm up p...

Page 38: ... sales region The Heater is provided as an optional unit depending on the sales areas d Reference For details refer to the User s Guide Online on the DVD No Name 1 Telephone Jack 1 2 LINE PORT 1 2 2 Jack for connecting a telephone TEL PORT1 2 3 Power Cord 4 Power switch for dehumidifying heater 5 USB Port Type A USB2 0 1 1 6 Network Connector 10Base T 100Base TX 1000Base T 7 USB Port Type B USB2 0...

Page 39: ... runs out of paper 6 Paper Tray Used to load standard size paper 7 Front Door Open this door to replace consumables or to maintenance this ma chine 8 Data Indicator Flashes blue while this machine is receiving a job If a job is current ly spooled this indicator lamp lights up blue 9 Status Indicator This indicator lights up white in phases according to the warm up progress state when this machine ...

Page 40: ... sales region The Heater is provided as an optional unit depending on the sales areas d Reference For details refer to the User s Guide Online on the DVD No Name 1 Telephone Jack 1 2 LINE PORT 1 2 2 Jack for connecting a telephone TEL PORT1 2 3 Power Cord 4 Power switch for dehumidifying heater 5 USB Port Type A USB2 0 1 1 6 Network Connector 10Base T 100Base TX 1000Base T 7 USB Port Type B USB2 0...

Page 41: ...ts Optional units This section shows the names of distinctive parts for each optional unit that can be installed in this machine Finisher FS 535 Saddle Stitcher SD 512 Punch Kit PK 521 bizhub C554e No Name 1 Output Tray 2 Punch Kit 3 Punch Scrap Box 4 Staple Cartridge 5 Saddle Stitcher ...

Page 42: ...About this machine 2 2 16 bizhub C554e C454e C364e C284e C224e 2 2 No Name 1 Staple Cartridge 2 Folding Output Tray ...

Page 43: ...bizhub C554e C454e C364e C284e C224e 2 17 2 2 About this machine 2 Job Separator JS 602 bizhub C554e No Name 1 Output Tray ...

Page 44: ...About this machine 2 2 18 bizhub C554e C454e C364e C284e C224e 2 2 Z Folding Unit ZU 606 bizhub C554e No Name 1 Z Folding Conveyance Unit 2 Punch Scrap Box ...

Page 45: ... C284e C224e 2 19 2 2 About this machine 2 Post Inserter PI 505 bizhub C554e d Reference For details on how to use the Control Panel refer to the User s Guide Online on the DVD No Name 1 Lower Tray 2 Upper Tray 3 Control Panel ...

Page 46: ...About this machine 2 2 20 bizhub C554e C454e C364e C284e C224e 2 2 Finisher FS 533 Punch Kit PK 519 No Name 1 Staple Cartridge 2 Punch Kit 3 Output Tray 4 Tray Extension ...

Page 47: ...bizhub C554e C454e C364e C284e C224e 2 21 2 2 About this machine 2 Job Separator JS 506 No Name 1 Output Tray ...

Page 48: ...About this machine 2 2 22 bizhub C554e C454e C364e C284e C224e 2 2 Finisher FS 534 Saddle Stitcher SD 511 Punch Kit PK 520 No Name 1 Output Tray 2 Punch Scrap Box 3 Staple Cartridge 4 Saddle Stitcher ...

Page 49: ...bizhub C554e C454e C364e C284e C224e 2 23 2 2 About this machine 2 No Name 1 Punch Kit 2 Staple Cartridge 3 Folding Output Tray 1 3 2 ...

Page 50: ...About this machine 2 2 24 bizhub C554e C454e C364e C284e C224e 2 2 Large Capacity Unit LU 301 LU 204 d Reference For details refer to the User s Guide Online on the DVD ...

Page 51: ...ontrol panel Use Main Power Switch to restart this machine 2 3 1 Turning the power on and off Turn the power on and off only when necessary for example when the administrative settings are changed or a power failure occurs 1 Open the Lower Front Door or Front Door and turn the Main Power Switch on 2 Turn the Main Power Switch off NOTICE To restart this machine turn the Main Power Switch off and on...

Page 52: ...turn this machine from the power save mode to the normal mode press the Power key again In the low power or sleep mode you can return this machine from the power save mode to the normal mode simply by placing your hand close to the Control Panel Status of this machine Description Power Save mode LowPoweror Sleep mode Flashes blue This machine returns to the normal mode when data or faxes are re ce...

Page 53: ...change Power Key Setting to Sub Power OFF Tap Utility and select Administrator Settings System Settings Power Supply Power Save Settings Power Key Setting After the setting is changed the power save mode shifts as shown below depending on how the Power key is pressed Pressing the Power key This machine shifts to the Sub Power OFF mode In the Sub Power OFF mode the machine can receive data or faxes...

Page 54: ...ton once again to end the use of this machine 6 Interrupt Tap this button to enter the Interrupt mode The indicator lamp lights up blue in the Interrupt mode To cancel the Interrupt mode tap Interrupt again 7 Preview Tap this button to print a single proof copy to be checked before printing a large number of copies This function can also display a finishing image with the current settings on the T...

Page 55: ...ou can change the setting in Power Key Setting of Administrator Settings For Power Key Setting refer to page 2 27 13 Warning Indicator Flashes orange if a warning occurs Lights up orange if this machine has stopped due to an error No Name Description 1 Keypad Use this keypad to enter numeric values such as the number of cop ies zoom ratio and fax number 2 C Press this key to cancel numeric values ...

Page 56: ...keying sounds and configure the operating environment of the Control Panel Counter Tap this button to display the total number of pages printed on this machine on a function or color basis Job List Tap this button to display active or standby jobs If necessary you can view job logs or print a communication report 2 Main menu keys Display shortcut keys assigned to any function By default the main m...

Page 57: ...tails refer to the User s Guide Online on the DVD 2 5 2 Operating the Touch Panel The Touch Panel of this machine supports user friendly operations such as sliding a finger on the Touch Panel Tap Lightly touch the screen with your finger then remove your finger from the screen immediately This action can select or determine a menu Double tap Lightly touch the screen with your finger twice in succe...

Page 58: ...en Preview screen Drag To move the scroll bar or document place your finger on it and move your finger Used to move the scroll bar or document Pan Slide your finger parallel in a front to back and side to side direc tion on the screen Used to move to the intended display location if data spans multiple screens Long tap Hold down the document by the finger Used to display the icon re lated to the d...

Page 59: ...ce and release it while a docu ment is selected Used to move the document to the intended place Pinch in Pinch out Place two fingers on the screen and then open or close them Used to enlarge or reduce a preview image Rotation Place two fingers on the screen and then rotate them Used to rotate a preview image ...

Page 60: ... operated with a wet finger The Touch Panel will not respond appropriately if operated with hands with gloves on It is recom mended that you use the Stylus Pen supplied with this machine or your finger The Touch Panel may not respond appropriately if the distance between you and a fluorescent lamp is 20 inches 50 cm or less while you are operating the Touch Panel Avoid using the Touch Panel at a s...

Page 61: ...How to close the keypad After entering tap Close to close the keypad It can also be closed by pressing the 10keypad provided for the Register key To display the keypad all the time The keypad can be displayed all the time on the copy screen print setting screen for boxes or browser d Reference For details refer to the User s Guide Online on the DVD ...

Page 62: ...gram use the keyboard screen displayed on the Touch Panel When typing in Group1 1 To type in uppercase letters or symbols tap the Shift key If you mistyped tap or to move the cursor to the character you want to clear then tap the Delete key Tap the Shift key again to return to the original keyboard screen 2 After typing completes tap OK 1 2 ...

Page 63: ... job function While a job is active you can register another job Up to 251 jobs can be registered in total The table below shows the maximum number of jobs that can be registered for each function Reference These values may vary depending on conditions For details refer to the User s Guide Online on the DVD No Description 1 Displays jobs 2 Select a job type In Comm List you can also print a sendin...

Page 64: ...n paper single side only paper thin paper special paper thick paper letterhead colored paper and re cycled paper How to load paper 1 Pull out the tray NOTICE Be careful not to touch the Film 2 Slide the Lateral Guide to fit the size of the paper to be load ed 3 Load paper into the tray Load paper into the tray with the print side facing up 4 When loading paper other than plain paper specify the pa...

Page 65: ...cled paper How to load paper 1 Pull out the tray NOTICE Be careful not to touch the Film 2 Load paper into the right tray Load paper into the tray with the print side facing up NOTICE Do not load the tray with paper of a size other than that previ ously specified To change the paper size contact your serv ice representative 3 Load paper into the left tray Load paper into the tray with the print si...

Page 66: ...aper special paper thick paper letterhead colored paper recy cled paper How to load paper 1 Open the door 2 Lift the Paper Feed Roller and load paper into the unit Load paper into the tray with the print side facing down NOTICE Exercise care not to touch the surface of the Paper Feed Roll er with your hand Do not load the Large Capacity Unit with paper of a size other than that previously specifie...

Page 67: ...o load paper NOTICE Exercise care not to touch the surface of the Paper Feed Roller with your hands 1 Open the tray To load large sized paper pull out the Tray Extension To load banner paper install the Mount Kit MK 730 for banner paper NOTICE Exercise care not to touch the surface of the Paper Feed Roll er with your hands 2 After loading paper adjust the Lateral Guide Load paper into the tray wit...

Page 68: ...Loading Paper 2 2 42 bizhub C554e C454e C364e C284e C224e 2 7 3 Specify the paper type Tap Paper 4 Select then tap Change Tray Setting 5 Select the paper type 1 2 ...

Page 69: ...er 2 6 Specify the paper size For Auto Detect Auto Detect detects the paper size automatically when standard size paper is loaded into a tray For Standard Size Standard Size is available when loading a postcard or standard size paper for overseas 1 3 2 3 2 4 ...

Page 70: ...Loading Paper 2 2 44 bizhub C554e C454e C364e C284e C224e 2 7 For Custom Size For Wide Paper 3 2 3 4 2 ...

Page 71: ...3 Basic Settings and Operations ...

Page 72: ......

Page 73: ...ator Check that this machine is correctly connected to the network cable For details refer to page 3 4 2 Checking network settings of this machine Administrator Check the network settings of this machine For details refer to page 3 4 The network can be used with the default settings unless otherwise requested 3 Installing the printer driver Install the printer driver on the computer For details re...

Page 74: ...d If no IP address is displayed you need to configure the network Tap Utility and select Administrator Settings Network Settings TCP IP Settings Configure the required settings to suit your environment For details refer to the User s Guide Online on the DVD d Reference In general the default settings are available for network connection however some network environments require a change on network...

Page 75: ...com patible with the printer driver 4 Select this machine from the list If multiple identical models are displayed check the IP address to select an appropriate one For details on how to check the IP address of this machine refer to page 3 4 5 Select the check boxes of the printer drivers to be installed 6 Click Install 7 Click Finish Printing data 1 Open the data you want to print using the appli...

Page 76: ...eck the network settings of this machine For details refer to page 3 7 The network can be used with the default settings unless otherwise requested 3 Installing the printer driver Install the printer driver on the computer For details refer to page 3 9 4 Adding and configuring a printer driver Set up your computer so that data can be printed using the installed printer driver For details refer to ...

Page 77: ...r for printing Select a printer driver and change the setting if necessary before printing Checking the cable connection Check that a LAN cable is connected to the LAN port of this ma chine and the green LED is on Checking network settings of this machine 1 Tap Utility and select Device Information Check that the IP address is displayed 2 Specify the Bonjour name Tap Utility and select Administrat...

Page 78: ...0C 4B indicates the last three bytes of the MAC address To change the Bonjour name tap Bonjour Name and enter the name using the displayed key board If no IP address is displayed in Step 1 you need to set up the network Tap Utility and select Administrator Settings Network Settings TCP IP Settings Configure the required settings to suit your environment For details refer to the User s Guide Online...

Page 79: ...er OS_10_6_x Letter bizhub_C364_106 pkg Printer driver for OS X 10 6 When ordinarily using metric sized paper select a printer driver in the A4 directory The last three digits of the printer driver name indicate the version of the operating system 3 Double click the file copied onto the desktop 4 Proceed with the procedure according to the on screen instructions until the installation screen ap pe...

Page 80: ... Select a printer for the Bonjour connection Search for this machine from the list of printers for which Kind is set to Bonjour and click it If you cannot identify the connected machine because multiple same product names are listed check with the administrator This automatically searches for a printer driver compatible with the selected printer 4 Check that the printer driver is displayed 5 Selec...

Page 81: ... computer on the network Once settings are configured you can send data easily For details refer to page 3 12 and page 3 20 Transmitting data as E mail attachment E mail TX Send scanned data as an E mail attachment This function is useful when you want to forward data to an outside location For details refer to page 3 28 Saving data to the USB memory device External memory Directly save scanned da...

Page 82: ...et your needs Issuing a scan instruction from a computer Web service function Saving data to a User Box on the HDD Save in User Box Sending to an FTP server FTP TX Sending to a WebDAV server WebDAV Send d Reference For details refer to the User s Guide Online on the DVD 3 2 2 Sending data to your Windows computer SMB Send Send scanned data to a computer on the network Once settings are configured ...

Page 83: ...ng computer information Check the information required for Store Address and fill out the checklist For details refer to page 3 15 4 Configuring your computer Configure settings to share a computer or create a dedicated folder to receive files For details refer to page 3 15 5 Registering destinations Register destinations to which files are sent while checking the checklist For details refer to pa...

Page 84: ...on however some network environments require a change on network settings For details refer to the User s Guide Online on the DVD Checklist While making notes in the checklist shown below check computer information and configure settings for preparation The completed checklist is used for Store Address For IPv4 environment For IPv6 environment Name Entry column Detail Host Address Host name or IP ...

Page 85: ... to configure a sharing setting In Windows 8 right click on the Start window select All apps Control Panel Network and In ternet Network and Sharing Center Change advanced sharing settings then select the Turn on file and printer sharing check box In Windows 7 from the Start menu select Control Panel Network and Internet Network and Sharing Center Change advanced sharing settings then select the T...

Page 86: ...ta as an address book of this machine 1 Tap Utility and select One Touch User Box Reg Create One Touch Destination Address Book Public PC SMB 2 Tap New 3 For Name specify the name to be displayed on the assigned key For Sort Character enter the same name as Name This sets the appropriate index for the name which you entered into Name to Index To change the setting tap Index 1 2 3 ...

Page 87: ...e checklist enter the user ID and password you wrote down 5 While checking the checklist enter the host address and file path you wrote down When not specifying a folder enter a slash for the file path When specifying a folder enter only the folder name without slash 6 Tap Close 2 3 1 3 1 2 ...

Page 88: ...Scan to Send function 3 3 18 bizhub C554e C454e C364e C284e C224e 3 2 Sending the original 1 Load the original 2 Tap Scan Fax 3 Select a destination 2 1 ...

Page 89: ...ired key on the Touch Panel 5 Press the Start key Settings Description Simplex Duplex Select whether to scan one or both sides of the original Resolution Specify the scanning resolution Color Select whether to scan the original in color or black and white mode File Type Select the type of the file to save scanned data Scan Size Specify the size of the original to be scanned E mail Settings Change ...

Page 90: ...e Administrator Check the network settings of this machine For details refer to page 3 21 3 Checking computer information Check the information required for Store Address and fill out the checklist For details refer to page 3 23 4 Configuring your computer Configure settings to share a computer or create a dedicated folder to receive files For details refer to page 3 23 5 Registering destinations ...

Page 91: ...If no IP address is displayed you need to configure the network Tap Utility and select Administrator Settings Network Settings TCP IP Settings Configure the required settings to suit your environment For details refer to the User s Guide Online on the DVD d Reference In Mac OS X10 6 or earlier the default settings are available during general use but you need to change set tings depending on your ...

Page 92: ...M v1 v2 in Utility Administrator Settings Network Settings SMB Settings Client Settings then tap OK Select ON in Utility Administrator Settings Network Settings SMB Settings Direct Hosting Setting then tap OK Select Utility Administrator Settings System Settings Date Time Settings to specify the same date time and time zone between this machine and your computer then tap OK 2 1 2 1 2 1 ...

Page 93: ...te down the folder name in the File path column of the checklist 2 Enable the folder sharing settings In the Apple menu select System Preferences Sharing 3 Select the File Sharing check box then click Options 4 Select the Share files and folders using SMB Windows and user name check boxes then click Done 5 Under Shared Folders click 6 Select a new folder 7 Click the new folder to check the access ...

Page 94: ...ta as an address book of this machine 1 Tap Utility and select One Touch User Box Reg Create One Touch Destination Address Book Public PC SMB 2 Tap New 3 For Name specify the name to be displayed on the assigned key For Sort Character enter the same name as Name This sets the appropriate index for the name which you entered into Name to Index To change the setting tap Index 1 2 3 ...

Page 95: ...e checklist enter the user ID and password you wrote down 5 While checking the checklist enter the host address and file path you wrote down When not specifying a folder enter a slash for the file path When specifying a folder enter only the folder name without slash 6 Tap Close 1 3 2 1 2 3 ...

Page 96: ...Scan to Send function 3 3 26 bizhub C554e C454e C364e C284e C224e 3 2 Sending the original 1 Load the original 2 Tap Scan Fax 3 Select a destination 1 2 ...

Page 97: ...ired key on the Touch Panel 5 Press the Start key Settings Description Simplex Duplex Select whether to scan one or both sides of the original Resolution Specify the scanning resolution Color Select whether to scan the original in color or black and white mode File Type Select the type of the file to save scanned data Scan Size Specify the size of the original to be scanned E mail Settings Change ...

Page 98: ...ble For details refer to page 3 29 2 Checking network settings of this machine Administrator Check the network settings of this machine For details refer to page 3 29 3 Configuring the E mail transmission environment Administrator Configure a server for E mail TX For details refer to page 3 30 4 Configuring administrator information Administrator Register the administrator name and E mail address ...

Page 99: ...layed If no IP address is displayed you need to configure the network Tap Utility and select Administrator Settings Network Settings TCP IP Settings Configure the required settings to suit your environment For details refer to the User s Guide Online on the DVD d Reference In general the default settings are available for network connection however some network environments require a change on net...

Page 100: ...e C364e C284e C224e 3 2 Configuring the E mail transmission environment 1 Tap Utility and select Administrator Settings Network Settings E Mail Settings 2 Tap E Mail TX SMTP 3 Select ON to enable E mail TX SMTP settings and E mail TX function 3 1 2 ...

Page 101: ... to Send function 3 4 Enter the SMTP server address Configuring administrator information 1 Tap Utility and select Administrator Settings Administrator Machine Settings Administrator Reg istration 2 Enter the required information then tap OK 1 2 1 2 3 ...

Page 102: ...Scan to Send function 3 3 32 bizhub C554e C454e C364e C284e C224e 3 2 Sending the original 1 Load the original 2 Tap Scan Fax 3 Enter a destination 1 2 ...

Page 103: ...ired key on the Touch Panel 5 Press the Start key Settings Description Simplex Duplex Select whether to scan one or both sides of the original Resolution Specify the scanning resolution Color Select whether to scan the original in color or black and white mode File Type Select the type of the file to save scanned data Scan Size Specify the size of the original to be scanned E mail Settings Change ...

Page 104: ...at this machine is correctly connected to the telephone line For details refer to page 3 35 2 Registering transmission information Administrator Specify the name and fax number to be displayed as a sender when sending a fax from this ma chine For details refer to page 3 35 3 Selecting the dialing method Administrator Select the dialing method to suit your environment For details refer to page 3 36...

Page 105: ...cking the cable connection Check that a modular cable is connected to the LINE port of this ma chine Registering transmission information 1 Tap Utility and select Administrator Settings Fax Settings Header Information 2 Enter the sender information then tap OK 2 1 3 ...

Page 106: ...electing the dialing method 1 Tap Utility and select Administrator Settings Fax Settings Line Parameter Setting 2 Tap Dialing Method Sender settings Sender Fax No Settings Enter the name to be displayed as a sender Enter the fax number to be displayed as a sender ...

Page 107: ...t 10pps If you do not know the type of the dialing method If you do not know the type of the dialing method operate push buttons of your phone When you hear beep boop beep set Dialing Method to PB If you do not hear beep boop beep after operating push buttons select 10pps Sending the original 1 Load the original 2 Tap Scan Fax 1 2 ...

Page 108: ...using the keys displayed on the Touch Panel To change the setting tap the desired key on the Touch Panel Color File Type and E mail Settings are not available when sending to a fax number Settings Description Simplex Duplex Select whether to scan one or both sides of the original Resolution Specify the scanning resolution Scan Size Specify the size of the original to be scanned 1 2 3 4 ...

Page 109: ...system Preparation flow The following describes a preparation flow to send a fax from a computer For details refer to the relevant page This preparation is not required the second time or subsequent times 1 Checking the cable connection Administrator Check that this machine is correctly connected to the telephone line and network cable For details refer to page 3 40 2 Checking network settings of ...

Page 110: ... sent using application software 2 Configuring the fax driver Select a fax driver and change the setting if necessary 3 Entering a destination to send data Enter a destination to send data Checking the cable connection 1 Check that a modular cable is connected to the LINE port of this machine 2 Check that a LAN cable is connected to the LAN port of this machine and the green LED is on ...

Page 111: ...ork Tap Utility and select Administrator Settings Network Settings TCP IP Settings Configure the required settings to suit your environment For details refer to the User s Guide Online on the DVD d Reference In general the default settings are available for network connection however some network environments require a change on network settings For details refer to the User s Guide Online on the ...

Page 112: ...eration requires administrator privileges for your computer 1 Insert the DVD ROM which includes the printer driver into the DVD ROM drive of the computer 2 Click Printer Install 3 Proceed with the procedure according to the on screen instructions Printers and MFPs connected to the network are automatically searched for 4 Select this machine from the list 5 Select a fax driver 6 Click Install 7 Cli...

Page 113: ...d click Print Clicking Preferences can change the setting of the printer driver as required If user authentication is enabled in this machine specify the required data such as the user name and password 4 Enter the destination Name and FAX Number To send data to more than one destination repeat this step Clicking Add from Address Book can retrieve the registered destinations of this machine 5 Clic...

Page 114: ...lowing describes the basic operations to make a copy 1 If user authentication is enabled the login screen appears Tap the entry field or keyboard icon to enter the required item then tap Login or Access If IC card or biometric authentication is enabled refer to page 3 46 2 Load the original 3 Tap Copy 1 2 ...

Page 115: ...key on the Touch Panel 5 Tap the input area for entering the number of copies 6 Enter the number of copies using the keypad and press the Start key Settings Description Original Type Specify the original type of the original Color Specify the color to output an image Density Adjust the copy density Paper Specify the output paper Zoom Specify the zoom ratio Duplex Combine Specify double sided copyi...

Page 116: ...r or group in this machine Installing optional units enables IC card or biometric authentication If IC card authentication is enabled pass or place the IC card over or on the card reader of the authentication unit If biometric authentication is enabled put your finger on the finger vein reader of the authentication unit ...

Page 117: ...tions as address books This sec tion explains an example to register an address book to which a fax is sent Using the Control Panel to register an address book Registration from Util ity Select a destination type and register destination information 1 Tap Utility and select One Touch User Box Reg Create One Touch Destination Address Book Public 2 Select the type of the destination you want to regi...

Page 118: ...s Name This sets the appropriate index for the name which you entered into Name to Index To change the setting tap Index Entry items and the number of setting screens vary depending on the destination type Use or to switch setting screens while entering the required items For information on entry items refer to page 3 52 5 Enter the fax number Tap Display Keypad to display the keypad and enter the...

Page 119: ...a destination 3 Using the Control Panel to register an address book Registration in scan fax mode Select a destination type and register destination information 1 Display the scan fax screen 2 Tap Address Reg 3 Tap Input New Address 4 Select a destination type ...

Page 120: ...n the destination type For informa tion on entry items refer to page 3 52 Registration by Direct Input The destination entered by using the Direct Input button can be registered before sending data as well What is an index This is used as an index of a registered destination Tap the Index key to narrow down a target desti nation If Favorite is selected as an index the destination appears in the ba...

Page 121: ...splayed you need to configure the network For details refer to the User s Guide Online on the DVD 2 Start a Web browser enter the IP address of this machine into the URL field then press the Enter key For http 192 168 1 20 192 168 1 20 is an IP address If you use a Web browser other than Internet Explorer 6 in the IPv6 environment enclose the IPv6 address in For example if the IPv6 address of this...

Page 122: ...he fax number of the destination PC SMB Name Enter the name of the destination to be registered as an address book User ID Enter the login name of the destination computer Password Enter the password required to log in to the com puter Host Address Enter the computer name or IP address Only uppercase letters are available for the computer name File Path Enter the folder name to be used as the dest...

Page 123: ...members at periodic intervals Registering a new group 1 Tap Utility and select One Touch User Box Reg Create One Touch Destination Group 2 Tap New 3 Enter the destination name you want to register Tap Name and enter the destination name using the displayed keyboard For Sort Character enter the same name as Name This sets the appropriate index for the name which you entered into Name to Index To ch...

Page 124: ...dress book on the destination selection screen The following two meth ods can be used to search for a destination Search by index Searches for the target destination name using an index Search by registration number Searches for the target destination using a registration number 5 Repeat Step 4 until you select all address books to be grouped ...

Page 125: ...stination Retrieve an address book or group to specify it as a destination to which data is sent Retrieving a destination 1 Tap Scan Fax The destinations which are categorized into Favorite when registering indexes are displayed on the basic screen 2 Narrow down destinations using index and address type 2 1 ...

Page 126: ...n the DVD 3 4 Item Description Direct Input Directly enter a destination using the keyboard screen or keypad Job History Specify a target destination in the job history latest five destinations on the scan fax screen Search Retrieves destination candidates by the prefix search function using the name registered destination name or address fax number E mail ad dress or computer name This function i...

Page 127: ...Formatted in FAT32 Without security function added or with security function that can be turned off as required The recommended memory size is 2GB Available printing file types PDF Compact PDF JPEG TIFF XPS Compact XPS OpenXML docx xlsx pptx and PPML ppml vdx zip Other file types are not supported on this machine Printing data 1 Connect a USB memory device to this machine NOTICE Do not insert the ...

Page 128: ...Using a USB memory device 3 3 58 bizhub C554e C454e C364e C284e C224e 3 6 3 Select data to be printed and tap Print 4 Check print settings 2 1 4 3 ...

Page 129: ...is convenient when printing data created on a computer that is not connected to the network Available USB memory device Compatible with USB version 2 0 1 1 interface Formatted in FAT32 Without security function added or with security function that can be turned off as required The recommended memory size is 2GB Specifying functions to be permitted for external memory Change the settings to save do...

Page 130: ...Using a USB memory device 3 3 60 bizhub C554e C454e C364e C284e C224e 3 6 2 Tap External Memory Functional Settings 3 Select Save Document and ON Tap OK 1 2 3 ...

Page 131: ...n the USB memory device 1 Load the original 2 Connect a USB memory device to this machine NOTICE Do not insert the USB memory device into the USB port close to the rear panel of this machine Do not use a USB device other than a flash memory device 3 Tap Save a document to External Memory ...

Page 132: ...on the Touch Panel To change the setting tap the desired key on the Touch Panel 6 Press the Start key NOTICE Do not disconnect the USB memory device during data sav ing Settings Description Simplex Duplex Select whether to scan one or both sides of the original Resolution Specify the scanning resolution Color Select whether to scan the original in color or black and white mode File Type Select the...

Page 133: ...he guidance function to display the description of a function on the screen and view an operation procedure with moving images If you have any questions during operation try to use this guidance function Getting help on the currently displayed screen Select Function on the Help Menu to display the guidance screen 1 Press the Guidance key 2 Select a menu ...

Page 134: ...Using the guidance function 3 3 64 bizhub C554e C454e C364e C284e C224e 3 7 3 Narrow down the information you want to know ...

Page 135: ... on the desired function or procedure Open the Help Menu and select a menu depending on an objective to display the guidance screen 1 Press the Guidance key 2 Select a menu Name Description Exit Returns to the main menu To Menu Returns to the Help Menu Close Returns to the preceding screen ...

Page 136: ...Using the guidance function 3 3 66 bizhub C554e C454e C364e C284e C224e 3 7 3 Narrow down the information you want to know ...

Page 137: ...ration Tap this button to display operation examples and explanations of this machine sorted by function Other Functions Tap this button to display the guidance menu of the functions and set tings that make it easier to use this machine Name and Function of Parts Tap this button to check the name or function of each part of this ma chine Service Admin Information Tap this button to display the ser...

Page 138: ...Using the guidance function 3 3 68 bizhub C554e C454e C364e C284e C224e 3 7 ...

Page 139: ...4 Advanced Functions ...

Page 140: ......

Page 141: ...hable PDF You can convert the scanned data to a searchable PDF file This requires the registration of i Option LK 105 v3 Web Browser You can use the Web browser on the Touch Panel of this machine You can access contents on the Internet or intranet This requires the registration of i Option LK 101 v3 File Type Extension Supports functions such as a function that converts a file into a DOCX or XLSX ...

Page 142: ...4 is required to use i Option For details on how to purchase or install an optional unit contact your service representative Preparation flow The following describes a preparation flow to use advanced functions For details refer to the relevant page This preparation is not required the second time or subsequent times 1 Registering the i Option license Administrator Register the option license on a...

Page 143: ...Utility and select Administrator Settings Forward License Settings Get Request Code 2 Tap Yes and OK 3 Tapping Print prints the serial number and request code Prepare at hand the printed serial number request code and token certificate supplied with i Op tion 4 Access the Web site of the License Management Server LMS Enter the MFP Serial Number and Re quest Code then click Next The URL is describe...

Page 144: ...nse code and function code are issued Tips The issued license code and function code are required to enable i Option You should write them down on a memo pad or print them out on paper by clicking Print You could also store them in your USB memory device The license code input could be omitted by using a USB memory device to achieve a convenient operation When using a USB memory device insert the ...

Page 145: ...ter the license and function codes in this machine By inputting the codes 1 Tap Utility and select Administrator Settings Forward License Settings Install License Function Licence Code 2 Enter the license and function codes you wrote down 3 Select Yes then tap OK This machine restarts automatically 1 2 3 1 2 ...

Page 146: ...ility and select Administrator Settings Forward License Settings Install License from Ext Memory 3 Select Yes then tap OK This machine restarts automatically Configuring each function Configure the required settings for each advanced function d Reference For details on the required setting items for each advanced function refer to the User s Guide Online on the DVD 1 2 ...

Page 147: ...5 Index ...

Page 148: ......

Page 149: ... Option 4 4 J Job 2 37 K Keypad 2 34 L License Management Server LMS 4 5 Loading Paper 2 38 2 39 2 40 2 41 Low Power mode 2 27 M Main Menu 2 30 MFP 2 11 2 13 Multi job 2 37 O Options 2 5 2 8 2 15 P PC Fax TX 3 39 PCL 3 6 Power Save mode 2 27 Print Function 3 3 3 6 Printing from a USB memory device 3 57 PS 3 6 R Request Code 4 5 S Safety information 1 5 Saving the scanned data 3 59 Search 3 55 Send...

Page 150: ...5 4 bizhub C554e C454e C364e C284e C224e Index by item 5 5 1 ...

Reviews: