background image

 2.7 Connecting Power Cable

2-24

2.7

Connecting Power Cable

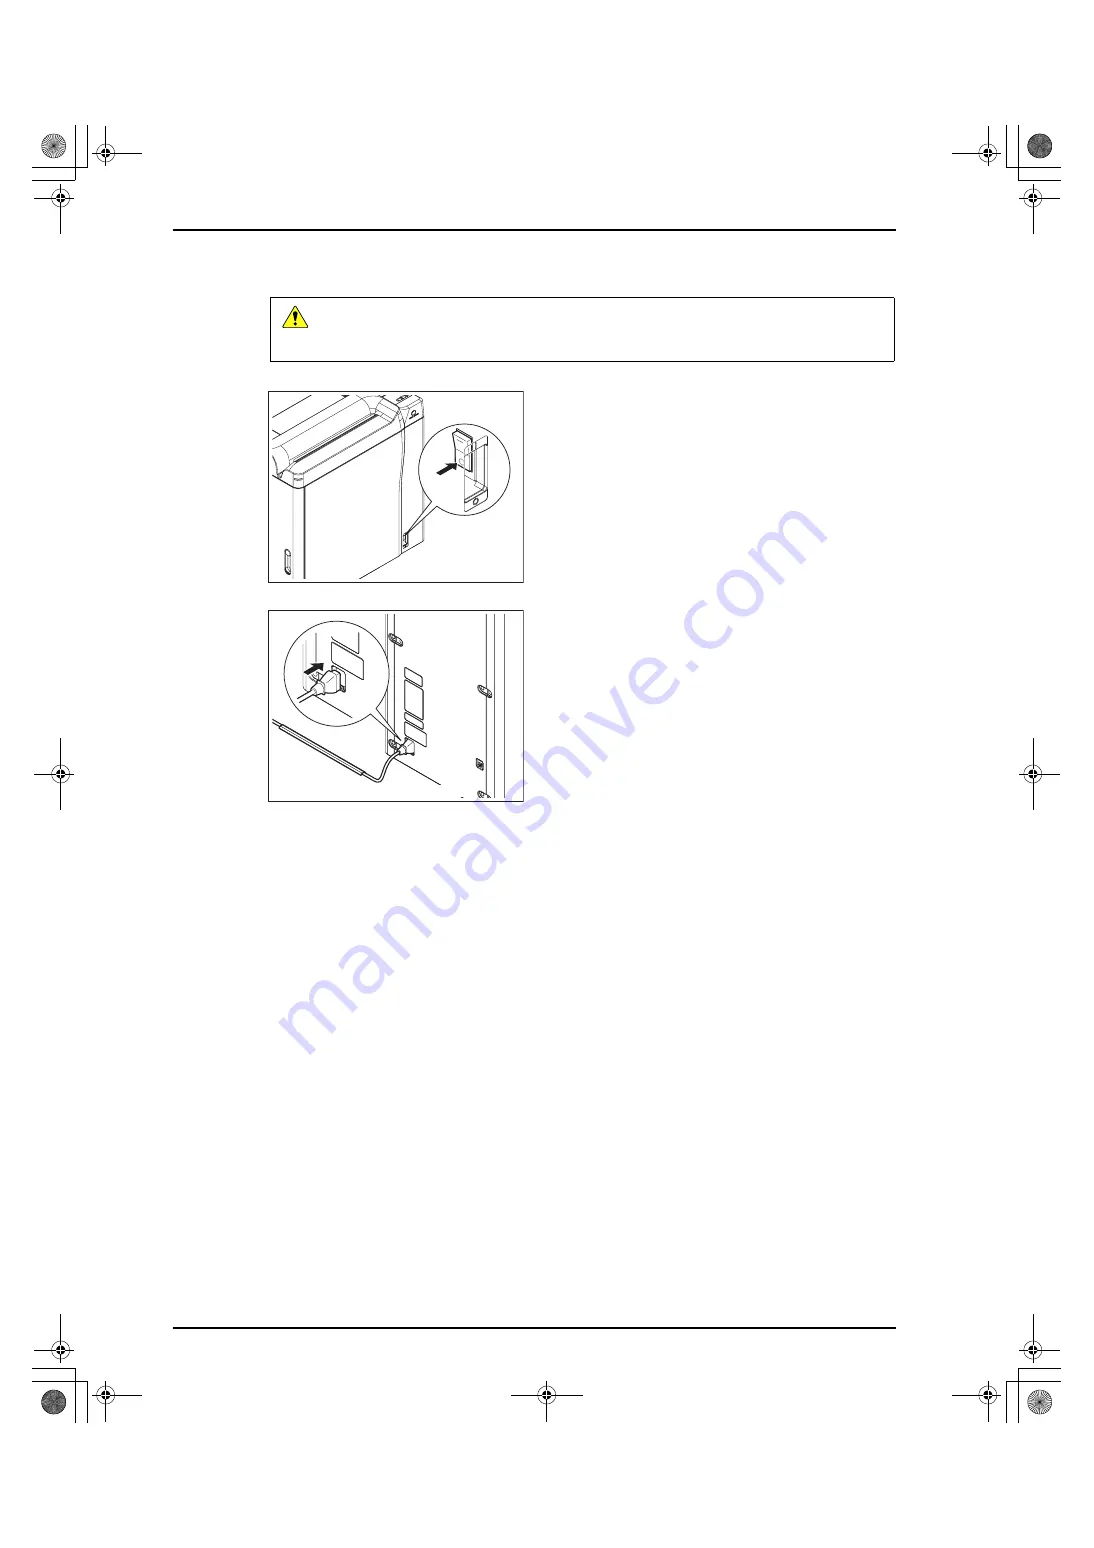
Connect the power cable that comes with the machine.

1

Check that the power breaker is turned OFF.

If the power breaker is ON, turn it OFF.

2

Connect to power cable to the power supply port.

3

Plug the power cable into the wall outlet (3P) in 
the facility.

4

Fix the power cable as required by the conditions 
at the installation location.

This is the final step in the process of connecting power cable.

Caution

Eliminate the clearance between the cable and the floor or wall to avoid hazards to people 
walking over it.
Otherwise, someone may trip over, resulting in injury or damage to the cable or machine.

Back of the second front side

0404YF220A.book  24 ページ  2009年8月20日 木曜日 午後1時26分

Summary of Contents for 0404

Page 1: ...Installation Manual DIRECT DIGITIZER REGIUS MODEL 110 HQ 0197 CODE NO 0404 1 Sakura machi Hino shi Tokyo 191 8511 Japan Manufacturer First Edition ...

Page 2: ... to the manufacturer 4 Notwithstanding item 3 above the manufacturer accepts no responsibility whatsoever for any loss or decrease in profits arising from usage of the product Trademark Company names and product names in this manual are trademarks or registered trademarks of their respective owners Copyright 2009 Konica Minolta Medical Graphic Inc All Rights Reserved 0404YF220A book i ページ 2009年8月2...

Page 3: ...Front Side 2 12 2 3 3 Removing Protective Parts Second Front Side 2 13 2 3 4 Removing Protective Parts Back of First Front Side 2 14 2 3 5 Checking Removal of Protective Parts 2 15 2 3 6 Installing External Panels 2 16 2 4 Changing Operation Panel Installation Position 2 17 2 5 Moving to and Fixing at Installation Location 2 22 2 6 Checking of Input Voltage 2 23 2 7 Connecting Power Cable 2 24 2 8...

Page 4: ... service engineers who install this machine or system including this machine The manual should be kept in a place handy for quick reference Prior to starting the installation thoroughly read the safety warnings and precautions in the operation manual and service manual and familiarize yourself with the precautions when handling the unit 0404YF220A book 0 ページ 2009年8月20日 木曜日 午後1時26分 ...

Page 5: ...quirements 1 2 1 1 2 Checking Maintenance Space 1 3 1 1 3 Checking Power Requirements 1 3 1 1 4 Checking Route for Power Cable and Network Cable 1 3 1 1 5 Checking Unpacking Area 1 4 1 1 6 Checking Transfer Path 1 4 1 1 7 Checking Network 1 4 1 1 8 Equipment and Tools Necessary for Installation 1 5 1 2 Name of Parts 1 6 1 3 Installation Workflow 1 8 0404YF220A book 1 ページ 2009年8月20日 木曜日 午後1時26分 ...

Page 6: ...to floor unevenness vibration or shock including during transportation The maximum level difference that can be accommodated with the adjuster feet of the unit is 12mm Place where chemicals are not stored Place where gas is not emitted Place away from noise sources Place away from underfloor cables or pipe bit covers Stripes may appear in the image Installation Space Find a place where an installa...

Page 7: ...k with a person in charge of the facility on the following points Position of the hub to which the unit is connected route for Ethernet cable and the necessary cable length Position of the wall outlet 3P into which the unit is to be plugged into the route for the power cable and the length of the requird power cable Furthermore check that the power cable can be safely laid for example so that it w...

Page 8: ... location meets the following requirements There are no steps or steep slopes etc that may affect the unit during transfer The doorway of the room through which the unit width 365mm will pass through should be sufficiently large There should be no deformations on the floor surface even after transporting the unit weight approximately 102kg 1 1 7 Checking Network When connecting to the facility net...

Page 9: ... REGIUS console to the unit for setting up the network Use a category 5e or higher cable A cross cable can be used instead Interface specifications RJ 45 connector 100 Base TX 1000 Base T Network hub Maintenance PC Used when setting up the network for the unit without using an existing REGIUS console in the system Since it is used instead of a REGIUS console the REGIUS console application must be ...

Page 10: ...ation configuration The second front is the front side For vertical installation interchange the operation panel locations No Name No Name 1 Air intake 2 Cassette insertion slot 3 Status lamp 4 Dummy operation panel 5 Operation panel 6 Second front cover 7 First front panel 8 Power supply circuit breaker 9 Second front back panel 10 Power supply port 11 Ethernet connection port 12 First front back...

Page 11: ... of Parts 1 7 Operation Panel operation erase 4 2 1 5 3 6 No Name 1 Message display window 2 operation lamp 3 operation switch 4 erase lamp 5 erase switch 6 Speaker 0404YF220A book 7 ページ 2009年8月20日 木曜日 午後1時26分 ...

Page 12: ...el Installation Position Vertical Installation Configuration Only 4 Moving to and Fixing at Installation Location 5 Connecting Power Cable 6 Checking Startup and Shutdown For further details refer to Chapter 2 Unpacking and Installation System Connection and Operation Check Connect the unit to the system Check that the machine operates properly in the system before handing it over to the user For ...

Page 13: ... Removing External Panels 2 11 2 3 2 Removing Protective Part First Front Side 2 12 2 3 3 Removing Protective Parts Second Front Side 2 13 2 3 4 Removing Protective Parts Back of First Front Side 2 14 2 3 5 Checking Removal of Protective Parts 2 15 2 3 6 Installing External Panels 2 16 2 4 Changing Operation Panel Installation Position 2 17 2 5 Moving to and Fixing at Installation Location 2 22 2 ...

Page 14: ...tion position of the operation panel For further details refer to 2 4 Changing Operation Panel Installation Position Moving to and Fixing at Installation Location Move the machine and fix it at the installation location For further details refer to 2 5 Moving to and Fixing at Installation Location Checking of Input Voltage Check the input voltage For further details refer to 2 6 Checking of Input ...

Page 15: ...her than the installation location check that there are no steps or obstacles in the way to the installation location For information about the unpacking space refer to 1 1 5 Checking Unpacking Area If the machine is unpacked immediately after it is moved in dew condensation may form inside the machine due to indoor outdoor temperature differences approximately 10 C or more To prevent this let the...

Page 16: ... Fixing band 2 Outer case cardboard box 3 Palette 4 Accessory bag 5 Buffer material Four pieces 6 Slope 7 Moisture proof bag containing the main unit 8 Fixture Two pieces 9 Buffer material Note The surface where a packing label is attached along the longer side is the front side Install the slope in front of the palette and move the main unit down on it 2 5 7 1 5 4 5 3 8 9 5 8 6 0404YF220A book 4 ...

Page 17: ... the accessory bag 4 Remove the following items that are placed around the main unit One slope Four pieces of buffer material Caution Avoid standing right in front of the bands When a tightly stretched fixing band is cut it may hit the worker Caution Be careful not to damage the items inside Note The items in the accessory bag are checked in 2 2 4 Checking Accessories described later Important Do ...

Page 18: ...r with a guide cut around the bottom of the moisture proof bag 7 Pull up to remove the moisture proof bag This is the final step in the process of removing the packing materials Caution Be careful not to damage the main unit 0404YF220A book 6 ページ 2009年8月20日 木曜日 午後1時26分 ...

Page 19: ... toward you 4 Press the back of the first front side until it contacts the stopper on the front side Caution Observe the following instructions when tilting the main unit Do not hold the bottom of the first front panel when lifting the main unit The panel may be damaged Do not tilt the main unit excessively The main unit may tip over causing personal injury or damage to the machine Important Do no...

Page 20: ...terial removed in step 3 and place it at the correct height under the slope 8 Remove the tape from two locations that fix the rotation plates on both sides of the front side 9 Press the first front side until it contacts the stopper on the back side Rear Caution You can step on the installed slope while carrying out the work However check again that it is installed properly The tenons on the slope...

Page 21: ...t with both hands Move one side of the main unit and then the other so that the casters touch the floor one after another 13 Remove the tape from eight places to remove two buffer materials from the bottom of the device Once you remove these tapes pull the buffer material toward the arrow indicated in the illustration Caution If the slope is not installed correctly it may fall off the palette when...

Page 22: ...l step in the process of checking accessories Caution When disposing of packaging materials be sure to do so by using authorized industrial waste disposal firms in accordance with applicable ordinances and regulations of the local government concerned Name Quantity Remarks Item list 1 Inspection card 1 OPERATION MANUAL 1 Power cable 1 Length 3m Important If any items are missing handle them as def...

Page 23: ... to remove the protective parts red parts from the machine interior 1 Remove the first front back panel Seven screws M4 8 Hold the bottom of the panel with both hands and pull it towards you to remove it 2 Remove the first front panel Six screws M4 8 Hold the bottom of the panel with both hands and pull it towards you to remove it This is the final step in the process of removing the external pane...

Page 24: ...emoving Protective Part A 1 Remove protective part A Top Three hexagonal Phillips socket screws M5 10 Right and left Four hexagonal Phillips socket screws M4 8 This is the final step in the process of removing the protective part on the first front side Protective part A First front side 0404YF220A book 12 ページ 2009年8月20日 木曜日 午後1時26分 ...

Page 25: ...art C Two hexagonal Phillips socket screws M5 10 3 Slide the optical part to the back 4 Remove the other screws of protective part C Two hexagonal Phillips socket screws M5 10 5 Remove protective part C This is the final step in the process of removing the protective parts on the second front side Protective part B Protective part C Second front side Caution Remove the screws while supporting prot...

Page 26: ...ur hexagonal Phillips socket screws M5 10 Removing Protective Part F 3 Remove protective part F Three hexagonal Phillips socket screws M5 10 This is the final step in the process of removing the protective parts on the back of the first front side Protective part F Protective part E Protective part D Back of the first front side Caution Remove the screws while supporting protective part D so that ...

Page 27: ...n Starting the main unit while protective parts still remain inside will cause damage to the main unit Protective part A Protective part B Protective part C Protective part D Protective part E Protective part F Protective Parts Mounting Screw Protective part A Top Three hexagonal Philips socket screws M5 10 Right and left Four hexagonal Philips socket screws M4 8 Protective part B Four hexagonal P...

Page 28: ... second front cover 3 Install the first front back panel Seven screws M4 8 Hold the bottom of the first front back panel with both hands and push the top of the panel into the top panel This is the final step in the process of installing the external panels Proceed to 2 5 Moving to and Fixing at Installation Location to move the machine and fix it at the installation location First front side Back...

Page 29: ...t board cover A 3 screws M3 6 Loosen all screws B 3 screws M3 20 Remove all screws 3 Remove the connectors from the MDU and remove the cable from the wire saddle CN1 MCN1 Cable CN2 MCN2 Cable No Tools 1 Phillips head screwdriver Horizontal installation configuration Factory configuration Operation unit Vertical installation configuration Horizontal installation configuration Factory configuration ...

Page 30: ...oved insertion unit upside down in a level location where the replacement work can be performed 6 Remove the dummy operation panel Four tapping screws M4 10 7 Remove the operation panel cable from the clamps Clamps at two locations First front side Caution Take out the cables removed in step 3 being careful to ensure they are not caught 0404YF220A book 18 ページ 2009年8月20日 木曜日 午後1時26分 ...

Page 31: ...ect the operation panel cable as shown in the figure Clamps at four locations 11 Install the dummy operation panel Four tapping screws M4 10 Important Confirm that the light shielding sponge is contained properly in the cable area for the operation panel Important Install the operation panel so that the bottom side of the Loading Cassette Do Not Sit On label shows on the operation side 0404YF220A ...

Page 32: ...3 Connect the cables on the insertion unit to the MDU and then put the cables through the wire saddle MCN1 CN1 MDU circuit board MCN2 CN2 MDU circuit board 14 Install the circuit board cover A 3 screws M3 6 B 3 screws M3 20 15 Install the first front panel Six screws M4 8 Hold the bottom of the first front panel with both hands and push the top of the panel into the top panel 16 Close the second f...

Page 33: ...o the top panel 18 Install the second front back panel Six screws M4 8 Four spacers This is the final step in the process of changing the installation position of the operation panel Proceed to 2 5 Moving to and Fixing at Installation Location to move the machine and fix it at the installation location Back of the first front side Back of the second front side 0404YF220A book 21 ページ 2009年8月20日 木曜日...

Page 34: ...the final step in the process of moving to and fixing at the installation location Caution Because the protective parts have been removed subjecting the machine to a strong shock may damage the inside of the main unit Move the machine carefully Note When the optical part is moved all the way to the front the locking rod moves down automatically to lock into position The second front cover does not...

Page 35: ...uits to the power voltage provided from the facility The wiring color is associated with each power voltage AC Following list shows the correspondence between the wiring color and power voltage Wire Color Brown Red Orange Yellow Power Voltage 100V 110V 115V 120V 200V 220V 230V 240V TAP Connector 0404YF220A book 23 ページ 2009年8月20日 木曜日 午後1時26分 ...

Page 36: ...ble into the wall outlet 3P in the facility 4 Fix the power cable as required by the conditions at the installation location This is the final step in the process of connecting power cable Caution Eliminate the clearance between the cable and the floor or wall to avoid hazards to people walking over it Otherwise someone may trip over resulting in injury or damage to the cable or machine Back of th...

Page 37: ...to the right during the initialization process When the bar reaches the right end NETWORK ERROR 24000 appears in the upper part of the message display window The factory set IP address of the machine is displayed in the lower part of the message display window 5 Press the operation switch for at least three seconds The backlight of the message display window goes off 6 Turn OFF the power breaker T...

Page 38: ...0404YF220A book 26 ページ 2009年8月20日 木曜日 午後1時26分 ...

Page 39: ...ystem 3 3 3 2 1 Upgrading REGIUS Console 3 3 3 2 2 Setting Up Network 3 4 3 2 3 Connecting to Network 3 5 3 3 Checking Operations and Backing Up Setup Data 3 6 3 3 1 Checking Images 3 6 3 3 2 Checking Coordinative Operations 3 6 3 3 3 Setting Sound Volume 3 6 3 3 4 Checking Safety Interlock Operation 3 7 3 3 5 Backing Up Setup Data 3 7 3 4 Handing Over 3 8 3 4 1 Cleaning 3 8 3 4 2 Instruction and ...

Page 40: ...le The settings related to the unit are as follows System reader configuration setting Configuration setting for the reader to be connected Cassette reader information setting Network information setting for the reader to be connected For further details refer to the REGIUS console Installation Service Manual Checking Operations and Backing Up Setup Data Check whether the unit operates in the syst...

Page 41: ...GIUS console application support the unit CS 3 V3 01 R00 or more CS 2 V1 40 R00 or more Requirements The procedures described in this manual require the following tools For information about the procedure for upgrading refer to the REGIUS console Installation Service Manual This is the final step in the process of upgrading the REGIUS console No Tools 1 CD containing the new version of the REGIUS ...

Page 42: ...ask 255 255 255 0 JOBM INFO screen Select Built in Job Manager and Post registration CCU INFO screen Host name R170 0001 Host name on the Job Manager r170 00001 IP address 192 168 20 170 PostgreSQL access tool c_status screen Set to CS 0001 only r_status screen Set to r170 0001 only relations screen Set to Only one relationship between CS 0001 and r170 0001 sys_config screen Set reg_type to1 CS CS...

Page 43: ...the unit to the Ethernet connection port Fix the Ethernet cables as required by the conditions at the installation location 2 Check the network connection After the network connection is completed turn ON the REGIUS console and the unit to check that no network error occurs For information about the procedure for making and checking the network connection refer to the REGIUS console Installation S...

Page 44: ... procedure refer to the REGIUS console Operation Manual This is the final step in the process of checking coordinative operations Proceed to 3 3 3 Setting Sound Volume to change the sound volume setting for the speaker of the unit When you do not need to change the sound volume proceed to 3 3 4 Checking Safety Interlock Operation to check that the interlock mechanism of the unit operates correctly...

Page 45: ...r The initialization process starts again When it finishes READY appears in the message display window This is the final step in the process of checking the safety interlock operation 3 3 5 Backing Up Setup Data Back up the unit setup data in the REGIUS console For information about the procedure for backing up the data refer to the REGIUS console Installation Service Manual This is the final step...

Page 46: ...k Sheet Report 2 Information described in the OPERATION MANUAL 2 1 Safety Precautions and Warnings 2 2 Product Outline Outline of Unit Name of Parts Operation Outline 2 3 Starting and Shutting Down Power ON OFF How to Start Shut down 2 4 Cassette Operation Handling the Cassette Reading Exposed Cassette Images Erasing the REGIUS Plate 2 5 Troubleshooting Error Display and Solutions Handling Cassett...

Page 47: ...0404YF220A book 1 ページ 2009年8月20日 木曜日 午後1時26分 ...

Page 48: ...0404YF220A 0404YF220A 20090827MD 20090827MD ...

Reviews: