Seatex Seapath 200 Installation Manual, rev. 13
Appendix D – Seapath configuration software, SCC
102
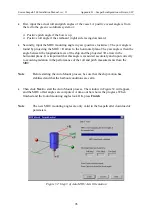
To setup the input interface proceed as follows:
•
In the Configuration Folder List, select
Data Interface \ Input.
•
Activate the device to be interfaced by clicking on the checkbox in front of the device
name.
•
The Property
of the selected Device ("Gyro", "DGPS" and "OpCom") is set by clicking in
the wanted
Properties
cell and the
Serial Port Settings
dialogue box below appears.
Select the wanted settings and click
OK
. The wanted communication (RS-232 or RS-422)
is selected in the
Electric
field. For com2 only RS-232 communication is available.
Figure 58 Serial Port Setting
•
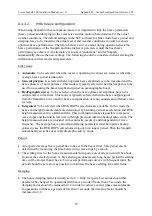
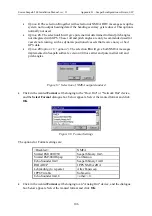
The Format settings can be changed for Device type "Gyro" and "DGPS". For Device type
"DGPS", click in the wanted DGPS
Format
cell and the
Select Format
dialogue box
below appears. Select "RTCM, RollOn, 6of8" or the "CMR" setting for the Trimble CMR
format. Click
OK
, or if " RTCM, RollOn, 6of8"
is selected, click on
RTCM Properties
button in order to
change format on RTCM Decoding. The
RTCM Format Decoding
dialogue box below appears. Choose the wanted settings for Roll Bytes and Bits/Byte and
click
OK
. The setting "MSB First (Roll ON)" and "6 of 8"
are the most commonly used
settings.
Figure 59 Format Setting
Summary of Contents for Seatex Seapath 200
Page 1: ...Seatex Seapath 200 Installation Manual Issued 2008 06 09 ...
Page 2: ...Blank page ...
Page 4: ...IV Blank page ...
Page 6: ...VI Blank page ...
Page 10: ...X Blank page ...
Page 14: ...XIV Blank page ...
Page 18: ...Seatex Seapath 200 Installation Manual rev 13 Introduction 4 Blank page ...
Page 22: ...Seatex Seapath 200 Installation Manual rev 13 Specifications 8 Blank page ...
Page 53: ...Seatex Seapath 200 Installation Manual rev 13 Installation drawings 39 ...
Page 54: ...Seatex Seapath 200 Installation Manual rev 13 Installation drawings 40 ...
Page 55: ...Seatex Seapath 200 Installation Manual rev 13 Installation drawings 41 ...
Page 56: ...Seatex Seapath 200 Installation Manual rev 13 Installation drawings 42 ...
Page 64: ...Seatex Seapath 200 Installation Manual rev 13 Appendix A Installation worksheet 50 Blank page ...
Page 80: ...Seatex Seapath 200 Installation Manual rev 13 Appendix C Installation of coax connectors 66 ...
Page 81: ...Seatex Seapath 200 Installation Manual rev 13 Appendix C Installation of coax connectors 67 ...
Page 82: ...Seatex Seapath 200 Installation Manual rev 13 Appendix C Installation of coax connectors 68 ...
Page 83: ...Seatex Seapath 200 Installation Manual rev 13 Appendix C Installation of coax connectors 69 ...


