3.3 Operation
Operation
3-78
WA80M-7, WA100M-7 – VENAM03001
3.3.9
Return to dig
1. Lower the bucket to the ground, adjust the desired digging
angle, and set the multi-function lever to HOLD.
2. Engage the work equipment lock lever and stop the engine.
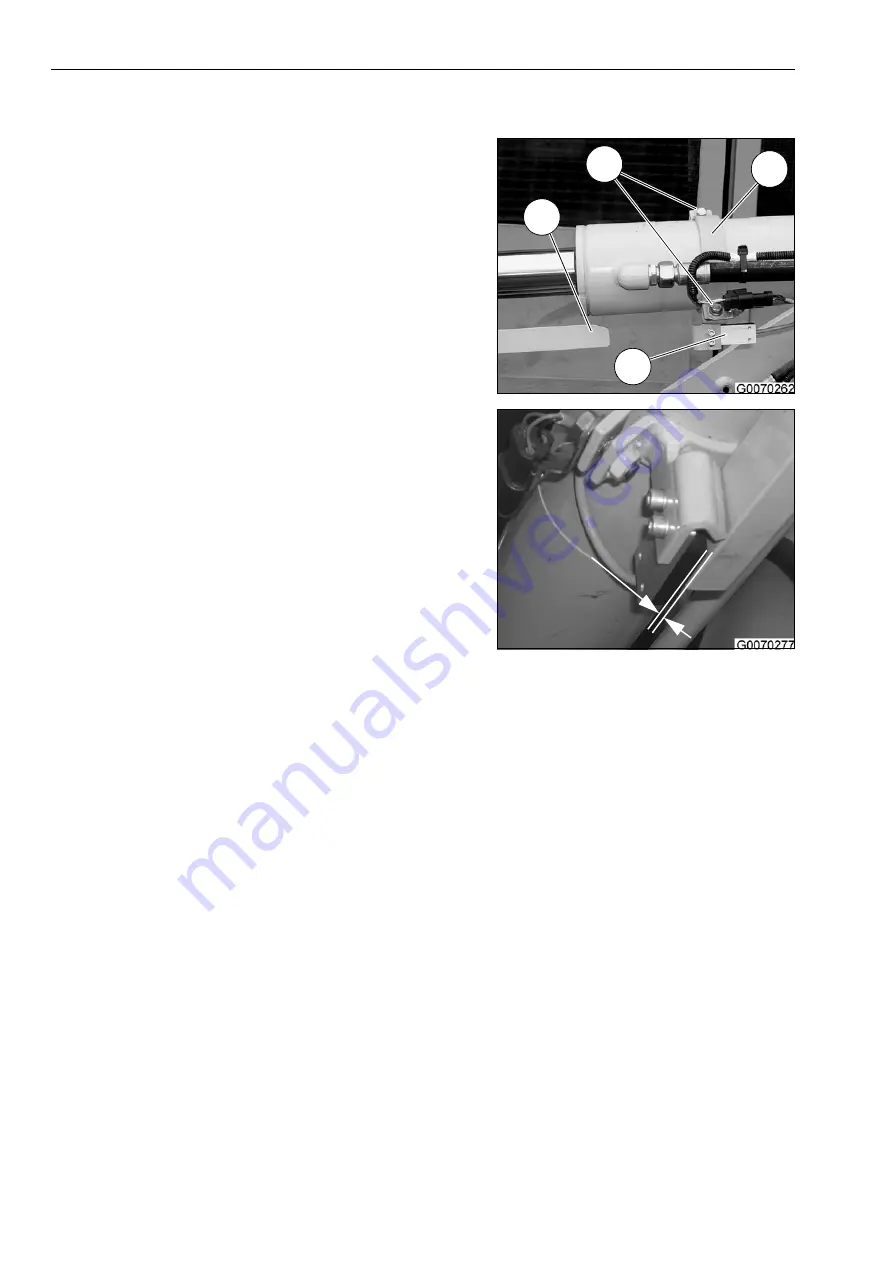
3. Loosen the 2 bolts (1) and adjust the bracket of the proximity
switch (4) so that the rearward end of the rod (2) is in line with
the centre of the sensing surface of the proximity switch (3).
Tighten the screws to lock the bracket in position.
Set the gap between the rod (2) and the sensing surface of
the proximity switch (3) to between 3 and 5 mm.
4. After adjusting, start the engine and raise the boom. Set the
bucket control lever to DUMP and then to TILT BACK. The
control lever should lock in a detent.
Check that the lever automatically returns to HOLD when the
bucket has reached the desired digging angle.
3.3.10
Working with the wheel loader
Saving the tyres
When digging in piles of soil or blasted rock, the tyres may
become cut by slipping. This reduces the service life of the tyres.
Use the following guidelines to prevent tyre slip:
Keep the ground in the working are level, and remove any
fallen rocks.
Always drive into the stockpile in a straight line. This yields
the greatest digging force and lowest tyre wear.
Drive slowly when clearing away stockpiled material or load-
ing blasted rock (speed range 1).
When digging, raise the bucket when entering the stockpile.
This increases the load on the front wheels, prevents the front
wheels from slipping, and reduces tyre wear.
Lower the bucket to the ground slowly. If the bucket hits the
ground, the front tyres will come off the ground, and the tyres
will slip.
To prevent the front wheels from slipping, they should press
into the ground as much as possible. Therefore, slightly raise
the bucket as soon as it enters the stockpile.
1
4
2
3
3 –
5
m
m
Summary of Contents for WA100M-7
Page 2: ......
Page 3: ...Foreword WA80M 7 WA100M 7 VENAM03001 1 1 1 Foreword...
Page 26: ...1 7 Equipment Foreword 1 24 WA80M 7 WA100M 7 VENAM03001...
Page 71: ...Operation WA80M 7 WA100M 7 VENAM03001 3 1 3 Operation...
Page 184: ...3 8 Reading error code Operation 3 114 WA80M 7 WA100M 7 VENAM03001...
Page 185: ...Troubleshooting WA80M 7 WA100M 7 VENAM03001 4 1 4 Troubleshooting...
Page 203: ...Maintenance WA80M 7 WA100M 7 VENAM03001 5 1 5 Maintenance...
Page 220: ...5 4 Fuel lubricants and coolants quantities Maintenance 5 18 WA80M 7 WA100M 7 VENAM03001...
Page 279: ...Technical data WA80M 7 WA100M 7 VENAM03001 6 1 6 Technical data...
Page 285: ...Special equipment attachments WA80M 7 WA100M 7 VENAM03001 7 1 7 Special equipment attachments...
Page 292: ...7 3 Central lubrication system Special equipment attachments 7 8 WA80M 7 WA100M 7 VENAM03001...
Page 293: ...Index WA80M 7 WA100M 7 VENAM03001 8 1 8 Index...
Page 298: ...8 1 Index Index 8 6 WA80M 7 WA100M 7 VENAM03001...
Page 299: ...Notes WA80M 7 WA100M 7 VENAM03001 9 1 9 Notes...
Page 300: ...Notes 9 2 WA80M 7 WA100M 7 VENAM03001...
Page 301: ...Notes WA80M 7 WA100M 7 VENAM03001 9 3...
Page 302: ...Notes 9 4 WA80M 7 WA100M 7 VENAM03001...


