


1.
Use a wet cloth to clean the area around the electrolyte
level lines and check that the electrolyte level is between
UPPER LEVEL (U.L.) and LOWER LEVEL (L.L.) lines.
2.
If the electrolyte level is below the middle between UPPER
LEVEL (U.L.) and LOWER LEVEL (L.L.) lines, immediately
remove cap (4) and add purified water (e.g. commercially
available replenishment water for a battery) to U.L. line.
3.
After adding the purified water, tighten cap (4) securely.
REMARK
If the purified water is added to above UPPER LEVEL (U.L.) line, remove the fluid by using a syringe to lower
the level to UPPER LEVEL (U.L.) line. Neutralize the removed electrolyte with baking soda (sodium bicarbon-
ate), then flush it away with a large amount of water. If necessary, consult your Komatsu distributor or a battery
manufacturer.
METHOD FOR CHECKING ELECTROLYTE LEVEL WHEN IT IS IMPOSSIBLE TO
CHECK FROM SIDE OF BATTERY
If it is impossible to check the electrolyte level from the side of the battery, or there is no UPPER LEVEL line on
the side of the battery, check as follows.
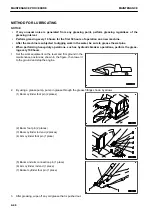
1.
Remove cap (4) at the top of the battery and check the
electrolyte level through electrolyte filler port (5).
2.
If the electrolyte does not reach the sleeve (6), always add
the purified water (e.g. commercially available replenish-
ment water for a battery) so that the level reaches the bot-
tom of the sleeve (UPPER LEVEL line).
(A) Correct level: Electrolyte level is up to bottom of
sleeve, so surface tension causes electrolyte surface to
bulge and pole plate appears to be warped.
(B) Low level: Electrolyte level does not reach the bottom
of sleeve, so pole plate appears straight and not to be
warped.
3.
After adding the purified water, tighten cap (4) securely.
MAINTENANCE
MAINTENANCE PROCEDURE
4-43
Summary of Contents for PC210-11
Page 2: ......
Page 24: ......
Page 74: ......
Page 352: ......
Page 431: ...SPECIFICATIONS 5 1 ...
Page 435: ...PC210LC 11 PC210NLC 11 SPECIFICATIONS SPECIFICATIONS 5 5 ...
Page 436: ...PC230NHD 11 SPECIFICATIONS SPECIFICATIONS 5 6 ...
Page 459: ...PC230NHD 11 2 Piece Boom ATTACHMENTS AND OPTIONS 2 PIECE BOOM 6 23 ...
Page 470: ... Not including tail swing SUPER LONG FRONT BOOM AND ARM ATTACHMENTS AND OPTIONS 6 34 ...
Page 505: ...REPLACEMENT PARTS 7 1 ...
Page 521: ......


