background image

3+5

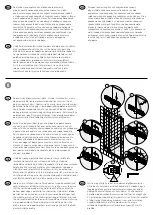
Zdemontuj wspornik oddzielając profil od elementów
mocujących. Przykręć element mocujący wspornik do ściany
kabiny. Następnie przyłóż przyścienny element mocujący
wspornik do ściany i zaznacz miejsce pod nawiercenie element
otworu montażowego. Wywierć w ścianie otwór o średnicy
6 mm, umieść w nim kołek rozporowy, a następnie przykręć
przyścienny element mocujący wspornik za pomocą wkrętu B.

Свалете подпората, като отделите профила от монтажните
елементи. Затегнете елемента, като закрепите подпората
към стената на душа. След това поставете стенния елемент,
като закрепите подпората до стената, и отбележете местата
за пробиване на дупки за монтаж. Пробийте в стената дупки
с диаметър 6 mm, поставете в тях дюбели и завинтете
подпората с помощта на винтове тип В.

Vyjměte rameno z montážního prvku na pevné boční stěně.
Upevněte tento prvek na pevnou boční stěnu. Dále umístěte
druhý montážní prvek ramene na místo označené na protilehlé
zdi a označte místa pro vyvrtání montážních otvorů. Do zdi
vyvrtejte montážní otvory o průměru 6 mm, vsaďte do nich
hmoždinky a přišroubujte montážní prvek pomocí šroubů B.

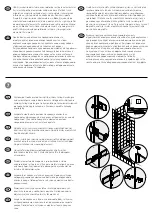
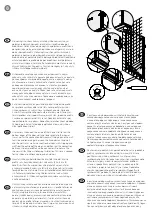
Remove the support bracket separating the profile from the
installation elements. Tighten the element fixing the support
bracket to the shower wall. Next, place the wall element
attaching the support bracket next to the wall and mark places
for drilling of installation holes. Drill 6 mm diameter holes in the
wall, place wall anchors in them and screw the wall support
bracket in using type B screws.

Húzza ki a tartóprofilt az oldalfal tartóeleméből. Húzza meg az
oldalfal tartóelemének csavarját. Illessze a fali rögzítőelemet
az előző lépésben megjelölt helyre, és jelölje be a falon a furat
helyét. Fúrjon egy 6 mm-es furatot a falba, helyezzen be egy
tiplit, majd egy „B” csavarral rögzítse a fali rögzítőelemet.

Scoateţi consola de susţinere care separă profilul de elementele
de instalare. Strângeţi elementul care fixează consola de
susţinere de peretele cabinei de duş. Apoi, amplasaţi elementul
de perete fixând consola de susţinere lângă perete şi marcaţi
locurile de practicare a orifi ciilor de instalare. Practicaţi în perete
orifi cii de 6 mm în diametru, amplasaţi ancorele de perete în
aceste orifi cii şi fixaţi consola de susţinere a peretelui utilizând
şuruburi de tip B.

Снимите опору, отделяя профиль от элементов крепления.
Прикрутите элемент крепления опоры к стенке и кабине.
Потом приложите настенный элемент крепления опоры
к стене и отметьте место сверления монтажного отверстия.
Высверлите в стене отверстие, диаметром 6 мм, вставьте
в него распорную пробку, а потом прикрепите настенный
элемент крепления опоры шурупом В.

Vyberte rameno z montážneho prvku na pevnej bočnej stene.
Upevnite tento prvok na pevnú bočnú stenu. Ďalej umiestnite
druhý montážny prvok ramena na miesto označené na
protiľahlej stene a označte miesta pre vyvŕtanie montážnych
otvorov. Do steny vyvŕtajte montážne otvory s priemerom 6 mm,
vsuňte do nich hmoždinky a priskrutkujte montážny prvok
pomocou skrutiek B.

Зніміть опору, відділяючи профіль від елементів кріплення.
Прикрутіть елемент кріплення опори до стінки і кабіни.
Потім прикладіть настінний елемент кріплення опори
до стіни і позначте місце свердління монтажного отвору.
Висвердліть в стіні отвір, діаметром 6 мм, вставте в нього
розпірну пробку, а потім прикріпіть настінний елемент
кріплення опори шурупом В.

Summary of Contents for NEXT HDRF 100

Page 1: ...de dou persoane Odpor ame aby mont sprchovacieho k ta vykon vali dve osoby Drzwi wn kowe drzwi do czenia ze ciank sta Instrukcja monta u K dlov dve e do niky dve e pro kombinaci s pevnou bo n st nou N...

Page 2: ...csok Ne haszn ljon s rol hat s tiszt t szereket Azuhanykabin tiszt t s hoz k m l hat s foly kony tiszt t szer haszn lat t javasoljuk Tov bbi inform ci kat tal l a garanciajegyen SK Pros me pre tajte s...

Page 3: ...v right jobbos dreapta prav lewa lev left balos stinga av 50 50 16 14 18 13 17 20 20 Z Y T 19 41 6 7 8 30 28 24 23 5 5 5 5 10 4 22 2 2 2 2 22 4 16 14 18 13 17 20 20 Z Y T 19 41 6 7 8 30 28 24 23 5 5 5...

Page 4: ...ent onto the wall in such a manner that the glass edge is located 15 mm 5 mm when the shower tray will be built in tiles from the shower tray edge level the element and mark the places for drilling of...

Page 5: ...lastikowy pro l uszczelniaj cy i wsu w niego pasek magnetyczny Nasu te na spodn podlahov pro l spojku pro lu pro spojen s pevnou bo n st nou zasu te tento pro l do spojky pro lu kter je namontov na na...

Page 6: ...Ata a i m nerul u ii Nasa te magnetick tesniacu li tu na dvere Predt m navlh ite okraj skla mydlov m roztokom mont magnetickej tesniacej li ty sa t m zjednodu Spodn tesniacu li tu nasa te na doln okra...

Page 7: ...tallation screws of xed element support brackets and adjust placement of shower stall elements in such a way as to ensure that the vertical door edges are parallel to each other and that the bottom do...

Page 8: ...k the mounting screws of the xed element support brackets and slide the wall pro le located on shower stall xed element to the wall using e g a wooden block If xed element glass needs to be slid in th...

Page 9: ...j zdi nasu te mont n prvek pro upevn n ke zdi Do mont n ho prvku pro upevn n na pevnou bo n st nu vlo te ochrannou podlo ku a potom tento prvek nasa te na rameno Rameno nasa te na pevnou bo n st nu v...

Page 10: ...n the wall place wall anchors in them and screw the wall support bracket in using type B screws H zza ki a tart pro lt az oldalfal tart elem b l H zza meg az oldalfal tart elem nek csavarj t Illessze...

Page 11: ...onsolei de sus inere n locurile n care se a ori ciile din elementul de xare a consolei de sus inere i apoi xa i cu uruburi de blocare de tip D D D 1 4 5 2 3 5 6 6 5 1 5 1 5 5 5 1 5 1 5 5 D D Upevnite...

Page 12: ...als l t az als pro l s a zuhanyt lca k z tti r st T m tse az oldals s als leket a x elem az oldalfal s a zuhanyt lca k z tt valamint a az als pro l s a zuhanyt lca k z tti r st k v lr l Tov bb t m ts...

Page 13: ...oisten the glass edge with a soap water solution to make installation of stripping easier Azokn l a zuhanykabinokn l amelyek ker miat lc ra vannak p tve a PVC cs kot a x elem al kell helyezni Helyezze...

Page 14: ...protective strip on the glued surface and attach the stripping to the wall Csatlakoztassa az sszek t elemet pro l fal fel li v g hez majd csatlakoztassa a pro lt az ajt x r sze fel li sszek t elemhez...

Page 15: ...om mont magnetickej tesniacej li ty sa t m zjednodu Spodn tesniacu li tu nasa te na doln okraj dver a zarovnajte ju s magnetickou tesniacou li tou Pripevnite na dvere dr adlo Na doln za lepke zawiasu...

Page 16: ...ical door edges are parallel to each other and that the bottom door edge is parallel to the shower tray This way you can adjust the wall position Adjustment of door position can be carried out in a si...

Page 17: ...manner on door hinges Lock the mounting screws of the xed element support brackets and slide the wall pro le located on shower stall xed element to the wall using e g a wooden block If xed element gl...

Page 18: ...torn mu a vonkaj iemu povrchu N sledne pripojte diely zakr vaj ce mont ne skrutky z vesov dver Sl bi i uruburile de instalare a consolelor de sus inere a elementului x i ajusta i pozi ia elementelor...

Page 19: ...ween the lower pro le and the connectors Do not use the shower stall for 24 hours following installation This time is needed for the silicone to achieve appropriate hardness Szaniter szilikonnal bel l...

Page 20: ...ezov oceli A Lze istit ANO Odoln v i n razu a rozbit ANO St lost vlastnost ANO Product description Shower stalls are designed for mounting on shower trays doors are designed for mounting in alcoves an...

Reviews: