background image

Diaphragm Pumps UN035_I EX 


Operation 


17 


Switching pump on 


The pump may not start up against pressure or vacuum during 
switch-on. This also applies in operation following a brief power 
failure.  


  Make sure that no pressure is present in the lines during 

switch-on. 


Switching off the pump 

  KNF recommends: When transferring aggressive media, flush 

the pump prior to switch-off to increase the service life of the 
diaphragm (see section 8.2.1). 

  Open pressure and suction lines to normal atmospheric pres-

sure. 


Summary of Contents for UN035.1.2AN.9I EX

Page 1: ...1 2ST 9I EX UN035 1 2SVI EX UN035 1 2SV 9I EX UN035 3ANI EX UN035 3AN 9I EX UN035 3ATI EX UN035 3AVI EX UN035 3STI EX UN035 3ST 9I EX UN035 3SVI EX UN035 3SV 9I EX UN035 3TTI EX UN035 3TVI EX Fig 1 UN...

Page 2: ...e the warning are specified here The signal word e g Warning indicates the danger level Measures for avoiding the danger and its conse quences are specified here Danger levels Signal word Meaning Cons...

Page 3: ...free in the specific application case Before using a medium check the compatibility of the materials of the pump head diaphragm and valves with the medium Only transfer gases which remain stable under...

Page 4: ...when handling these media Make sure the temperature of the medium is always sufficiently below the ignition temperature of the medium to avoid ignition or explosion This also applies for unusual opera...

Page 5: ...ted Stainless Steel FPM UN035_AV_I EX Aluminium FPM Stainless Steel FPM UN035_SN_I EX Stainless Steel CR CR UN035_ST_I EX Stainless Steel PTFE coated PTFE UN035_SV_I EX Stainless Steel FPM FPM UN035_T...

Page 6: ...permissible operating pressure bar Ultimate vacuum mbar abs UN035_N_I EX 30 4 100 UN035_T_I EX 27 4 100 UN035_V_I EX 30 2 100 UN035 3_N_I EX 30 13 UN035 3_T_I EX 27 20 UN035 3_T_I EX 30 13 UN035 1 2_N...

Page 7: ...otect against overloading Other parameters Parameter Values Permissible ambient temperature 5 C to 40 C Permissible media temperature 5 C to 40 C Gas tightness of pump head leak rate for all pumps exc...

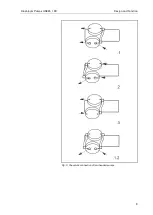
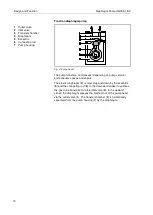
Page 8: ...Diaphragm Pump UN035_I EX 8 5 Design and Function Design UN035S__I EX 1 Pneumatic pump outlet 2 Pneumatic pump inlet 3 Electrical connection 4 Motor 5 Flow direction indicator Fig 2 Diaphragm Pump UN...

Page 9: ...Diaphragm Pumps UN035_I EX Design and Function 9 Fig 3 Pneumatic connection of two headed pumps...

Page 10: ...es depending on pump version and evacuates gases and vapors The elastic diaphragm 4 is moved up and down by the eccentric 5 and the connecting rod 6 In the downward stroke it aspirates the gas to be t...

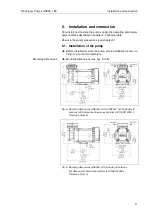
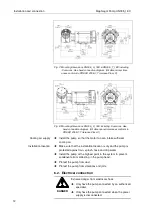
Page 11: ...1 Installation of the pump Before installation store the pump at the installation location to bring it up to room temperature Mounting dimensions see figs 5 to 8 Fig 5 Mounting dimensions UN035A_I EX...

Page 12: ...tall the pump so that the motor fan can intake sufficient cooling air Make sure that the installation location is dry and the pump is protected against rain splash hose and drip water Install the pump...

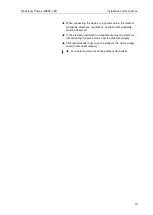
Page 13: ...ds directives regulations and technical standards must be observed In the electrical installation arrangements must be made for disconnecting the pump motor from the electrical supply KNF recommends t...

Page 14: ...e data on the motor plate For operating current see type plate The voltage must not vary by more than 10 and 10 from that shown on the type plate 2 Connect pumps according to figs 9 or 10 Note Black a...

Page 15: ...ions 1 Remove the protective plugs from the hose connection threads 2 The silencer filter and hose connectors where applicable are screwed into the port threads If the pump is used as a vacuum pump no...

Page 16: ...uction line to prevent the maximum permis sible operating pressure from being exceeded If the air or gas quantity in the pressure line is throttled or regulated make sure that the maxi mum permissible...

Page 17: ...n operation following a brief power failure Make sure that no pressure is present in the lines during switch on Switching off the pump KNF recommends When transferring aggressive media flush the pump...

Page 18: ...g When cleaning make sure that no liquids enter the inside of the housing 8 2 1 Flushing Pump When transferring aggressive media flush the pump under atmospheric conditions for a few minutes with air...

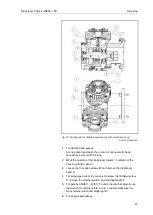
Page 19: ...key 4 mm 1 Allen key 5 mm 1 Screwdriver blade width 6 5 1 Screwdriver blade width 4 0 1 Fork wrench 16 mm only for two headed pumps 1 Pencil 1 Adjustable pin wrench for two hole nuts or KNF wrench for...

Page 20: ...Servicing Diaphragm Pump UN035_I EX 20 Fig 11 Pump parts for single head versions with aluminium head not for 9 versions...

Page 21: ...the position of the diaphragm head C in relation of the housing A with a pencil 3 Loosen the four allen screws B and remove the diaphragm head C 4 For all pumps except 9 versions Unscrew the flathead...

Page 22: ...0 Nm 9 Change lower reed valve Undo the cheese head screw U and exchange the reed valve P tighten the cheese head screw U 10 Change upper reed valve Loosen the allen screws S remove the cover plate T...

Page 23: ...driver blade width 6 5 1 Pencil 1 Adjustable pin wrench for two hole nuts or KNF wrench for retainer plate see accessory section 10 only for 9 versions Tab 10 With multi head pumps parts of the indivi...

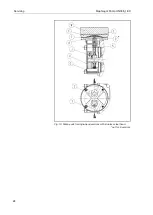
Page 24: ...Servicing Diaphragm Pump UN035_I EX 24 Fig 13 Pump parts for single head versions with stainless steel head not for 9 versions...

Page 25: ...he position of the head plate W and intermediate plate X in relation of the housing A with a pencil 4 Loosen the four allen screws Y and remove the head plate head W valve plate Z and intermediate pla...

Page 26: ...iner plate uniformly and diagonally torque 5 0 Nm 10 Place the intermediate plate X on the top of the diaphragm F so that it corresponds to the marks on the housing 11 Place the new valve plate Z on t...

Page 27: ...cuum too low The pump does not achieve the output specified in the Technical data or the data sheet Cause Fault remedy Condensate has collected in pump head Flush pump see Section 8 2 1 Install pump a...

Page 28: ...e pump to KNF Customer Service see first page for the ad dress 1 Flush the pump to free the pump head of dangerous or ag gressive gases see Section 8 2 1 2 Remove the pump 3 Clean the pump see Section...

Page 29: ...AT_I EX UN035_TT_I EX Spare part Position Kit Order No Diaphragm F 071739 Cheesehead screw Y Reed valve P Gasket V Protection Disc Tab 15 According to Fig 11 UN035_SN_I EX Spare part Position Kit Orde...

Page 30: ...n RMA number submit a completed Decontamination Declaration form to rma knf com The Decontamination Declaration form can be accessed and completed from our website or by contacting KNF Technical Servi...

Page 31: ...Diaphragm Pumps UN035_I EX Product Return 31...

Page 32: ...Form 5554E Phone 715 675 3311...

Page 33: ...3 1 0 0 4 0 1 1 2 0 5 6 7 4 4 4 0 0 4 4 0 8 2 0 9 0 4 4 0 0 4 0 4 7 0 1 9 5 9 7 0 0 0 6 8 4 8 4 4 4 4 7 4 1 4 4 1 0 3 4 4 7 4 7 7 1 0 6 4 4 7 6 7 8 6 4 A 6 0 9 7 7 0 7 8 0 0 7 B 4 3 5 3 4 B 4 6 C 44...

Page 34: ...urisdiction must be consulted concerning the installation and suitability of motors for use in Hazardous Locations The local authority having jurisdiction must make the final determination of what typ...

Page 35: ...e nearest obstruction are suitable for indoor or outdoor standard service applications 0 motors must be mounted in the air stream When the motor nameplate states a minimum airflow the motor must be mo...

Page 36: ...y result in bearing damage 6 Use flexible couplings if possible For applications that apply radial axial or moment loading on the motor shaft see section 3 3 3 7 6 Unless approved by the motor manufac...

Page 37: ...s to squeal initially when line starting a motor In general belt tensions should be kept as loose as possible while still transmitting the required torque without slipping Belt tensions must be measur...

Page 38: ...details on conventional V belt sections A B C D and E or other belt types 6 Average Deflected Force is per section 3 3 4 4 of this document and is the force required to deflect the center of a belt 1...

Page 39: ...for heater Temperature Code and heater rating Failure to follow this instruction could result in serious personal injury death and or property damage 6 When thermal protection is provided one of the...

Page 40: ...o component reassembly wipe clean all machined surfaces 6 3 7 B The gap between mating surfaces with the machined terminal box MUST BE LESS THAN 0 002 inches This gap must be checked with a feeler gag...

Page 41: ...starts see 3 4 5 3 The equipment can now be fully loaded and operated within specified limits as stated on the nameplate C 44 4 9 Do not start more than twice in succession under full load Repeated st...

Page 42: ...000 Hrs 3000 Hrs 5000 Hrs If motor remains idle for more than six months Lubricate at the beginning of the season then follow lubrication interval B B 4 1 D 1 4 Maximum Ambient Temperature and Contami...

Page 43: ...r without all grease fittings properly installed H 7 Assume NEMA 286T IEC 180 1750 RPM Vertical motor driving an exhaust fan in an ambient temperature of 43 C and the atmosphere is moderately corrosiv...

Page 44: ...educe driven load to match motor capacity or increase motor size to match load requirements VFD will not restart motor after tripping 1 Check fault codes on VFD and follow VFD troubleshooting procedur...

Page 45: ...provisions add grease per relubricating instructions see section 4 2 3 If noise persists contact warranty service Motor out of balance Disconnect from load Set motor on rubber pads on solid floor Sec...

Page 46: ...xceeds limit Verify that voltage to the motor terminals is within limits see section 3 4 1 3 Power surge to motor caused by lightning strike or other high transient voltage If a common problem install...

Reviews: