KLEIBER 217 R - LWL
KLEIBER-Pyrometer
Operation Manual
Betriebsanleitung
Fast measurement, fast controlling, fast switching
Page 1: ...KLEIBER 217 R LWL KLEIBER Pyrometer Operation Manual Betriebsanleitung Fast measurement fast controlling fast switching ...
Page 2: ...orage on electronic media and translation of the manual into foreign languages without written approval of the company KLEIBER Infrared GmbH is strictly forbidden All rights reserved c 2010 2012 KLEIBER Infrared GmbH Jegliche Reproduktion der vorliegenden Bedienungsanleitung ganz oder auszugsweise die Speicherung in elektronischen Medien sowie die Übersetzung in Fremdsprachen sind ohne schriftlich...
Page 3: ...re Optics 8 5 2 1 Vario optis 8 5 2 2 Fixed optics 9 5 3 Operating and display elements 9 5 4 Power cable 10 5 5 Connecting cable 7 pole 10 5 6 Connection fibre cable and fibre optic 10 6 Starting Up 11 6 1 Installation Site Requirements 11 6 1 1 Climatic conditions 11 6 1 2 Requirements at the place of use 11 6 2 Installation 12 6 2 1 Fix and connect the pyrometer 12 6 2 2 Align pyrometer 12 7 Op...
Page 4: ...Storage of the pyrometer 16 10 Maintenance and Care 17 10 1 General information 17 10 2 Cleaning the Optics 17 11 Taking out of service Disposal 18 11 1 Taking out of service 18 11 2 Disposal 18 iv KLEIBER 217 R LWL ...
Page 5: ...rational units and accompanied by the corresponding results Listings without a sequential order are presented as bullet points and items in sub lists are preceded by dashes Safety precautions are shown with pictograms and key words They provide information about the type source and consequences of the hazard and safety precautions The meanings of the pictograms and key words are explained in Safet...
Page 6: ...xchanged instrument components Deviations from the proper use described in this user manual will result in restricted warranty and liability or the loss in case of damage Damage to wearing parts e g fuses is excluded from the guarantee Warranty and liability claims for personal injuries and or material damage are excluded if this or these result from one or more of the following causes improper us...
Page 7: ...ccount in the pyrometer design The safety of the pyrometer is confirmed by the decla ration of conformity and the CE mark All information related to safety is with reference to the regulations of the European Union currently in force In other countries applicable laws national directives and safety regulations have to be met Apart from the safety instructions given in these operating instructions ...
Page 8: ...B LWL 300 1 400 9 253 Type 217 R B LWL 500 2 500 9 254 Type 217 R C LWL 200 1 000 9 153 Type 217 R C LWL 300 2 300 02172 19200 Type 217 R C LWL 350 3 500 3 3 Accessories Standard optics Art No Description Measuring dis tance in mm Measuring field in mm Measuring range in C Fibre optics cable 30006 12500 LVO 25 80 300 1 6 4 3 from 200 blue 30006 13500 LVO 35 250 1 000 3 5 11 0 from 200 Special opti...
Page 9: ...ibre optics cable 200 𝜇m red stainless steel 1 5 m 30005 12020 Fibre optics cable 200 𝜇m red stainless steel 2 0 m 30005 12025 Fibre optics cable 200 𝜇m red stainless steel 2 5 m 30005 12050 Fibre optics cable 200 𝜇m red stainless steel 5 0 m 30005 12075 Fibre optics cable 200 𝜇m red stainless steel 7 5 m 30005 12100 Fibre optics cable 200 𝜇m red stainless steel 10 0 m 30005 12150 Fibre optics cab...
Page 10: ...ejection filter 940 nm 30 mm 30006 33130 Laser rejection filter 940 nm 30 mm 30006 32010 90 mirror 30006 32160 Mounting with retaining pin 10 mm 30006 32130 Ball and socket mounting high grade steel 30006 32230 Air purge unit stainless steel Accessories for every optics Art No Description 30002 30010 Optical scanner SC 1 30002 30030 Maximum value storage only in combination with optical scanner SC...
Page 11: ...ing mechanism LED pilot light Operating temperature 0 40 C 0 260 C for fibre optic and fibre cable Storage temperature 20 70 C Power supply 230 V AC 50 60 Hz 0 2 A Degree of protection IP 54 according to DIN 40 050 Test base EN 55 011 1998 limit class A CE marking according to EU regulations Length basic instrument 195 mm panel instrument case clipping 192 mm Depth 186 mm with handle 196 mm panel ...
Page 12: ...n the signal processing unit and changed into a standard output signal which can then be read in the display and be used for process control The operating elements are located at the front of the panel instrument case the connections interfaces are located at the back see Operating and display elements section 5 3 at page 9 Figure 1 Structure of the pyrometer 5 2 Fibre Optics The pyrometer is equi...
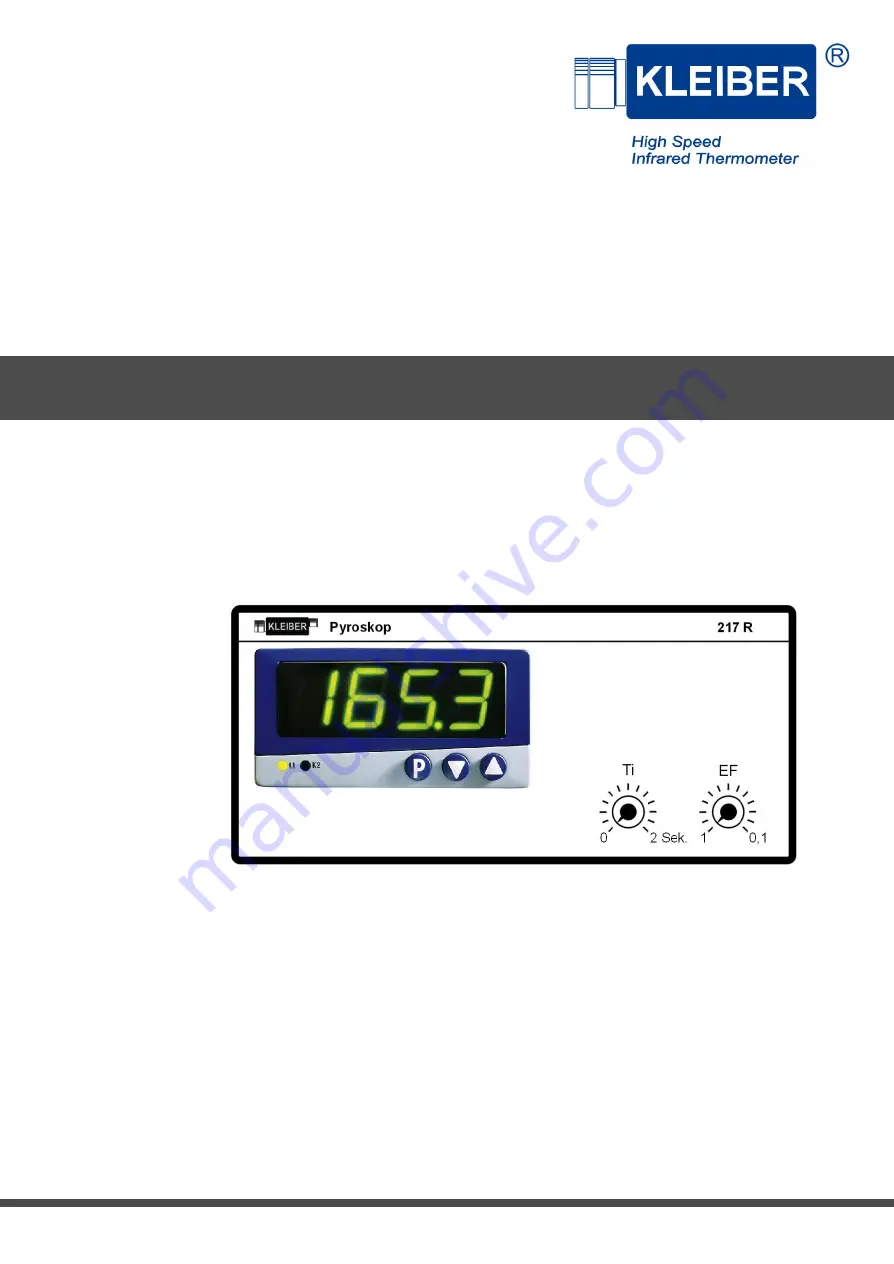
Page 13: ...g and display elements The controls and the controller are located on the front side of the panel instrument case For the meaning of individual elements refer to legend Figure 4 and Figure 5 for operation of the pyrometer see Operation of the pyrometer section 7 at page 13 Figure 4 Front side panel instrument case Element Meaning 1 Place for a controller here as sample type 702043 for function see...
Page 14: ...ut 0 4 20 mA brown ground output green for output controller when used controller 702043 connected at connection 9 relay contact output 1 yellow for output controller when used controller 702043 connected at connection 10 relay con tact output 1 grey for output controller when used controller 702043 connected at connection 12 relay con tact output 2 pink for output controller when used controller ...
Page 15: ... C 0 C bis 260 C for optical head and fibre cable maximum air humidity 60 room temperature atmosphere free of dust corrosive vapors and fume gases 6 1 2 Requirements at the place of use Take into account the following requirements at the place of use of the pyrometer Take care with the choice of the place of use and take into account the ergonomic and the legal guidelines for industrial safety in ...
Page 16: ...r cable X The pyrometer is ready for use and the power supply can be switched on 6 2 2 Align pyrometer The pyrometer is equipped with an LED pilot light for accurate alignment of the sensor with the object to be measured Align the pyrometer with the object to be measured as follows 1 Switch on the supply voltage to the pyrometer 2 Allow a starting time of approx 5 minutes for thermo stabilization ...
Page 17: ...180 200 220 240 260 280 300 Mb in mm 1 6 1 8 2 0 2 2 2 4 2 6 2 8 3 1 3 4 3 7 4 0 4 3 Lc in mm 63 2 60 0 58 1 56 2 55 4 54 6 54 0 53 6 53 1 52 7 52 4 52 1 aMeasuring distance bMeasuring fielddiameter cLength 7 2 Adjusting the emissivity The emissivity is the relationship between infrared energy radiated from an object and the radiation energy of a perfect emitter black emitter at the same temperatu...
Page 18: ...tures for the calibrated temperature range at an accuracy mentioned in the technical data IMPORTANT Please pay attention if you take over table values of emissivity to give the value of emissivity factor at a certain wave length Adjusting emissivity following table values is not as exactly as adjusting following a comparing measurement Changing emissivity The emissivity can be adjuested at the fro...
Page 19: ...ry work on the electrical components of the pyrometer Only eliminate such problems yourself when their causes obviously relate to incorrect power supply under cooling or contamination of the lens Do not undertake any interventions into the pyrometer If problems arise which do not relate to the causes men tioned above inform the service staff of the KLEIBER Infrared GmbH for contact data see Servic...
Page 20: ...temperature deviations while transporting In the case of overseas shipping a suitable desiccator e g silica gel should be inserted and the pyrom eter should be sealed together with the desiccator in a protective plastic sheet If the pyrometer is not immediately installed after delivery and put into operation then it should be carefully stored in a location protected against dust and humidity Stora...
Page 21: ...cs must therefore be checked and if necessary cleaned at regular intervals according to the operating and environmental conditions see Cleaning the Optics section 10 2 at page 17 This is necessary in particular if the measured temperature levels do not lie in the expected range In the case of excessive contamination or scratches of the optics please contact the technical customer service contact a...
Page 22: ...e power supply has been switched off X The pyrometer is thus out of operation 11 2 Disposal For disposal you can return the pyrometer to KLEIBER Infrared GmbH for address see Service address section 3 3 at page 6 For this you should pack the pyrometer appropriately in the original packaging or use a cardboard carton with shock absorbing PE material REFERENCE TO ENVIRONMENTAL PROTECTION Do not disp...
Page 23: ...ktionsprinzip 8 5 2 Optik 8 5 2 1 Vario Optik 8 5 2 2 Festoptik 9 5 3 Bedienelemente 9 5 4 Netzkabel 10 5 5 Anschlusskabel 7 polig 10 5 6 Anschluss Lichtwellenleiter und Vorsatzoptik 10 6 Inbetriebnahme 11 6 1 Standortanforderungen 11 6 1 1 Klimatische Bedingungen 11 6 1 2 Anforderungen an den Einsatzort 11 6 2 Installation 12 6 2 1 Pyrometer befestigen und anschließen 12 6 2 2 Pyrometer ausrichte...
Page 24: ...ZEICHNIS 9 2 Lagerung des Pyrometers 16 10 Wartung und Pflege 17 10 1 Allgemeines 17 10 2 Reinigen der Optik 17 11 Außerbetriebnahme Entsorgung 18 11 1 Außerbetriebnahme 18 11 2 Entsorgung 18 ii KLEIBER 217 R LWL ...
Page 25: ...t dem entsprechenden Ergebnis versehen Aufzählungen ohne zeitliche Abfolge sind als Punktaufzählungen Unteraufzählungen als Strichaufzählungen dargestellt Sicherheitshinweise sind mit Piktogrammen und einem Signalwort gekennzeichnet Es werden Art Quelle und die Folgen der Gefahr benannt sowie Hinweise zur Gefahrenabwehr gegeben Die Bedeutung der verwen deten Piktogramme und Signalwörter sind im Si...
Page 26: ...n Abweichungen von der in dieser Bedienungsanleitung beschriebenen bestimmungsgemäßen Verwendung füh ren im Schadensfall zu Einschränkungen bzw zum Wegfall der Gewährleistung und Haftung Schäden an Verschleißteilen z B Sicherungen sind von der Gewährleistung ausgenommen Gewährleistungs und Haftungsansprüche bei Personen und Sachschäden sind ausgeschlossen wenn sie auf eine oder mehrere der folgend...
Page 27: ...erungen der zutreffenden Gesetze Normen und Richtlinien angewandt Die Sicherheit der Pyrometer wird durch die Konformitätserklärung und die CE Kennzeichnung erklärt Alle Angaben zur Sicherheit beziehen sich auf die derzeit gültigen Verordnungen der Europäischen Union In anderen Ländern müssen die dort zutreffenden Gesetze Landesverordnungen und Sicherheitsvorschriften eingehalten werden Beachten S...
Page 28: ...2 300 9 152 Typ 217 R B LWL 300 1 400 9 253 Typ 217 R B LWL 500 2 500 9 254 Typ 217 R C LWL 200 1 000 9 153 Typ 217 R C LWL 300 2 300 02172 19200 Typ 217 R C LWL 350 3 500 3 3 Zubehör Standard Optiken Artikel Nr Bezeichnung Messdistanz in mm Messfeld in mm Messbereich in C Lichtleiter 30006 12500 LVO 25 80 300 1 6 4 3 ab 200 blau 30006 13500 LVO 35 250 1 000 3 5 11 0 ab 200 Spezial Optiken Artikel...
Page 29: ...ter 30005 12015 Lichtleiter 200 𝜇m rot Edelstahl 1 5 m 30005 12020 Lichtleiter 200 𝜇m rot Edelstahl 2 0 m 30005 12025 Lichtleiter 200 𝜇m rot Edelstahl 2 5 m 30005 12050 Lichtleiter 200 𝜇m rot Edelstahl 5 0 m 30005 12075 Lichtleiter 200 𝜇m rot Edelstahl 7 5 m 30005 12100 Lichtleiter 200 𝜇m rot Edelstahl 10 0 m 30005 12150 Lichtleiter 200 𝜇m rot Edelstahl 15 0 m 30005 12900 Verlängerung Lichtleiter ...
Page 30: ...Lasersperrfilter 940 nm 30 mm 30006 33130 Lasersperrfilter 940 nm 30 mm 30006 32010 90 Umlenkaufsatz 30006 32160 Halterung mit Haltebolzen 10 mm 30006 32130 Halterung mit Kugelgelenk Edelstahl 30006 32230 Luftblasvorsatz Edelstahl Zubehör für alle Vorsatzoptiken Artikel Nr Bezeichnung 30002 30010 Schwenker SC1 30002 30030 Spitzenwertspeicher nur mit Schwenker SC1 möglich Spitzenwertspeicher für Sc...
Page 31: ...4 Visiereinrichtung LED Pilotlicht Betriebstemperatur 0 40 C 0 260 C für Lichtwellenleiter und Lichtleiteroptiken Lagertemperatur 20 70 C Spannungsversorgung 230 V AC 50 60 Hz 0 2 A Schutzart IP 54 nach DIN 40 050 Prüfgrundlage EN 55 011 1998 Grenzwertklasse A CE Kennzeichnung gemäß EU Richtlinien Länge Grundgerät 195 mm Schalttafelausschnitt 192 mm Tiefe 186 mm mit Griff 196 mm Schalttafelausschn...
Page 32: ...t Dieses Signal wird in der Aus werteeinheit linearisiert und in ein standardisiertes Ausgangssignal umgewandelt Es kann dann zur Anzeige gebracht und zur Steuerung oder Regelung verwendet werden Die Bedienelemente befinden sich an der Vorderseite des Schalttafelgehäuses die Anschlüsse Schnittstellen befinden sich an der Rückseite vgl Bedienelemente Abschnitt 5 3 auf Seite 9 Abbildung 1 Aufbau des...
Page 33: ...emente Die Bedienelemente sowie der Regler befinden sich an der Vorderseite des Schalttafelgehäuses Zur Bedeu tung der einzelnen Elemente siehe Legende zu Abbildung 4 und Abbildung 5 zur Bedienung siehe Bedienen des Pyrometers Abschnitt 7 auf Seite 13 Abbildung 4 Frontseite Schalttafelgehäuse Element Bedeutung 1 Position für Regler hier als Beispiel Typ 702043 zur Funktion siehe Anleitung des Regl...
Page 34: ...ung weiß Ausgang 0 4 20 mA braun Masse Ausgang grün für Ausgang Regler bei Regler 702043 verbunden mit Anschluss 9 Relais Ausgang 1 gelb für Ausgang Regler bei Regler 702043 verbunden mit Anschluss 10 Relais Ausgang 1 grau für Ausgang Regler bei Regler 702043 verbunden mit Anschluss 12 Relais Ausgang 2 pink für Ausgang Regler bei Regler 702043 verbunden mit Anschluss 13 Relais Ausgang 2 grün gelb ...
Page 35: ...ellenleiter und Vorsatzoptik maximale Luftfeuchte 60 bei Raumtemperatur Atmosphäre staubarm frei von Dämpfen und Rauch 6 1 2 Anforderungen an den Einsatzort Beachten Sie folgende Anforderungen an den Einsatzort des Pyrometers Beachten Sie bei der Wahl des Einsatzortes ergonomische und arbeitsschutzrechtliche Richtlinien um eine sichere Bedienung des Pyrometers zu gewährleisten Vermeiden Sie die di...
Page 36: ...iebsbereit und die Spannungsversorgung kann eingeschaltet werden 6 2 2 Pyrometer ausrichten Das Pyrometer ist zum exakten Ausrichten des Sensors auf das Messobjekt mit einem LED Pilotlicht ausge stattet Richten Sie das Pyrometer wie folgt auf das Messobjekt aus 1 Legen Sie die Versorgungsspannung an das Pyrometer an 2 Warten Sie die Anlaufzeit von ca 5 Minuten zur Thermostatisierung ab Das Pyromet...
Page 37: ...20 140 160 180 200 220 240 260 280 300 Mb in mm 1 6 1 8 2 0 2 2 2 4 2 6 2 8 3 1 3 4 3 7 4 0 4 3 Lc in mm 63 2 60 0 58 1 56 2 55 4 54 6 54 0 53 6 53 1 52 7 52 4 52 1 aMessentfernung bMessfeld Durchmesser cLänge 7 2 Einstellen des Emissionsgrades Der Emissionsgrad ist das Verhältnis der von einem Objekt abgestrahlten Infrarotenergie zur Strahlungsenergie eines perfekten Strahlers Schwarzstrahler bei...
Page 38: ...onsgrades für eine bestimmte Wellenlänge angegeben wird Die Einstellung des Emissionsgrades nach Tabellen bietet daher nicht die gleiche Genauigkeit wie die Einstellung nach einer Vergleichsmes sung Verändern des Emissionsgrades Der Emissionsgrad kann an der Vorderseite des Schalttafelgehäuses über den Emissionsgradpotentiometer stufenlos zwischen 0 1 und 1 0 eingestellt werden 7 3 Einstellen des ...
Page 39: ...rbeiten an den elektrischen Kompo nenten des Pyrometers durch Beheben Sie nur solche Störungen selbständig deren Ursachen offensichtlich auf fehlerhafte Stromversorgung oder Verschmutzung der Linse zurückzuführen sind Nehmen Sie keine Eingriffe in das Pyrometer selbst vor Treten Störungen auf die sich nicht auf die oben ge nannten Ursachen zurückführen lassen verständigen Sie das Servicepersonal d...
Page 40: ...ermeiden Bei Überseeversand ist ein geeignetes Trockenmittel z B Silikagel beizulegen und das Pyrometer ist zusammen mit dem Trockenmittel in eine Folie einzuschweißen Wird das Pyrometer nicht unmittelbar nach der Auslieferung montiert und in Betrieb genommen ist es sorgfältig an einem vor Staub und Feuchtigkeit geschützten Ort zu lagern Lagerbedingungen vgl Lage rung des Pyrometers Abschnitt 9 2 ...
Page 41: ...ntsprechend den Betriebs und Umgebungsbedingungen in regelmäßigen Abständen überprüft und ggf gereinigt werden vgl Reinigen der Optik Abschnitt 10 2 auf Seite 17 Dies ist insbesondere dann notwendig wenn die gemessenen Temperaturwerte nicht im zu erwartenden Bereich liegen Bei gröberen Verunreinigungen oder Kratzern in der Optik wenden Sie sich bitte an den technischen Kunden dienst Kontaktadresse...
Page 42: ...r Kabel dass die Spannungsversorgung ausgeschaltet ist X Das Pyrometer ist damit außer Betrieb 11 2 Entsorgung Zur Entsorgung können Sie das Pyrometer an die KLEIBER Infrared GmbH zurückschicken Adresse vgl Serviceadresse Abschnitt 3 3 auf Seite 6 Verpacken Sie hierzu das Pyrometer zweckmäßigerweise in der Originalverpackung oder verwenden Sie einen mit stoßdämpfendem PE Material ausgelegten Karto...