background image

36

EN

CLEANING AND CARE

If the automatic ignition ca not be used, please remove the cooking grill and heat 

diffuser (hotplate), and turn the valve anticlockwise to 90°, to light with BBQ lighter in 
the distance of 5mm to the burner fire hole. Replace the cooking grill and heat diffuser 
(hotplate), please wear the fireproof and heat resisting gloves.

Cleaning

Your gas grill is easy to clean with minimum effort, just follow these helpful hints for 
cleaning convenience.

Storage

•  Your gas cylinder must be stored outdoors in a well ventilated area and must be 

disconnected from your gas grill when not in use. Ensure that you are outdoors and  
way from any sources of ignition before attempting to disconnect your gas cylinder 
from your gas grill.

•  When you are using your gas grill after a period of storage, please ensure to check 

for gas leaks and check for any obstructions in the burner etc. before using. Always 
follow the cleaning instructions to ensure gas grill is safe.

•  If gas grill is stored outdoors ensure to check that all areas under the front panel are 

free from any obstructions (dirt, insects etc.) as this may affect the flow of gas.

•  Store your barbecue in a cool dry place. It may be necessary to dry the barbecue 

and the inside of the cover if used.

•  Chrome plated warming racks etc. should be coated with cooking oil. Wrap the  

urners in aluminum foil to help prevent insects or other debris from obstructing the 
burners.

WARNING: Danger of burns

All cleaning and maintenance should be carried out when the barbecue 
is cool and with the fuel supply turned OFF at the gas cylinder.

Summary of Contents for Tomahawk 3.OT

Page 1: ...2531CS 0069 10033567 Tomahawk 3 OT Gas BBQ grill ...

Page 2: ......

Page 3: ...zum Erwerb Ihres Gerätes Lesen Sie die folgenden Hinweise sorgfältig durch und befolgen Sie diese um möglichen Schäden vorzubeugen Für Schäden die durch Missachtung der Hinweise und unsachgemäßen Gebrauch entstehen übernehmen wir keine Haftung Scannen Sie den QR Code um Zugriff auf die aktuellste Bedienungsanleitung und weitere Informationen rund um das Produkt zu erhalten INHALT ...

Page 4: ...E FR IT LU IE GB GR PT ES CY CZ LT SK CH SI LV I3B P 30 LU NL DK FI SE CY CZ LT MT SK SI BG IS NO TR HR RO IT HU LV I3B P 37 PL I3B P 50 AT DE CH LU SK PIN Nummer CE2531CS 0069 Wichtige Hinweise WARNUNG Zugängliche Teile können sehr heiß sein Halten Sie kleine Kinder fern Lesen Sie die Anweisungen bevor Sie das Gerät benutzen Verwenden Sie das Gerät in gut belüfteten Bereichen Alle Änderungen am G...

Page 5: ...n Sie den Schlauch und alle Verbindungen aus Gaslecks Wenden Sie sich an den Kundendienst oder Ihren lokalen Gashändler falls das Leck weiterhin besteht Verwenden Sie zum Überprüfen des Geräts auf Gaslecks niemals offene Flammen Trennen Sie keinesfalls die Gasverbindung während das Gerät in Verwendung ist Lassen Sie das Gerät während der Verwendung niemals unbeaufsichtigt Lassen Sie bei der Zubere...

Page 6: ...enden Sie zur Nutzung des Geräts Ofenhandschuhe und langes Grillbesteck Seien Sie vorbereitet falls ein Brand oder ein Unfall auftritt Informieren Sie sich über den Standort des Erste Hilfe Kastens und des Feuerlöschers und machen Sie sich mit der Verwendung vertraut Halten Sie das Netzstromkabel und den Gasschlauch fern von heißen Geräteoberflächen Lassen Sie beim Zubereiten von Lebensmitteln äuß...

Page 7: ...7 DE ÜBERSICHT ...

Page 8: ... 2 X 2 3 X 3 4 X 1 X 1 5 6 X 1 7 X 1 8 X 2 9 X 1 10 X 1 11 X 2 12 X 2 13 X 2 14 X 1 15 X 2 16 X 1 17 X 2 18 X 1 19 X 1 20 X 1 21 X 1 22 X 1 23 X 1 A B C D E F X 24 X 12 X 4 X 2 X 1 X 2 24 25 26 27 X 1 X 1 X 1 X 1 ...

Page 9: ...endreher Entweder ein Schraubenschlüssel oder eine Zange Zusammenbau Lesen Sie die Bedienungsanleitung vollständig durch bevor Sie fortfahren Suchen Sie sich einen großen sauberen Bereich an dem Sie den Grillwagen aufbauen können Sehen Sie in die Liste des Lieferumfangs nach und schauen sich die Montagebilder an Der Aufbau des Grills beinhaltet viele große Teile Der Aufbau benötigt 2 Personen Hinw...

Page 10: ...10 DE 4 A X 12 3 ...

Page 11: ...11 DE A X 2 5 C D X 4 X 2 C D 6 ...

Page 12: ...12 DE B x4 8 A X 4 7 ...

Page 13: ...13 DE B x4 A x6 9 10 ...

Page 14: ...14 DE 12 13 11 E X 1 E ...

Page 15: ...iner flachen ausreichend großen Fläche platziert werden Vergewissern Sie sich dass die Ein und Ausgangsregler passend und für das Gasflaschenventil und das Gerät geeignet sind Sollen Sie den Gasdruckregler im Außenbereich verwenden stellen Sie sicher dass dieser vor Umwelteinflüssen geschützt wird Für den Anschluss der Gasflasche benötigen Sie einen passenden Schraubenschlüssel Stellen Sie beim An...

Page 16: ...n Zündung mit Steuergasregelung Hauptbrenner oder Hauptbrenner mit Seitenbrenner oder Hauptbrenner mit Seitenbrenner und Seitenbrenner Drehen Sie wenn sich alle Schalter am Gasgrill in der Position Off befinden das Gasflaschenventil in die Position On Um einen Funken zu erzeugen müssen Sie den Gassteuerknopf A drücken und 3 5 Sekunden lang in dieser Position halten um den Gasdurchfluss zu ermöglic...

Page 17: ...nem Grillfeuerzeug welches in 5 mm Entfernung zum Brennerloch platziert wird zu entzünden Setzen Sie anschließend den Wärmeverteiler und das Grillgitter mit Schutzhandschuhen wieder in den Grill ein und tragen Sie hierfür feuer und hitzebeständige Schutzhandschuhe Warnung Wenn der Brenner sich dennoch nicht entzünden lässt drehen Sie den Gassteuerknopf in die Position Off und warten Sie zwei Minut...

Page 18: ...ähe befinden Überprüfen Sie den Gasgrill nach einer längeren Lagerungszeit auf Gaslecks und Blockaden der Brenneröffnungen bevor Sie diesen erneut verwenden Befolgen Sie die Reinigungshinweise um zu gewährleisten dass der Grill sicher verwendet werden kann Überprüfen Sie alle Bereiche unterhalb der Abdeckung auf Insekten und auf durch Insekten verursachte Blockaden wenn der Grill im Außenbereich g...

Page 19: ...oder Draht beschädigt Fehlerhafter Zündschalter Elektrode oder Draht austauschen Der Brenner lässt sich nicht mit einem Streichholz anzünden Die Gasflasche ist leer Durch eine volle Gasflasche ersetzen Fehlerhafter Druckregler Den Druckregler überprüfen oder ersetzen Verstopfung im Brenner Den Druckregler überprüfen oder ersetzen Verstopfung im Gasdüse oder schlauch Den Brenner reinigen Niedrige F...

Page 20: ...20 DE Konformitätserklärung Hersteller Chal Tec GmbH Wallstraße 16 10179 Berlin Dieses Produkt entspricht den folgenden Europäischen Richtlinien 2009 142 EG Gasverbrauchseinrichtungen ...

Page 21: ...lations on purchasing this equipment Please read this manual carefully and take care of the following hints to avoid damages Any failure caused by ignoring the items and cautions mentioned in the instruction manual are not covered by our warranty and any liability Scan the QR code to get access to the latest user manual and other information about the product CONTENTS ...

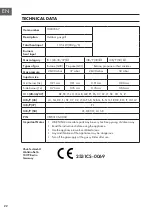
Page 22: ...r 1x 0 76 mm 0 76 mm 0 76 mm 0 66 mm I3 28 30 37 BE FR IT LU IE GB GR PT ES CY CZ LT SK CH SI LV I3B P 30 LU NL DK FI SE CY CZ LT MT SK SI BG IS NO TR HR RO IT HU LV I3B P 37 PL I3B P 50 AT DE CH LU SK PIN CE2531CS 0069 Important Notes WARNING accessible parts may be very hot Keep young children away Read the instructions before using the appliance Use the appliance in well ventilated areas Any mo...

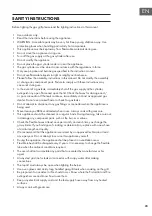
Page 23: ... for gas leaks Do not attempt to disconnect any gas fittings or connectors when the appliance is being used Never leave you BBQ unattended when in use Always cook with great care This appliance should be cleaned on a regular basis During cleaning take care not to damage any component parts such as the burner or valves Check the flexible hoses at least once per month and each time you change the ga...

Page 24: ...food on the grill Pressure may build up and cause the container to burst possibly resulting in serious personal injury or damage to the grill It is recommended to use protective gloves when operating the appliance especially handling particularly hot components ...

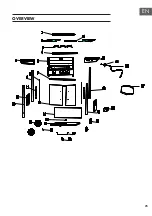
Page 25: ...25 EN OVERVIEW ...

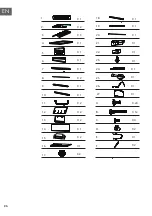
Page 26: ... 2 X 2 3 X 3 4 X 1 X 1 5 6 X 1 7 X 1 8 X 2 9 X 1 10 X 1 11 X 2 12 X 2 13 X 2 14 X 1 15 X 2 16 X 1 17 X 2 18 X 1 19 X 1 20 X 1 21 X 1 22 X 1 23 X 1 A B C D E F X 24 X 12 X 4 X 2 X 1 X 2 24 25 26 27 X 1 X 1 X 1 X 1 ...

Page 27: ...driver or flat bladed screwdriver and either a spanner we have supplied a multifunction spanner or a pair of pliers Assembly Please read all instructions thoroughly before proceeding Find a large clean area in which to assemble your trolley barbecue Please refer to the parts list and assembly diagram as necessary Assembly of the barbecue involves many large components it is advisable to have two p...

Page 28: ...28 EN 4 A X 12 3 ...

Page 29: ...29 EN A X 2 5 C D X 4 X 2 C D 6 ...

Page 30: ...30 EN B x4 8 A X 4 7 ...

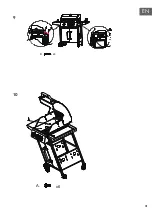
Page 31: ...31 EN B x4 A x6 9 10 ...

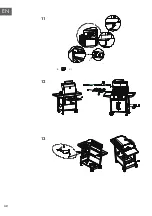
Page 32: ...32 EN 12 13 11 E X 1 E ...

Page 33: ...appliance The appliance is positioned firmly on a flat sufficiently large surface area Make sure the inlet and the outlet regulator are correct and suitable for the cylinder valve and appliance If the regulator is used outdoors make sure that it is protected from atmospheric agents For connecting the gas cylinder you will need a suitable spanner When connecting the flexible tube make sure it is no...

Page 34: ...to HIGH B It can spark to the burner lighting tube C You will hear a snap from the igniter and you will also see an orange flame coming from the burner lighting tube at the left side offhe burner D Continue to hold the burner control knob in for two seconds after the snap this will allow gas to flow completely down the burne riube E and insure ignition When the burner is alight adjacent burers wil...

Page 35: ...35 EN ...

Page 36: ...disconnect your gas cylinder from your gas grill When you are using your gas grill after a period of storage please ensure to check for gas leaks and check for any obstructions in the burner etc before using Always follow the cleaning instructions to ensure gas grill is safe If gas grill is stored outdoors ensure to check that all areas under the front panel are free from any obstructions dirt ins...

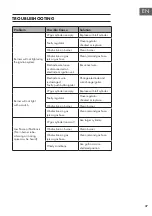
Page 37: ...wire is damaged Faulty push button igniter Change electrode and wire change igniter Burner will not light with a match LP gas cylinder is empty Replace with full cylinder Faulty regulator Have regulator checked or replace Obstructions in burner Clean burner Obstructions in gas jets or gas hose Clean jets and gas hose Low flame or flashback fire in burner tube a hissing or roaring noise may be hear...

Page 38: ...Declaration of Conformity Manufacturer Chal Tec GmbH Wallstraße 16 10179 Berlin Germany This product conforms to the following European Directives and Regulations 2009 142 EC appliances burning gaseous fuels ...

Page 39: ......

Page 40: ......
Reviews: