background image

14

EN

1

Connect the stand elements A and B and screw them tight as described 
above.

2

Push the handles with the foot straps (6) over the handles of the handle 
elements (3).

Summary of Contents for 10030293

Page 1: ...10030293 Paarafit Fitness Ständer Fitness Stand Paralelas para fondos Support fitness Stand per fitness ...

Page 2: ......

Page 3: ... responsabilidad por los daños causados por el incumplimiento de las instrucciones y el uso inadecuado Escanee el siguiente código QR para obtener acceso a la última guía del usuario y más información sobre el producto Chère cliente cher client Toutes nos félicitations pour l acquisition de ce nouvel appareil Veuillez lire attentivement et respecter les instructions de ce mode d emploi afin d évit...

Page 4: ...zu benutzen ist Kinder sollten beaufsichtigt werden um sicherzustellen dass sie nicht mit dem Gerät spielen Achtung Das Gerät ist nicht im Boden verankert es darf nicht wie eine Schaukel oder Wippe etc verwendet werden es könnte umkippen Achten Sie darauf dass das Gerät jeweils von nur einer Person benutzt wird Stellen Sie sicher dass um das Gerät herum ein Freiraum von mindestens 2 Metern besteht...

Page 5: ...chweite von Kindern auf damit sie nicht von diesen verschluckt werden können Lassen Sie kleine Kinder nicht mit Folie spielen Es besteht Erstickungsgefahr Gehen Sie bei der Montage des Geräts umsichtig vor Entfernen Sie die Verpackungsmaterialien vorsichtig und legen Sie zum Schutz des Bodens gegebenenfalls eine Unterlage aus Vergewissern Sie sich dass alle Teile vorhanden sind EINZELTEILE Standel...

Page 6: ...6 DE Achsschraube mit Außengewinde x12 Achsschraube mit Innengewinde x12 Längenverstellbarer Handgriff Fußschlaufe x2 Inbusschlüssel x1 ...

Page 7: ...hrauben mit dem Innengewinde 5 jeweils an der Seite ein an der sich die quadratischen Öffnungen der Rahmenelemente überlagern Drehen Sie dann die Schrauben mit den Außengewinden 4 von der anderen Seite fest Drehen Sie die Schrauben dann jeweils abwechselnd fest ...

Page 8: ...8 DE 1 Verbinden Sie die Standelemente A und B und schrauben Sie diese nach oben beschriebener Weise fest 2 Schieben Sie die Handgriffe mit den Fußschlaufen 6 über die Griffe der Griffelemente 3 ...

Page 9: ...9 DE 3 Verbinden Sie die Griffelemente mit den Standelementen Ziehen sie zuletzt alle Schrauben nochmals an ...

Page 10: ...y a person responsible for their safety Children should be supervised to ensure that they do not play with the device Warning The device is not anchored to the ground it must not be used as a swing or see saw etc it could tip over Make sure that the device is only used by one person at a time Make sure there is at least 2 metres of free space around the device Place the unit on a dry and level sur...

Page 11: ...rts out of the reach of children to prevent them from being swallowed Do not let small children play with plastic film There is a danger of suffocation Be careful when assembling the device carefully remove the packaging materials and if necessary lay down an underlay to protect the floor Make sure all parts are present INDIVIDUAL PARTS Stand element A x2 Stand element B x2 Grip element x2 ...

Page 12: ...12 EN Axle bolt with external thread x12 Axle bolt with internal thread x12 Adjustable length handle foot strap x2 Allen key x1 ...

Page 13: ...te Insert the axle bolts with the internal thread 5 on the side where the square openings of the frame elements overlap Then tighten the screws with the external threads 4 from the other side Then tighten the screws alternately ...

Page 14: ...14 EN 1 Connect the stand elements A and B and screw them tight as described above 2 Push the handles with the foot straps 6 over the handles of the handle elements 3 ...

Page 15: ...15 EN 3 Connect the handle elements to the stand elements Finally tighten all the screws again ...

Page 16: ... Los niños deben estar bajo vigilancia para evitar que jueguen con el aparato Atención Este aparato no está anclado al suelo por lo tanto no debe utilizarse como un columpio o balancín etc ya que podría volcarse Asegúrese de que solamente una persona utilice este aparato Asegúrese de que hay un espacio libre de al menos 2 metros alrededor del aparato Coloque el aparato en una superficie plana y ni...

Page 17: ...e tarjetas de memoria y las piezas del embalaje fuera del alcance de los niños para evitar que se asfixien No permita que los niños jueguen con los plásticos Existe peligro de asfixia Tenga cuidado al montar el aparato retire con cuidado los materiales de embalaje y si es necesario coloque una base para proteger el suelo Asegúrese de que todas las piezas están presentes PIEZAS Base A x2 Base B x2 ...

Page 18: ...18 ES Perno del eje con rosca exterior x12 Perno del eje con rosca interior x12 Asa ajustable en longitud correa para los pies x2 Llave Allen x1 ...

Page 19: ...erte los tornillos del eje con la rosca interior 5 en cada lado donde se superponen las aberturas cuadradas del marco A continuación apriete los tornillos con la rosca exterior 4 desde el otro lado Luego apriete los tornillos de forma alterna ...

Page 20: ...20 ES 1 Fije y atornille las bases A y B como se ha descrito anteriormente 2 Deslice las asas con las correas para los pies 6 sobre las asas de los mangos 3 ...

Page 21: ...21 ES 3 Fije las asas a las bases Por último vuelva a apretar todos los tornillos ...

Page 22: ... façon d utiliser l appareil Surveillez les enfants pour qu ils ne jouent pas avec l appareil Attention L appareil n est pas ancré au sol il ne doit pas être utilisé comme balançoire ou autre il pourrait basculer Assurez vous que l appareil n est utilisé que par une seule personne à la fois Assurez vous qu il y a au moins 2 mètres d espace libre autour de l appareil Placez l appareil sur une surfa...

Page 23: ...ge hors de portée des enfants afin qu ils ne puissent pas les avaler Ne laissez pas les jeunes enfants jouer avec les plastiques d emballage Il y a risque d étouffement Soyez prudent lors du montage de l appareil retirez soigneusement les matériaux d emballage et si nécessaire posez une sous couche pour protéger le sol Vérifiez que toutes les pièces sont présentes PIÈCES DÉTACHÉES Élément de suppo...

Page 24: ...24 FR Boulon d axe mâle x12 Boulon d axe femelle x12 Guidon sangle de pied réglable en longueur x2 Clé Allen x1 ...

Page 25: ... Insérez les boulons d essieu avec le filetage intérieur 5 du côté où les ouvertures carrées des éléments du cadre se chevauchent Serrez ensuite les vis avec les filetages externes 4 de l autre côté Serrez ensuite les vis en alternance ...

Page 26: ...26 FR 1 Connectez les éléments de support A et B et vissez les comme décrit ci dessus 2 Poussez les poignées avec les repose pieds 6 sur les poignées de guidon 3 ...

Page 27: ...27 FR 3 Connectez les éléments de poignée aux éléments de support Resserrez enfin toutes les vis ...

Page 28: ...izzo corretto e sicuro del dispositivo Tenere sotto controllo i bambini per assicurarsi che non giochino con il dispositivo Attenzione Il dispositivo non è ancorato al terreno non deve quindi essere usato come un altalena o un sedile per altalena perché potrebbe ribaltarsi Assicurarsi che il dispositivo venga utilizzato da una persona sola Accertarsi che attorno al dispositivo ci sia uno spazio di...

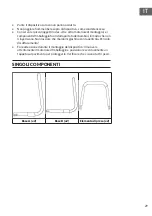
Page 29: ...laggio fuori dalla portata dei bambini in modo che non li ingeriscano Non lasciare che i bambini giochino con la pellicola Pericolo di soffocamento Fare attenzione durante il montaggio del dispositivo rimuovere attentamente il materiale d imballaggio e posizionare eventualmente un tappeto sul pavimento per proteggerlo Verificare che vi siano tutti i pezzi SINGOLI COMPONENTI Base A x2 Base B x2 Ele...

Page 30: ...30 IT Vite assiale con filettatura esterna x12 Vite assiale con filettatura interna x12 Manico regolabile in lunghezza cinturino per caviglia x2 Chiave a brugola x1 ...

Page 31: ...ali inserire ogni vite assiale con filettatura interna 5 nel lato in cui le aperture quadrate degli elementi del telaio si sovrappongono Serrare poi le viti con filettatura esterna 4 dall altro lato Stringere ogni vite alternativamente ...

Page 32: ...32 IT 1 Collegare le basi A e B e avvitarle seguendo il metodo descritto sopra 2 Far scorrere i manici con cinturini per caviglia 6 sopra le impugnature degli elementi di presa 3 ...

Page 33: ...33 IT 3 Collegare gli elementi di presa con le basi Stringere infine di nuovo tutte le viti ...

Page 34: ... 16 10179 Berlin Deutschland Germany IMPORTEUR FÜR GROSSBRITANNIEN Importer for Great Britain Importador para Gran Bretaña Importateur pour la Grande Bretagne Importatore per la Gran Bretagna Berlin Brands Group UK Limited PO Box 42 272 Kensington High Street London W8 6ND United Kingdom ...

Page 35: ......

Page 36: ......

Reviews: