background image

Summary of Contents for KD-21 SERIES

Page 1: ...KttchBnAid CONVERSION FOR UNDERCOUNTER INSTALLATION SAVE THIS DOCUMENT FOR FUTURE USE FORM 15371 ...

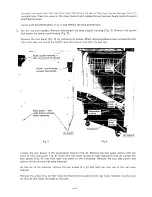
Page 2: ... latch the door Place dishwasher on its back and support the top with a block of wood such as a 2 x 4 Drain water by placing the drain hose in a container 3 Remove two screws Fig 1 from lower front panel Disengage tabs by pushing panel toward the op of the dishwasher and pull panel forward and down to remove Remove three screws Fig 1 holding stainless steel trim and end caps to lower front panel D...

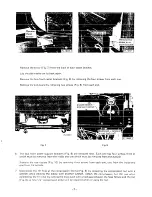
Page 3: ... up and then the top two c c J wrr _I ____ _ I LU Hose coupler housing take out screws to remove c Power cord housing remove two screws Rear panel start with bottom screws when removing Fig 3 Fig 4 Loosen the two screws in the evaporation channel Fig 4 Remove the two upper screws from the front of each side panel Fig 4 loosen the two lower screws on each side panel Fig 4 Loosen the two screws Fig ...

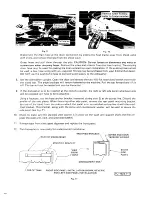
Page 4: ...must be removed from the inside and one which must be removed from the outside Remove the rear casters Fig 10 by removing three screws from each one two from the inside and one from the outside 7 Disconnect the fill hose at the compression fitting Fig 9 by loosening the compression nut with a wrench while holding the elbow with another wrench Retain the compression nut for use when connecting the ...

Page 5: ...the dishwasher is to be installed at the end of a counter the right or left side panel whichever side will be exposed will have to be re attached Using a hacksaw cut the hose anchor bracket removed during step 5 at the scored line Discard the smaller of the two pieces When fastening either side panel remove the rear panel mounting bracket on top of the tank from the side on which the panel is to b...

Page 6: ...a division of WORLD HEADQUARTERS TROY OHIO 45379 FORM 15371 434 PRINTED IN U S A ...

Reviews: