background image

IMPORTANT NOTICE: 

DO NOT return to place of purchase!!! 
Please contact Customer Service hotline at 800-913-8999 for help.


SAFETY CHECKS   


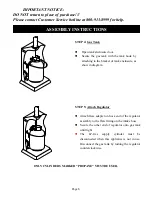
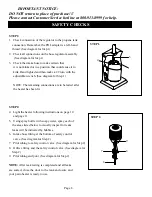
STEP 1: 


1.


Check connection of the regulator to the propane tank 


STEP 1.   

connection. Remember, the POL adapter is a left-hand   

thread. (See diagram for Step 1) 

2.


Check all connections on the hose regulator assembly   

    (See diagram for Step 1) 

3.


Check the intake hose to make certain that 


it is not kinked or in a position that could cause it to   

kink. Hand tighted and then make a 1/2 turn with the   

adjustable wrench. (See diagram for Step 1) 


NOTE: The remaining connections are to be tested after   

the heater has been lit.   


STEP 2:   

4.


Light the heater following instructions on page 10   

and page 11.   

 7 

STEP 2.   

5.


Using spray bottle with soapy water, spray each of 

the areas listed below to visually inspect for leaks. 

leaks will be indicated by bubbles.   

6.


Intake hose fitting at the bottom of safety control   

valve. (See diagram for Step 2)   

7.


Pilot tubing to safety control valve. (See diagram for Step 2) 

8.


Orifice fitting and the safety control valve. (See diagram for   

Step 2) 

9.


Pilot tubing and pilot. (See diagram for Step 2) 


NOTE: 

After leak testing is completed and all leaks   

are sealed, close the door to the tank enclosure and   

your patio heater is ready to use. 


Page 8 

Summary of Contents for PTH106A-SS

Page 1: ...LIST 16 WARRANTY 17 READ THE FOLLOWING INSTRUCTIONS CAREFULLY AND BE SURE YOUR PATIO HEATER IS PROPERLY INSTALLED ASSEMBLIED AND CARED FOR FAILURE TO FOLLOW THESE INSTRUCTIONS MAY RESULT IN SERIOUS BO...

Page 2: ...n cause severe property damage or serious injury or death Please read the installation operation maintenance instructions thoroughly before installing or servicing this equipment FOR YOUR SAFETY If yo...

Page 3: ...ank Enclosure Assembly 1 LPG Gas regulator with Hose 1 Hardware Bag Page2 Post Socket 1 4 Acorn cap 4 Post Socket 1 4 Flat Washer 4 Reflector 5 32 Truss Head Screw 3 Reflector Plate 1 4 Truss Head Scr...

Page 4: ...amage the heater and render it unsafe for use Check the heater immediately if any of the following exists 1 The smell of gas in conjunction with extreme yellow tipping of the burner flames 2 The heate...

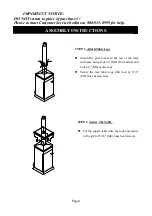
Page 5: ...TIONS Page4 STEP 1 Attach Table Legs z Attach the post socket to the top of the tank enclosure using four 1 4 M6 flat washers and four 1 4 M6 acorn caps z Secure the four table legs with four of 5 32...

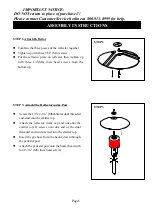
Page 6: ...or then tighten up with three 1 4 M6 truss head screws from the bottom up STEP 2 STEP 3 Attach The Reflector nut Post z Screw the 1 4 x 2 3 4 M6x60mm dual threaded end stud into the emitter top z Atta...

Page 7: ...to the bracket of tank enclosure as show in diagram STEP 5 Attach Regulator Attach flare adapter on hose end of the regulator assembly to the flare fitting on the intake hose Secure the other end of r...

Page 8: ...n must conform with local codes or in the absence of local codes with National Fuel Gas Code ANSI Z223 1 1996 z The heater comes equipped with a hose assembly for hook up to a standard z A dented rust...

Page 9: ...h See diagram for Step 1 NOTE The remaining connections are to be tested after the heater has been lit STEP 2 4 Light the heater following instructions on page 10 and page 11 6 8 7 9 STEP 2 5 Using sp...

Page 10: ...be maintained at all times The installation must conform to local codes or in the absence of local codes with the standard for the storage and handling of liquid petroleum gases In the US use ANSI NFP...

Page 11: ...r clockwise direction Check for leaks by applying soapy water to the tank and hose connections D Push and turn the gas control knob to PILOT position The igniter will spark at the same time Firmly pre...

Page 12: ...reflector the heater should be turned off immediately and the heater should not be operated again until repairs are made FIGURE 2 NORMAL FLAME POSITION 2 50 8mm 1 25 4mm 0 0mm RELIGHTING A Turn the co...

Page 13: ...se assembly Never paint the reflector emitter assembly the safety control valve cylinder valve panel or instruction plate on post The posts of the burner must remain clean so that the gas flow is unre...

Page 14: ...etc the pilot flame may be small and the thermocouple may not heat up enough for the main burner to come on If this occurs it will be necessary to clean the pilot Lower Cone Cylinder Safety Valve Cyli...

Page 15: ...t assembly to the lower screen cone 3 Hold the pilot assembly with slip joint pliers loosen and remove the nut at the base of the pilot 4 Inspect the pilot and tubing for blockage you should be able t...

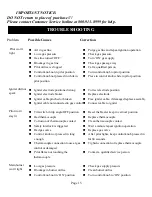
Page 16: ...ontrol or damaged Pilot flame not touching the thermocouple Low gas pressure Blockage in burner orifice Control knob not in ON position Purge gas line and repeat ignition operation Check gas pressure...

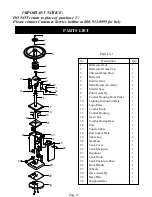
Page 17: ...Main Burner Assembly Emitter base Pilot Assembly Control Housing Front Panel Lighting Instruction Plate Logo Plate Control Knob Control Housing Gas Valve Control Husing Base Post Square Table Post Soc...

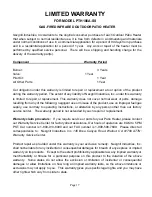
Page 18: ...use contrary to operating instructions or alteration by any person other than our factory service center The warranty period is not extended by such repair or replacement Warranty claim procedure If y...

Reviews: