Kingsford CG2203801 Owner'S Manual Download Page 1


                              1 of 27 


20151102-V0


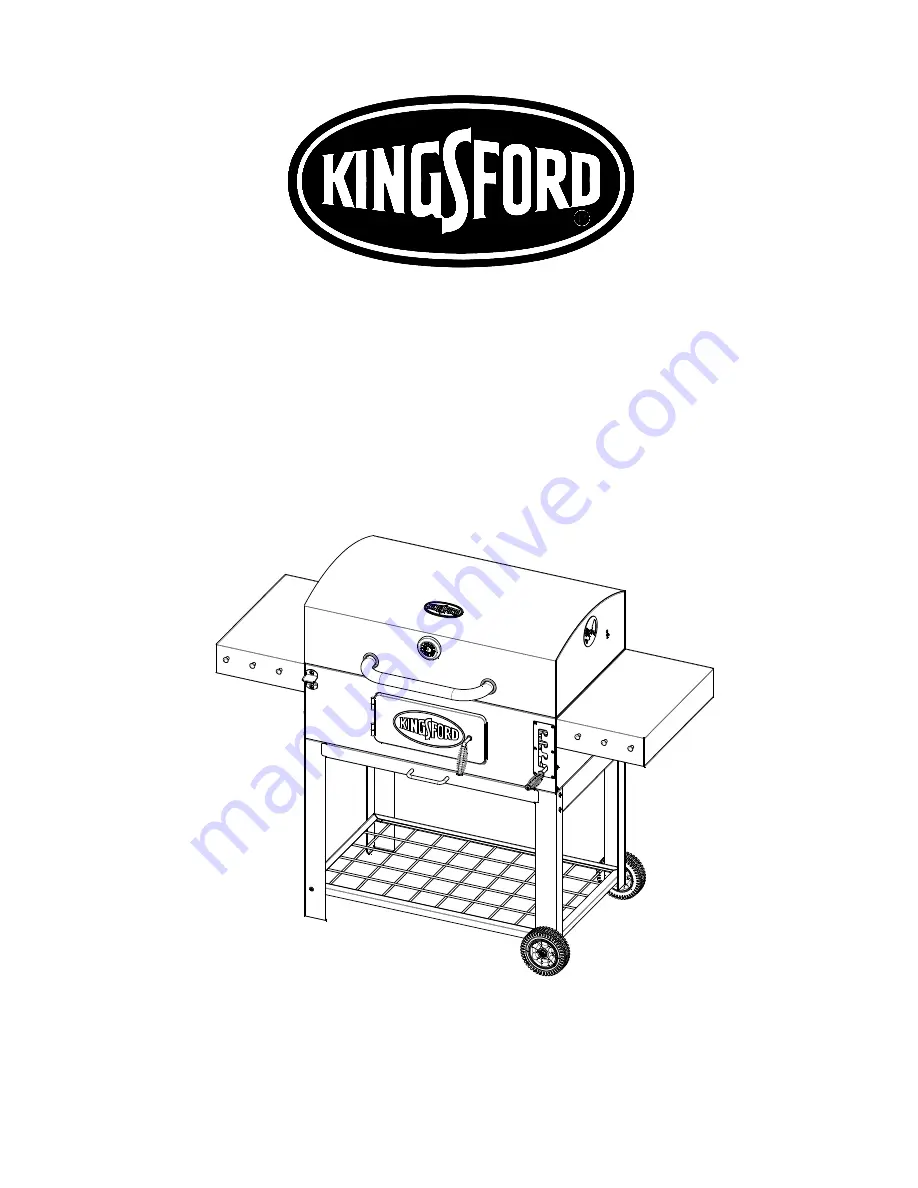
KF LARIAT CHARCOAL GRILL BLACK


Owner

’s Manual 


Assembly and Operating Instructions 


Model Number #      CG2203801-KF 


Tools required for assembly: (Not Included) 

Pliers, Philips & Flathead Screwdrivers, Adjustable Wrench.   

Keep this manual for future reference. 

Summary of Contents for CG2203801

Page 1: ...HARCOAL GRILL BLACK Owner s Manual Assembly and Operating Instructions Model Number CG2203801 KF Tools required for assembly Not Included Pliers Philips Flathead Screwdrivers Adjustable Wrench Keep th...

Page 2: ...s open until covered with a light ash approximately 20 minutes This will allow charcoal lighting fluid to burn off Failure to do this could trap fumes from charcoal lighting fluid in grill and may res...

Page 3: ...coals and ashes should be placed a safe distance from all structure and combustible materials With a garden hose completely wet the surface beneath and around grill to extinguish any ashes coals or em...

Page 4: ...please call customer service at customerservice rankam com or at 888 837 1380 U S only Mon to Fri 8 00 a m 5 00 p m Pacific Standard Time Proof of purchase will be required Inspect contents of the box...

Page 5: ...5 of 27 20151102 V0 Product Diagram 29 38 30 31 14 26 27 16 10 25 18 22 32 11 3 36 1 23 21 24 2 12 37 4 15 17 8 7 28 9 33 19 34 20 35 6 5 13...

Page 6: ...ht Rear Leg 1 pc 1 pc 1 pc 1 pc 9 Bottom Rack 10 Charcoal Tray 11 Left Side Shelf 12 Right Side Shelf 1 pc 1 pc 1 pc 1 pc 13 Lid 14 Warming Rack 15 Ask Pan 16 Cooking Grid 1 pc 1 pc 1 pc 2 pcs 17 Axle...

Page 7: ...0 Bezel 31 Upper Hinge 32 Lower Hinge 1 pc 2 pcs 2 pcs 2 pcs 33 Door Latch 34 Lock Plate 35 Ash Pan Handle 36 Bottle Opener 1 pc 1 pc 1 pc 1 pc 37 Hanger 38 Temperature Gauge 6 pcs 1 pc STOP DO NOT RE...

Page 8: ...102 V0 Hardware List Item No Item name Diagram Qty A BOLT M6x35 8 B BOLT M6x15 48 C BOLT M6x12 2 D BOLT M5x12 2 E LOCK NUT M10 2 F LOCK NUT M8 1 G FLANGE NUT M6 22 H LOCK NUT M6 4 J FLANGE NUT M4 6 K...

Page 9: ...IN 8 Q COTTON PIN 14 Assembly Procedures Symbol The following symbols will be shown in each procedure for indication of tightening the bolt and nut if necessary Some steps may require the assistance o...

Page 10: ...dures Step 1 Assembly Left Panel 3 and Right Panel 4 to Front Panel 1 and Back Panel 2 with Bolt B Step 2 Assembly Left Front Leg 5 Left Rear Leg 6 Right Front Leg 7 and Right Rear Leg 8 to Grill Body...

Page 11: ...11 of 27 20151102 V0 Step 3 Assembly Reinforcement 20 to Left Front Rear Leg and Right Front Rear Leg with Bolt B and Nut G Step 4 Assembly Bottom Rack 9 to the Legs with Bolts B G B 20 B 9 B...

Page 12: ...1102 V0 Step 5 Tighten the bolts and nuts in steps 1 2 3 and 4 Step 6 Assembly Wheel 28 with Axle 17 Nut E and Washer K Step 7 Assembly Air Vent 27 to Grill Body with Bolt B and Nut H H B 27 27 B 17 E...

Page 13: ...oal Tray Arm 22 to Left Holder 25 and Right Holder 26 respectively with Hinge Pin P Cotton Pin Q and Washer M Step 9 Assembly the Left Holder 25 and Right Holder 26 to Grill Body with Bolt B and Nut G...

Page 14: ...mbly the Charcoal Tray Bar 18 to Connector 23 and Lifting Arm 21 with Washer M Hinge Pin P and Cotton Pin Q Step 11 Assembly the Charcoal Tray Bar 18 and Lifting Arm 21 to Grill Body with Washer M and...

Page 15: ...102 V0 Step 12 Assembly the Charcoal Tray 10 to the Grill Body with Washer M Hinge Pin P and Cotton Pin Q Step 13 Assembly Cool Touch Handle 24 to Lifting Arm 21 with Cotton Pin Q 10 24 Q 24 Q Q P Q M...

Page 16: ...ck Plate 34 to Front Door 19 with Washer L and Lock Nut F Assembly Front Door 19 to the Grill Body Step 15 Assembly Lower Hinge 32 to Grill Body with Bolt A and Nut G Assembly Bottle Opener 36 to Gril...

Page 17: ...2 V0 Step 16 Assembly the Hanger 37 to the Left Side Shelf 11 and Right Side Shelf 12 with Nut J Step 17 Assembly the Left Side Shelf 11 and Right Side Shelf 12 to the Grill Body with Bolt B 37 12 J J...

Page 18: ...lt B Assembly Air Vent 27 to Lid 13 with Bolt B and Nut H Assembly Upper Hinge 31 to the Lid 13 with Bolt A and Nut G Assembly Temperature Gauge 38 to the Lid 13 Step 19 Put the Lid to Grill body with...

Page 19: ...19 of 27 20151102 V0 Step 20 Assembly warming rack 14 to the grill with Cotton Pin Q Step 21 Assembly Handle 35 to Ash Pan 15 with Bolt D Q 14 Q 35 D 15...

Page 20: ...20 of 27 20151102 V0 Step 22 Assembly cooking grid 16 and Ash Pan 15 Final assembly 16...

Page 21: ...s manual If using a Charcoal Chimney Starter follow all manufacturer s warnings and instructions regarding the use of their product Start with 6 pounds 2 72 kg of charcoal Instruction for reference on...

Page 22: ...pletely NOTE It is important that the exterior of the grill is not scraped or rubbed during the curing process IMPORTANT to protect your smoker from excessive rust the unit must be cured periodically...

Page 23: ...p 3 Saturate charcoal with lighting fluid With lid open and charcoal grate completely placed inside the grill wait 2 to 3 minutes to allow lighting fluid to soak into charcoal Store charcoal lighting...

Page 24: ...re you may need to add more wood and or charcoal during the cooking cycle NOTE Dry wood burns hotter than charcoal so you may want to increase the ratio of wood to charcoal to increase the cooking tem...

Page 25: ...e materials With a garden hose completely wet surface beneath and around the grill to extinguish any ashes coals or embers which may have fallen during the cooking or cleaning process Cover and store...

Page 26: ...TIME LOSS OF FOOD INCONVENIENCE EXPENSES FOR TRAVEL TRANSPORTATION LODGING EXPENSES LOSS BY DAMAGE TO PERSONAL PROPERTY OR LOSS OF INCOME PROFITS OR REVENUE 6 MANUFACTURER S OBLIGATION Manufacturer s...

Page 27: ...T Do not return product to the store WE CAN HELP Rankam Metal Products Manufactory Ltd 1618 W Rosecrans Ave Gardena CA90249 USA Please contact Customer Service at customerservice rankam com or at 1 88...

Reviews: