background image

 7

Getting Started
STEP 1. Unpack and Inspect the Network Analyzer Modules

Unpack the network analyzer modules from the shipping containers. Keep the 

black plastic port protector and the shipping containers for possible reuse.

Inspect for Damage

After unpacking a network analyzer module, inspect it for any shipping 

damage. Report any damage to the shipping agent immediately, as such 

damage is not covered by the warranty.

CAUTION

To avoid damage when handling the network analyzer modules, do not touch exposed 

connector pins.

How to Return an Instrument for Service

Should it become necessary to return a network analyzer module for repair or 

service, follow the steps below:

1. Review the warranty information shipped with your product.
2. Contact Keysight to obtain a Return Material Authorization (RMA) and 

return address. For assistance finding Keysight contact information, go to 

www.keysight.com/find/assist

 (worldwide contact information for repair 

and service).

3. Write the following information on a tag and attach it to the network 

analyzer module:

• Name and address of owner. A P.O. box is not acceptable as a return 

address.

• Network analyzer module serial numbers. The serial number label is 

located on the side panel of the module. The serial number can also be 

read from the Soft Front Panel (SFP) interface, after the hardware is 

installed.

• Description of the service required or the failure.

4. On the shipping label, write ATTENTION REPAIR DEPARTMENT and the 

RMA number.

5. Ship the analyzer module using the original packaging materials. Shipping 

the analyzer module in anything other than the original packaging may 

result in non-warranted damage.

NOTE

In your correspondence, refer to the network analyzer module by serial number and by 

model number.

Summary of Contents for M9300A

Page 1: ...89A PXIe Vector Network Analyzer Source M9309A PXIe Vector Network Analyzer Synthesizer M9340A PXIe Vector Network Analyzer RF Distributor M9376A PXIe Vector Network Analyzer Receiver M9377A PXIe Vector Network Analyzer Direct Access Receiver M9378A B PXIe Vector Network Analyzer Directional Coupler ...

Page 2: ...r software described in this document are furnished under a license and may be used or copied only in accordance with the terms of such license Restricted Rights Legend If software is for use in the performance of a U S Government prime contract or subcontract Software is delivered and licensed as Commercial computer software as defined in DFAR 252 227 7014 June 1995 or as a commercial item as def...

Page 3: ...fe Module Operating Conditions 9 Tools Required for the Installation Procedure 9 Installation Procedure 10 STEP 4 Install the Software 37 System Requirements 37 Hardware Requirements 37 Power Up the Controller 38 Software Installation Overview 38 STEP 5 Verify Operation of the Network Analyzer Modules 41 Execute the M9385A Soft Front Panel Application 41 The Operator s Check 41 Port Configuration ...

Page 4: ...4 Contents ...

Page 5: ... network analyzer measurement just as the n port Network Analyzer The scope of this Startup Guide is to detail the processes of receiving and installing the network analyzer module and cables that compose the Keysight M9485A PXIe Vector Network Analyzer modules Additionally installing the required software and verifying network analyzer module operation is documented If you have any questions afte...

Page 6: ...afe work station to perform all work on electronic assemblies Figure 1 1 shows a static safe work station using two types of ESD protection conductive table mat and wrist strap combination and conductive floor mat and heel strap combination Both types when used together provide a significant level of ESD protection Of the two only the table mat and wrist strap combination provides adequate ESD pro...

Page 7: ... Material Authorization RMA and return address For assistance finding Keysight contact information go to www keysight com find assist worldwide contact information for repair and service 3 Write the following information on a tag and attach it to the network analyzer module Name and address of owner A P O box is not acceptable as a return address Network analyzer module serial numbers The serial n...

Page 8: ...ipment STEP 2 Check the Shipment The M9485A consists of several modules cables and dividers Use the Contents List in the shipping container to verify the completeness of your shipment If not complete refer to Contacting Keysight on page 44 ...

Page 9: ... M9018A PCIe Cable Interface download the Keysight Multiple PXIe and AXIe Chassis System Configuration Tool Save the file to your local hard drive do not try to open the file from the Internet location Use slot blockers and EMC filler panels in empty module slots to ensure proper operating temperatures Keysight chassis and slot blockers optimize module temperature performance and reliability of te...

Page 10: ... 3 on page 11 3 If the chassis has multiple fan speed settings ensure that the fan switch is set to high or auto 4 Position the chassis to provide ample space between the chassis fan intake and exhaust vents Blockage by walls or obstructions affects the air flow needed for cooling Refer to the chassis documentation for more information about cooling 5 Before inserting the network analyzer module i...

Page 11: ...o place To remove the module from the chassis you must first press the injector ejector handle to unlock it Figure 1 3 Installing the Network Analyzer Module 7 Repeat for other modules if present 8 Modules should be installed from left to right and not otherwise 9 If the number of receiver is equal or less than 6 up to 6 port module on a single chassis configuration can be applied Hence for up to ...

Page 12: ...l 3 installations are explained in the following sections Standard Receiver M9376A Installation Module location for single chassis can be either one from the following two configuration for single chassis If each module is not placed in the right slot the M9485A software will not be able to control them Figure 1 4 on page 12 shows up to 12 port module on a single chassis configuration when only st...

Page 13: ... either one from the following two configuration for two chassis Figure 1 6 on page 13 shows up to 24 port module on two chassis configuration with standard receiver modules M9376A Figure 1 7 on page 14 shows up to 12 port module also on two chassis configuration with standard receiver modules M9376A Figure 1 6 Case 1 Up to 24 port Module in Two Chassis Configuration ...

Page 14: ...al coupler M9378A the installation procedure is the same as standard receiver M9376A installation Standard Receiver M9376A Installation on page 12 Configurable Test Set M9377A and M9378A B Installation a The installation of the Configurable Test Set differs from installation of the Standard Receiver Due to the semi rigid cables usage there is limitation of how 2 way and 4 way divider can be positi...

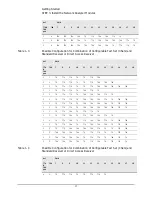
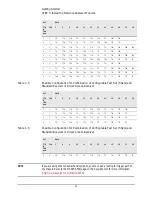
Page 15: ...ysight if you need an assistance Table 1 1 Possible Configuration for Combination of Configurable Test Set 1 Set and Standard Receiver or Direct Access Receiver Table 1 2 Possible Configuration for Combination of Configurable Test Set 2 Sets and of Slot 77A 78A pair 76A 7 8 9 10 11 12 13 14 15 16 17 18 1 1 78 77A 76A 1 3 78 77A 76A 76A 76A 1 5 78 77A 76A 76A 76A 76A 76A 1 7 78 77A 76A 76A 76A 76A ...

Page 16: ...A 76A 76A 76A 2 6 78 77A 76A 76A 76A 76A 76A 78 77A 76A 2 8 78 77A 76A 76A 76A 76A 76A 78 77A 76A 76A 76A 2 6 78 77A 76A 76A 76A 76A 76A 76A 77A 78 2 8 78 77A 76A 76A 76A 76A 76A 76A 76A 76A 77A 78 2 2 76A 77A 78 78 77A 76A 2 4 76A 77A 78 78 77A 76A 76A 76A 2 6 76A 77A 78 78 77A 76A 76A 76A 76A 76A 2 8 76A 77A 78 77A 78 76A 76A 76A 76A 76A 76A 76A 2 4 76A 76A 76A 77A 78 76A 77A 78 2 6 76A 76A 76A ...

Page 17: ...77A 77A 78 78 77A 76A 76A 76A 3 5 78 77A 77A 78 78 77A 76A 76A 76A 76A 76A 3 1 78 77A 77A 78 76A 77A 78 3 3 78 77A 77A 78 76A 76A 76A 77A 78 3 5 78 77A 77A 78 76A 76A 76A 77A 78 76A 76A 3 5 78 77A 77A 78 76A 76A 76A 76A 78 77A 76A 3 5 78 77A 77A 78 76A 76A 76A 76A 76A 77A 78 3 1 78 77A 76A 78 77A 77A 78 3 3 78 77A 76A 78 77A 76A 76A 77A 78 3 5 78 77A 76A 78 77A 76A 76A 77A 78 76A 76A 3 5 78 77A 76...

Page 18: ...A 78 78 77A 76A 76A 77A 78 4 4 78 77A 77A 78 78 77A 77A 78 76A 76A 76A 76A 4 2 78 77A 77A 78 76A 77A 78 78 77A 76A 4 4 78 77A 77A 78 76A 77A 78 78 77A 76A 76A 76A 4 4 78 77A 77A 78 76A 76A 76A 76A 78 77A 77A 78 4 2 78 77A 76A 78 77A 77A 78 78 77A 76A 4 4 78 77A 76A 78 77A 77A 78 78 77A 76A 76A 76A 4 4 78 77A 76A 76A 76A 76A 77A 78 78 77A 77A 78 4 4 76A 76A 76A 76A 78 77A 77A 78 78 77A 77A 78 of Sl...

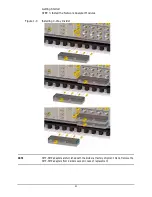
Page 19: ...if you are using dividers fasten the modules only after alignment plate is installed Figure 1 8 on page 20 shows the installation of the M9376 60016 4 Way alignment plate on the modules b Only after the alignment plate is installed the black plate cover should be removed 2 port module have the option of using M9376 60014 2 Way alignment plate c Next fasten the M9376 62006 4 way divider by ensuring...

Page 20: ...r Modules f Tighten the top mounting screw see callout 7 in Figure 1 3 and the bottom mounting screw located below the injector ejector handle on the module s using a Phillips 1 torque drive set to 4 in lbs 0 45 N m Figure 1 8 Alignment Plate Installation ...

Page 21: ...3 Install the Network Analyzer Modules Figure 1 9 Installing 4 Way Divider NOTE SMP SMP adapters are furnished with the divider at factory shipment Do not remove the SMP SMP adapters from dividers except in case of replacement ...

Page 22: ...ivider as shown in Figure 1 10 on page 22 below on the dividers The color in circle shows the color of the cable Figure 1 10 Label for Divider Figure 1 11 Cable Removal Tool part number 5002 3361 NOTE Remove the 50 ohm load from output ports used on M9340A Other unused ports should be terminated NOTE The IF Out port of the VNA receiver is terminated with 50 ohm load This 50 ohm load can be used at...

Page 23: ...e test port connector When connecting or disconnecting a cable for Device Under Test DUT to from test port first hold the connector saver body steady with 5 5 mm open end wrench to prevent the connector saver body rotation as shown in Figure 1 12 Position both wrenches within 90 degrees from each other before applying force Then connect or disconnect the cable for DUT with Torque Wrench for SMA as...

Page 24: ...the 12 port configuration as shown in Figure 1 14 on page 24 and for all 24 port configuration as shown in Figure 1 15 on page 25 regardless of the receiver modules settings c Figure 1 16 on page 25 shows the complete cable connections between standard modules for 12 port configuration in 1 chassis d Figure 1 17 on page 26 shows the complete cable connections between standard modules for 24 port c...

Page 25: ...Install the Network Analyzer Modules Figure 1 15 Cable Connections Between Source Synthesizers Reference and Distributor for 24 port Configuration Figure 1 16 Cable Connections Between Standard Modules for 12 port Configuration ...

Page 26: ...peratures Table 1 7 Part Numbers of Required Cables for Connection No Cable Part Numbers Cable Type Required Tool to Place the Cable 0 8120 5091 Flexible 1 M9485 61601 Flexible 8 in lbs Torque Wrench for SMA not supplied 2 M9485 61602 Flexible 3 M9485 61603 Flexible 4 M9485 61604 Flexible Cable Removal Tool 5002 3361 is required for removing No tools required for placing 5 M9485 61605 Flexible 6 M...

Page 27: ...High Power measurement 11 M9485 61611 Semi rigid Socket and torque driver to be used with socket adapter set to 8 in lb not supplied 12 M9485 61612 Semi rigid 13 M9485 61613 Semi rigid 14 M9485 61614 Semi rigid 15 M9485 61615 Semi rigid 16 M9485 61616 Semi rigid 17 M9485 61617 Semi rigid 18 M9485 61618 Semi rigid 19 M9485 61619 Semi rigid 21 M9485 61633 For system rack M9485 61621 For 2 tier chass...

Page 28: ... the M9377A Figure 1 18 Cable Connections For Standard Measurement Configuration with M9378A Figure 1 19 Cable Connections For Standard Measurement Configuration with M9378B c Figure 1 21 on page 29 and Figure 1 21 on page 29 below shows the cable connection for high power measurement with M9378A and M9378B Its important to ensure that test port labeled 6 ATT Out is connected to test port 4 Thru R...

Page 29: ... page 29 below shows the cable connection for Wide Dynamic Range measurement with M9378A and M9378B Figure 1 22 Cable Connections For Wide Dynamic Range Configuration with M9378A Figure 1 23 Cable Connections For Wide Dynamic Range Configuration with M9378B e Figure 1 24 on page 30 and Figure 1 25 on page 30below shows the cable connection for high gain measurement with M9378A and M9378B ...

Page 30: ...mper cables for the Configurable Test Set comes with color coding to ease cable selection Figure 1 26 on page 30 below shows the jumper cable used for Configurable Test Set Figure 1 26 Jumper Cable For DRA Measurement g As shown in the figure above the color coding and the connector number on the jumper cable indicates the measurement it should be used for and the connection between ports h For ex...

Page 31: ... in Figure 1 27 on page 31and Figure 1 28 on page 32 for M9378A and M9378B These are connections for both situations where coupler M9378A B is to the left side of the M9377A side A and where M9378A B is on the right side of the M9377A side B Figure 1 27 Jumper Cable Connection Direct Receiver Access Measurement with M9378A ...

Page 32: ...32 Getting Started STEP 3 Install the Network Analyzer Modules Figure 1 28 Jumper Cable Connection Direct Receiver Access Measurement M9378B ...

Page 33: ...twork Analyzer Modules Example of 1 Chassis Setup with Configurable Test Set and Standard Receiver or Direct Access Receiver Figure 1 29 Cable Connection of 1 Chassis with Configurable Test Set and Standard Receiver or Direct Access Receiver ...

Page 34: ...es Example of 2 Chassis Setup with Configurable Test Set and Standard Receiver or Direct Access Receiver with 2 Way Divider Figure 1 30 Cable Connection of 2 Chassis with Configurable Test Set and Standard Receiver or Direct Access Receiver with 2 Way Divider 1 ...

Page 35: ... set of cables as shown in Table 1 8 on page 35 are required Table 1 8 Part Numbers of Required Cables for Connection No Cable Part Numbers Connection 1 Connection 2 Note a 1250 4189 M9340A B In is SMB SMA Adapter Fix this adapter before connecting the cable M9340A B In b 8120 5091 M9310A 100MHz In M9309A 100MHz Out Flexible cable M9309A 100MHz In M9309A 100MHz Out c M9485 61619 M9310A RF In M9309...

Page 36: ... Y9485 61606 M9340A A Out 1 Divider Source In 7 Y9485 61617 M9340A B Out 3 Divider 100MHz In 8 Y9485 61618 M9340A B Out 2 Divider 100MHz In 9 Y9485 61619 M9340A B Out 1 Divider 100MHz In h M9485 61626 M9340A A In M9340A A Out 2 i M9485 61623 M9340A A Out 2 M9340A B In j M9485 61621 M9340A A In M9309A RF LO Out k M9485 61605 M9300A Out 5 M9309A 100MHz In l M9485 61606 M9300A Out 4 M9340A B In m M94...

Page 37: ...ontroller external PC connected to the chassis by a PCI to PXI interface is required Embedded controller Keysight M903xA or an equivalent embedded controller that meets the following requirements A PXIe system controller PXI 1 embedded controllers are not compatible Utilizes a 2x8 4x4 or 1x8 PXIe system slot link configuration Runs one of the operating systems listed in System Requirements above R...

Page 38: ... to the Keysight M9018A documentation for further details 2 Connect peripherals mouse keyboard monitor 3 Power up the chassis Software Installation Overview The software installation includes the following items Keysight IO Libraries Suite IOLS which includes the Keysight Connection Expert This software is included with your shipment and the latest version is available at www keysight com find ios...

Page 39: ...g a remote controller install the PXIe Chassis Drivers a Using the downloadable file at http www keysight com find m9018a launch the installer b Follow the installer prompts 4 Complete the installation If Using an Embedded Controller a After the InstallShield Wizard has completed click Finish b Restart the embedded controller PC using Start Restart and wait for the system to restart If Using a Rem...

Page 40: ...Software NOTE When using two chassis power on the chassis first which does not have embedded controller or is not connected with remote controller the power on the chassis which has embedded controller or is connected with remote controller ...

Page 41: ...t in the help file The operator s check is not complete solution to find all malfunctions Hence perform the verification and performance tests to check the complete performance of M9485A Operator s check is executed at the Soft Front Panel boot up default as a start up test You can turn off the start up test by the preference setting System System Setting Preference Optionally you can execute the ...

Page 42: ...42 Getting Started STEP 5 Verify Operation of the Network Analyzer Modules ...

Page 43: ...Module Help System Use the Help System to quickly reference programming and user documentation To access Help From the analyzer module software On your PC screen click the Network Analyzer icon After making your analyzer module configuration settings click Help Online go to http ena support keysight com m9485a manuals webhelp eng ...

Page 44: ...re available on the Web at www keysight com find assist If you do not have access to the Internet please contact your Keysight field engineer NOTE In any correspondence or telephone conversation refer to the Keysight product by its model number and full serial number With this information the Keysight representative can determine whether your product is still within its warranty period ...

Page 45: ...This information is subject to change without notice Keysight Technologies 2015 2016 M9485 90020 www keysight com ...

Reviews: