background image

8

Replacing the Power Supply

i3070 Inline System (E9988E)

11

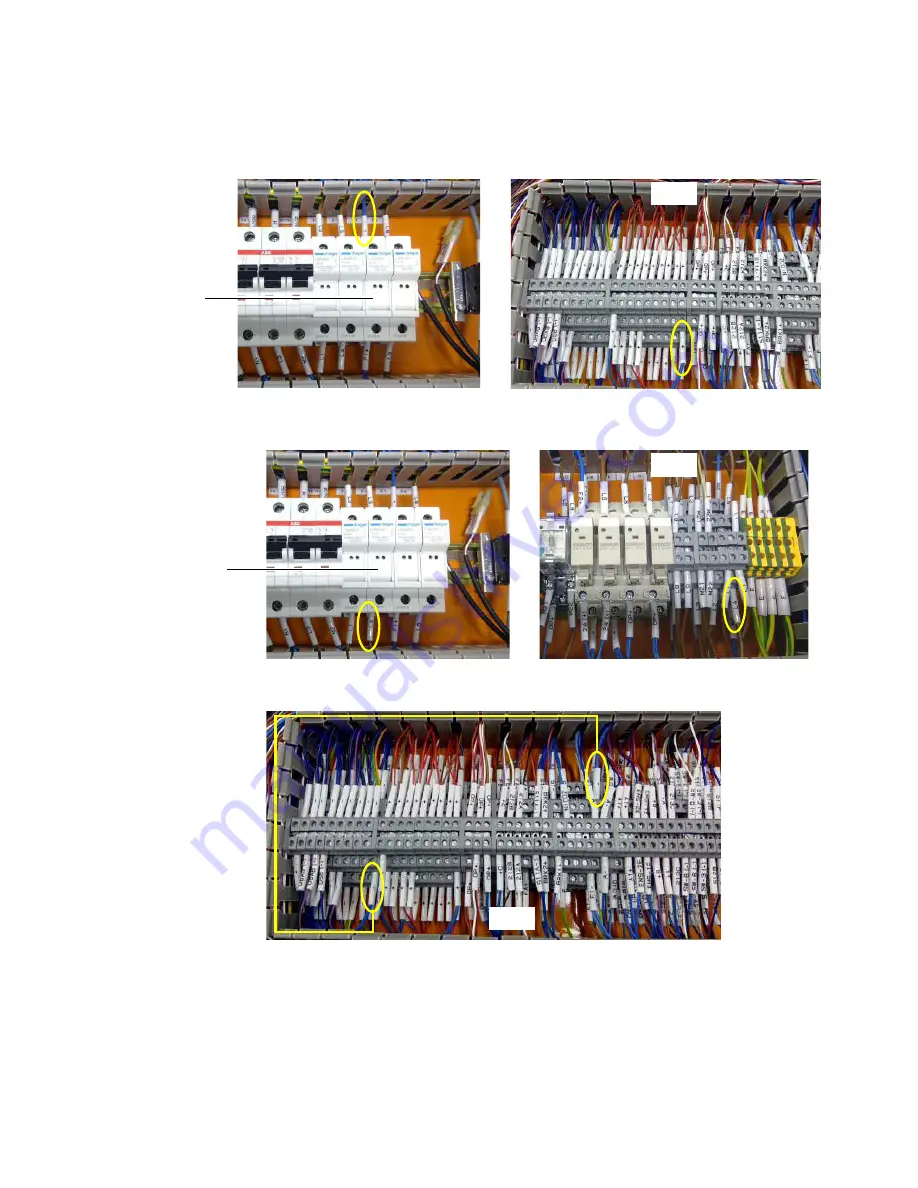
Connect a new cable labeled 

+

 from F-5 to TB-1.

12

Connect a new cable labeled 

L4

 from F-4 to TB-2.

13

At TB-1, connect a new cable labeled 

 as shown below:

Continue with 

Completing the installation

.

TB-1

F-5

TB-2

F-4

TB-1

Summary of Contents for E9986E

Page 1: ...Keysight i3070 Series 5i Inline In Circuit Test System Replacing the Power Supply ...

Page 2: ...tware is customarily provided to the public Accordingly Keysight provides the Software to U S government customers under its standard commercial license which is embodied in its End User License Agreement EULA a copy of which can be found at http www keysight com find sweula The license set forth in the EULA represents the exclusive authority by which the U S government may use modify distribute o...

Page 3: ... i3070 Inline In Circuit Test System Replacing the Power Supply Parts 4 i3070 Inline System E9988E 5 i3070 Lean Inline System E9988EL 10 i3070 4 mod Inline System E9986E 17 Tools required Allen key Screwdriver ...

Page 4: ...on For i3070 Inline System E9988E E9988 61208 Omron Cosel Power Supply Bracket with DIN Rail Standard Inline E9988 61615 Cables Set for Omron Power Supply 20A Replacement Standard Inline For i3070 Lean Inline System E9988EL E9988 61209 Omron Power Supply Bracket Lean Inline EMU E9988 61616 Cables Set for Omron Power Supply 20A Replacement Lean Inline E9988 61210 Cosel Power Supply Bracket Lean Inl...

Page 5: ...f installing the Omron 20 A AC DC power supply remove PS1 and PS2 If installing the Cosel 6 4 A AC DC power supply remove PS3 a Open the protective cover and loosen the screws to release all cables at the AC DC power supply terminal point of the power supply to be replaced b Remove the button screws and any cable ties securing the power supply to be replaced Remove the power supply and bracket Tur...

Page 6: ...ing the Omron 20 A AC DC power supply follow step 5 through step 13 5 Locate and remove the cables labeled PF F E L5 and N2 that were connected to PS2 as they are no longer needed 6 Locate and remove these cables brown cable labeled L4 that connects F 4 and K B terminal contact 4 brown cable labeled L5 that connects TB 2 and K B terminal contact 3 TB 2 K B F 4 ...

Page 7: ...onnections remain the same If using the existing cables the connector heads have to be replaced with ferrule heads to connect to the Omron power supply If the existing cables are not long enough replace them with the new cables that have the same labels Be sure to connect the new cables to the same locations as the old cables 10 Locate the cable labeled F1 TB 1 to F 5 Disconnect the cable from TB ...

Page 8: ...nline System E9988E 11 Connect a new cable labeled from F 5 to TB 1 12 Connect a new cable labeled L4 from F 4 to TB 2 13 At TB 1 connect a new cable labeled as shown below Continue with Completing the installation TB 1 F 5 TB 2 F 4 TB 1 ...

Page 9: ...DC power supply 15 Connect the cables labeled ST ST E N1 L7 formerly from PS3 to the Cosel power supply Tighten the screws to secure the cables and close the protective cover Completing the installation 16 Make sure all the cables are routed properly in the trunking then close all the trunking covers 17 Ensure all connections are correct before securing the system s top cover Cosel 6 4 A AC DC pow...

Page 10: ...E9988EL 1 Remove the button screws securing the system s top cover and remove the top cover 2 Remove the cap screws to remove the cover to the electrical panel 3 Remove the trunking covers to access the cables Turn off the main switch before beginning any replacement work electrical panel ...

Page 11: ...n 20 A AC DC power supply remove PS1 and PS2 If installing the Cosel 6 4 A AC DC power supply remove PS3 a Open the protective cover and loosen the screws to release all cables at the AC DC power supply terminal point of the power supply to be replaced b Remove the button screws and any cable ties securing the power supply to be replaced Remove the power supply and bracket F 3 protective cover PS1...

Page 12: ...ep 6 through step 15 6 Locate and remove the cables labeled PF F E L5 and N2 that were connected to PS2 as they are no longer needed 7 Locate and remove these cables cable labeled F that connects K 2 terminal contact 12 and TB 4 brown cable labeled L4 that connects K B terminal contact 12 and F 4 brown cable labeled L5 that connects K B terminal contact 8 and TB 2 ...

Page 13: ...n power supply The terminal point connections remain the same If using the existing cables the connector heads have to be replaced with ferrule heads to connect to the Omron power supply If the existing cables are not long enough replace them with the new cables that have the same labels Be sure to connect the new cables to the same locations as the old cables 11 Connect a new cable labeled from F...

Page 14: ...8EL 12 Connect a new cable labeled from K 2 terminal contact 12 to TB 4 13 Disconnect the blue cable labeled F1 from TB 3 and connect it to K B terminal contact 8 14 Connect a new cable labeled F2 from K B terminal contact 12 to TB 3 TB 4 K 2 TB 3 K B TB 3 K B ...

Page 15: ...er supply If installing the Cosel 6 4 A AC DC power supply follow step 16 through step 20 16 Install the bracket and mount the new Cosel 6 4 A AC DC power supply 17 Connect the cables labeled ST ST E N1 and L7 formerly from PS3 to the Cosel power supply Tighten the screws to secure the cables and close the protective cover TB 2 F 4 Cosel 6 4 A AC DC power supply with bracket protective cover ...

Page 16: ...9988EL Completing the installation 18 Make sure all the cables are routed properly in the trunking then close all the trunking covers 19 Ensure all connections are correct before securing the electrical panel cover 20 Close and secure the system s top cover ...

Page 17: ...utton screws securing the system s top cover at the electrical panel side then remove the top cover 2 Remove the trunking covers to access the cables 3 Open the F 3 fuse holder and replace the 2 5 A slow blow fuse with a new 6 0 A slow blow fuse Turn off the main switch before beginning any replacement work F 3 ...

Page 18: ...d b Remove the button screws and any cable ties securing the power supply to be replaced Remove the power supply and bracket Installing the Omron 20 A AC DC power supply If installing the Omron 20 A AC DC power supply follow step 5 through step 14 5 Locate and remove the cables labeled PF F E L5 and N2 that were connected to PS2 as they are no longer needed 6 Mount the bracket for the new Omron 20...

Page 19: ... the connector heads have to be replaced with ferrule heads to connect to the Omron power supply If the existing cables are not long enough replace them with the new cables that have the same labels Be sure to connect the new cables to the same locations as the old cables 9 Connect a new cable labeled from F 5 to TB 3 10 Remove the cables labeled L4 and L5 which are connected between K B and TB 1 ...

Page 20: ...2 to F 5 Disconnect the cable from TB 2 and connect it to K B 12 Connect a new cable labeled F2 to K B Connect the other end to TB 2 in the space previously occupied by F1 13 At TB 1 move the cable labeled L4 to the space previously occupied by L5 which was removed in step 5 TB 2 K B TB 2 K B TB 1 ...

Page 21: ... AC DC power supply If installing the Cosel 6 4 A AC DC power supply follow step 15 through step 18 15 Install the bracket and mount the new Cosel 6 4 A AC DC power supply 16 Connect the cables labeled ST ST E N1 L7 formerly from PS3 to the Cosel power supply Tighten the screws to secure the cables and close the protective cover TB 2 Cosel 6 4 A AC DC power supply with bracket protective cover ...

Page 22: ...070 4 mod Inline System E9986E Completing the installation 17 Make sure all the cables are routed properly in the trunking then close all the trunking covers 18 Ensure all connections are correct before securing the system s top cover ...

Page 23: ......

Page 24: ...This information is subject to change without notice 2020 Keysight Technologies Edition 2 May 2020 www keysight com ...

Reviews: