background image

Return the module for service

Step 4: Install the Module

PXI hardware does not support "hot-swap" operation. Before installing the module into the chassis,

power off the chassis to prevent damage to the module.

The module can be installed in any PXIe slot marked with a peripheral slot compatibility image (a circle
containing the slot number).

The module can also be installed in any hybrid PXIe slot marked with a peripheral slot compatibility
image (the letter “H” and a solid circle containing the slot number).

1. Make sure the chassis is connected to the main supply, but power switch is in the Off (Standby) position.

2. If the chassis has multiple fan speed settings, ensure that the fans are set to automatic. Do not set the fan

speed to low or turn it off.

3. Position the chassis so that there is ample space between the chassis fan intake and exhaust vents.

4. If using a remote controller, install the System Interface Card in the slot identified by the triangle symbol:
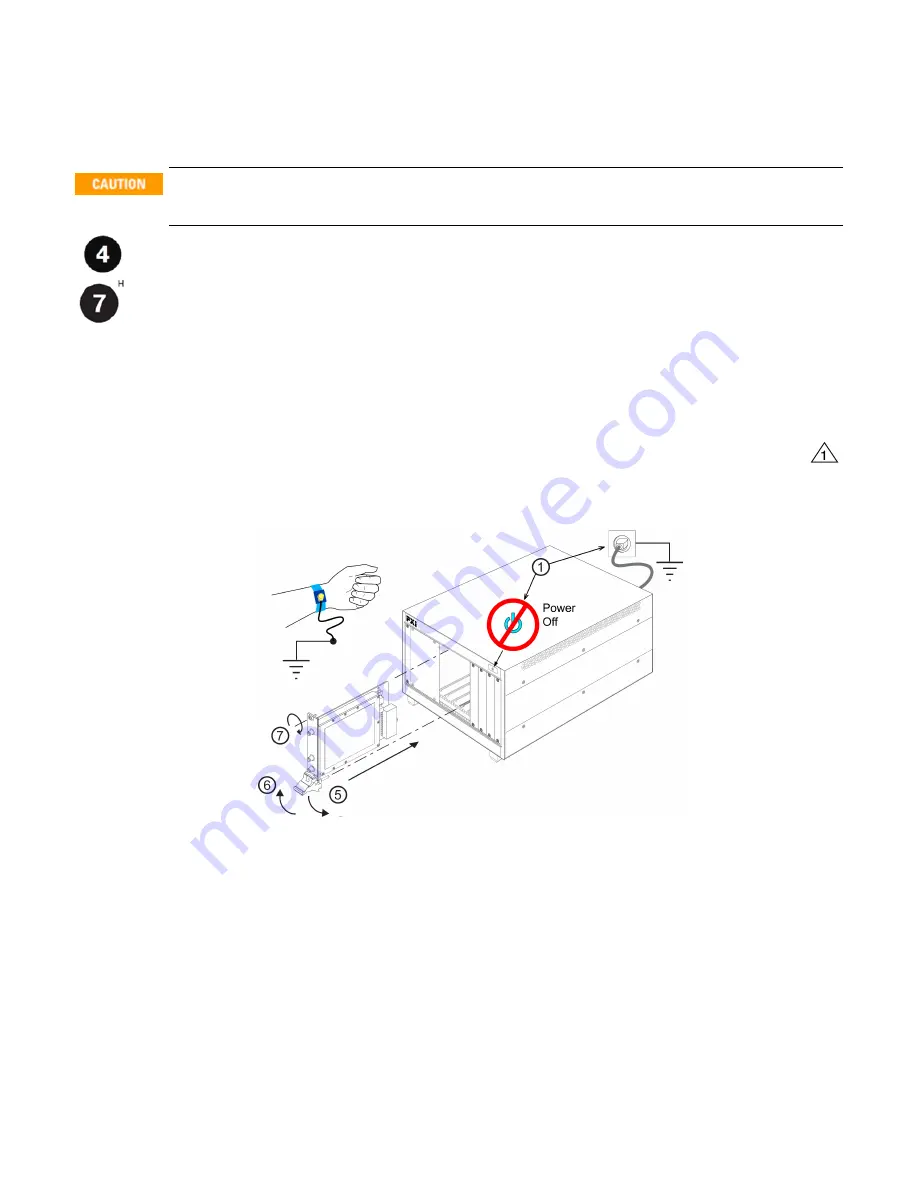
5. Install the module into the appropriate slot of the chassis by placing the module card edges into the front mod-

ule guides (top and bottom), Ensure that the ejector handle is pushed down and slide it to the rear.

6. When resistance is felt, latch the module by pulling up on the ejector handle.

Figure 3 - Installing a module into a PXI chassis

7. Tighten the screws on the module front panel. Performance may suffer if the screws are not tightened.

8. Verify that the chassis fans are operable and free of dust and other contaminants that may restrict airflow.

9. Install all chassis covers and filler panels after installing the module. Missing filler panels may disrupt nec-

essary air circulation in the chassis.

10. Plug in and power up the PXI chassis. (If you are using a remote controller, reboot the host PC.)

11. Check the status LED on the module front panel, It should be orange or red when the power is applied, If not-

there is a problem with either the module or the chassis.

12. Follow the New Hardware Wizard's instructions to install the driver.

13. Reboot the system.

12

M9202A PXI Express 12-bit Wideband IF Digitizer Startup Guide

Summary of Contents for Agilent Technologies PXI Express M9202A

Page 1: ...bit Wideband IF Digitizer M9202A Startup Guide NOTICE This document contains references to Agilent Technologies Agilent s former Test and Measurement business has become Keysight Technologies For more...

Page 2: ...or contract clause Use duplication or disclosure of Software is subject to Agilent Technologies standard commercial license terms and non DOD Departments and Agencies of the U S Government will recei...

Page 3: ...the voltage being measured The instrument and accessories must be used in accordance with its specifications and operating instructions or the safety of the equipment may be impaired Do not exceed th...

Page 4: ...nt means caution risk of danger You should refer to the operating instructions located in the user documen tation in all cases where the symbol is marked on the instrument This symbol indicates the ti...

Page 5: ...anel Connectors 13 Front Panel LED 13 Step 5 Verify Operation of the M9202A Module 14 Conducting a Self Test 15 Conduct M9202A Operational check optional 16 Requirements for Verification 16 Required H...

Page 6: ...Documentation Map 6 M9202A PXI Express 12 bit Wideband IF Digitizer Startup Guide...

Page 7: ...elect Technical Support Manuals l Help system for the Soft Front Panel l Help systems for the device drivers IVI C and IVI COM and LabVIEW G l Specifications Data Sheet Follow the Startup Sequence Thi...

Page 8: ...spect for damage After unpacking the module carefully inspect it for any shipping damage Report any damage to the shipping agent immediately as such damage is not covered by the warranty Warranty info...

Page 9: ...instrument or prevent it from moving in the shipping container Styrene pellets can also cause equipment damage by generating static electricity or by lodging in fan motors If any correspondence is req...

Page 10: ...r operation than is required for installation The amount of space listed above is required for installation 2 Note NET Framework Runtime Components are installed by default with Windows Vista Therefor...

Page 11: ...llowing l Agilent IO Library Suite IOLS which includes the Agilent Connection Expert This software must be installed first Version 16 2 or newer of the Agilent IO Libraries Suite is required l Soft Fr...

Page 12: ...e triangle symbol 5 Install the module into the appropriate slot of the chassis by placing the module card edges into the front mod ule guides top and bottom Ensure that the ejector handle is pushed d...

Page 13: ...t This input is AC cou pled and 50 terminated The recommended signal level is 1 V pk pk 4 dBm The clock signal frequency should be half of the desired sampling frequency TRG OUT This MMCX female conne...

Page 14: ...202 module is recognized 3 Select the M9202A module and check that the correct Model Name appears in the Instrument Properties 4 Select the Installed Software tab and review the configuration data as...

Page 15: ...e with the processor controlling it When the SFP is launched it will initiate a self calibration which takes a little over 1 minute Verify that no error is shown in the lower left hand log area The im...

Page 16: ...or 1x BNC MMCX cable 50 Coaxial 100 cm Operational Verification Procedure Do not exceed the maximum power level to the INPUT connector 0 5 W 1 Launch the soft front panel SFP The calibration must succ...

Page 17: ...cilloscope 3 If the problem occurs during Operational Verification disconnect the input signal and note the status of the LED on the front panel it should be GREEN Reconnect the signal and select the...

Page 18: ...ers Manufacturers Group PCIe and PCI EXPRESS are registered trademarks and or service marks of PC SIG Microsoft Windows VisualStudio VisualC VisualC and VisualBasic are either registered trademark or...

Reviews: