Operating Manual
Thank you for purchasing this product.
Please read the operating manual carefully and use this product properly.
Raw Cashew Moisture Tester
HB-600
Page 1: ...Operating Manual Thank you for purchasing this product Please read the operating manual carefully and use this product properly Raw Cashew Moisture Tester HB 600...
Page 2: ...given to the safety of the product however take care to read the precautions in this operating manual for proper handling Be sure to carefully follow all safety precautions Carefully read the operatin...
Page 3: ...it Keys control panel 8 6 Before Measuring 9 7 Directions 10 7 1 Measurement 10 7 2 Average display 13 7 3 Continuous measurement mode setting 14 7 4 Moisture Content Value Correction 15 7 5 Setting t...
Page 4: ...ment is made or key is operated for approximately 5 minutes the power is automatically shut off and avoids wasting the batteries Upper limit setting function Setting any moisture value enables a buzze...
Page 5: ...ensation Functions Upper limit alarm setting 7 to 30 and OFF Moisture value bias adjustment 9 9 to 9 9 Auto power off automatically turned off in approx 5 minutes Average value display Continuous meas...
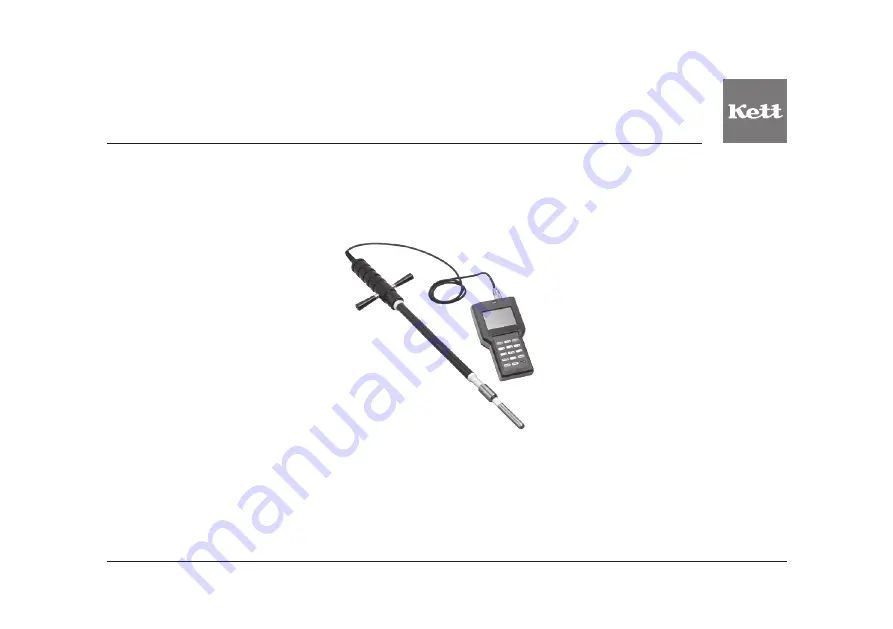
Page 6: ...6 Main unit Accessories Connector Display Control panel Battery cover back Bar sensor PU 360 Operating Manual 1 5 V batteries AA alkaline x6 Shoulder strap 3 Part names...
Page 7: ...7 Calibration curve number Battery indicator Number of measuring Calibration curve name Set value for the alarm Moisture value Bar graph 4 Display...
Page 8: ...5 Description of Main Unit Keys control panel Key Functions Turns the power ON and OFF Adjusts a moisture value bias Selects a sample number Averages measured values Enters a minus correction value Ac...
Page 9: ...g to secure the connection At this moment direct the silver indentation to the front side or measured values may be affected 3 Prepare a sample to be measured and allow the sample to equilibrate to th...
Page 10: ...and Errors on page 20 2 Select the number of the calibration curve to be measured This instrument has only one pre installed calibration curve but this function is required when a user calibration cu...
Page 11: ...er Failure to observe this may apply excessive load to the bar sensor and accordingly cause damage to it In addition the state of contact with a sample significantly changes which may greatly affect a...
Page 12: ...step 3 Insert the bar sensor into the sample on page 11 When measurement is completed press the key to turn off the power The auto power off function turns off the power of this unit automatically if...
Page 13: ...is continuously made measurement number will be 1 If the number of measurements exceeds 9 the measured value up to that point resets and measurement starts from measurement number 1 Due to the presen...
Page 14: ...o the sample or the moisture content is below the measurement range LO will be displayed and the numeric display will blink 2 Canceling the continuous measurement mode Hold down the key for 2 seconds...
Page 15: ...ias can be adjusted 9 9 to 9 9 by the following method The symbol denotes a blinking display 1 Press the key The BIAS indicator will blink and the previously entered bias value will be displayed The i...
Page 16: ...1 Press the key The numbers to the right of ALARM will blink 2 Enter the alarm value Enter a 2 digit number To enter 20 press the and keys in succession 3 The alarm setting value is displayed Press th...
Page 17: ...e level of sample are 1 10 slope and 1 0 intercept The user correction formula is shown as follows Measurement Value after Correction Correction Coefficient A Measurement Value before Correction Corre...
Page 18: ...and the unit will be the calibration curve input mode 3 Enter a user calibration curve number 02 to 15 to be registered In this case 03 is selected for user calibration curve registration Successivel...
Page 19: ...he default value is 0 0 In this case 1 0 is entered for the correction coefficient B Successively press keys in the order of 6 After the entry is completed the unit is in the state where the registere...
Page 20: ...ure measurement Servicing is required The power is turned off after error display in 4 seconds HI always If the measurement value is always displayed as HI an abnormality may occurs in this unit Press...
Page 21: ...21...
Page 22: ......
Page 23: ......
Page 24: ...displayed on this manual may differ from the actual ones however operations and functions are not affected All efforts have been made to ensure the contents of this manual are accurate However if you...