


43
PBJ_N-SH-e-1810.docx
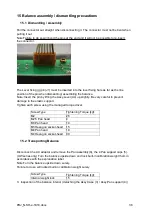
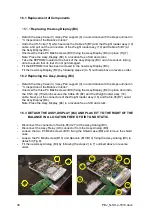
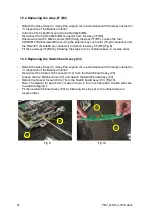
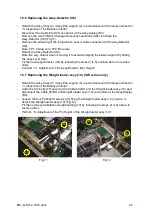
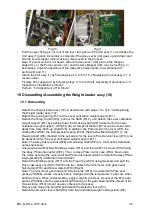
16.8 Replacing the Unit assy (1)
-
Detach the Assy,Case (3) / Assy,Pan support (4) in accordance with the steps outlined in
“3. Inspection of the Balance Interior”.
-
Disconnect the Cable,65 (U27) connector at the Assy,Analog (B3).
-
Disconnect the Assy,Relay (U9) connector from the Assy,Analog (B3).
-
Loosen the P3 M4X14 hexagonal socket-head bolt (25) fixing the Unit assy (1) in place to
detach the Unit assy (1) (Fig.13).
Warning: Never hold the Unit assy (1) in the parallel guide or/and movable column when
lifting it up. Always hold it in the base part. (Refer to Fig.14.)
-
Fit the new Unit assy (1) by following the steps 2) to 4) outlined above in reverse order.
Pt-Ni band protector that is attached to the replacement Unit assy (Fig.14) does not have
to be removed.
Parallel Guide
Movable
Column
12
Parallel Guide
1
25
Fig.13
Fig.14
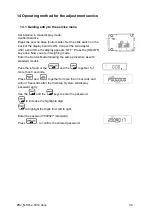
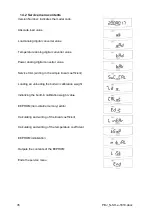
16.9 Input of temperature coefficient data
-
Prepare the EEPROM data print out that is attached to the new Unit Assy for
replacement.
-
Copy the print-out data of addresses 00 to 0E into the same addresses of the existing
EEPROM using
“Edit” in the service menu.
16.10 Replacement of the level
-
Detach the Assy,Case (3) in accordance with the steps outlined in “3. Inspection of the
Balance Interior”.
-
Place the balance on a level surface with the four feet including the fixed one at even
lengths.
-
Loosen the three set screws and remove the level from the mount by unscrewing it.
-
Screw the level into the mount until it stops, then unscrew it about one turn.
-
Screw down one of the three set screws of the level until it slightly tightens against the
mount surface.
-
Screw down the other two set screws and tighten them until the bubble of the level comes
into the red circle.
Summary of Contents for PBJ-N
Page 4: ...PBJ_N SH e 1810 docx 4 ...
Page 40: ...PBJ_N SH e 1810 docx 40 Fig 7 Fig 8 ...
Page 47: ...47 PBJ_N SH e 1810 docx Fig 22 Fig 23 ...
Page 55: ...55 PBJ_N SH e 1810 docx 23 Drawing Fig 31 ...
Page 56: ...PBJ_N SH e 1810 docx 56 ...
Page 57: ...57 PBJ_N SH e 1810 docx Fig 33 ...


