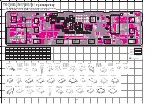
background image

S

R

Q

P

O

N

M

L

K

J

I

H

G

F

E

D

C

B

A

1

2

3

4

5

6

7

8

9

10

11

12

13

14

R155

R160

D22

C92

C94

C95

R69

L17

IC14

R123

R170

R95

C200

C156

C274

R133

Q23

C221

C205

C148

C222

C179

D29

D2

Q1

D24

C4

R29

R151

C142

C174

R108

R113

C139

D17

C168

R137

C151

R121

C147

C170

C162

C159

R101

R98

C112

C115

C118

C120

R106

R92

UL

C125

R148

R146

R150

D3

D4

D5

R13

Q6

D14

Q17

C106

Q13

C88

D11

R43

C37

C66

R61

C69

D1

R22

C121

C119

C190

C157

C180

R115

Q29

R178

C123

R107

R136

Q24

C186

Q19

SP

C128

C116

C113

IC10

Q21

R175

C204

+

C196

C217

C223

R169

IC15

D36

D35

C224

C220

R157

C183

C187

R162

C177

R112

R110

C130

C133

C152

R166

Q33

Q16

C215

C219

C209

C127

C23

L10

C149

C169

C192

Q7

C41

C44

C52

D21

R138

R134

R126

D27

Q5

R103

R163

1

4

5

8

C102

IC8

R18

R58

R45

R16

R28

R24

F1

C143

R142

R100

R21

R14

R116

Q18

Q28

R159

R33

R25

C33

R36

L1

C36

C26

R31

C31

C181

Q25

L14

C158

L12

Q22

R127

R132

R144

C189

C184

R128

R119

R109

R129

R111

C132

C137

R117

D16

R97

L6

R118

C135

C124

R94

C105

C110

Q

14

L9

C100

C82

L8

C126

R105

L7

R99

C111

C101

Q15

R88

R125

R145

Q26

R152

R122

R135

D20

C24

R17

R12

R6

C20

R153

D19

D15

C129

C150

R83

R80

C87

R81

R149

R47

R72

R60

C78

C58

R54

R168

R139

R141

R130

R173

R174

R41

R20

R15

C29

R26

R120

Q20

R114

C153

C163

R220

R154

R176

R179

R172

R219

C154

C164

R124

R181

R180

R164

C216

R171

R167

Q27

R147

R161

C167

C175

C136

C155

C62

C56

L4

L2

L3

C49

C146

C241

R182

R183

R184

C122

C173

C185

C194

C201

C218

C22

C51

C53

D18

D23

TV

D28

D30

D31

IC2

Q10

Q31

X1

R186

C248

L33

D39

R189

R190

R192

L27

C259

R42

R35

R185

R196

PC

Q36

R55

R210

R140

ANT

J72-0759-12  A/2

G1 S

G2 D

G1
S

G2
D

RX

(ST)

HT

E

8CL

MD

CV

1

3

4

5

1

2

3

4

IC400

+

+

8RC

CK

DT

ST

B

C

E

B

C

E

E

8T

C

B

9C

1

3

4

5

+

+

8TC

IC9

1

89

16

ASQ

+

IC1

1

3

4

5

+

5C

O

G

I

+

+

B

E

C

+

1

7

8

14

CN2

1

34

CV

8R

8CL

TP1

RSSI

8C

DB

SB

SFTDT

UL

PLST

PLDT

PLCK

RSSI

ASQ

TO

SPTST

DAST

CNTDT

CNTCK

W/N

CTO

DTMFIO

MO

AFO

SB

SB

PSW

AUX3

AUX1

AUX4

AUX2

EMG/TXS

8C

MM

MI

OE

AL

T

DEO

MII

MIO

E

Component side

Foil side

Pattern 1

Pattern 2

Pattern 3

Pattern 4

PC BOARD VIEW   

TK-760G/

(

N

)

/762G/

(

N

)

60

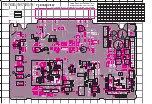
TX-RX UNIT (X57-595X-XX) (A/2)

Foil side view

2-71 : TK-760G(N)

2-72 : TK-762G(N)

2-73 : TK-762G

2-74 : TK-760G

Ref. No. Address

IC1

11E

IC2

9J

IC8

9N

IC9

9G

IC10

8E

IC14

9D

IC15

7O

IC400

2K

Q1

11B

Ref. No. Address

Q5

11B

Q6

11B

Q7

11K

Q10 13G

Q13

13K

Q14 10N

Q15 13O

Q16 13M

Q17

9B

Ref. No. Address

Q18

13N

Q19

7C

Q20

8C

Q21

7C

Q22

7L

Q23

7E

Q24

8B

Q25

6J

Q26

8C

Ref. No. Address

Q27

9Q

Q28

7I

Q29

7G

Q31

6H

Q33

7N

Q36

9K

D1

13D

D2

12B

D3

13C

Ref. No. Address

D4

13C

D5

13D

D11

12G

D14

10H

D15

10B

D16

11N

D17

7L

D18

12Q

D19

8B

Ref. No. Address

D20

8D

D21

7C

D22

7J

D23

10Q

D24

8D

D27

8D

D28

10Q

D29

5D

D30

8Q

Ref. No. Address

D31

8Q

D35

7Q

D36

6R

D39

8L

Summary of Contents for TK-760G series

Page 1: ...N JAPAN B51 8562 10 N VHF FM TRANSCEIVER TK 760G N 762G N SERVICE MANUAL 5 TONE TK 760G N TK 762G N Panel assy A62 0731 03 Key top K29 5344 02 Panel assy A62 0642 03 Cabinet Upper A01 2165 13 Key top K29 5343 02 REVISED ...

Page 2: ...na DO NOT transmit until all RF connectors are verified se cure and any open connectors are properly terminated SHUT OFF and DO NOT operate this equipment near electrical blasting caps or in an explosive atmosphere All equipment should be properly grounded before power up for safe operation This equipment should be serviced by a qualified techni cian only Note The terms Wide and Semi wide this ser...

Page 3: ... will be connected in the final installa tion Transmitter frequency deviation and power output should be checked as should receiver sensitivity squelch operation and audio output Signalling equipment operation should be verified 3 PLANNING THE INSTALLATION 3 1 General Inspect the vehicle and determine how and where the radio antenna and accessories will be mounted Plan cable runs for protection ag...

Page 4: ... cable KES 3 External speaker KCT 19 Accessory connector cable KCT 18 Ignition sense cable Frequency range MHz 146 174 RF power 25W Type E NE See page 12 A personal computer IBM PC or compatible programming interface KPG 22 and programming software KPG 67D are required for programming The frequency and signalling option data are programmed for the transceiver Option Option Option Option Option See...

Page 5: ... is deactivated by pressing the Monitor or Squelch key Appears when the AUX port is activated Flashes orange when the Talk Around feature is active Displays the selected channel number OPERATING FEATURES IO Power switch Press to switch the transceiver ON or OFF LED indicator Lights red while transmitting Lights green while receiv ing If programmed by the dealer flashes orange while receiving a Cod...

Page 6: ... are momentary type push buttons The functions of these keys are explained below POWER key Transceiver POWER key When the power is switched off all the parameters are stored in memory When the power is switched on again the transceiver returns to the previous conditions CHANNEL UP DOWN key Programmable key Programmable TK 760G only SCAN key Programmable TK 760G only MONITOR key Programmable A D A ...

Page 7: ... channel LCD dots light TX 25 sec RX 5 sec Emergency ACK code receive Foot switch 1 push Horn Light operation stop Horn Light operation D A key 1 push Emergency reset code receive MON key Foot SW 1 push Emergency mode reset Normal operation After 1 min 2 2 1 Dots Dots LCD dots light 3 or or Foot switch 1 push Hold it down for about one second Emergency mode Emergency channel LCD dot status change ...

Page 8: ...el contained in the scan sequence and Delete channel is not contained In the scan mode this key switches the channnel delete or add temporarily Talk around Press this key the transceiver uses the receive fre quency and the tone for transmission The operator can call the other party directory without repeater Press this key again the talk around function goes off Volume up down When the key is pres...

Page 9: ...eactivate the key programmed to the scan function during scan mode the scan ends The scan icon SCN and SCAN display goes off OPERATING FEATURES Temporarily delete add It is possible to delete or add channel temporarily during scan When scan stops on unnecessary channel for ex ample by interference of the other party activate the delete add function for example press the key then that channel is de...

Page 10: ...d when signalling matches Auto Reset If option signalling matches a group set up with option signalling option signalling is released After matching op tion signalling option signalling will temporarily reset auto matically OPERATING FEATURES Dead Beat Disable If the D B D code matches a predetermined action will occur Whether option signalling is activated or not when D B D matches on any channel...

Page 11: ...Firmware program ming mode Panel tuning mode Data program ming mode PC test mode PC tuning mode Self programming mode TK 760G only Check sum Clone mode TK 760G only Mode Function User mode For normal use Panel test mode Used by the dealer to check the funda ment characteristics Panel tuning mode Used by the dealer to tune the radio PC mode Used for communication between the radio and PC IBM compat...

Page 12: ...762G is in Program mode 7 Press F10 on the personal computer A window opens on the display to indicate the writing progress When the TK 760G 762G starts to receive data the BUSY TX LED lights green 8 If writing ends successfully the LED on the TK 760G 762G goes off and the checksum is displayed Since the TK 762G does not have a display check the checksum with the FPU KPG 67D 9 If you want to conti...

Page 13: ...f you press the MON switch again while the checksum is displayed PROG 576 is redisplayed 2 If you press the A switch while PROG 576 is dis played the display changes to PROG 192 to indicate that the write speed is low speed 19200 bps If you press the A switch again while PROG 192 is dis played the display changes to PROG 384 and the write speed becomes the middle speed 38400 bps If you press the A...

Page 14: ...0000MHz The right most dot indicates 50Hz digit On 5 Off 0 2 RX Off Off QT DQT signalling QT 67 0 250 3Hz QT__67 0_ switching EIA mode QT_250 3_ A Mode switching QT 67 0 254 1Hz QT__67 0 SCN Normal 0 1Hz step mode QT_254 1 Inverse switching DQT 000 777 DQT000N Normal DQT777N 1 step mode DQT 023 754 DQT023N_ Normal DQT754N_ Standard table mode DQT 000 777 DQT000I Inverse DQT777I 1 step mode DQT 023...

Page 15: ... OFF _BOT_OFF Not valid if PTT ID TX ID Encode A H _EOT___A off or BOT is set Only when Turn the CH key 5 tone is selected for signalling type No Function Choices Display Remarks Blank T Frequency on 100 0000 T 150 0000 blank switching 550 0000MHz The right most dot indicates 50Hz digit On 5 Off 0 4 TX Off Off QT DQT signalling QT 67 0 250 3Hz QT__67 0_ switching EIA mode QT_250 3_ A Mode switchin...

Page 16: ...D D A MON PTT ID monitor D A MON CALL 1 monitor CALL 2 monitor D A MON D A D A for No Function Choices Display Remarks 18 Decode 1 ID OFF DEC1_OFF Turn the CH key Only when Decode A F DEC1___A 5 tone is selected for signalling type 19 Decode 2 ID OFF DEC2_OFF Turn the CH key Only when Decode A F DEC2___A 5 tone is selected for signalling type 20 CALL 1 ID OFF _CL1_OFF Turn the CH key Only when Enc...

Page 17: ...F Cannot be set when rekey 1s step TOT is off time Default Off 7 TOT OFF 1 15 TOTS_OFF Cannot be set when reset 1s step TOT is off time 8 Squelch 0 9 1 step SQL__5__ Default 5 level Others 9 Panel Enable PTM__ENA Default test Not used for TK 762G panel Disable PTM__DIS tuning mode Self programming mode Function setting mode Power on tone yes no D A Control tone yes no D A Warning tone yes no D A D...

Page 18: ...imp terminal into the square plug both of which are supplied with the KCT 19 1 2 1 3 13 15 Crimp terminal E23 0613 05 B E C B D CN8 CN5 D E B C A Contact Square plug E09 1571 05 3 4 6 7 8 9 5 CN4 CN3 1 2 Fig 1 Fig 2 INSTALLATION 1 2 KCT 19 Accessory Port Function No No Name Function Note A B C D E 1 D 2 DTC Data channel control 1 External hook input 2 D 5 ME External microphone ground 3 D 3 IGN Ig...

Page 19: ...EMG I EMG Foot switch input 2 active low CN7 1 PA LI O Relay for PA function KAP 1 control O PA LI ON High PA LI OFF Low 2 SPO O Audio signal output to KAP 1 3 SPI I Audio signal input from KAP 1 CN8 1 SP O Audio signal output to internal external speaker 2 E Ground 1 MDT mode 2 Emergency mode 3 Ignition Sense Cable KCT 18 Option The KCT 18 is an optional cable for enabling the ignition function T...

Page 20: ...ch unit into the connectors on the transceiver 3 Secure the switch unit board to the chassis with a screw The notch in the board must be placed at the front left side 4 Attach the cushion on the top of the KAP 1 switch unit 1 3 2 4 2 Modifying the Transceiver Horn alert The signal from pin 4 of IC9 on the TX RX unit turns Q5 and Q1 on and off and drives KAP 1 HA relay K2 to drive the horn with a m...

Page 21: ...l 6 Earth 10 HR1 12 PA HR2 Fig 8 5 Emergency Mode 5 1 Transceiver Modification Procedure Install the foot switch Install the foot switch through the KCT 19 and KCT 18 When the switch is treaded on the radio enters the emer gency mode Change the power switch circuit TX RX unit B 2 Control section R705 Attach R92 1252 05 0Ω TX RX unit A 2 RF section R142 Remove RK73GB1J473J 47kΩ Once the transceiver...

Page 22: ...eiver can be mounted with its internal speaker in the upper half of the case facing down in your car 1 Remove the control panel and the TX RX unit B 2 con trol section Fig 11 Fig 11 1 2 3 4 5 6 2 Fold the flat cable in the opposite direction 3 Rotate the control section 180 degrees 4 Insert the flat cable into the control section connector CN501 5 Mount the control section on the transceiver CN501...

Page 23: ...ransceiver Refit the two halves of the case to complete installation Fig 13 Fig 13 7 2 KES 4 Option The KES 4 is an external speaker used with the acces sory connection cable Connection procedure 1 Install the KCT 19 in the transceiver See the KCT 19 section 2 Insert the crimp terminal into the square plug supplied with the KCT 19 3 Connect CN8 of the transceiver to connector C of the KCT 19 inste...

Page 24: ...st IF signal is amplified by Q13 and the enters IC5 FM processing IC The signal is heterodyned again with a second local oscillator signal within IC5 to create a 450kHz second IF signal The second IF signal is then fed through a 450kHz ceramic filter CF2 to further eliminate unwanted signals before it is amplified and FM detected in IC5 Item Rating Nominal center frequency 49 95MHz Pass bandwidth ...

Page 25: ...zer The PLL circuit generates the first local oscillator signal for reception and the RF signal for transmission PLL The frequency step of the PLL circuit is 5 or 6 25kHz A 16 8MHz reference oscillator signal is divided at IC3 by a fixed counter to produce the 5 or 6 25kHz reference fre quency The voltage controlled oscillator VCO output sig nal is buffer amplified by Q106 Sub unit then divided in...

Page 26: ...line The transmitter circuit produces and amplifies the de sired frequency directly It FM modulates the carrier signal by means of a varicap diode Power Amplifier Circuit The transmit output signal from the VCO is amplified to a specified level of the power module IC400 by the drive block Q22 and Q25 The amplified signal passes through the transmission reception selection diode D16 and goes to a l...

Page 27: ...ys low The microprocessor monitors the status of the KIN0 to KOUT2 ports If the state of one of the ports changes the microprocessor assumes that the key at the matrix point corresponding to that port has been pressed IC502 CPU KIN0 KIN1 KIN2 KOUT0 KOUT1 KOUT2 D A GRP DN CH DN CH UP GRP UP A VOL DN VOL UP Fig 11 Display circuit Fig 12 Key matrix circuit Display Circuit The CPU IC502 controls the s...

Page 28: ... HOR D2 Q1 Q5 R21 Q6 R3 R135 B IC9 HNC IGN Fig 15 Horn control circuit Q23 SW Q19 SW Q20 SW Q26 INV IC14 F F Q21 SW D21 SW R135 R134 IGN SB B PSW Fig 17 Power supply circuit PA Switch If the optional KAP 1 is used see the separate section for details the PA Public Address function becomes available In this case the signal flow changes as follows PA off For TX the switch which is between pins 10 an...

Page 29: ...1 O Key scan output 1 36 KOUT0 O Key scan output 0 37 RDY I Pull up 38 NC NC Pin No Name I O Function 39 HOLD I Not used 40 41 NC NC 42 RD O READ signal 43 NC NC 44 WR O WRITE signal 45 LCDCS O LCD chip enable output 46 CNTDAT O Common data output LCD SHIFT REG VOL Audio processor 47 CNTCLK O Common clock output EEPROM LCD SHIFT REG VOL Audio processor 48 CSO Chip select signal 49 A19 Not used 50 ...

Page 30: ...ver latch Clock generator Shift register Address detector COM3 COM2 COM1 S35 S34 S9 S8 P8 S2 P2 S1 P1 INH OSC VDD VLCD VLCD1 VLCD2 VSS DI CL CE Terminal function Pin No Name I O Function 1 8 S1 P1 S8 P8 O Segment output for displaying data 9 35 S9 S35 transferred from serial data 36 38 COM1 COM3 O Common driver output Frame frequency fo fosc 384 Hz 39 VDD Power supply for logic section 2 7V 6 0V 4...

Page 31: ...f No Use Function Operation Condition D28 RF BPF tuning D29 Reverse current prevention D30 31 RF BPF tuning D33 34 ANT switch D35 36 APC voltage detect D39 Voltage reference Power protection D40 Charge DEO D41 Voltage drop Charge pump D501 Reverse current KOUT 0 prevention D502 Reverse current KOUT 1 prevention D503 Reverse current KOUT 2 prevention D504 Reverse current KOUT 0 prevention D505 Reve...

Page 32: ...ctive when powering up Q21 DC switch Active while PS voltage is more than 20V Q22 RF amplifier Predrive Ref No Use Function Operation Condition Q23 DC switch SB switch active when powering up Q24 AF mute Active while power switch is off Q25 RF amplifier Drive Q26 Inverter Active while power switch is low Q27 L N A Q28 DC switch 8T active while TX Q29 DC switch 8T cont active while TX Q31 APC contr...

Page 33: ...arbon EX R D 7 3 E B 2 B 0 0 0 J 1 2 3 4 5 6 7 Chip B F Carbon resistor Normal type EX R D 1 4 B B 2 C 0 0 0 J 1 2 3 4 5 6 7 1 Type ceramic electrolytic etc 5 Voltage rating 2 Shape round square ect 6 Value 3 Dimension 7 Tolerance 4 Temp coefficient Capacitor value 010 1pF 100 10pF 101 100pF 102 1000pF 0 001µF 103 0 01µF Less than 10pF Code B C D F G pF 0 1 0 25 0 5 1 2 1st word 2nd word Refer to ...

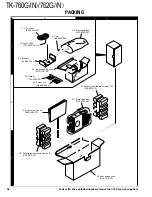
Page 34: ...0720 04 PROTECTION BAG 200X350 34 3H H52 1519 02 ITEM CARTON CASE 36 2G J19 1584 05 HOLDER ACC 37 2A 2D J21 8382 03 HARDWARE FIXTURE 38 1G J29 0627 23 BRACKET 40 2A K29 5343 02 KEY TOP 760 40 1D K29 5344 02 KEY TOP 762 A 2A 2D N33 2606 45 OVAL HEAD MACHINE SCREW B 2C 2F N67 3008 46 PAN HEAD SEMS SCREW W C 2B 2E N87 2606 46 BRAZIER HEAD TAPTITE SCREW D 2B 2E N87 2612 46 BRAZIER HEAD TAPTITE SCREW 4...

Page 35: ...K73GB1H102K CHIP C 1000PF K C97 C92 0546 05 CHIP TAN 68UF 6 3WV C98 CK73GB1H103K CHIP C 0 010UF K C99 C92 0004 05 CHIP TAN 1 0UF 16WV C100 CK73GB1H102K CHIP C 1000PF K C101 CC73GCH1H040C CHIP C 4 0PF C C102 103 CK73GB1H102K CHIP C 1000PF K C104 C92 0002 05 CHIP TAN 0 22UF 35WV C105 CK73GB1H102K CHIP C 1000PF K C106 CC73GCH1H180J CHIP C 18PF J C107 CK73GB1H102K CHIP C 1000PF K C110 CC73GCH1H180J CH...

Page 36: ...3GCH1H270J CHIP C 27PF J C517 CK73GB1C683K CHIP C 0 068UF K C518 CC73GCH1H270J CHIP C 27PF J C519 CK73GB1H102K CHIP C 1000PF K C520 CK73GB1C104K CHIP C 0 10UF K C521 CK73GB1H102K CHIP C 1000PF K C522 C92 0507 05 CHIP TAN 4 7UF 6 3WV C523 CC73GCH1H221J CHIP C 220PF J C524 CK73GB1H103K CHIP C 0 010UF K C525 CK73GB1E123K CHIP C 0 012UF K C526 CK73GB1C683K CHIP C 0 068UF K C527 CK73GB1H222K CHIP C 220...

Page 37: ...RE COIL L24 L34 4481 05 AIR CORE COIL L25 L34 4478 05 AIR CORE COIL L26 L40 4775 77 SMALL FIXED INDUCTOR 47NH L27 L40 2281 86 SMALL FIXED INDUCTOR 0 22UH L33 L92 0179 05 FERRITE CHIP L501 L92 0138 05 FERRITE CHIP L503 504 L92 0138 05 FERRITE CHIP L507 L92 0140 05 FERRITE CHIP L510 L92 0140 05 FERRITE CHIP X1 L77 1826 05 TCXO 16 8MHZ X501 L77 1708 05 CRYSTAL RESONATOR 3 579545MHZ X502 L78 0462 05 R...

Page 38: ...3J CHIP R 10K J 1 16W R120 R92 1252 05 CHIP R 0 OHM R121 RK73GB1J100J CHIP R 10 J 1 16W R122 R92 1215 05 CHIP R 470 J 1 2W R123 RK73GB1J472J CHIP R 4 7K J 1 16W R124 RK73GB1J103J CHIP R 10K J 1 16W R125 RK73GB1J333J CHIP R 33K J 1 16W R126 RK73GB1J471J CHIP R 470 J 1 16W R127 RK73GB1J222J CHIP R 2 2K J 1 16W R128 RK73GB1J220J CHIP R 22 J 1 16W R129 RK73GB1J152J CHIP R 1 5K J 1 16W R130 RK73GB1J103...

Page 39: ...GB1J103J CHIP R 10K J 1 16W R560 RK73GB1J154J CHIP R 150K J 1 16W R561 RK73GB1J333J CHIP R 33K J 1 16W R562 R92 1252 05 CHIP R 0 OHM R563 RK73GB1J473J CHIP R 47K J 1 16W R564 RK73GB1J223J CHIP R 22K J 1 16W R565 R92 1252 05 CHIP R 0 OHM R566 RK73GB1J563J CHIP R 56K J 1 16W R567 RK73GB1J334J CHIP R 330K J 1 16W R568 RK73GB1J473J CHIP R 47K J 1 16W R569 RK73GB1J102J CHIP R 1 0K J 1 16W R570 RK73GB1J...

Page 40: ...AMP X2 Q1 DTD114EK DIGITAL TRANSISTOR Q2 KRA225S DIGITAL TRANSISTOR Q5 6 DTC114EKA DIGITAL TRANSISTOR Q7 2SC4649 N P TRANSISTOR Q8 2SC2412K TRANSISTOR Q9 2SC4215 Y TRANSISTOR Q10 2SC2412K TRANSISTOR Q11 2SA1832 GR TRANSISTOR Q12 2SC4738 GR TRANSISTOR Q13 14 2SC4649 N P TRANSISTOR Q15 SGM2014AM FET Q16 DTC114EKA DIGITAL TRANSISTOR Q17 DTC363EU DIGITAL TRANSISTOR Q18 2SA1745 6 7 TRANSISTOR Q19 DTC11...

Page 41: ... 05 AIR CORE COIL R101 102 RK73GB1J101J CHIP R 100 J 1 16W R103 RK73GB1J102J CHIP R 1 0K J 1 16W R104 RK73GB1J470J CHIP R 47 J 1 16W R105 RK73GB1J154J CHIP R 150K J 1 16W R106 RK73GB1J470J CHIP R 47 J 1 16W R107 110 RK73GB1J103J CHIP R 10K J 1 16W R111 RK73GB1J331J CHIP R 330 J 1 16W R112 113 RK73GB1J181J CHIP R 180 J 1 16W R114 RK73GB1J470J CHIP R 47 J 1 16W R115 RK73GB1J103J CHIP R 10K J 1 16W R...

Page 42: ...2 A B C 1 24 3 24 2 40 37 7 11 6 17 22 22 23x2 27 24 9 25 14 12 21x2 44 26 IC400 16 701 702 Cx2 703 A C C Cx2 Dx11 B B A Ax2 703 TX RX unit X57 595 B 2 TX RX unit X57 595 A 2 Display unit X54 327 704 A M2 6 x 6 OC BLK N33 2606 45 B M3 x 8 N67 3008 46 C M2 6 x 6 Br Tap N87 2606 46 D M2 6 x 12 Br Tap N87 2612 46 ...

Page 43: ...21x2 44 26 IC400 16 701 702 Cx2 703 C C Cx2 Dx11 B B A A Ax2 703 TX RX unit X57 595 B 2 TX RX unit X57 595 A 2 Display unit X54 328 704 A M2 6 x 6 OC BLK N33 2606 45 B M3 x 8 N67 3008 46 C M2 6 x 6 Br Tap N87 2606 46 D M2 6 x 12 Br Tap N87 2612 46 Parts with the exploded numbers larger than 700 are not supplied ...

Page 44: ...62 1439 10 13 DC cord E30 3339 05 19 Fuse 10A F51 0016 05 x 2 30 Polystyrene foamed fixture F H10 6618 12 31 Polystyrene foamed fixture R H10 6619 12 32 Inner packing case H12 1391 03 33 Protection bag H25 0720 04 33 Protection bag H25 0720 04 34 Item carton case H52 1519 02 36 Holder J19 1584 05 38 Bracket J29 0627 23 42 Screw set N99 0395 05 ...

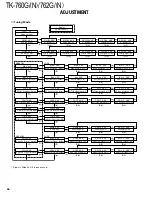
Page 45: ...g Signalling No RX TX 1 None None 2 None 100Hz square 3 QT 67 0Hz QT 67 0Hz 4 QT 151 4Hz QT 151 4Hz 5 QT 210 7Hz QT 210 7Hz 6 QT 250 3Hz QT 250 3Hz 7 DQT D023N DQT D023N 8 DQT D754I DQT D754I 9 DTMF DEC 159D DTMF ENC 159D 10 None DTMF tone 9 11 2 tone 321 7 928 1Hz 2 tone 321 7 928 1Hz 12 Single tone 1200Hz Single tone 1200Hz 13 5 tone DEC EIA 12345 5 tonr ENC 23456 Preparations for tuning the tra...

Page 46: ...e F DQT_XXX DQT fine deviation L A F D Q T_XXX DQT fine deviation C F D Q T _ XXX DQT fine deviation H SENS_XXX Seisitivity S ENS_XXX Sensitivity L A S E N S_XXX Sensitivity C S E N S _ XXX Sensitivity H DTMF_XXX DTMF fine deviation Wide TONE_XXX Single tone fine deviation Wide WIDE NARROW _MAX_XXX Max deviation Narrow _BAL_XXX DQT balance Narrow _FQT_XXX QT fine deviation Narrow FDQT_XXX DQT fine...

Page 47: ...Sensitivity Frequency Range 10Hz to 1000MHz Frequency Counter Frequency Stability 0 2ppm or less 7 Ammeter 20A 8 AF Volt Meter Frequency Range 50Hz to 10kHz AF VTVM Voltage Range 1mV to 10V 9 Audio Generator AG Frequency Range 20Hz to 20kHz or more Output 0 to 1V 10 Distortion Meter Capability 3 or less at 1kHz Input Level 50mV to 10Vrms 11 4Ω Dummy Load Approx 4Ω 10W or more 12 Regulated Power Su...

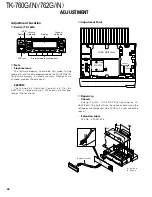
Page 48: ... Squelch etc for the EEPROM is stored in memory When parts are changed readjust the transceiver Repair Jig Chassis Use jig Part No A10 4010 02 for repairing the TK 760G 762G The jig facilitates the voltage check when the voltage on the component side TX RX unit is checked during repairs Extension cable Part No E30 3404 05 L13 L11 L18 L15 L5 RSSI TX RX UNIT A 2 PLL VCO TC106 CV TC109 Power LED Volu...

Page 49: ...D 3kHz E AG 1 5kHz NE AF output 0 45V 4Ω DVM TX RX RSSI A 2 2 S ENS Front CH Adjust panel SSG freq 146 050MHz 3 S E N S _ Adjust SSG freq 173 950MHz Measurement Test equipment Unit Terminal Adjustment Unit Parts Method Specifications Remarks Condition Item 1 PLL lock 1 Set test mode DVM TX RX CV PLL TC106 7 5V 0 1V voltage CH CH3 Sig1 Power meter A 2 RX F conter TX 2 PTT ON Transmit TC109 7 5V RX ...

Page 50: ...req 160 050MHz 3 S Q L 3 _ Adjust SSG freq 173 950MHz Semi wide 4 SQL3 Adjust SSG freq 160 050MHz SSG output 125dBm 0 13µV SSG MOD 2 4kHz 4 Squelch 9 1 Set test mode Wide Select SQL9 in tuning mode Narrow S QL9 Adjust SSG freq 146 050MHz SSG output 115dBm 0 4µV SSG MOD 3kHz Wide 1 5kHz Narrow 2 S Q L 9 Adjust SSG freq 160 050MHz 3 S Q L 9 _ Adjust SSG freq 173 950MHz Semi wide 4 SQL9 Adjust SSG fr...

Page 51: ...t Terminal Adjustment Unit Parts Method Specifications Remarks Condition Item 1 Frequency 1 Set test mode Power meter Rear ANT Front CH Check 160 100MHz 50Hz Select FREQ in tuning mode F counter panel panel PTT ON Adjust _ 2 Power 1 Maximum power Check More than 26 0W output Set test mode Select HPOW in tuning mode H POW Adjust 256 PTT ON 3 High power 1 Set test mode 25 0W 1 0W Select HPOW in tuni...

Page 52: ...e Narrow balanced MIC input OFF Deviation panel panel modulation Wide Select BAL in tuning mode meter waveform neat Narrow _ BAL Oscilloscope Deviation meter filter LPF 3kHz HPF OFF AF VTVM Front MIC De emphasis OFF AG panel PTT ON Adjust 2 _ B A L PTT ON Adjust 3 _ B A L _ PTT ON Adjust Semi wide 4 _BAL PTT ON Adjust 7 Maximum 1 Set test mode 3 95kHz Wide 50Hz deviation Connect AG to the MIC 1 95...

Page 53: ... _FQT 0 60kHz PTT ON Adjust 10 DQT 1 Set test mode Front CH 0 75kHz Wide 50Hz deviation Select FDQT in tuning mode panel 0 35kHz Narrow Wide F DQT Narrow Deviation meter filter LPF 3kHz HPF OFF PTT ON Adjust 2 F D Q T PTT ON Adjust 3 F D Q T _ PTT ON Adjust Semi wide 4 FDQT 0 60kHz PTT ON Adjust 11 DTMF 1 Set test mode Front CH 3 0kHz Wide 0 1kHz Wide deviation Select DTMF in tuning mode panel 1 5...

Page 54: ...2 0683 02 CN801 MBL 5C CE CL E E SB DI 1 2 7 8 C801 C802 C803 C804 C805 C806 C807 D801 D808 IC801 B C E Q801 R801 R802 R803 R804 R805 R806 R808 R809 L801 1 16 17 32 48 49 64 33 D804 D803 D805 D802 J72 0683 02 CN801 1 MBL 5C CE CL E E SB DI 2 7 8 C801 C802 C803 C804 C805 C806 C807 D801 D808 IC801 B C E Q801 R801 R802 R803 R804 R805 R806 R808 R809 L801 1 16 17 32 48 49 64 33 Component side Foil side...

Page 55: ...0676 02 C107 C114 C121 C118 C111 C123 C117 D105 R116 C110 R101 R102 TC106 L101 TC109 R117 R106 R104 R105 C113 C124 R112 R113 L102 C112 D101 D102 D103 D104 L108 L107 Q101 G S D G S D Q103 L105 L103 L104 C102 C126 C120 C119 R110 C125 R107 C115 C104 C105 R103 R108 C116 L110 L109 C122 R115 R109 R114 R111 Q102 Q104 Q105 Q106 L106 C127 L111 L116 CN101 RX ST HT E 8CL MD CV 1 6 J72 0676 02 L103 L104 C102 ...

Page 56: ...C172 C114 C195 C30 C35 C47 C63 L23 Q8 R188 Q37 R193 D40 L26 C271 Q38 R197 L5 TP1 C77 R208 TV 8R CV J72 0759 12 A 2 A1 X58 4670 XX 8CL 1 10 11 20 1 8 9 16 G O I 1 4 5 8 1 12 13 24 5C G S D 1 4 5 8 SB GND DEO DTC IGN DI ME MI PTT SQ 1 8 RSSI GND E C B O G I GND B J1 EXT SP CN7 1 3 PA LI SPI SPO CN8 2 1 E 10 SP CN3 SB E HOR 3 1 1 1 3 AM MM EMG TXS G D S CN1 15 1 GND MIO MII AFI AFO ALT AUX2 AUX4 AUX1...

Page 57: ...R154 R176 R179 R172 R219 C154 C164 R124 R181 R180 R164 C216 R171 R167 Q27 R147 R161 C167 C175 C136 C155 C62 C56 L4 L2 L3 C49 C146 C241 R182 R183 R184 C122 C173 C185 C194 C201 C218 C22 C51 C53 D18 D23 TV D28 D30 D31 IC2 Q10 Q31 X1 R186 C248 L33 D39 R189 R190 R192 L27 C259 R42 R35 R185 R196 PC Q36 R55 R210 R140 ANT J72 0759 12 A 2 G1 S G2 D G1 S G2 D RX ST HT E 8CL MD CV 1 3 4 5 1 2 3 4 IC400 8RC CK...

Page 58: ... 3 4 5 6 7 8 9 10 11 12 13 14 C91 C67 R93 C104 Q32 L24 L20 L25 IC5 IC6 IC3 C10 C7 C3 C60 C107 C75 Q9 C54 XF1 CN4 CN5 C50 C131 C117 C161 C160 R68 C74 C46 C43 R44 IC4 R78 IC7 C103 C98 C81 R71 Q12 C93 C99 C1 C5 C8 C11 C2 C6 C9 R201 C141 C144 C134 IC12 C32 C203 C207 C210 C212 L18 C213 L15 C138 C211 L13 L11 C86 C64 CF2 R87 C96 C97 C16 C17 C18 C19 C21 C15 C14 C13 R9 R10 R11 R59 R203 C72 Q2 R91 R37 R34 R...

Page 59: ... 12 13 14 R538 C521 R555 R592 R519 C508 R514 R572 D521 R602 C603 C609 C605 C601 C599 C613 C503 IC503 G I O C507 R529 R536 C524 R556 C526 C626 C628 R616 R539 C580 R531 C523 C538 R534 R518 R510 R532 R537 C520 R551 C532 R540 R541 C630 C631 D529 R622 IC501 1 16 17 32 IC510 1 CNT CK 8 9 16 C501 R505 IC507 1 4 5 8 C543 C640 R560 R562 C541 R563 R564 R561 C542 C537 D514 A TK 760G MON TK 762G D A TK 760G T...

Page 60: ...C628 R616 R539 C580 R531 C523 C538 R534 R518 R510 R532 R537 C520 R551 C532 R540 R541 C630 C631 D529 R622 IC501 1 16 17 32 IC510 1 CNT CK 8 9 16 C501 R505 IC507 1 4 5 8 C543 R560 R562 C541 R563 R564 R561 C542 C537 D514 A TK 760G MON TK 762G D A TK 760G TK 762G TK 760G TK 762G TK 760G A TK 762G SCN TK 760G CH DN CH UP C517 E MBL 5C LCD CS SB CNT DT E D511 C505 R544 C528 C531 C527 R566 R559 R630 R567...

Page 61: ...T R P N L J H F D B S Q O M K I G E C A 1 3 5 7 2 4 6 SCHEMATIC DIAGRAM TK 760G N Note Components marked with a dot are parts of patterun 1 70 ...

Page 62: ...A C E G I K M O Q S B D F H J L N P R T 1 3 5 7 2 4 6 TK 762G N SCHEMATIC DIAGRAM Note Components marked with a dot are parts of patterun 1 71 ...

Page 63: ...TK 760G N 762G N TK 760G N 762G N TK 760G N 762G N BLOCK DIAGRAM 77 ...

Page 64: ...on connect the AC level meter ANT input 53dBm 1kHz FM 3kHz DEV Wide 2 4kHz DEV Semi wide 1 5kHz DEV Narrow The AF output level is adjusted for 0 45V 4Ω by the front panel AF VOL control To make measurements in the RF section connect the RF wattmeter 50Ω To make measurements in the AF section connect the AC level meter AG is set so that MIC input becomes 3kHz 2 4kHz 1 5kHz Wide Semi wide Narrow DEV...

Page 65: ...h input signal 26 8C DC 8V 27 MM MIC mute 28 MI External MIC input signal 29 OE Output enable for IC9 30 ALT Alert tone signal 31 DEO Receiver detector output 32 MII Transmit audio signal input 33 MIO Transmit audio signal output 34 GND Ground CN3 TX RX Unit Pin No Name Function 1 HOR Horn alert call output 2 E Ground 3 SB Switched B DC 13 2V output Maximum 1A CN4 TX RX Unit Pin No Name Function 1...

Page 66: ... than 8 0A on transmit Operating Temperature Range 30 C to 60 C Dimensions Weight 140 W x 40 H x 145 D mm 940g Channel Frequency Spread 28MHz RECEIVER Measurements made per ETS standard Sensitivity 12dB SINAD EIA Wide 0 25µV Semi wide 0 25µV Narrow 0 32µV Adjacent Channel Selectivity Wide 70dB Semi wide 70dB Narrow 60dB Intermodulation 65dB Spurious Responce Rejection 70dB Audio Power Output 4 0W ...

Page 67: ...Ney 75018 Paris France KENWOOD ELECTRONICS U K LIMITED KENWOOD House Dwight Road Watford Herts WD18 9EB United Kingdom KENWOOD ELECTRONICS EUROPE B V Amsterdamseweg 37 1422 AC Uithoorn The Netherlands KENWOOD ELECTRONICS ITALIA S p A Via G Sirtori 7 9 20129 Milano Italy KENWOOD IBERICA S A Bolivia 239 08020 Barcelona Spain KENWOOD ELECTRONICS AUSTRALIA PTY LTD A C N 001 499 074 16 Giffnock Avenue ...

Reviews: