background image

Remote control

103

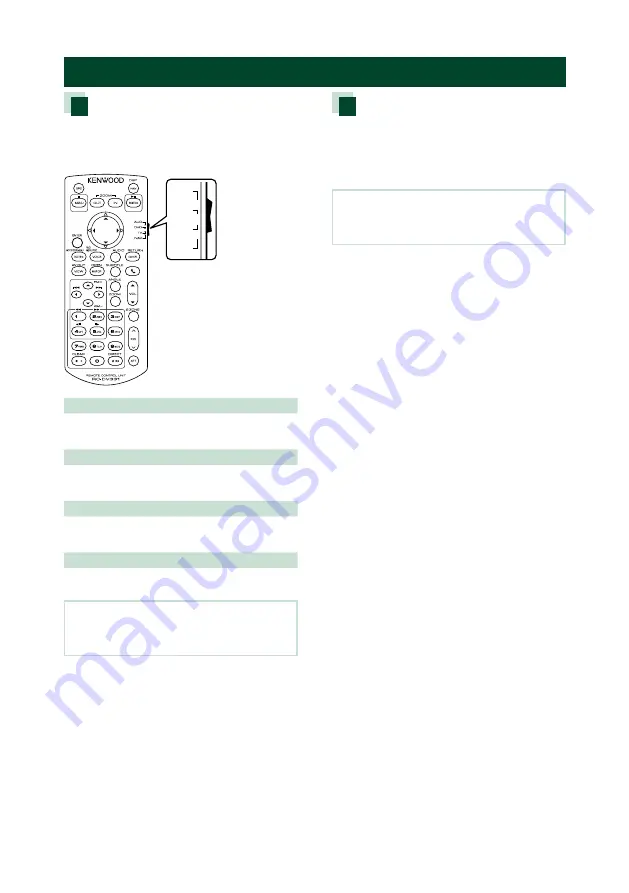
Functions of the Remote control Buttons

Switching the operation mode

The functions operated from the remote 

control differ depending on the position of 

the mode switch.

DVD

T V

NAV

AUD


AUD mode

Switch to this mode when controlling a 
selected source or tuner source, etc.

DVD mode

Switch to this mode when playing a disc 
media including DVD, VCD, and CD.

NAV mode

Switch to this mode when controlling 
navigation function.

TV mode

Not used.

NOTE

•  When controlling a player that is not integrated in 

the unit, select “AUD” mode.

Direct search mode

Using the remote control, you can jump 

directly to the desired file, track chapter, etc. 

with entering the number corresponding to 

the content.

NOTE

•  This operation cannot be performed for USB 

device and iPod.

Press the <#BS> button several times 
until the desired content appears.

The available contents are different 

depending on the source.

DVD
Title number/Chapter number
VCD 1.X and 2.X (PBC OFF)
Track number
VCD 2.X (PBC ON)
Scene number/Track number
Music CD
Track number
Radio
Frequency value
HD Radio tuner
Frequency value/Channel number
SiriusXM
Channel number

Enter the number of the content you 
want to play using the numeric keypad.

For DVD or VCD, music CD, press the 
<ENTER> button. 
For radio, press the <

C

> or <

D

> button.

The content you entered is played.

Summary of Contents for DNX573S

Page 1: ...artphone Control dans Google Play pour trouver et installer Ia version Ia plus recente Fran ais page 18 gl fll Touchez pendant 2 secondes pour enregistrer en tant que contenu d alerte artiste de Ia chanson que vous etes en train d ecouter Ill Touchez pendant 2 secondes pour enregistrer Ia chanson actuelle en tant que contenu d alerte Fran ais page 78 r Panneau de fonction Traffic Weather Sports Fl...

Page 2: ...eparation Reglez Automotive Mirroring sur OFF Page 15 Fran ais page 37 Correct j iPod iPhone connectables Convient pour iPhone 6s Plus iPhone 6s iPhone 6 Plus iPhone 6 iPhone 5s iPhone 5c iPhone 5 iPhone 4s iPod touch 6th generation iPod touch 5th generation Fran ais page 28 Correct Ajoute etape Connexion d un iPod iPhone Connecteur a30 broches Espaf10 pdgina 45 Preparatives 4 Ajuste cada elemento...

Page 3: ...your new GPS Navigation System For your records Record the serial number found on the back of the unit in the spaces designated on the warranty card and in the space provided below Refer to the model and serial numbers whenever you call upon your KENWOOD dealer for information or service on the product Model DNX893S DNX773S DNX693S DNX573S DNX7160BTS DNX5160BTS Serial number US Residents Only Regi...

Page 4: ...s In this manual each model name is abbreviated as follows DNX893S DNX8 DNX773S DNX7160BTS DNX7 DNX693S DNX6 DNX573S DNX5160BTS DNX5 If above icons are showed read the article applicable to the unit you use In operation procedures bracket shape indicates the key or button you should control indicates the name of panel buttons indicates the name of touch keys Precautions WARNING Ñ Ñ To prevent inju...

Page 5: ...s with This unit may not correctly play discs which do not have the mark You cannot play a disc that has not been finalized For the finalization process see your writing software and your recorder instruction manual Ñ Ñ Acquiring GPS signal The first time you turn on this unit you must wait while the system acquires satellite signals for the first time This process could take up to several minutes...

Page 6: ...re Using the navigation system at extreme temperatures can lead to malfunction or damage Also note that the unit can be damaged by strong vibration by metal objects or by water getting inside the unit CAUTION Failure to avoid the following potentially hazardous situations may result in injury or property damage The navigation system is designed to provide you with route suggestions It does not ref...

Page 7: ...or the control screen and setting items Default is American English en Instruction Manual P 80 1 Touch Language 2 Touch Language Select 3 Select the desired language 4 Touch Color Set the screen and button illumination color You can select whether to perform color scan and adjust scanning color Instruction Manual P 84 1 Touch Color 2 Touch Panel Color 3 Select the desired color 4 Touch twice Camer...

Page 8: ...ct the disc press it for 2 seconds and touch OK after the message is displayed 8 Disc insert slot A slot to insert a disc media 9 SD card slot A slot to insert an SD card See How to insert an SD Card microSD Card P 7 You can play audio visual file in the card Only for DNX893S DNX773S An SD card slot for upgrading the map For how to upgrade the map refer to the instruction manual of the navigation ...

Page 9: ...OPEN to the panel fully opens 3 Hold the SD card with the label facing up and insert it into the slot until it clicks Labelled side 4 Press G button Ñ Ñ Eject an SD Card 1 Press G button 2 Touch OPEN to the panel fully opens 3 Push the SD card until it clicks and then remove your finger from the card The card pops up so that you can pull it out with your fingers 4 Press G button DNX6 DNX5 1 Hold t...

Page 10: ...nt source 1 Touch Source selection screen appears 1 2 1 Displays the HOME screen 2 Displays the SETUP screen 2 Flick the screen left or right to changes the page 3 Touch source icon to changes the playback screen Ñ Ñ Customizing Short cut buttons on HOME screen You can arrange the position of the source icons as you like 1 Touch and hold the icon which you want to move to go into the customizing m...

Page 11: ...dition and so on Navigation information Displays the current location and the direction The screen changes to the navigation screen when you touch here Short cut buttons The source changes to the one you have set as a short cut For the short cut setting refer to Customizing Short cut buttons on HOME screen P 8 5 Touch to display the Hands Free screen P 21 Ñ Ñ List screen There are some common func...

Page 12: ...ations that you may receive for failing to follow all applicable traffic laws and signs Your route is marked with a magenta line As you travel your navigation system guides you to your destination with voice prompts arrows on the map and directions at the top of the map If you depart from the original route your navigation system recalculates the route 1 2 3 4 5 6 7 8 9 1 Views the Next Turn page ...

Page 13: ...ore information Updating the software To update the navigation system software you must have an SD card a USB mass storage device and an internet connection 1 Go to www garmin com kenwood 2 Select Update 3 Follow the on screen instructions Updating maps You can purchase updated map data from Garmin or ask your KENWOOD dealer or KENWOOD service center for details 1 Go to www garmin com kenwood 2 Se...

Page 14: ...peed changes 2 times 8 times Plays in slow motion forward or backward DVD only SETUP Touch to display the DVD SETUP screen DVD only MENU CTRL Touch to display the DVD VIDEO disc manu control screen DVD only PBC Turn Playback control PBC on or off VCD only NOTE For other operations refer to the Instruction Manual Video menu operations 1 Touch on the left side of the screen Touch MENU CTRL 2 Perform...

Page 15: ...CA HD100 KCA iP103 Automotive Mirroring OFF APP Connection select iPhone Bluetooth HDMI MHL Bluetooth Connection Audio A2DP App SPP To listen music with Lightning connector device KCA iP103 Automotive Mirroring OFF APP Connection select iPhone USB To listen music with 30 pin connector device KCA iP102 Automotive Mirroring OFF APP Connection select iPhone USB To listen to music via Bluetooth Automo...

Page 16: ...or DVD refer to Inserting a disc P 11 Ñ Ñ SD card microSD card DNX893S DNX773S DNX693S DNX573S To insert SD card or microSD card refer to How to insert an SD Card microSD Card P 7 Playback operations Ñ Ñ Control the music you are listening to on the source control screen 2 1 1 L Plays or pauses E F Searches the previous next content Press and hold to fast forward or fast backward It will be cancel...

Page 17: ...n DNX6 DNX5 Volume knob 2 Touch SETUP 3 Touch AV 4 Set each item as follows Automotive Mirroring Select ON to use Apple CarPlay CarPlay Sidebar Select the position of the control bar left or right shown on the touch panel Left Default Right 5 Connect iPhone using KCA iP103 P 28 When iPhone compatible with CarPlay is connected to the iPod terminal the Bluetooth smartphone currently connected is dis...

Page 18: ... and the Bluetooth smartphone currently connected is disconnected 2 Unlock your Android device Ñ Ñ Operation buttons and available Apps on the Android Auto screen You can perform the operations of the Apps of the connected Android device The items displayed on the screen differ among the connected Android devices 1 Press the HOME button 2 Touch 3 Touch Android Auto 1 1 Starts the application or di...

Page 19: ...gital and lights with gray when it is analog While receiving an analog station it is off Ñ Ñ Function panel 1 Touch on the left side of the screen 10key Direct Display the direct station channel search screen AME Presets stations automatically RCV Change the HD Radio reception mode Auto Switch between digital and analog audio automatically Digital Select this to tune to digital audio only Analog S...

Page 20: ...nnel search screen SETUP Display the SiriusXM SETUP screen Band Switches the band SXM1 SXM2 SXM3 SXM4 Replay Live Turns the replay mode on or off Tune Scan 1 Hear a few seconds of the songs from each of the SmartFavorite music channels on the current preset band Tune Mix 2 When you turn it ON the preset channels on P1 P6 are shuffled to provide a playback which is a blend of songs from your favori...

Page 21: ... B 3 FM AM Switches the band 4 E F Tunes in a station The method of frequency switching can be changed 5 Recalls the memorized station When touched for 2 seconds stores the current receiving station in memory Ñ Ñ Function panel 1 Touch on the left side of the screen TI 1 Sets the traffic information mode on AME Presets stations automatically PTY 1 Searches a program by setting program type MONO 1 ...

Page 22: ... displayed when it has hands free connection with the unit 4 Select if you want to use the audio player app in your smartphone over A2DP and the other apps in your smartphone over SPP 5 Select if you want to transfer your phonebook data The phonebook data transmission starts Some smartphones may request permission to access the data The data transmission will start with your permission When the da...

Page 23: ... Û Call using call records 1 Touch 2 Select the phone number from the list Call using the phonebook 1 Touch 2 Touch 3 Select the initial to sort the list in the alphabetical order 4 Select the name from the list 5 Select the number from the list Call using the preset number 1 Touch 2 Touch the Name or phone number Call by voice You can make a voice call using the voice recognition function of the ...

Page 24: ...uching the each frequency bar You can select frequency bar and adjust its level by R S Preset Select Displays the screen to recall the preset equalizer curve Memory Saves the adjusted equalizer curve to User1 to User4 Initialize The current EQ curve returns to flat ALL SRC Apply the adjusted equalizer to all sources Touch ALL SRC and then touch OK on the confirmation screen Bass EXT Bass Extend Se...

Page 25: ...tery wires the battery may be drained If the console has a lid make sure to install the unit so that the front panel will not hit the lid when closing and opening If the fuse blows first make sure the wires aren t touching to cause a short circuit then replace the old fuse with one with the same rating Insulate unconnected wires with vinyl tape or other similar material To prevent a short circuit ...

Page 26: ...ng sleeve with a screwdriver or similar utensil and attach it in place Ñ Ñ Japanese cars 7 or 8 7 or 8 Car Bracket NOTE Make sure that the unit is installed securely in place If the unit is unstable it may malfunction eg the sound may skip Ñ Ñ Trim plate DNX893S DNX7160BTS DNX693S DNX5160BTS 1 Attach accessory 9 to the unit 9 General Motors cars DNX893S 1 Cut out accessory 5 to meet the shape of t...

Page 27: ...n that is spaced at least 12 inch 30 cm from cellular phone or other transmitting antennas Signals from the GPS satellite may be interfered with by these types of communication Painting the GPS antenna with metallic paint may cause a drop in performance Ñ Ñ Microphone unit 1 Check the installation position of the microphone accessory 3 2 Clean the installation surface 3 Remove the separator of the...

Page 28: ...k 3 FM AM antenna input 4 When connecting to an external amplifier connect its ground wire to the car s chassis to avoid damaging the unit Rear Audio Preout Left White Right Red Front Audio Preout Left White Right Red Subwoofer Preout Left White Right Red 5 Accessory Steering remote harness DNX7160BTS DNX5160BTS only Connect to vehicle s steering remote harness Contact your KENWOOD dealer for deta...

Page 29: ...ire To steering remote To use the steering wheel remote control feature you need an exclusive remote adapter not supplied matched to your car Connect to vehicle s reverse lamp harness when using the optional rear view camera Light Blue Yellow Steering remote control wire Orange White Dimmer control wire Blue Antenna control wire Blue White Power control wire Depending on what antenna you are using...

Page 30: ...onnect iPod iPhone with HDMI cable the necessary cable differs depended on the type of the connecter like Lightning or 30 pin Refer to Connecting iPod iPhone P 13 for the necessary cable The setting is necessary to meet the connected iPod iPhone or Android device Refer to Selecting the Android iPod iPhone device to play and connection method P 13 KCA HD100 1 8 m 3 KCA iP103 0 8m 3 KCA iP103 0 8m 3...

Page 31: ...and other countries This item incorporates copy protection technology that is protected by U S patents and other intellectual property rights of Rovi Corporation Reverse engineering and disassembly are prohibited Manufactured under license from Dolby Laboratories Dolby and the double D symbol are trademarks of Dolby Laboratories INRIX is a registered trademark of INRIX Inc The terms HDMI and HDMI ...

Page 32: ...rovided that the following conditions are met Redistributions of source code must retain the above copyright notice this list of conditions and the following disclaimer Redistributions in binary form must reproduce the above copyright notice this list of conditions and the following disclaimer in the documentation and or other materials provided with the distribution Neither the name of the Xiph o...

Page 33: ...48 kHz C 16 bit WMA wma A 8 320kbps B 16 48 kHz C 16 bit Linear PCM WAVE wav A B 16 48 kHz Disc 16 192 kHz USB SD C 16 24 bit FLAC flac A B 16 48 kHz Disc 16 192 kHz USB SD C 16 24 bit Vorbis ogg A VBR B 16 48 kHz C 16 bit NOTE If music of normal CD and other playback systems are recorded in the same disc only the playback system recorded at the first setout is played WMA and AAC of which is cover...

Page 34: ... on or inside the product relating to laser product safety JVC KENWOOD Corporation 2967 3 ISHIKAWA MACHI HACHIOJI SHI TOKYO JAPAN THIS PRODUCT COMPLIES WITH DHHS RULES 21 CFR SUBCHAPTER J IN EFFECT AT DATE OF MANUFACTURE Location Top plate DNX893S DNX773S DNX693S DNX573S Ñ Ñ IC Industry Canada Notice This device complies with Industry Canada licence exempt RSS standard s Operation is subject to th...

Page 35: ...osible que este equipo o dispositivo no cause interferencia perjudicial y 2 este equipo o dispositivo debe aceptar cualquier interferencia incluyendo la que pueda causar su operación no deseada Ñ Ñ Informação sobre a eliminação de pilhas Este produto não deve ser eliminado como lixo doméstico geral Devolva a pilha usada ao revendedor ou entidade autorizada para que a mesma seja devolvida ao fabric...

Page 36: ...MEDIA INTERFACE 0Bluetooth andtroid Ccsiriusxm au 0 READY l g tftY ii if 5 Mado for r 1 Works with iPod IJiPhone a Apple CarPiay KENWOOD g Radio ltl2 HD3 oo cmn Digital Sound l rorjram Info Artiat Exprilnce E margancyAlarU ...

Page 37: ...ial number found on the back of the unit in the spaces designated on the warranty card and in the space provided below Refer to the model and serial numbers whenever you call upon your KENWOOD dealer for information or service on the product Model DNX893S DNX773S DNX693S DNX573S DNX7160BTS DNX5160BTS Serial number US Residence Only Register Online Register your KENWOOD product at www kenwoodusa co...

Page 38: ...ION SYSTEM In this manual you will learn various convenient functions of the system Click the icon of the media you want to play With one click you can jump to the section of each media iPod USB VCD HD Radio SiriusXM DVDVIDEO Music CD Disc Media BT Audio Android Auto Mirroring Apple CarPlay Radio ...

Page 39: ..._____ 36 Mirroring Operation__________________ 39 Apple CarPlay Operation______________ 40 Android Auto Operation_____________ 42 Radio and HD Radio Tuner 44 Radio HD Radio Tuner Basic Operation___ 44 Memory Operation___________________ 47 Selecting Operation__________________ 48 Traffic Information ___________________ 50 Receive Mode HD Radio tuner only _________________ 51 Bookmark HD Radio tune...

Page 40: ..._____ 88 AV Setup___________________________ 88 Controlling Audio 90 Speaker X over setup_________________ 90 Controlling General Audio_____________ 93 Equalizer Control____________________ 94 Volume Offset_______________________ 95 Zone Control________________________ 96 Sound Effect________________________ 97 Listening Position DTA_______________ 98 Remote control 102 Battery Installation_______...

Page 41: ... to the unit may affect its mechanical parts Wiping the faceplate with a hard cloth or using a volatile liquid such as thinner or alcohol may scratch the surface or erase screened print Lens fogging When you turn on the car heater in cold weather dew or condensation may form on the lens in the disc player of the unit Called lens fogging this condensation on the lens may not allow discs to play In ...

Page 42: ...ins necessary procedures to achieve the operation Indicates the name of panel buttons Indicates the name of touch keys Operation title Introduces the function NOTE Introduces some tips notes etc 30 30 CD Audio and Visual Files iPod APPS Search Operation You can search music video or picture files by the following operations NOTE If you use a remote control you can jump directly to the desired trac...

Page 43: ...NX893S DNX773S DNX7160BTS If above icon is showed read the article applicable to the unit you use How to insert an SD Card 1 Press 7 G button 2 Touch OPEN to the panel fully opens 3 Hold the SD card as the illustration in the right and insert it into the slot until it clicks 4 Press 7 G button öTo eject the card 1 Press 7 G button 2 Touch OPEN 3 Push the card until it clicks and then remove your f...

Page 44: ...essing for 1 second displays the Voice Recognition screen P 75 7 G Displays the Angle Adjust screen DISC EJECT Ejects the disc OPEN Fully opens the panel to the location of the SD card slot When the panel is opened pressing closes the panel To forcibly eject the disc press it for 2 seconds and touch OK after the message is displayed 8 Disc insert slot A slot to insert a disc media 9 SD card slot A...

Page 45: ...0BTS If above icons are showed read the article applicable to the unit you use How to insert a microSD Card NOTE A dummy microSD card is inserted as the slot cover Remove it before using and keep it in an appropriate place 1 Hold the microSD card with the label side facing right and the notched section down and insert it into the 8 slot until it clicks öTo eject the card Push the card until it cli...

Page 46: ...lays the navigation screen 6 Switch the APP CarPlay Mirroring source Pressing for 1 second displays the Voice Recognition screen P 75 7 Volume Knob Turning adjusts volume up or down Displays the popup menu screen Pressing for 1 second switches view camera display on off 8 microSD card slot A slot to insert a microSD card You can play audio visual file in the card Only for DNX693S DNX573S A microSD...

Page 47: ...rning on is different depending on the model Press the HOME button The unit is turned on To turn off the unit Press the HOME button for 1 second If it is your first time turning the unit on after installation it will be necessary to perform Initial setup P 11 1 ...

Page 48: ...ct 3Select the desired language 4Touch For detailed operation see User Interface Setup P 80 Color Set the screen and button illumination color You can select whether to allow color scan operation or select a fixed color for operation 1Touch Color 2Touch Panel Color 3Select the desired color 4Touch twice For detailed operation see Display Setup P 84 Camera Set the parameters for the camera 1Touch C...

Page 49: ...Basic Operations 12 12 DEMO Set the demonstration mode Default is ON 1Touch DEMO and set ON or OFF Touch Finish NOTE These settings can be set from the SETUP menu See Setting Up P 78 2 ...

Page 50: ...unit loads the disc and playback starts To eject the disc Press the G button USB device Connect the USB device with the USB cable Press the HOME button Touch USB P 16 To disconnect the device Press the HOME button Touch a source other than USB Detach the USB device iPod Connect the iPod Press the HOME button Touch iPod P 16 NOTE For the details of the necessary cable and adapter to connect with iP...

Page 51: ...pops up so that you can pull it out with your fingers NOTE A dummy microSD card is inserted as the slot cover Remove it before using and keep it in an appropriate place HDMI MHL source You can display the screen of smartphones connected via the HDMI MHL input terminal Press the HOME button Touch Touch HDMI MHL P 16 Start an application or playback on your smartphone About Wireless Display Adapter ...

Page 52: ...able and set 3rd Party TV Tuner Control in AV Setup P 88 to ON The TV tuner can be controlled with its supplied remote control through the remote sensor on the front panel of this unit Press the HOME button Touch Touch AV IN1 P 16 1 1 Key display area Touch to display the control screen Menu control screen Touch 1 Key display area Hides the indicators and buttons Touch Hide Change the channel Touc...

Page 53: ...on HOME screen appears Flick the screen left or right to select the widget Touch the widget to display the detailed screen Selecting the playback source on the HOME screen 4 3 1 2 1 Displays the source selection screen 2 Short cut buttons 3 Displays the Hands Free screen P 72 4 Displays the control screen of current source 1 2 ...

Page 54: ... Touch the icon of the desired application Display navigation screen Touch NAV Turn off all audio function Touch STANDBY Vehicle information display etc Touch the icon of the desired vehicle information Enter setup mode Touch the icon of the desired setup function Customizing Short cut buttons on HOME screen You can arrange the position of the source icons as you like 1 Touch and hold the icon whi...

Page 55: ... operated from most screens 4 5 3 1 2 Indicators Navigation information Short cut buttons 1 Connected Bluetooth device information Lights up when quick charging battery of the connected iPod iPhone Smartphone 2 Displays the function panel other operation button window 3 All sources icon Displays all sources 4 Secondary screen The Secondary screen changes every time you touch it Indicators Displays...

Page 56: ...most sources Return Returns to previous screen Text scroll Scrolls the displayed text etc Keys with various functions are displayed here Plays all tracks in the folder containing the current track Jump to the letter you entered alphabet search Moves to the upper hierarchy Page scroll You can change the page to display more items by pressing Displays the top or bottom page Flick scrolling You can s...

Page 57: ...vigation screen You can control audio sources while the navigation screen is displayed Also you can view the navigation information while the source control screen is displayed Touch the Navigation information of Secondary screen The navigation screen with audio information appears Each time you touch in the navigation screen Touching this area displays the audio screen Displays the navigation and...

Page 58: ...weather forecast by connecting your iPhone or Android smartphone in which the KENWOOD Traffic Powered By INRIX application is installed to this unit Preparation Install the latest version of the KENWOOD Traffic Powered By INRIX application on your iPhone or Android iPhone Search for KENWOOD Traffic Powered By INRIX in the Apple App Store to find and install the most current version Android Search ...

Page 59: ... provided for the vehicle and vehicle information can be displayed on this unit Press the HOME button HOME screen appears Touch icon Displays information about the instruments such as a speedometer Displays information about the air conditioner of the vehicle Displays information about the Parking Distance Sensor of the vehicle Displays information about the tire pressures of the vehicle 1 2 ...

Page 60: ...formation about the Radar Detector NOTE Displayable screens button names and screen names vary depending on the type of the connected iDataLink and the model of the vehicle For more details access the following URL www idatalink com ...

Page 61: ...hen Playback control PBC is on Hide Hides the control screen Repeats the current content Each time you touch the key repeat mode switches in the following sequence DVD Title repeat Chapter repeat Repeat off VCD PBC On Does not repeat VCD PBC Off Track repeat Repeat off 2 Function bar Various functions can be performed by using keys in this area For details on the keys see Function bar P 25 Display...

Page 62: ...n is done for 5 seconds If you use a remote control you can jump directly to the desired image with entering the chapter number scene number play time etc P 103 Function bar DVD VCD The functions of each key are as follows E F Searches the previous next content Touch and hold to fast forward or fast backward It will be cancelled automatically after about 50 seconds DH Plays or pauses ...

Page 63: ...hen you play it the next time Fast forward or fast backward Each time you touch the key the speed changes 2 times 8 times or DVD only Plays in slow motion forward or backward SETUP DVD only Touch to display the DVD SETUP screen See DVD Setup P 28 MENU CTRL DVD only Touch to display the DVD VIDEO disc manu control screen See DVD Disc Menu Operation P 27 PBC VCD only Turn Playback control PBC on or ...

Page 64: ...trol mode P 27 Moves the cursor Touch R S C D Switches the subtitle language Touch Subtitle Each time you touch this key language is switched Switches the audio language Touch Audio Each time you touch this key language is switched Switches the picture angle Touch Angle Each time you touch this key picture angle is switched These keys may not function depending on the disc Highlight control Highli...

Page 65: ...udio Language See Language setup P 29 Dynamic Range Control Sets the dynamic range Wide The dynamic range is wide Normal The dynamic range is normal Dialog Default Makes the total sound volume larger than other modes This is effective only when you are using Dolby Digital software Screen Ratio Sets the screen display mode 16 9 Displays wide pictures 4 3 LB Displays wide pictures in the Letter Box ...

Page 66: ...Touch the desired item Menu Language Subtitle Language Audio Language Language Set screen appears 2 Select a language For language code refer to DVD Language Codes P 117 Sets the entered language and returns to the DVD Setting screen NOTE To set the DVD s original language for audio language touch Original ...

Page 67: ...which your iPod iPhone supports are necessary as follows Use application Sold separately Automotive Mirroring To Apple CarPlay source KCA iP103 ON P 40 Use application Sold separately APP Connection select iPod Connection Bluetooth Connection To listen music and watch video with Lightning connector device Lightning Digital AV Adapter KCA HD100 KCA iP103 iPhone Bluetooth HDMI MHL Bluetooth HDMI MHL...

Page 68: ...ouch SETUP SETUP Menu screen appears 3 Touch AV AV screen appears 4 Set Automotive Mirroring to OFF 5 Touch APP iPod SETUP App iPod SETUP screen appears 6 Set each item as follows APP Connection select Select how to connect your smartphone Android Bluetooth Connect an Android smartphone via Bluetooth iPhone Bluetooth Connect an iPhone via Bluetooth HDMI MHL Connect an Android smartphone or iPhone ...

Page 69: ...eat mode switches in the following sequence Track repeat Repeat all Randomly plays all tracks in disc Each time you touch the key random mode switches in the following sequence Track random Random off 2 Track information Displays the information of the current track 3 Function bar Various functions can be performed by using keys in this area For details on the menu see Function bar P 34 Displays t...

Page 70: ...om Album random Random off 2 Track information Displays the information of the current file Only a file name and a folder name are displayed if there is no tag information iPod Touch to display the category list screen See Category search P 36 3 Function bar Various functions can be performed by using keys in this area For details on the keys see Function bar P 34 Displays the Graphic Equalizer sc...

Page 71: ...ly Touch to display the control screen Function bar Music CD iPod Disc media USB device and SD card The following functions can be performed by using keys in this area 1 Disc media iPod USB device and SD card only Searches track file For details on search operation see Search Operation P 36 E F Searches the previous next track file Touch and hold to fast forward or fast backward audio and video fi...

Page 72: ... and SD card USB device The following functions can be performed by using keys in this area disc media USB device and SD card only Searches previous next folder USB DEVICE CHANGE Only for USB device of DNX893S DNX7160BTS DNX693S DNX5160BTS Switches to another USB device when two USB devices are connected ...

Page 73: ...ding to hierarchy 1 Touch on the right side of the screen Control list appears 2 Touch desired track file Playback starts NOTE For disc media you cannot display the list during random play and stop Category search iPod only You can search a file by selecting category 1 Touch 1 Category List screen appears 2 Touch S 3 Touch Category List 4 Touch the desired category 5 The list is sorted by selected...

Page 74: ...our selection appears NOTE The list is sorted by the way you selected Artists Displays the album list of the artist Albums Displays all tunes of the current album Genres Displays the artists list in which artists belong to the same genre Composers Displays the album list of the composer of the current file 5 Touch to select desired item in the list Repeat this step until you find the desired file ...

Page 75: ...ard only You can search a file according to hierarchy 1 Touch 1 Folder List screen appears 2 Touch the desired folder When you touch a folder its contents are displayed 3 Touch desired item from the content list Playback starts NOTE For operations in the list screen see List screen P 19 ...

Page 76: ...H100 sold separately or HDMI KCA HD100 sold separately Select how to connect the unit with your smartphone For the details refer to APP iPod settings P 31 Preparation 1 Press the MENU button volume knob Popup menu appears 2 Touch SETUP SETUP Menu screen appears 3 Touch AV AV screen appears 4 Set Automotive Mirroring to OFF 5 Connect an Android device Operation 1 Press the HOME button 2 Touch 3 Tou...

Page 77: ...y Compatible iPhone devices You can use CarPlay with the following iPhone models iPhone 5 iPhone 5c iPhone 5s iPhone 6 iPhone 6 Plus iPhone 6s iPhone 6s Plus Preparation 1 Press the MENU button volume knob Popup menu appears 2 Touch SETUP SETUP Menu screen appears 3 Touch AV AV screen appears 4 Set each item as follows Automotive Mirroring Select ON to use Apple CarPlay ON Default OFF CarPlay Side...

Page 78: ... Apple CarPlay icon in the HOME screen 2 3 1 1 On the App screen Displays the home screen of CarPlay On the home screen of CarPlay Touch and hold to activates Siri 2 Application buttons Starts the application 3 HOME Exits the CarPlay screen and displays the Home screen To exit the CarPlay screen 1 Press the HOME button Using Siri You can activate Siri 1 Press the button for 1 second Press for 1 se...

Page 79: ...of Android version 5 0 Lollipop or later Note Android Auto may not be available on all devices and is not available in all countries or regions Preparation 1 Press the MENU button Popup menu appears 2 Touch SETUP SETUP Menu screen appears 3 Touch AV AV screen appears 4 Set Automotive Mirroring to ON 5 Connect an Android device via iPod iPhone terminal To use the hands free function connect the And...

Page 80: ... items displayed on the screen differ among the connected Android devices To enter Android Auto mode touch Android Auto icon in the HOME screen 1 1 Application information buttons Starts the application or displays information To exit the Android Auto screen 1 Press the HOME button Using voice control 1 Press the button for 1 second Press for 1 second To cancel 1 Press the button ...

Page 81: ...en the audio is digital and lights with gray when it is analog While receiving an analog station it is off 2 Information display Displays the information of the current station Frequency and Channel Touching allows you to switch between Content A Content B and Content C HD Radio tuner Radio Content A Station name Song Title Artist Name PS name Radio Text Title Artist Content B Station Message Radi...

Page 82: ...nt content 8 FM AM Switches the band 9 Preset list Recalls the memorized station or channel When touched for 2 seconds stores the current receiving station or channel in memory Function bar Radio HD Radio tuner The functions of each key are as follows E F Tunes in a station The method of frequency switching can be changed see 3 in table CHS CHR HD Radio tuner only Selects a channel 1 HD Radio tune...

Page 83: ...Emergency Alerts HD Radio tuner only Turn on or off the alert message See Alert Message P 53 Alert Message Log HD Radio tuner only Displays the alert message received See Alert Message P 53 MONO FM Tuner only Select the Monaural reception Adjacent to traditional main stations are HD2 HD3 Channels providing new original programming on the FM dial A music product discovery feature that enables users...

Page 84: ...ed band key 2 Touch on the left side of the screen Touch AME 3 Touch Yes Auto memory starts Manual memory You can store the current receiving station or channel in memory 1 Select a station or channel you wish to store in memory 2 Touch FM 1 15 or AM 1 5 in which you want to store the station or channel for 2 seconds until a beep sounds ...

Page 85: ... List Control screen appears 2 Select a station or channel from the list Search by program type FM tuner and HD Radio tuner only You can tune to a station with a specific program type when listening to FM 1 Touch on the left side of the screen Touch PTY TUNER PTY Mode screen appears 2 Select a program type from the list 3 Touch Search You can search a station of the selected program type ...

Page 86: ...ect screen appears 2 Select the search method 3 Enter the frequency or channel number 4 Touch Enter NOTE To clear the number you entered touch BS Channel search HD Radio tuner only You can specify the desired channel 1 Touch 1 Channel list appears 2 Select the desired content from the list NOTE Touch Info Change in the channel list Select the sequence of the list Song title artist name album name ...

Page 87: ...Touch on the left side of the screen Touch TI Traffic information mode is set When the traffic bulletin starts The Traffic Information screen appears automatically NOTE It is necessary to have Traffic Information function set to on in order to have the Traffic Information screen appear automatically The volume setting during reception of traffic information is automatically stored The next time th...

Page 88: ...cally Digital Select this to tune to digital audio only Analog Select this to tune to analog audio only Bookmark HD Radio tuner only Stores tag information title artist album URL and description about the song you are listening to now Detailed information and QR codes can be displayed according to the stored tag information Registering a bookmark 1 Touch on the left side of the screen Touch Regist...

Page 89: ...ct the desired bookmark from the list The bookmark information appears Delete Deletes the bookmarks being displayed Bookmark delete Deleting a bookmark 1 Touch The Bookmark List appears 2 Touch Delete The Bookmark Delete List appears 3 Select the bookmark to delete from the list þ All Select all bookmarks All Erases all check marks 4 Touch Deletes all the selected bookmark s ...

Page 90: ... Same alert message cannot be displayed for next 10 minutes Ignore The alert message is erased Same alert message cannot be displayed for next 12 hours Display of the received Alert Message You can read the received alert message afterward 1 Touch on the left side of the screen Touch Alert Message Log The Alert Message Log appears 2 Select the desired Alert Message from the list The Alert Message ...

Page 91: ...ner using one of the two methods below For users in the U S A Online Visit www siriusxm com activatenow Phone Call SiriusXM Listener Care at 1 866 635 2349 For users in Canada Online Visit www siriusxm ca activatexm Phone Call XM customer Care at 1 877 438 9677 NOTE Set the remote control mode switch to AUD mode before starting operation see Switching the operation mode P 103 To use SiriusXM Satel...

Page 92: ...ill close the list 6 Function panel Touch on the left side of the screen to display the function panel Touch again to close the panel For details on the keys see Function panel P 56 7 Information display Displays the following information SXM Band display Preset Preset number CH Channel display Logo Display album artwork for most SiriusXM music channels 8 Preset list Recalls the memorized station ...

Page 93: ...itches the band SXM1 SXM2 SXM3 SXM4 Replay Live Turns the replay mode on or off See Replay P 60 TuneScan 1 Hear a few seconds of the songs from each of the SmartFavorite music channels on the current preset band See TuneScan P 62 TuneMix 2 When you turn it ON the preset channels on P1 P6 are shuffled to provide a playback which is a blend of songs from your favorite channels See TuneMix P 61 1 Com...

Page 94: ...the right side of the screen 3 Press and hold for 2 seconds until you hear a beep the preset number SXM 1 4 P 1 6 in which you want to store the channel Preset select You can list and select memorized station or channel Selecting from the preset list 1 Touch on the right side of the screen List Control screen appears 2 Select a channel from the list ...

Page 95: ...annel 10Key Direct screen appears 2 Enter the channel number and touch Enter NOTE To clear the number you entered touch BS Category Channel search You can specify the desired category and select a channel 1 Touch 1 Category list appears 2 Select a category Channel list appears 3 Select the desired content from the list ...

Page 96: ...list as follows Channel name artist name song title category name content info Categories which have the prefix Featured are Featured Favorites Featured Favorites are groups of channels that are created by the SiriusXM Programming department allowing you to discover new channels Featured Favorite channels are dynamic and can change often allowing you to discover new channels ...

Page 97: ...channel Replay time bar Play mode indicator Display recorded capacity and playback position D B etc Current play mode indicatory 1 Display a list of recorded data on a program basis Function panel Touch on the left side of the screen Live Return to live music content 2 Touch 1 to display an Instant Replay list Instant Replay List Touching this plays back the displayed program Info Change Touch Inf...

Page 98: ...play P 60 When tuning from a SmartFavorites channel songs will play from the beginning of each track TuneStart You can enable disable TuneStart see TuneStart P 65 NOTE Compatible with SXV200 or later tuner models TuneMix TuneMix plays a unique blend of songs from your Preset music channels from the current SiriusXM Preset Band allowing you to build a custom channel from as few as two to as many as...

Page 99: ...h on the left side of the screen 2 Touch TuneScan to begin scanning your SmartFavorites channels You will hear a few seconds of the songs from each of the SmartFavorite channels 3 Touch TuneScan again while your favorite song is being played to start listening to that song Scan finishes and continues playing the song NOTE To cancel TuneScan Touch on the left side of the screen Touch TuneScan Touch...

Page 100: ...gs P 65 Parental code You can set a SiriusXM parental code for Parental Control 1 Touch Parental Code in the SiriusXM SETUP screen Parental Pass Check screen appears NOTE The code number is set to 0000 as default 2 Enter the current code number Parental Pass 1st entering screen appears 3 Enter the new code number and touch Enter Parental Pass 2nd entering screen appears 4 Enter the same code numbe...

Page 101: ...l Lock Channel Selection in the SiriusXM SETUP screen Parental Pass Check screen appears NOTE You need to set up a Parental code P 63 beforehand 2 Enter the parental code you originally input in Parental code P 63 and touch Enter Parental Lock Category Select screen appears 3 Touch the desired category from the list Displays all the channels in the selected category NOTE Touch All Channels to disp...

Page 102: ... NOTE To delete the skip channel setting touch Disable All and then touch YES on the confirmation screen Touch Info Change Select the sequence of the channel list as follows Channel name Artist name Song title Category name Content information TuneStart 1 Touch Tune Start in the SiriusXM SETUP screen The TuneStart is turned on or off Default is ON Reset 1 Touch SiriusXM Reset in the SiriusXM SETUP...

Page 103: ...he following URL http www kenwood com cs ce bt The units supporting the Bluetooth function have been certified for conformity with the Bluetooth Standard following the procedure prescribed by Bluetooth SIG However it may be impossible for such units to communicate with your cell phone depending on its type Registering and Connecting Bluetooth Unit It is necessary to register the Bluetooth audio pl...

Page 104: ...ered Bluetooth units Delete unnecessary registration See Connecting the Bluetooth unit P 68 This unit is compatible with the Apple Easy Pairing function When an iPod touch or iPhone is connected to this unit an authentication dialog appears Performing operation for authentication on this unit or iOS smartphone registers the smartphone as a Bluetooth device Step 2 Connection settings 1 Select the h...

Page 105: ...start with your permission When the data transmission and connection have completed the Bluetooth connection icon appears on the screen Connecting the Bluetooth unit 1 Touch Select Device in the Bluetooth SETUP screen 2 Touch the device name you want to connect Profile select screen appears NOTE If the icon is lighted it means that the unit will use that device 3 Set each profile as follows TEL HF...

Page 106: ...egistered Bluetooth unit 1 Touch Delete 2 Touch the device name to check þ All Select all Bluetooth unit All Erases all check marks 3 Touch Delete Confirmation message appears 4 Touch Yes Change the PIN code 1 Touch PIN Code in the Bluetooth SETUP screen PIN Code Set screen appears 2 Input the PIN code 3 Touch SET Change the device name 1 Touch Device Name in the Bluetooth SETUP screen Change Devi...

Page 107: ...Folder search P 71 Displays the Graphic Equalizer screen P 94 4 Function panel Touch on the left side of the screen to display the function panel Touch again to close the panel For details on the keys see Function panel P 71 5 Play mode indicator D H Current play mode indicator The meanings of each icon are as follows D play H pause 6 Function panel Touch on the left side of the screen to display ...

Page 108: ...audio P 71 Connecting the Bluetooth audio Selects the device to connect via Bluetooth audio A2DP or APP SPP 1 Touch on the left side of the screen Touch BT DEVICE CHANGE 2 Touch the device name you want to connect 3 Touch Close Folder search 1 Touch 1 2 Touch the desired file or folder When you touch a folder its contents are displayed 3 Touch desired item from the content list Playback starts NOT...

Page 109: ...lls received calls and missed calls up to 50 entries each 2 Select a dialing method Call by entering a phone number Call using call records Call using the phonebook Call using the preset number Voice Recognition P 75 Select the cell phone to use When you connect two cell phones 1 Touch to select the phone you want to use Bluetooth SETUP 1 Touch Bluetooth SETUP screen appears NOTE The status icons ...

Page 110: ... phone number Call using the phonebook 1 Touch 2 Touch 3 Select the initial Characters with no corresponding name will not appear During search a non accent character such as u is searched for instead of an accent character such as ü 4 Select the person you want to call from the list 5 Select the phone number from the list NOTE You can set the list to arrange in the order of last name or first nam...

Page 111: ...button Turn the volume knob Mute your voice Touch to mute or not to mute your voice Output the dial tone Touch DTMF to display the tone input screen You can send tones by touching desired keys on the screen Switching the speaking voice output Touching each time switches the speaking voice output between cell phone and speaker Call waiting When you receive a call while talking on another call you c...

Page 112: ...ctly and touch SET See Call by entering a phone number P 73 NOTE To delete the preset number touch Delete and then touch OK on the confirmation screen Voice Recognition You can access the voice recognition function of the cell phone connected to this unit You can search the cell phone phonebook by voice The functionality depends on the cell phone 1 Press the button for 1 second Press for 1 second ...

Page 113: ...ansmission starts Phonebook deletion 1 Touch 2 Touch Edit 3 Touch Delete Phonebook 4 Touch the name to check þ All Checks all boxes All Erases all check marks 5 Touch Delete Confirmation message appears 6 Touch OK Hands Free Setup You can perform various setup about handsfree function 1 Press the MENU button volume knob Popup menu appears 2 Touch SETUP SETUP Menu screen appears ...

Page 114: ...N the Apple Auto Pairing function is turned on to automatically register the iPod touch or iPhone connected to this unit ON Default Uses Apple Auto Pairing function OFF Not uses Apple Auto Pairing function Sort Order Sets how to arrange the cell phone phonebook First Arranges in the order of first name Last Default Arranges in the order of last name Echo Cancel Level Adjusts the level of echo canc...

Page 115: ...pect Select screen mode Full Changes the aspect ratio of video and displays fully on the screen Normal Displays with 4 3 ratio Auto DVD VCD and disc media Video of 16 9 ratio is displayed in Full and video of 4 3 ratio is displayed in Regular USB device and SD card Displays video fully on vertical or horizontal with no ratio change NOTE Adjusting items are different depending on the current source...

Page 116: ...ngle as the angle during power off Touch Memory when the desired angle is selected View Camera Control You can select the front or rear view camera 1 Press the MENU button for 1second volume knob for 1second Press for 1 second Press for 1 second View camera screen appears 2 Adjust each item as follows 2 1 1 Switching the View Camera Touching each time changes between the front view camera and rear...

Page 117: ...llowing section for each setting Set up the user interface P 80 Set up special P 82 Set up security P 83 Set up display P 84 Set up camera P 86 Set up navigation P 88 Set up AV P 88 User Interface Setup You can setup user interface parameters 1 Press the MENU button volume knob Popup menu appears 2 Touch SETUP SETUP Menu screen appears 3 Touch User Interface User Interface screen appears 4 Set eac...

Page 118: ...fault Right This can be set when the iDataLink commercially available is connected Language Select Mode Selects the mode to select a language Easy Default Selects a language easily Advanced Allows you to select languages for respective items Language Select Selects a language Touch Panel Adjust Adjust the sensing position of touch panel P 82 Clock NAV SYNC Default Synchronizes the clock time with ...

Page 119: ...ncel the touch panel adjustment touch Cancel To reset to the initial status touch Reset Special Setup You can setup Special parameters 1 Press the MENU button volume knob Popup menu appears 2 Touch SETUP SETUP Menu screen appears 3 Touch Special Special screen appears 4 Set each item as follows DEMO Set the demonstration mode Default is ON SETUP Memory Locks or unlocks the Audio SETUP Memory Recal...

Page 120: ... For how to update the software see the relevant update procedure manual which comes with the software Security Setup You can set up a security code to protect your receiver system against theft 1 Press the MENU button volume knob Popup menu appears 2 Touch SETUP SETUP Menu screen appears 3 Touch Security Security screen appears 4 Set each item as follows SI A red indicator will blink on the unit ...

Page 121: ... Receiver from battery enter the correct security code as that you have entered in step 4 and touch Enter You can use your receiver To change the security code 1 Touch Security Code Change on the Security screen then repeat step 2 and 3 To clear the security code 1 Touch Security Code Cancellation on the Security screen Display Setup 1 Press the MENU button volume knob Popup menu appears 2 Touch S...

Page 122: ...he desired color User The color you have set in the process of Adjust is registered Scan You can set the panel color to continuously scan through the color spectrum 3 Touch Registering original color You can register your original color 1 Touch User in the Panel Color Coordinate screen 2 Touch Adjust Panel Color RGB Coordinate screen appears 3 Use and to adjust each color value 4 Touch Changing ba...

Page 123: ...se NOTE See Playable Media and Files P 110 for readable image specifications Camera Setup You can set camera parameters 1 Press the MENU button volume knob Popup menu appears 2 Touch SETUP SETUP Menu screen appears 3 Touch Camera Camera screen appears 4 Set each item as follows R CAM Interruption ON Displays the picture from the rear view camera when you shift the gear to the reverse R position OF...

Page 124: ...OFF Default Displays the picture from the front view camera as it is Adjusting the parking guidelines 1 Touch ON of Parking Guidelines in the Camera screen 2 Touch Guideline Setup in the Camera screen 3 Adjust the parking guidelines by selecting the mark 4 Adjusting the position of the selected mark A B C D Make sure that A and B are horizontally parallel and that C and D are the same length NOTE ...

Page 125: ...ETUP screen appears 4 Set each item as follows NAV Voice Volume Adjusts the volume for voice guidance of the navigation system Default is 24 AV Setup You can set AV parameters 1 Press the MENU button volume knob Popup menu appears 2 Touch SETUP SETUP Menu screen appears 3 Touch AV AV screen appears 4 Set each item as follows APP iPod SETUP Set up APP iPod connection See APP iPod settings P 31 ...

Page 126: ...an AV source to be output from the AV OUTPUT port OFF AV IN AV IN1 AV IN2 DISC USB SD or iPod You cannot select iPod if it is connected via Bluetooth If you select USB SD iPod Disc Mirroring Bluetooth audio Apple CarPlay or Android Auto as the main source you cannot select USB SD or iPod as the AV output source Automotive Mirroring Select ON to use Apple CarPlay or Android Auto ON Default OFF CarP...

Page 127: ...4 Performing zone control P 96 Set sound effect P 97 Set volume offset P 95 Set listening position P 98 Speaker X over setup 1 Press the MENU button volume knob Popup menu appears 2 Touch Audio Audio screen appears 3 Touch Speaker X over Speaker Select screen appears 4 Touch the speaker you wish to adjust and set each item as follows Car Type You can setup the car type and speaker network etc Spea...

Page 128: ...s set automatically for timing adjustment of sound output for each channel to have the highest surround effects Speaker Front OEM 3 1 2 inch 4 inch 4 3 4 inch 5 inch 6 1 2 inch 6 3 4 inch 7 inch 4x6 5x7 6x8 6x9 7x10 Rear None OEM 3 1 2 inch 4 inch 4 3 4 inch 5 inch 6 1 2 inch 6 3 4 inch 7 inch 4x6 5x7 6x8 6x9 7x10 Subwoofer None 6 1 2 inch 8 inch 10 inch 12 inch 15 inch over Select None if you hav...

Page 129: ...t screen Slope 3 Sets a crossover slope Gain Adjusts the front speaker rear speaker or subwoofer level TW Tweeter Gain 1 Adjusts the tweeter level When front is selected on Speaker Select screen Phase Inversion 2 Sets the phase of subwoofer output Check Phase Inversion to shift the phase 180 degrees When subwoofer is selected on Speaker Select screen 1 Only when Tweeter is set to Small Middle Larg...

Page 130: ...p menu appears 2 Touch Audio Audio screen appears 3 Touch Fader Balance Fader Balance screen appears 4 Set each item as follows Fader Balance Adjust the volume balance around the touched area C and D adjust the right and left volume balance R and S adjust the front and rear volume balance ...

Page 131: ...el by R S Preset Select Displays the screen to recall the preset equalizer curve Memory Saves the adjusted equalizer curve to User1 to User4 Initialize The current EQ curve returns to flat ALL SRC Apply the adjusted equalizer to all sources Touch ALL SRC and then touch OK on the confirmation screen Bass EXT Bass Extend Settings When turned on the frequency lower than 62 5 Hz is set to the same gai...

Page 132: ...n different sources 1 Press the MENU button volume knob Popup menu appears 2 Touch Audio Audio screen appears 3 Touch Volume Offset Volume Offset screen appears 4 Touch or to adjust the level Initialize Returns to the initial settings If you have increased the volume first then reduced the volume using the Volume Offset the sound generated if you suddenly switch to another source may be extremely ...

Page 133: ... source for each Rear VOL Adjusts the rear channel volume NOTE When the rear speaker sound is switched the audio source that is output at the AV OUTPUT terminal is also switched to the same source When the dual zone function is set to on the following functions are not available Output from the subwoofer Subwoofer Level Bass Boost P 97 Equalizer Control Sound Effect Listening Position P 94 97 98 S...

Page 134: ...lly optimized to meet the current car speed by GPS OFF ON Space Enhancer Select the feeling of sound space enhancement OFF Small Medium Large This setting is not available during HD Radio tuner source Supreme Turns ON OFF the Supreme function Technology to extrapolate and supplement with proprietary algorithm the high frequency range that is cut off when encoding Realizer Virtually makes the sound...

Page 135: ...3 Touch Position DTA Set up Listening Position P 98 Set up Front Focus P 100 Listening Position Adjust the sound delay time as nearer speakers to the selected seat have more delay time so that the sound from each speaker arrive a listener at the same time 1 Touch Listening Position in the Position DTA screen 2 Select listening position from Front R Right front Front L Left front Front All All fron...

Page 136: ...ion 1 Touch Adjust 2 Touch Delay 3 Touch T or U to adjust the delay time of the selected speaker 4 Touch Level 5 Touch T or U to adjust the sound level of the selected speaker NOTE To return to the initial setting of Delay and Level touch Initialize and YES in the confirmation screen ...

Page 137: ...ustment 1 Touch Adjust 2 Touch Delay 3 Set each item as follows Sound Image LR Front Adjust the sound image to focus on in front of front seats Sound Image LR Rear Adjust the sound image to focus on in front of rear seats Size of the Virtual Sound Field Adjust the size of sound image to meet your taste If the sound image is shifted from the front adjust it by Sound Image LR Front or Sound Image LR...

Page 138: ...Controlling Audio 101 NOTE To return to the initial setting of Delay and Level touch Initialize and YES in the confirmation screen ...

Page 139: ...osion or excessive heat generation may result Do not recharge short break up or heat the battery or place it in an open fire Such actions may cause the battery to leak fluid If spilled fluid comes in contact with your eyes or on clothing immediately rinse with water and consult a physician Place the battery out of reach of children In the unlikely event that a child swallows the battery immediatel...

Page 140: ... Using the remote control you can jump directly to the desired file track chapter etc with entering the number corresponding to the content NOTE This operation cannot be performed for USB device and iPod 1 Press the BS button several times until the desired content appears The available contents are different depending on the source DVD Title number Chapter number VCD 1 X and 2 X PBC OFF Track num...

Page 141: ...isplays Main menu 4 OUT IN NAV Zooms in or out the navigation map 5 POSITION AUD DVD Pauses the track or file and resumes playing by pressing twice During radio HD Radio and SiriusXM source in AUD mode switches the seek mode NAV Displays the current position 6 Cursor Key DVD Moves the cursor in the DVD menu NAV Moves the cursor or scrolls the map 7 ENTER AUD DVD Performs the selected function NAV ...

Page 142: ... the number to search in direct search For details on the direct search mode see Direct search mode P 103 DVD Press 1 2 to fast forward backward Press 4 5 to slow forward backward Switches the slow playback speed each time you press this key DVD only 15 DVD Clears the number 16 BS AUD DVD Switches to the direct search mode For details on the direct search mode see Direct search mode P 103 17 AUDIO...

Page 143: ...e function to on See Zone Control P 96 Cannot set up the equalizer Cannot set up the crossover network The dual zone function is enabled Set the dual zone function to off See Zone Control P 96 About audio operations Problem Reason Solution Radio reception is poor The car antenna is not extended Pull out the antenna all the way The antenna control wire is not connected Connect the wire correctly Se...

Page 144: ...Change the disc See Playable Media and Files P 110 Read Error The disc is quite dirty Clean the disc See Precautions on handling discs P 4 Disc is upside down Load the disc with the labeled side up Region Code Error The disc you wanted to play has a region code that cannot be played with this unit See Region Codes in the World P 116 or try another disc Error 07 67 The unit is not operating correct...

Page 145: ...ed to the radio Subscription Updated Press Return To Continue The SiriusXM subscription has been renewed Pressing the Control knob will clear the message SXM Chan Unavailable The currently selected channel is unavailable SXM Ch Unsubscribed The currently selected channel is not subscribed to SXM Check Antenna No antenna is connected to the SiriusXM tuner Check that an antenna is connected to the S...

Page 146: ...Troubleshooting 109 ...

Page 147: ...back depends on authoring conditions DVD RW DVD R DVD RW DVD R DL Dual layer Only video format DVD R DL Double layer DVD RAM CD Music CD 1 CD ROM MP3 WMA AAC WAV FLAC Vorbis playback Multisession is supported Packet write is not supported CD R CD RW DTS CD Video CD VCD Super video CD Photo CD CD EXTRA Only music CD session can be played HDCD CCCD Others Dualdisc Super audio CD Only CD layer can be...

Page 148: ...f music of normal CD and other playback systems are recorded in the same disc only the playback system recorded at the first setout is played WMA and AAC of which is covered with DRM cannot be played Although the audio files are complied with the standards listed above the play may be impossible depending on the types or conditions of media or device An online manual about audio files is put on th...

Page 149: ...sic Operation P 32 Latest compatible list of iPod iPhone For details see www kenwood com cs ce ipod By connecting your iPod iPhone to this unit with an optional accessory iPod connection cable KCA iP103 or KCA iP102 you can supply power to your iPod iPhone as well as charge it while playing music However the power of this unit must be on If you start playback after connecting the iPod the music th...

Page 150: ...es used with this unit The files can be erased depending on the operating conditions of the USB device We shall have no compensation for any damage arising from any erased data No USB device comes with this unit You need to purchase a commercially available USB device When connecting the USB device usage of the CA U1EX option is recommended However maximum supply current of CA U1EX is 500mA Normal...

Page 151: ...t Orange Error at the disc player VIDEO Identifies the video file MUSIC Identifies the music file VCD 1chLL 2chLL Identifies the left audio output of channel 1 or 2 1chLR 2chLR Identifies the monaural audio output of channel 1 or 2 1chRR 2chRR Identifies the right audio output of channel 1 or 2 1chST 2chST Identifies the stereo audio output of channel 1 or 2 LL Identifies the left audio output LR ...

Page 152: ...tate of traffic information White TP is being received Orange TP is not being received HD Radio reception MC A multicast digital broadcast is being received ANALOG An analog broadcast is being received DIGITAL A digital broadcast is being received ST A stereo broadcast is being received EA White Emergency Alert is on No light Emergency Alert is off Orange Interrupting or in snooze ignore state ...

Page 153: ...hot from multiple angles you can select a favorite angle 16 9 LB Indicates the type of screen for the image The left mark indicates that a wide image picture 16 9 is displayed on a standard TV set screen 4 3 with a black band at both the top and bottom of the screen letter box Operation regulatory marks With this DVD some functions of this unit such as the play function may be restricted depending...

Page 154: ... Kannada ko Korean ks Kashmiri ku Kurdish ky Kirghiz la Latin lb Luxembourgish ln Lingala lo Laotian lt Lithuanian lv Latvian Lettish mg Malagasy mi Maori mk Macedonian ml Malayalam mn Mongolian mo Moldavian mr Marathi ms Malay mt Maltese my Burmese na Nauru ne Nepali nl Dutch no Norwegian oc Occitan om Afan Oromo or Oriya pa Punjabi pl Polish ps Pashto Pushto pt Portuguese qu Quechua rm Rhaeto Ro...

Page 155: ...z 48 kHz 20 22 000 Hz 44 1 kHz 20 20 000 Hz Total Harmonic Distortion 0 010 1 kHz S N Ratio dB 98 dB DVD Video 96 kHz Dynamic Range 98 dB DVD Video 96 kHz Disc Format DVD Video VIDEO CD CD DA Quantifying Bit Number 16 20 24 bit USB interface section USB Standard USB 2 0 High Speed File System FAT 16 32 NTFS Maximum Power Supply Current DNX893S DNX693S DNX7160BTS DC 5 V 1 5 A 2 DNX773S DNX573S DNX5...

Page 156: ...120 150 180 220 250 Hz Through Slope 6 12 18 24 dB Oct Position Front Rear Subwoofer Delay 0 20 0ft 0 03ft Step Gain 8 0 dB Subwoofer level 50 10 dB Digital FM tuner section DNX893S DNX773S DNX693S DNX573S Frequency Range step 87 9 MHz 107 9 MHz 200 kHz Frequency Response 3 0 dB 20 Hz 20 kHz S N Ratio 80 dB STEREO Digital AM tuner section DNX893S DNX773S DNX693S DNX573S Frequency Range step 530 kH...

Page 157: ...600 Ω Speaker Impedance 4 8 Ω Navigation section Receiver High sensitivity GPS receiver Reception Frequency 1575 42 MHz C A code Acquisition Times Cold 29 seconds typ All satellites at 130 dBm Without aiding Update Rate 1 second continuous Accuracy Position 2 5 meters CEP at 130 dBm Velocity 0 1 meter sec Position Method GPS Antenna External GPS antenna General Operating Voltage 14 4 V 10 5 16 V a...

Page 158: ...or other countries QR Code is registered trademarks of DENSO WAVE INCORPORATED in JAPAN and other countries The terms HDMI and HDMI High Definition Multimedia Interface and the HDMI logo are trademarks or registed trademarks of HDMI Licensing LLC in the United States and other countries MHL and the MHL logo are a trademark or registered trademark of MHL LLC Incorporates MHL 2 THIS PRODUCT IS LICEN...

Page 159: ...ANY EXPRESS OR IMPLIED WARRANTIES INCLUDING BUT NOT LIMITED TO THE IMPLIED WARRANTIES OF MERCHANTABILITY AND FITNESS FOR A PARTICULAR PURPOSE ARE DISCLAIMED IN NO EVENT SHALL THE FOUNDATION OR CONTRIBUTORS BE LIABLE FOR ANY DIRECT INDIRECT INCIDENTAL SPECIAL EXEMPLARY OR CONSEQUENTIAL DAMAGES INCLUDING BUT NOT LIMITED TO PROCUREMENT OF SUBSTITUTE GOODS OR SERVICES LOSS OF USE DATA OR PROFITS OR BU...

Page 160: ... labels on or inside the product relating to laser product safety JVC KENWOOD Corporation 2967 3 ISHIKAWA MACHI HACHIOJI SHI TOKYO JAPAN THIS PRODUCT COMPLIES WITH DHHS RULES 21 CFR SUBCHAPTER J IN EFFECT AT DATE OF MANUFACTURE Location Top plate DNX893S DNX773S DNX693S DNX573S IC Industry Canada Notice This device complies with Industry Canada licence exempt RSS standard s Operation is subject to...

Page 161: ...ita al mismo tiempo efectos perjudiciales en la salud y el medio ambiente Para cumplimiento de la COFETEL La operación de este equipo esta sujeta a las siguientes dos condiciones 1 es posible que este equipo o dispositivo no cause interferencia perjudicial y 2 este equipo o dispositivo debe aceptar cualquier interferencia incluyendo la que pueda causar su operación no deseada Informação sobre a el...

Page 162: ...Appendix 125 ...

Page 163: ...I IIOE android 0Bluetooth auto Siriusxm READY ore I DOLBY Deo ro l r s v 1DE 0 DIGITAL J i Made for r 111 Works with lgjiPod D iPhone Apple CarPiay KENWOOD 11 21HD3 Boolvnlwk Digital Sound Progr nInfo Art18tExprilnat Emerglncy Aleria ...

Page 164: ...DNX893S DNX773S DNX693S DNX573S GPS NAVIGATION SYSTEM INSTRUCTION MANUAL 2016 JVC KENWOOD Corporation IM391_Nav_K_En_00 ...

Page 165: ...Other Content The Map Data and Other Content are collectively the Content The Software Application and Content collectively the Garmin Products are protected under copyright laws and international copyright treaties The Garmin Products are licensed not sold The structure organization and code of the Software and Application are valuable trade secrets of Garmin and or its third party providers The ...

Page 166: ... The Garmin Products are provided to you as is and you agree to use them at your own risk Garmin and its licensors including the licensors service providers channel partners and suppliers and affiliated companies of Garmin and its licensors make no guarantees representations or warranties of any kind express or implied arising by law or otherwise including but not limited to content quality accura...

Page 167: ...rtext links to third parties or other Content by trade name trademark manufacturer supplier or otherwise does not necessarily constitute or imply its endorsement sponsorship or recommendation by Garmin or its licensors Product and service information are the sole responsibility of each individual vendor The HERE name and logo the HERE and HERE ON BOARD trademarks and logos and other trademarks and...

Page 168: ...ish version will control Government End Users If End User is an agency department or other entity of the United States Government or funded in whole or in part by the U S Government then use duplication reproduction release modification disclosure or transfer of the Application and accompanying documentation is subject to restrictions as set forth in DFARS 252 227 7014 a 1 JUN 1995 DOD commercial ...

Page 169: ......

Page 170: ...Using Suggested Routes 5 About Exit Services 5 Finding Exit Services 5 Navigating to an Exit 5 Avoiding Road Features 5 About Custom Avoidances 5 Avoiding an Area 5 Avoiding a Road 6 Disabling a Custom Avoidance 6 Deleting Custom Avoidances 6 Enabling Advanced Detours 6 Taking a Detour 6 Custom Points of Interest 6 Installing POI Loader Software 6 Using the POI Loader Help Files 6 Finding Extras 6...

Page 171: ...n Your Route 11 Taking an Alternate Route 11 Viewing Traffic on the Map 11 Traffic in Your Area 11 Searching for Traffic Delays 11 Viewing a Traffic Incident on the Map 11 Understanding Traffic Data 11 Customizing the Device 11 Map and Vehicle Settings 11 Enabling Maps 12 Navigation Settings 12 Changing the Route Calculation Mode 12 Display Settings 12 Changing the Color Mode 12 Traffic Settings 1...

Page 172: ... Select Where To Remove Shortcut s 2 Select a shortcut to remove 3 Select the shortcut again to confirm 4 Select Save Adding a Shortcut You can add shortcuts to the Where To menu A shortcut can point to a location a category or a search tool The Where To menu can contain up to 36 shortcut icons 1 Select Where To Add Shortcut 2 Select an item Updating the Software Before you can update the navigati...

Page 173: ...search term select the term To search using the text you entered select 6 If necessary select a location Changing the Search Area 1 From the main menu select Where To 2 Select Searching near 3 Select an option Search Tools Search tools allow you to search for specific types of locations by responding to on screen prompts Finding an Address NOTE The order of the steps may change depending on the ma...

Page 174: ...rch list that displays the last four destinations you selected 1 Select Where To 2 Select a category or select Categories 3 If applicable select a destination from the Quick Search list 4 If necessary select the appropriate destination Saving a Home Location You can set your home location for the location you return to most often 1 Select Where To Set Home Location 2 Select Enter My Address Use Cu...

Page 175: ...r one or more category names separated by commas 6 If necessary select a suggested category 7 Select Done Navigation Starting a Route 1 Search for a location Locations 2 Select a location 3 Select Go 4 If necessary select a route Previewing Multiple Routes 1 Search for a location Finding a Location by Category 2 From the search results select a location 3 Select Routes 4 Select a route 5 Select Go...

Page 176: ...mes the location may appear in the navigation bar on the map along with the estimated time of travel and traffic information Select the navigation bar to view a suggested route to the location About Exit Services NOTE You must be on a major highway or road to view exit services While navigating a route you can find businesses and services near upcoming exits Services are listed by category Gas Foo...

Page 177: ...road on the route select Detour by Road s on Route and select a road around which to detour Custom Points of Interest Custom POIs are customized points on the map They can contain alerts that let you know if you are near a designated point or if you are traveling faster than a specified speed Installing POI Loader Software You can create or download custom POI lists on your computer and install th...

Page 178: ...oute on the Map 1 While navigating a route select the navigation bar at the top of the map 2 Select Map Viewing the Next Turn While navigating a route a preview of the next turn lane change or other maneuver appears in the upper left corner of the map The preview includes the distance to the turn or maneuver and the lane in which you should be traveling if available From the map select to view the...

Page 179: ...oRoute 2 Follow the on screen instructions Calibrating the Fuel Economy You can calibrate the fuel economy to receive more accurate fuel reports for your specific vehicle and driving habits You should calibrate when you fill up your fuel tank 1 Select Apps ecoRoute At the Pump 2 Enter the current fuel price 3 Enter the amount of fuel the vehicle has used since the last time the fuel tank was fille...

Page 180: ... for a location Finding a Location by Category 5 Select Select 6 To add additional locations select 7 Search for a location 8 Select Select 9 Select Next 10Enter a name and select Done Scheduling a Trip You can add scheduling information to each location in your trip including the desired arrival time and layover duration at each location This can help you plan your departure to reach locations in...

Page 181: ...ther alerts near your current location or near a selected city 1 Select Apps Weather 2 If necessary select a city 3 Select Weather Alerts Checking Road Conditions 1 Select Apps Weather 2 If necessary select a city 3 Select Road Conditions Viewing Road Weather Before you can use this feature your device must be connected using Bluetooth wireless technology to access connected services This feature ...

Page 182: ...y Gray Traffic information is not available Traffic on Your Route Viewing Traffic on Your Route 1 While navigating a route select 2 Select Traffic On Route A list of traffic events appears organized by their location on the route 3 Select an event Manually Avoiding Traffic on Your Route 1 From the map select 2 Select Traffic On Route 3 If necessary use the arrows to view other traffic delays on yo...

Page 183: ...tention and could become a distraction while driving Voice Prompts Enables voice prompts GPS Simulator Stops the device from receiving a GPS signal Changing the Route Calculation Mode 1 Select Settings Navigation Calculation Mode 2 Select an option Select Faster Time to calculate routes that are faster to drive but can be longer in distance Select Shorter Distance to calculate routes that are shor...

Page 184: ...e About Displays the software version number the unit ID number and information on several other software features Travel History Allows the device to record information for the myTrends Using Suggested Routes Where I ve Been Viewing Previous Routes and Destinations and Trip Log Viewing the Trip Log features Clear Travel History Clears your travel history from the navigation system Update Maps Exp...

Page 185: ...To download free navigation software updates and purchase updated maps for your product go to www garmin com kenwood 190 01961 00_0A ...

Page 186: ...aciones abiertas antes de Ia conexi6n para el uso en el coche Mantenga pulsada Ia tecla lnicio y seleccione Cerrar todas para cerrar todas las aplicaciones abiertas Borre Ia memoria RAM del telefono Android antes de Ia conexi6n para el uso en el coche Mantenga pulsada Ia tecla lnicio y seleccione Administrador de tareas A continuaci6n seleccione RAM y Borrar memoria para borrar todos los procesos ...

Page 187: ......

Page 188: ......

Page 189: ...y market for inspection and approved warranty service or ship your unit in its original carton box or equivalent fully insured and shipping charges prepaid to the authorized Kenwood Service Center Dear Customer LIMITATION OF IMPLIED WARRANTIES Any and all implied warranties including warranties of merchantability and fitness for aparticular purpose shall be limited in duration to the length of thi...

Page 190: ...not disclose any defects covered by this warranty GARANTIE KENWOOD JVCKENWOOD Canada Inc ci apres appelee KENWOOD donne par ecrit Ia garantie suivante al acheteur original de chaque nouveau produit Kenwood distribue au Canada par KENWOOD et achete a un concessionnaire autorise par KENWOOD KENWOOD garantit sous reserve destermes etdes conditions enonces ci dessous que chaque nouveau produit Kenwood...

Reviews: