background image

DEEP FAT FRYING

For  safety  purposes  when  deep  fat  fry-
ing,  do  not  fill  the  pan  more  than  one
third full of oil.

DO  NOT

cover  the  pan  with  a  lid  and

DO NOT

leave the pan unattended.

In  the  unfortunate  event  of  a  fire,  leave
the pan where it is and turn off the con-
trol knobs.

Place a damp cloth or lid over the pan to
smother  the  flames.  Leave  the  pan  to
cool  for  at  least  30minutes  before  mov-
ing the pan.

DO NOT

USE WATER ON THE FIRE.

CHOICE  OF  THE  BURNER

On  the  control  panel,  near  each  knob,
there  is  a  diagram  that  indicates  which
burner  is  controlled  by  that  knob.
Select  the  burner  that  is  most  suitable
for the diameter and capacity of the pan
to  be  used. 
As  an  indication,  the  burners  and  the
pans must be used in the following way:

It is important that the base diameter of
the pot is at least the same diameter as
the  burner  ring  to  obtain  an  efficient
heat transfer.
Always  position  pans  centrally  over  the
burners.

Adjust the size of the flame so that it
does not lick up the side of the pan. 
Position  pan  handles  so  that  they
cannot be accidentally knocked.

Fig. 3.3

BURNERS

POT DIAMETER

Auxiliary

12 - 14 cm

Semi-rapid

16 - 24 cm

Rapid

24 - 26 cm

Triple-ring

26 - 28 cm

do not use pans with concave

or convex bases

9

LIGHTING  GAS  BURNERS  FITTED

WITH  SAFETY  VALVE  DEVICE

To  ignite  the  burner,  the  following
instructions are to be followed:

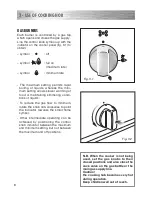
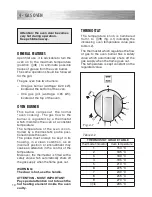
1) Press in the corresponding knob and

turn  counter-clockwise  (fig. 3.2)  to
the full flame position marked by the

symbol  (fig. 3.1)  and  hold  the

knob in until the flame has been lit.

In the case of a mains failure light the
burner with a match or lighted taper.

2) Wait  for  about  ten  seconds  after  the

gas burner has been lit before letting
go  of  the  knob  (valve  activation
delay).

3) Adjust  the  gas  valve  to  the  desired

position.

If  the  burner  flame  should  go  out  for
some reason, the safety valve will auto-
matically stop the gas flow.
To re-light the burner, return the knob to
the closed 

position, 

wait for at least

1  minute

and  then  repeat  the  lighting

procedure

.

If your local gas supply makes it difficult
to  light  the  burner  with  the  knob  set  to
maximum, set the knob to minimum and
repeat the operation.

Summary of Contents for CK 304 G

Page 1: ...Instructions for use Installation advices GAS COOKER CK 304 G GB Before operating this cooker please read these instructions carefully ...

Page 2: ...onment 2 Dear Customer Thank you for purchasing a Kenwood Gas Cooker The safety precautions and recommendations in these instructions are for your own safety and that of others They will also provide a means by which to make full use of the features offered by your appliance Please keep this booklet in a safe place It may be useful in the future either to yourself or to others in the event that do...

Page 3: ...rements of EU Directive EMC 2004 108 EC Requirements of EU Directive 93 68 EEC 3 CONTENTS Page Number Introduction 2 3 Important Safeguards Recommendations 4 5 Cooking Hob 6 Control Panel 7 Use of cooking hob 8 9 Fan oven 10 12 Cooking guide 13 Minute counter 14 Cleaning maintenance 15 22 Advice For The Installer 23 Installation 24 28 Gas section 29 34 Electrical section 35 36 Guarantee 37 After S...

Page 4: ...azardous parts be made harmless especially in relation to children who could play with unused appliances After use ensure that the knobs are in off position Keep children away from the appliance during use Household appliances are not intended to be played with by children Young children should be supervised to ensure that they do not play with the appliance Children or persons with a disability w...

Page 5: ... and do not allow fat or oils to build up in the oven base or tray Remove spillages as soon as they occur Do not stand on the cooker or on the open oven door Always stand back from the appliance when opening the oven door to allow steam and hot air to escape before removing the food This appliance is for domestic use only WARNING Taking care NOT to lift the cooker by the door handle Safe food hand...

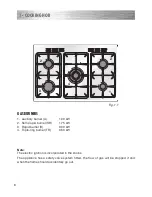
Page 6: ...burner SR 1 75 kW 3 Rapid burner R 3 00 kW 4 Triple ring burner TR 3 50 kW 1 COOKING HOB Note The electric ignition is incorporated in the knobs The appliance has a safety valve system fitted the flow of gas will be stopped if and when the flame should accidentally go out 6 ...

Page 7: ...control knob 2 Minute counter 3 Front left burner control knob 4 Rear left burner control knob 5 Central burner control knob 6 Rear right burner control knob 7 Front right burner control knob 8 Oven light control knob 2 CONTROL PANEL 1 7 2 3 4 5 6 7 8 ...

Page 8: ...or maintaining simmering condi tions of liquids To reduce the gas flow to minimum rotate the knob anti clockwise to point the indicator towards the small flame symbol Other intermediate operating can be achieved by positioning the control knob indicator between the maximum and minimum setting but not between the maximum and off positions 8 N B When the cooker is not being used set the gas knobs to...

Page 9: ...not lick up the side of the pan Position pan handles so that they cannot be accidentally knocked Fig 3 3 BURNERS POT DIAMETER Auxiliary 12 14 cm Semi rapid 16 24 cm Rapid 24 26 cm Triple ring 26 28 cm do not use pans with concave or convex bases 9 LIGHTING GAS BURNERS FITTED WITH SAFETY VALVE DEVICE To ignite the burner the following instructions are to be followed 1 Press in the corresponding kno...

Page 10: ...tains the oven at a constant temperature The temperature of the oven is con trolled by a thermostatic probe posi tioned inside the oven The probe must always be kept in its housing in a clean condition as an incorrect position or encrustment may cause an alteration in the control of the temperature Moreover the thermostat is fitted with a safety valve which automatically shuts off the gas supply w...

Page 11: ...his operation 2 Lightly press and turn the tempera ture knob anti clockwise to max position 3 Press the knob right down to prime the electric ignition Keep the knob pressed Never continue this operation for more than 15 seconds If the burn er has still not ignited wait for about 1 minute prior to repeating the ignition In case of a power cut press the knob and immediately bring a light ed match to...

Page 12: ...e the electric ignition Keep the knob pressed Never continue this operation for more than 15 seconds If the burn er has still not ignited wait for about 1 minute prior to repeating the ignition In case of a power cut press the knob and immediately put a lighted match to the right and left side of the burner fig 4 6 4 After lighting the burner wait a few seconds before releasing the knob until the ...

Page 13: ...ration Keep children away Notes The grill burner has only one setting that is full on It is important that the heat shield is fit ted the correct way up as shown in the figure 4 7 IMPORTANT WARNING For best results when using the grill place the shelf on the second level and when using the grill pan handle avoid contact with the heat shield which will be HOT during use Fig 4 7 OVEN LIGHT The cooke...

Page 14: ...7 8 20 25 mins Bread Rolls 225 7 8 10 15 mins Pizza Dough 225 8 15 20 mins Shortcrust pastry 200 6 20 30 mins Quiches Flans 180 190 4 5 30 40mins ROAST MEATS Beef medium joint 190 5 20 25 mins lb 20mins Lamb 190 5 25 30mins lb 25mins Pork 190 5 30mins lb 30mins Chicken 190 5 20 25mins lb 30mins Turkey 180 4 15 20mins lb 20mins Stews Casseroles 170 3 11 2 2hours Temperature and times given are appr...

Page 15: ...l sound at the end of the countdown The knob must be rotated clockwise as far as the 120 minutes position first and then set to the required time by rotating it anticlockwise IMPORTANT WARNING This is only a mechanical timer Remember to turn off the oven manually at the end of countdown 60 2 0 4 0 8 0 1 0 0 Fig 6 1 ...

Page 16: ...mended when handling or cleaning of this appliance Important Before cleaning or carrying out any maintenance disconnect the appliance from the electrical supply and wait for it to cool down Attention The appliance gets very hot mainly around the cooking areas It is very impor tant that children are not left alone in the kitchen when you are cooking Do not use a steam cleaner because the moisture c...

Page 17: ...these parts must be cleaned very carefully to avoid scratching and abrasion You are advised to use a soft cloth and neutral soap CAUTION Do not use abrasive substances or non neutral detergents as these will irreparably damage the surface GAS TAPS In the event of operating faults in the gas taps call the Service Department INSIDE OF OVEN The oven should always be cleaned after use when it has cool...

Page 18: ...respective housings Check that the electrode S figs 7 1 7 3 is always clean to ensure trouble free spark ing Check that the probe T figs 7 1 7 3 next to each burner is always clean to ensure cor rect operation of the safety valves Both the probe and ignition plug must be very carefully cleaned Note The electrode S must be very carefully cleaned To avoid damage to the electric ignition do not use i...

Page 19: ...w The burners must be correctly positioned so that they cannot rotate fig 7 4 Then position the cap A and the ring B fig 7 4 7 5 Fig 7 4 A B Fig 7 3 S T CORRECT REPLACEMENT OF THE AUXILIARY SEMI RAPID AND RAPID BURNERS It is very important to check that the burner flame distributor F and the cap C has been correctly positioned see figs 7 1 7 2 failure to do so can cause serious problems ...

Page 20: ... use harsh abrasive cleaners or sharp metal scrapers to clean the oven door glass since they can scratch the surface which may result in shattering of the glass Do not store flammable material in the oven or in the storage compartment STORAGE COMPARTMENT The storage compartment is accessible through the pivoting panel fig 7 7 Fig 7 6 ...

Page 21: ...y and rack into the run ners Fig 7 9 The shelf must be fitted so that the safety catch which stops it sliding out faces the inside of the oven To dismantle operate in reverse order OVEN FLOOR The oven floor F fig 7 10 can be eas ily removed to facilitate cleaning Remember to replace the floor correctly afterwards Be careful not to confuse the tray L with the oven floor F fig 7 10 ...

Page 22: ...nges fig 7 11B Hold the door as shown in fig 7 11 Gently close the door and withdraw the lower hinge pins from their location fig 7 11C Withdraw the upper hinge pins from their location fig 7 11D Rest the door on a soft surface To replace the door repeat the above steps in reverse order Fig 7 11D Fig 7 11C Fig 7 11B Fig 7 11A REMOVING THE OVEN DOOR Fig 7 11 ...

Page 23: ... with a protective film on steel and aluminium parts This film must be removed before using the cooker The appliance is designed and approved for domestic use only and should not be installed in a commercial semi commercial or communal environment Your product will not be guaranteed if installed in any of the above environments and could affect any third party or public liability insurances you ma...

Page 24: ...etween the side of the cooker and the furniture The furniture walls adjacent to the cooker must be made of material resistant to heat The veneered synthetic material and the glue used must be resistant to a temperature of 90 C in order to avoid ungluing or deformations Curtains must not be fitted immediately behind appliance or within 500 mm of the sides If the cooker is located on a pedestal it i...

Page 25: ... the rear of the cooker on a piece of the polystyrene packag ing exposing the base for the fit ting of the feet Fit the 4 legs by screwing them tight into the support base as shown in picture 8 3 Fig 8 3 LEVELLING THE COOKER The cooker may be levelled by screwing the lower ends of the feet IN or OUT fig 8 4 Fig 8 4 ...

Page 26: ...le carry out this manoeuvre to prevent dam age to the adjustable feet fig 8 5 Fig 8 6 Fig 8 7 WARNING Be careful do not lift the cooker by the door handle when raising to the upright position fig 8 6 WARNING When moving cooker to its final position DO NOT DRAG fig 8 7 Lift feet clear of floor fig 8 5 ...

Page 27: ...n fig 8 8 can be purchased from most plumbers merchants and do it yourself D I Y shops Wall fixing Floor fixing Brackets Existing slot in rear of cooker Dotted line showing the position of cooker when fixed Dimension is in millimetres 3 Outline of cooker backplate at the engagement slot Fig 8 8 ...

Page 28: ...tside air in which case no permanent ventilation is required For rooms with a volume greater than 10 m3 no permanent ventilation is required NB Regardless of room size all rooms containing the appliance must have direct access to the outside air via an openable window or equivalent Where there are other fuel burning appliances in the same room BS 5440 2 2000 should be consulted to determine the co...

Page 29: ...stalled Serviced by a competent person in accordance with the current editions of the following Standards Regulations or those regulations appropriate to the geographical region in which they are to be installed Gas Safety Installation Use Regulations Building Regulations British Standards Regulations for Electrical Installation Installation and service of any gas product must be made by a suitabl...

Page 30: ...ge of electricity should install the appliance He should observe the Regulations and Codes of Practice governing such installation of gas appliances Note It is recommended that the gas connection to the appliance is installed with a flexible connecting tube made to BS5386 Notes Flexible hoses can be used where the sited ambient temperature of the hose does not exceed 70 C These hoses must be manuf...

Page 31: ...so be connected in such away that it does not touch the floor To screw the connecting tube operate with two spanners fig 9 2 The unused end inlet pipe must be closed with the plug interposing the gasket After connecting to the mains check that the coupling are correctly sealed using soapy solution but never a flame GB 1 2 BSP male Plug Fig 9 1 Fig 9 2 Left gas inlet pipe Right gas inlet pipe ...

Page 32: ...32 IMPORTANT PRESCRIPTIONS FOR GAS CONNECTION Rear wall 700 mm Suggested area for gas mains connection 200 mm Fig 9 3 ...

Page 33: ... most suitable for the kind of gas for which it is to be used The burners are conceived in such a way so as not to require the regula tion of the primary air CONVERSION TO LPG NATURAL GAS ADJUSTING OF THE MINIMUM OF THE TOP BURNERS In the minimum position the flame must have a length of about 4 mm and must remain lit even with a quick turn from the maximum position to that of minimum The flame adj...

Page 34: ... 00 Triple ring TR 7 00 Oven 12 40 Grill 9 30 Reference value BURNERS Nominal Power kW Reduced Power kW G 30 28 30 mbar G 31 37 mbar G 20 20 mbar Ø injector 1 100 mm Ring opening mm Ø injector 1 100 mm Ring opening mm Auxiliary A 1 00 0 30 50 72 X Semi rapid SR 1 75 0 45 65 97 Z Rapid R 3 00 0 75 85 115 Y Triple ring TR 3 50 1 50 95 135 T Oven 6 20 1 30 120 8 180 1 5 Grill 4 65 107 Fully open 165 ...

Page 35: ...njectors operating as follows remove the oven bottom unscrew and remove the burner fixing screw A fig 9 6 slacken screw B fig 9 6 slip the burner itself from the oven Fig 9 7 Take care not to damage the wire to the ignition electrode and the safety valve probe remove the injector from the connection and replace it with the correct one fig 9 7 Fig 9 7 A B Fig 9 6 ...

Page 36: ...rew C fig 9 8 Slacken screw D fig 9 8 Move and gently suspend the burner as shown in figure 9 9 Take care not to damage the wire to the ignition electrode and the safety valve probe Remove the injector from the connection and replace it with the correct one fig 9 9 Fig 9 9 Fig 9 8 C D ...

Page 37: ...BURNER With a screwdriver untighten the screw figs 9 10 9 11 and turn the air ring to close or open the air flow according to the TABLE FOR THE CHOICE OF THE INJECTORS Light the burner and check the flames Fig 9 10 Fig 9 11 Ring opening mm ...

Page 38: ...l not to turn the knob rod until the flame reaches 3 4 mm high N B For LPG the by pass screw must be fixed thoroughly LUBRICATION OF THE GAS TAPS If the gas tap becomes stiff it is neces sary to dismount it accurately clean it with gasoline and spread a bit of special grease resistant to high temperatures on it The operations must be executed by a suitably qualified and registered techni cian IMPO...

Page 39: ...ED FOR ANY OTHER REASON THEN THE FUSE SHOULD BE REMOVED AND THE CUT OFF PLUG DISPOSED OF SAFELY TO PREVENT THE HAZARD OF ELECTRIC SHOCK THERE IS A DANGER OF ELECTRICAL SHOCK IF THE CUT OFF PLUG IS INSERTED INTO ANY 13 AMP SOCKET OUTLET If a replacement plug is to be fitted please observe the wiring code shown below A properly earthed three pin plug fused at 3 amps to BS 1362 ASTA approved must be ...

Page 40: ...ied technician To connect the supply cable Remove the screws securing the cover A on the rear of the cooker fig 10 2 Feed the supply cable through the cable clamp D The supply cable must be of a suitable size for the current requirements of the appliance see the section Feeder cable section Connect the wires to the terminal block B as shown in the diagram in figure 10 3 or connect the phase wires ...

Page 41: ... not misused neglected or damaged it it has not been modified it is not second hand it has not been used commercially you have not fitted a plug incorrectly and you supply your receipt to show when you brought it The appliance has been installed as per the instructions contained within this booklet This guarantee does not affect your statutory rights GUARANTEE ...

Page 42: ...e on 0844 561 6263 Descriptions and illustrations in this booklet are given as simply indicative The manufacturer reserves the right considering the characteristics of the models described here at any time and without notice to make eventual necessary modifications for their construction or for commercial needs ...

Page 43: ...43 ...

Page 44: ...code 1103643 ß2 ...

Reviews: