15
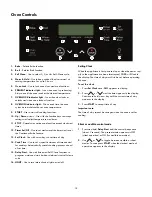
Oven Controls
1. Bake
- Selects Bake function.
2. Broil
- Selects Broil function.
3. Self Clean
- Use to select 2, 3, or 4hr Self-Clean cycle.
4. Warm & Hold
- Use to keep cooked food warm and at
serving temperature for up to 3 hours.
5. Oven Lock
-
Use to lock oven door and oven functions
.
6. PREHEAT indicator light
- Is on when oven is preheating.
Stays on until the oven reaches the desired temperature.
7. OVEN LOCK indicator light
- Is on when door locks or
unlocks and when oven lockout is active.
8. OVEN ON indicator light
- Glows each time the oven
cycles on to maintain the set oven temperature.
9. START
- Use to start all cooking functions.
10. Up / Down
arrows - Use with the function keys to accept
settings and adjust temperature and times.
11. STOP
- Cancels any active oven function except clock and
timer.
12. Timer Set/Off
- Use to set and cancel the timer and to set
the Continuous Bake feature.
13. Set
Clock
- Use with arrow keys to set time of day.
14. Cook Time
- Use to set a specific amount of time needed
for cooking. Automatically cancels cooking process at end
of set time.
15. Delay Start
- Use with Bake and Self Clean functions to
program a delayed start bake or delayed start self clean
cycle.
16. LIGHT
- Use to turn internal oven light on and off.
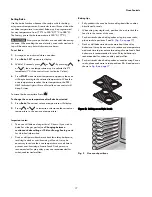
Setting Clock
When the appliance is first powered up or when the power sup-
ply to the appliance has been interrupted,
12:00
will flash in
the display. The time of day must first be set before operating
the oven.
To set the clock
1.
Press
Set Clock
once.
CLO
appears in display.
2.
Press
or
and the time appears in the display.
Continue to hold arrow key until the correct time of day
appears in the display.
3.
Press
START
to accept time of day.
Important note:
The time of day cannot be changed when the oven is set for
cooking.
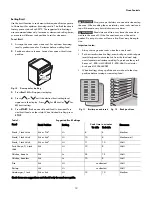
Silent or audible control mode
1.
Press and hold
Delay Start
until the control beeps once
(about 3 seconds). The present mode appears as OFF
(silent operation) or ON (for audible operation).
2.
Use
or
to toggle between audible or silent
modes. To save press
START
when the desired mode of
operation appears in the display
1
2
3
4
5
6
7
8
9
10
11
12
13
14
15
16
Summary of Contents for 970. 5032 Series
Page 29: ......
Page 30: ...424712 10 20 08 SR Printed in the U S A 02488 ...


