InfoV.A.C.® Therapy UnitOwner Service Manual
Important Document
File in your maintenance records.
Page 1: ...InfoV A C Therapy Unit Owner Service Manual Important Document File in your maintenance records...
Page 2: ......
Page 3: ...es 10 Inspect Unit For Damage 10 Hanger Arm and Rubber Anti slip Pad Inspection 12 Battery Check Change 13 Charge Battery 15 Power On Screen Inspection 16 Data Transfer 16 Canister Bellows Check 17 Ca...
Page 4: ...m Rubber Block Replacement 29 Rubber V Groove Anti slip Pad Repair 31 Specifications 32 Spare Parts 33 Symbols Used 34 Service Manual 34 Therapy Unit 34 Customer Contact Information 34 Technical Repor...
Page 5: ...law US restricts this device to sale or rental by or on the order of a physician DISCLAIMER OF WARRANTY AND LIMITATION OF LIABILITY KCI HEREBY DISCLAIMS ALL EXPRESS OR IMPLIED WARRANTIES INCLUDING WIT...
Page 6: ...ted surfaces Although this product conforms to the intent of the standard IEC 60601 1 2 in relation to Electromagnetic Compatibility electrical equipment may produce interference If interference is su...
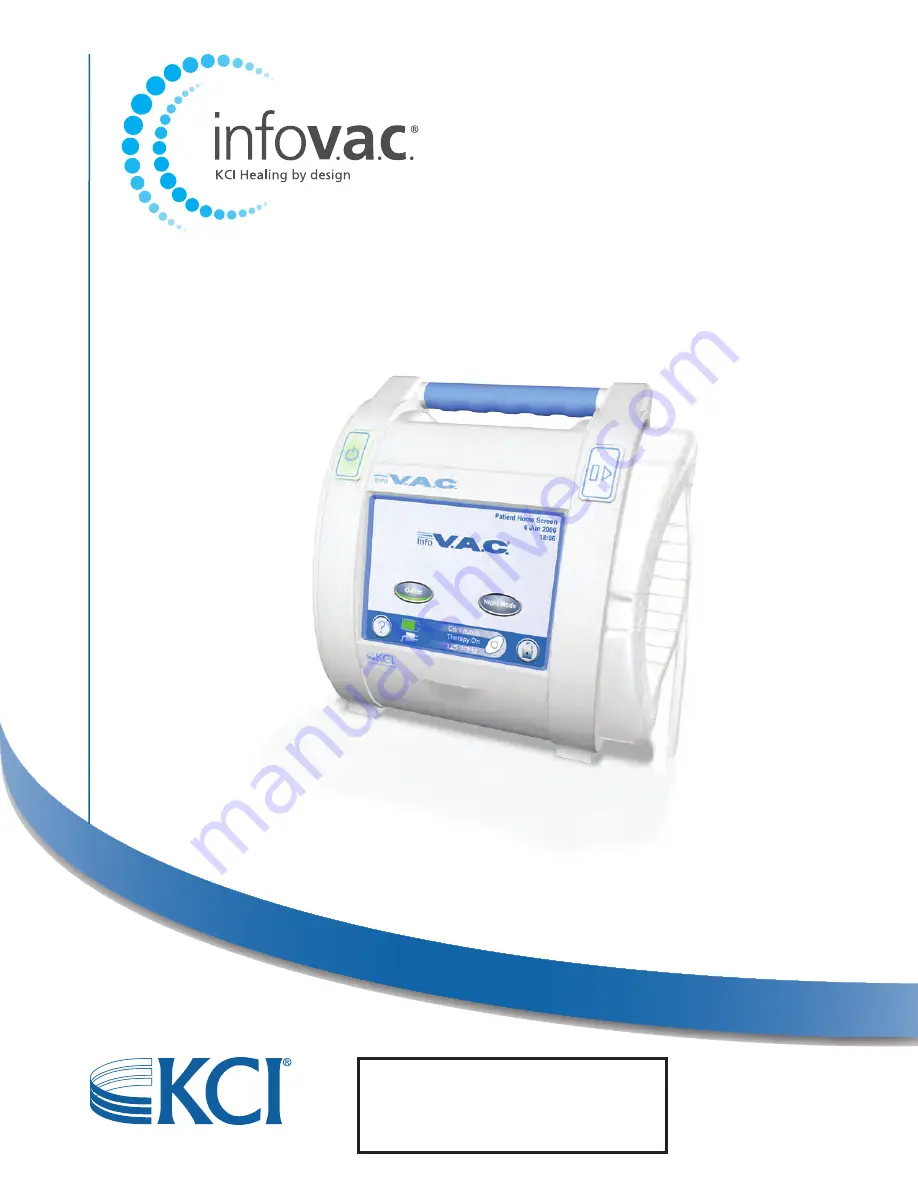
Page 7: ...Canister Canister Release Button Hanger Lock Knob Regulatory Label Carry Handle USB Data Port InfoV A C Power Supply Power Connection Battery Charging Indicator LED Hanger Arm Hanger Arm Instruction...
Page 8: ...oV A C Therapy Unit for use includes unpacking inspection for any damaged or missing parts and an initial round of service procedures to ensure the battery is fully charged and the unit is ready for p...
Page 9: ...ipment PPE and hand hygiene protocols in accordance with the following standards 29 CFR 1910 1030 OSHA Bloodborne Pathogens Standard MMWR October 2002 51 No RR 16 Guidelines for Hand Hygiene in Health...
Page 10: ...r dry 5 Place the clean unit in a clear plastic bag and move it to the service area Therapy Unit 1 Ensure therapy unit is unplugged from power supply 2 Remove canister bellows from unit Wipe clean bel...
Page 11: ...r dry 3 Inspect the power supply brick and cords for damage and cracked or exposed wiring Contact KCI see page 34 if replacement is necessary 4 Inspect the caution labels attached to the power cords f...
Page 12: ...on sources Use PPE as appropriate or as specified in local protocols Inspect Unit For Damage Tools and Supplies None The following replacement parts may be required As needed and identified during ins...
Page 13: ...sure they are clear with no visible bent pins or other obstructions 9 Check the touch screen for any visible signs of damage or excessive screen scuffing or scratches that could obscure screen element...
Page 14: ...ubber Anti slip Pad Inspection The purpose of this inspection is to ensure correct operation of the hanger arm and that all rubber anti slip pads are undamaged and properly attached If the hanger arm...
Page 15: ...Phillips head screwdriver Calibrated torque screwdriver The following replacement parts may be required InfoV A C Battery Pack KCI PN 340426 InfoV A C Battery Tray KCI PN M4270570 InfoV A C Battery H...
Page 16: ...l the battery history label to indicate the battery has been checked so this procedure can be bypassed during future service procedures 11 Once the dates are verified carefully examine the battery pac...
Page 17: ...wer on self test verify the plug icon is present on the lower left of the touch screen as shown 8 Power the unit off by holding down the power on off button for a minimum of two seconds 9 Allow the ba...
Page 18: ...t KCI see page 34 6 If the unit passes continue on to Data Transfer Power On Off Button glows green Battery Icon shows 3 4 Charge or more Data Transfer If a problem occurs with therapy and you would l...
Page 19: ...return to the Clinician Home Screen 12 Remove the USB Flash Drive from the InfoV A C Therapy Unit 13 Connect the USB Flash Drive to an external computer 14 Using a plain text editor program open the e...
Page 20: ...mly toward the therapy unit listening and feeling the canister latch into place with a slight click 3 If the canister does not easily fit and latch into place remove the canister and check that the ca...
Page 21: ...of the screen If the time and date are correct to within five minutes of local time proceed to Testing Procedures otherwise go to Step 2 2 Press the Utilities button 3 Press the Time Date button Clin...
Page 22: ...a new PM Label be placed on the InfoV A C Therapy Unit each time the PM check is performed 4 If the last PM check was performed more than five and one half 5 months prior perform the pressure transdu...
Page 23: ...ion of the touch screen as shown 8 Verify that the unit is in clinician mode as indicated in the upper right of the touch screen Change to clinician mode if the unit is in patient mode as shown Engine...
Page 24: ...r of the readings are out of tolerance perform the Zero Pressures procedure and repeat this sensor accuracy procedure 13 If the unit still fails contact KCI see page 34 Zero Pressures Perform this pro...
Page 25: ...er tubing Ensure a snug fit for a secure seal as shown 3 Obtain a locally available piece of flexible tubing that will both fit into the over tubing and onto the digital manometer barb Ensure a snug f...
Page 26: ...the Settings button 20 Press the Pressure button 21 Use the minus arrow key to set the pressure to 125 mmHg 22 Press the Exit button two times 23 Press the OK button 24 The pressure should drop and st...
Page 27: ...PN M6275069 one each Canister Preparation These are normal InfoV A C canisters that can be reused for up to 6 months as a test canister KCI recommends marking the canisters with Test Canister Not For...
Page 28: ...in approximately two minutes or less 5 Press the Reset button to return to the Therapy Start screen 6 Press the Exit button to return to the Clinician Home Screen 7 Continue on to Blockage Alert if th...
Page 29: ...On Off button to start therapy 4 Press the Exit button to return to the Clinician Home Screen 5 The Canister Full Therapy Interrupted alarm should sound in approximately 90 seconds or less 6 Ensure t...
Page 30: ...m patient placements according to local protocols that ensure the cleanliness of the unit and power supply 1 Carefully wrap each power cord into a bundle and place them and the power supply into a cle...
Page 31: ...ve or equivalent Isopropyl alcohol Cleaning cloth An appropriate sized tool for removing any residual old adhesive a standard flat blade screwdriver may work Protective gloves Rubber block KCI PN M324...
Page 32: ...nsuring the adhesive remains inside the hook cavity 5 Press the rubber block into place 6 Immediately remove any excess adhesive on the block hanger arm or cast metal hook 7 Follow manufacturer direct...
Page 33: ...ective gloves The following replacement parts may be required InfoV A C Battery Tray KCI PN M3268561 The rubber V groove anti slip pads are glued in place Rough handling of the unit may loosen these p...
Page 34: ...re with air oxygen or nitrous oxide Continuous Operation Type B Applied Part Class II Internally Powered Equipment IPX0 Battery Run Life Approximately 12 hours depending on settings Electrical Charger...
Page 35: ...nfoV A C Patient Information Label M3253940 InfoV A C Serial Number Label M3253961 InfoV A C Logo Label M3253962 KCI Logo Label M3268561 InfoV A C Battery Housing M3253946 InfoV A C Power Cord Warning...
Page 36: ...ocedures laid down in the council directive Class II Internally Powered Equipment Refer to User Instructions Type B Applied Part UL Rated This product is designated for separate collection at an appro...
Page 37: ...al safety precautions such as DOUBLE INSULATION or REINFORCED INSULATION are provided there being no provision for protective earthing or reliance upon installation conditions For the InfoV A C Therap...
Page 38: ...ature Unit cleaned and disinfected Perform Infection Prevention and Control process pg 7 Charge Battery pg 15 Inspect Unit For Damage pg 10 Blockage Alert pg 26 Canister Not Engaged pg 27 Canister Ful...
Page 39: ...th Plus is a trademark of Nice Pak Products Inc Loctite 411 is a trademark of Henkel Corporation All other trademarks designated herein are proprietary to KCI Licensing Inc its affiliates and or licen...