6 Panoramic and 3D calibrations and adjustments
63
3D Panel
After replacing the 3D panel redo all the 3D calibrations
and the 3D quality check. If the collimator is moved redo all
collimator, pixel and geometry calibrations as well as the
quality checks.
Panoramic panel
After replacing the panoramic panel redo all the panoramic
calibrations. If the collimator is adjusted or replaced, redo
all collimator, pixel and geometry calibrations as well as the
quality checks.
6.3 Reset maintenance counter
1. Open S2 terminal.
2. Enter service mode.
3. Type “indicator service clear” in the command prompt.
This resets the annual maintenance counter to zero.
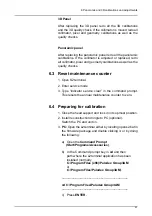
6.4 Preparing for calibration
1. Close the head support and lock it in its upmost position.
2. Install reconstruction dongle to PC (optional).
Switch the PC and unit on.
3.
PC:
Open the s2terminal either by locating opens2.bat in
the firmware package and double clicking it, or by doing
the following:
a) Open the
Command Prompt
(Start\Programs\Accessories)
.
b) In the Command prompt key in
cd
and then
path where the s2terminal application has been
installed (normally
C:\Program Files (x86)\Palodex Group\IAM
or
C:\Program Files\Palodex Group\IAM
).
_______________________________________
cd C:\Program Files\Palodex Group\IAM
_______________________________________
c) Press
ENTER.
Summary of Contents for ORTHOPANTOMOGRAPH OP 3D Pro
Page 2: ......
Page 4: ......
Page 8: ...iv rev...
Page 18: ...1 Introduction 10...
Page 27: ...2 Unit description 19 2 6 Unit movements Panoramic unit movements R C J D...
Page 29: ...2 Unit description 21...
Page 30: ...2 Unit description 22...
Page 38: ...4 PC requirements 30...
Page 54: ...5 Installing the unit 46 4 Fasten the covers...
Page 67: ...5 Installing the unit 59 C C D D Top cover of the column E E...
Page 104: ...7 Cephalometric calibration and alignment 96...
Page 111: ...7 Cephalometric calibration and alignment 103 3 Tighten the locking nut...
Page 117: ...7 Cephalometric calibration and alignment 109...
Page 128: ...8 Special procedures 120 6 Remove the arm from the column 4 nuts 7 Disassemble the arm...
Page 132: ...8 Special procedures 124 right handed assembly Prism assembly for the left handed cephalostat...
Page 158: ...8 Special procedures 150...
Page 165: ...9 OP 3D Pro Pre sales check list 157 9 11 Notes comments...
Page 166: ...9 OP 3D Pro Pre sales check list 158 9 12 Dimensions 463...
Page 167: ...9 OP 3D Pro Pre sales check list 159 9 13 Dimensions with cephalostat...


