background image

CORDLESS 125mm ANGLE GRINDER INSTRUCTION MANUAL

6

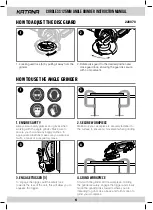
HOW TO USE THE ANGLE GRINDER

HOW TO ADJUST THE DISC GUARD

1. ENSURE SAFETY

1. Loosen guard lock (5) by pulling it away from the 

grinder.

2. SECURE WORKPIECE

2. Rotate disk guard to the desired position and 

close guard lock, ensuring the guard is secure 

with no movement.

Always wear safety glasses and gloves when 

working with the angle grinder. Make sure to 

secure your hair and any baggy clothes. In 

appropriate situations make sure you wear ear 

muffs, a mask or a respiratory mask.

Make sure your workpiece is securely fastened to  

the surface to ensure no movement when grinding.

3. ENGAGE TRIGGER (3)

Start with the grinder off the workpiece. Holding 

the grinder securely, engage the trigger and slowly 

move the grinding disk towards where you are 

intending to grind. Use a back and forth motion to 

grind your workpiece.

To engage the trigger, pull the safety lock 

towards the rear of the unit, this will allow you to 

squeeze the trigger.

4. GRIND WORKPIECE

CHARGE-ALL

18V

1

1

3

2

2

4

CHARGE-ALL

18V

220070

Summary of Contents for 220070

Page 1: ...CORDLESS 125mm ANGLE GRINDER INSTRUCTION MANUAL CORDLESS 125mm ANGLE GRINDER INSTRUCTION MANUAL 220070 LITHIUM ION 18V WARRANTY 5 YEAR DISCS 125mm...

Page 2: ...rying power tools with your finger on the switch or energising power tools that have the switch on invites accidents d Remove any adjusting key or wrench before turning the power tool on A wrench or a...

Page 3: ...fragments The eye protection must be capable of stopping flying debris generated by various operations The dust mask or respirator must be capable of filtrating particles generated by your operation P...

Page 4: ...off wheels are intended for peripheral grinding side forces applied to these wheels may cause them to shatter d Always use undamaged wheel flanges that are of correct size and shape for your selected...

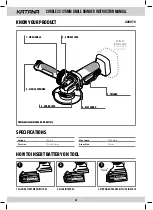
Page 5: ...SIDE HANDLE 5 GUARD LOCK Minimum recommended 4Ah battery 6 FLANGE SPANNER 4 DISC GUARD 3 TRIGGER 2 SPINDLE LOCK ANY 18V CHARGE ALL BATTERY WILL FIT BATTERY INSERTS HERE HOW TO INSERT BATTERY ON TOOL 1...

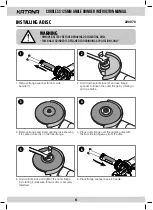
Page 6: ...uter flange by rotating it clockwise Ensure disc is securely fastened 2 Hold down spindle lock 2 and use flange spanner to loosen the outer flange by rotating it anti clockwise 4 Place outer flange ov...

Page 7: ...d any baggy clothes In appropriate situations make sure you wear ear muffs a mask or a respiratory mask Make sure your workpiece is securely fastened to the surface to ensure no movement when grinding...

Page 8: ...major failure and compensation for any other reasonably foreseeable loss or damage You are also entitled to have the goods repaired or replaced if the goods fail to be of acceptable quality and the f...

Reviews: