T U N E R
9.5.2. Defining scanning settings for
a separate directory
9.5.2.1. The directory Property window:
Selecting the required directory
The Tuner program allows to define scanning settings for a
separate directory. To do this, follow these steps:
1. Select the required directory with the arrow keys or with your
mouse.
By default the program selects the first directory in the list.
2. Press
the
Property
button. The
Property for…
window will
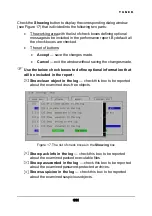
appear on your screen. This window contains the tabs:
Objects
,
Actions
, and
Options
and the buttons:
Accept
,
Accept to all
,
Save as…
and
Cancel
. Options on these tabs
allow you to define the following settings for the selected
directory:
•
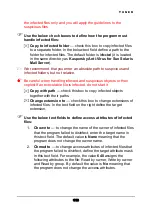
the objects and the file types to be checked for viruses
(for details see subchapter 9.5.2.2);
•
the way infected objects must be processed (for details
see subchapter 9.5.2.3);
•
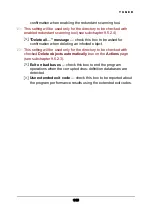
the advanced scanning tools to be used (for details see
subchapter 9.5.2.4).
3. Buttons at the bottom of the
Property for…
window allow you
to do the following:
•
Accept —
applies the defined settings to the directory
selected on the
Location
page.
•
Accept to all
— applies the defined settings to the
location to be checked (the entire list of directories
defined on the
Location
page).
•
Save as…
— allows to apply the defined settings to a
new directory to be added to the location to be checked.
101

