background image

Venkon XL

Assembly, installation and operating instructions

59

11

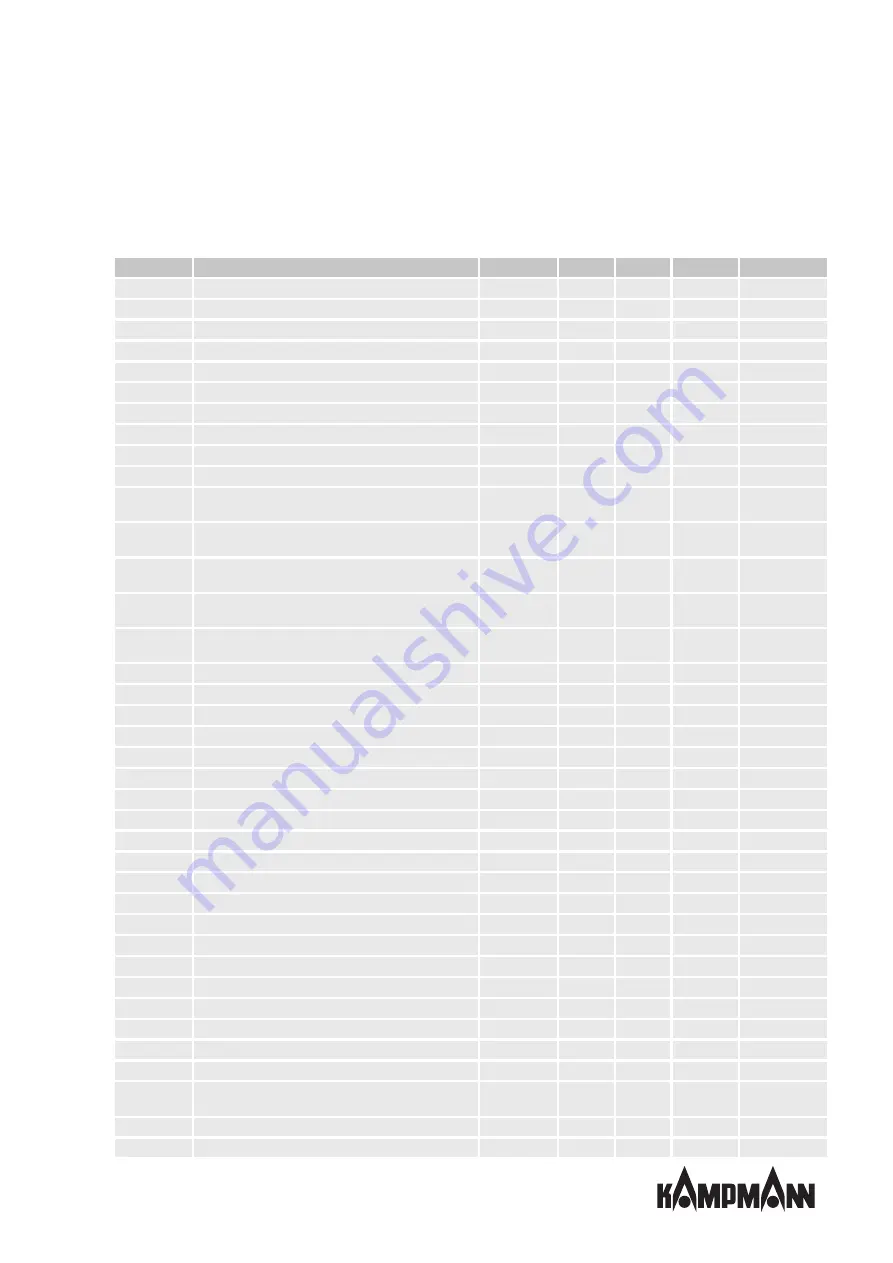
List of KaControl parameters

11.1 Venkon XL parameter list

Parameter

Function

Standard

Min.

Max.

Unit

Venkon XL*

P000

Software version

24

0

255

-

24

P001

Basic setpoint for setpoint input ± 3K

22

8

32

°C

22

P002

Switch-on and switch-off hysteresis for valves

3

0

255

K/10

1

P003

Neutral zone in a 4-pipe system (only in automatic mode)

3

0

255

K/10

20

P004

Cooling without fan assistance (natural convection)

0

0

255

K/10

0

P005

Heating without fan assistance (natural convection)

5

0

255

K/10

0

P006

Fan On/Off hysteresis (only in ventilation mode)

5

0

255

K/10

5

P007

P-band, heating

20

0

100

K/10

25

P008

P-band, cooling

20

0

100

K/10

25

P009

Shifting to the basic setpoint for setpoint input ± 3K

3

0

10

C

3

P010

Contact sensor: temperature limit value to activate fan
stages 1 and 2 in heating mode

26

0

255

°C

26

P011

Contact sensor: temperature limit value to activate fan
stages 3 and 4 in heating mode

28

0

255

°C

28

P012

Contact sensor: temperature limit value to activate fan
stage 5 in heating mode

30

0

255

°C

30

P013

Contact sensor: hysteresis for limit temperatures
P010, P011, P012, P014

10

0

255

K/10

10

P014

Contact sensor: limit value temperature to activate fan
stages in cooling mode

18

0

255

°C

18

P015

Function of input AI1

0

0

19

-

0

P016

Function of input AI2

0

0

19

-

0

P017

Function of input AI3

0

0

9

-

0

P018

Temperature increase of cooling setpoint in Eco operation

30

0

255

K/10

30

P019

Temperature reduction of heating setpoint in Eco operation

30

0

255

K/10

30

P020

ADC limit coefficient

6

0

15

-

6

P021

ADC average coefficient

6

0

15

-

6

P022

Activation/deactivation of sun symbol in Comfort mode

0

0

1

-

0

P023

Difference for compensation when cooling

0

-99

127

K/10

0

P024

Coefficient for compensation when cooling

0

-20

20

1/10

0

P025

Difference for compensation when heating

0

-99

127

K/10

0

P026

Coefficient for compensation when heating

0

-20

20

1/10

0

P027

Fan setting: maximum run-time for manual fan mode

0

0

255

min.

0

P028

Rinsing function: fan stage during the rinsing function

2

1

5

-

2

P029

Activation of continuous fan mode

0

0

1

-

0

P030

Ventilation temperature activation

12

0

255

°C

12

P031

Ventilation interval

27

0

255

°C

27

P032

Rinsing function: maximum idle time of fan

15

0

255

min.

15

P033

Rinsing function: duration of the rinsing function

120

0

255

s

120

P034

Rinsing function: activation in operating modes

0

0

3

-

0

P035

Fan run-on time after an operating mode is switched to
stage 1

0

0

255

s

0

P036

Type of setpoint setting

0

0

1

-

0

P037

Display

1

0

7

-

1

Summary of Contents for Venkon XL

Page 1: ...Venkon XL Assembly installation and operating instructions Keep these instructions in a safe place for future use Issue07 23EN SAP No 1809237...

Page 2: ......

Page 3: ...and function 13 5 1 Overview 13 5 2 Brief description 14 5 3 Wear parts list 14 6 Installation and wiring 15 6 1 Definition of the connection side 15 6 2 Requirements governing the installation site...

Page 4: ...ndensate pump 45 7 3 KaControl C1 46 7 3 1 KaController installation 46 7 3 2 Connection C1 47 7 3 3 Cabling Venkon XL KaControl C1 control by KaController 49 7 3 4 Cabling Venkon XL KaControl C1 cont...

Page 5: ...apply as do general safety provisions governing the use of the equipment Illustrations in this guide are intended to provide a basic understanding and may differ from the actual model Ongoing tests a...

Page 6: ...must be observed IMPORTANT NOTE Only use the unique after completion of the complete building and system Site heating is not deemed to be correct and proper use Intended use of the unit also includes...

Page 7: ...efer to VDI 2035 Sheets 1 2 DIN EN 14336 and DIN EN 14868 with regard to the properties of the medium used to protect the equipment The following values provide further guidance The water used should...

Page 8: ...tch cabinets computers or other electrical units or contacts that are not drip proof Never use the unit as a construction site heater Never operate the unit in areas with a high dust content IMPORTANT...

Page 9: ...from specialist professional training Safety and accident prevention regulations Guidelines and recognised technical regulations i e Association of German Electricians VDE regulations DIN and EN stan...

Page 10: ...ite IMPORTANT NOTE 2 people are needed to transport the unit Wear personal protective clothing when transporting the unit Only lift the unit on both sides and not by the pipes valves IMPORTANT NOTE Ma...

Page 11: ...tions and shocks IMPORTANT NOTE Under certain circumstances packages can carry storage instructions that exceed the requirements listed here Comply with these instructions accordingly 3 4 Packaging Ha...

Page 12: ...V 230 V Size 1 2 3 4 1 2 3 4 Unit Unit Air volume l s 59 254 60 438 112 683 118 878 cfm 125 538 127 928 237 1447 250 1860 MCA A A MOP A A Heat output 1 kW 2 03 13 53 2 6 23 43 4 78 36 6 5 2 47 45 MBH...

Page 13: ...uction and function 5 1 Overview 1 2 3 4 5 6 7 8 9 10 Fig 1 Venkon XL at a glance example ceiling version 1 Float switch 2 Water connection 3 Actuator 4 Valve condensate tray 5 Condensate pump 6 Filte...

Page 14: ...d or cooled air is discharged into the room through the optional connection unit for circular pipes 5 3 Wear parts list Figure Item Features Suitable for Item no Replacement filter ePM10 50 M5 MERV 8...

Page 15: ...efinition of the connection side Example ceiling mounting left connection left Example ceiling mounting right connection Fig 2 Ceiling mounting left and right connection Example wall mounting left con...

Page 16: ...flow and return water connections on site Connection to the pipe network 24 There is a power supply on site Maximum electrical rating values 38 If need be provide a condensation connection with a suff...

Page 17: ...NOTE Horizontal installation of units When installing the units ensure that they are completely horizontal to ensure proper operation IMPORTANT NOTE Avoid draughts Consider the occupied zone when inst...

Page 18: ...gn the basic unit for correct operation Install the basic unit with a gradient on the condensation discharge side should condensation be produced Once the basic unit has been aligned prevent the fixin...

Page 19: ...Size 2 Size 3 Size 4 X Fig 5 Views cladding simplified representation The cladding depth X for all sizes is 275 mm 10 8 inches By means of the holes in the side panels see detail X the cladding can b...

Page 20: ...xing brackets for the casing Glue the spacers maintain a min distance of 2 cm from above to prevent the edge of the casing from colliding with the spacers Position the casing on the basic unit Attach...

Page 21: ...ssories Overview air side steel sheet accessories 1 2 3 4 5 Fig 6 Schematic layout of steel sheet accessories for ceiling mounting 1 Air duct bend 90 4 Splitter silencer 2 Elastic connecting piece 5 F...

Page 22: ...lastic connecting piece 1 2 3 4 A 570 870 1320 1670 B 530 830 1280 1630 950 1250 1700 2050 900 1200 1650 2000 750 800 Inspection hatch with frame 198 240 Splitter silencer 1 2 3 4 A 570 870 1320 1670...

Page 23: ...Venkon XL Assembly installation and operating instructions 23 Frame connection dimensions Size 1 Size 2 Size 3 Size 4 Fig 7 Frame connection dimensions...

Page 24: ...s Route condensation lines with a sufficient cross section without bends and narrow sections with a gradient to the in situ waste water pipe Allow adequate space for the air flow air inlet and outlet...

Page 25: ...ed Fol low appropriate safety precautions Remove the protective covers from the supply and return pipes For 2 pipe Remove red protective caps from connection For 4 pipe Remove red protective caps from...

Page 26: ...unit right connection Ceiling unit left connection Water connection A Venting heating for size 1 4 B Venting cooling for size 1 4 C Venting heating for size 1 2 D Venting heating for size3 4 Venting c...

Page 27: ...pipe Right side view 2 pipe Right side view 4 pipe Dimensions mm left connection side Dimensions mm right connection side Dimensions inch left connection side Dimensions inch right connection side Fig...

Page 28: ...th return screw fitting Suitable for all sizes Item no 34823B0B4 2 Mounting water con nection right Differential pressure independent valve kit Mounting water con nection left 2 pipe differential pres...

Page 29: ...w Bottom view Side view Side view Bottom view Bottom view Rear view Rear view 2 way valve kit wall mounting 2 pipe left connection side 2 way valve kit wall mounting 4 pipe left connection side 2 way...

Page 30: ...ar view Side view Bottom view Bottom view 2 way valve kit ceiling mounting 2 pipe left connection side 2 way valve kit ceiling mounting 2 pipe right connection side 2 way valve kit ceiling mounting 4...

Page 31: ...Rear view Rear view Valve kit differential pressure independent wall mounting 2 pipe left side connection Valve kit differential pressure independent wall mounting 4 pipe left side connection Valve k...

Page 32: ...mounting 2 pipe left side connection Valve kit differential pressure independent ceiling mounting 4 pipe left side connection Valve kit differential pressure independent ceiling mounting 2 pipe right...

Page 33: ...light slope in the condensate drain dir ection otherwise condensate will remain in the main condensate tray When connecting the condensate drain to the sewage system the valid regulations must be obse...

Page 34: ...on minimum 1 2 Increase the cross section of the line with longer condensate lines Check whether the condensation line needs to be insulated to prevent the build up of condensation along the line Do n...

Page 35: ...imum suction 3 m 9 80 ft self priming Maximum head 20 m 65 60 ft Maximum horizontal run 100 m 330 ft at 0 head and 0 suction Sound 20 dBA at 1 m DIN EN ISO 3741 2011 DIN EN ISO 3744 2010 Voltage 100 2...

Page 36: ...mm 42mm 15mm 48mm 39mm 132mm 87mm 53mm 53mm 286mm Stromversorgungskabel Sternschlauch und Siphon Stopp Vorrichtung Saugschlauch L ftungsschlauch Werkseitig instal lierte Sicherung Alarmkabel Kabelbind...

Page 37: ...efore reinstalla tion of the REFCO Combi pump CAUTION This appliance incorporates an earth connection for functional purposes only DO NOT use tools to connect the tubing DO NOT operate this product in...

Page 38: ...8 Maximum electrical rating values for Venkon XL KaControl C1 Venkon XL electromechanical model 00 01 Size Number of fans Nominal voltage V AC Mains fre quency Hz Nominal power W Nom inal current A Le...

Page 39: ...control Comply with the details on cable types and cabling with due consideration of VDE 0100 Without NYM J The requisite number of wires including PE conductor is stated on the cable Cross sections a...

Page 40: ...W1 N PE L 1 2 gn ge Mains 230 V 50 Hz Venkon XL electromechanical 00 Room thermostat type 30155 In situ fusing Observe Electrical data information table Mains 230 V AC Unit no 1 Unit no 2 Mains power...

Page 41: ...OM NO 2 2 2 2 5 W10 W11 W7 W9 W6 Mains 230 V 50 Hz Venkon XL electromechanical 00 Air conditioning controller type 30155 In situ fusing Observe Electrical data information table Mains 230 V AC Unit no...

Page 42: ...0 V 50 Hz Venkon XL electromechanical 00 Clock thermostat type 30256 In situ fusing Observe Electrical data information table Mains 230 V AC Unit no 1 Unit no 2 Valve drive s 230 V AC Open Closed Fan...

Page 43: ...GND I2 GND L W10 W7 W9 W6 Mains 230 V 50 Hz Venkon XL electromechanical 00 Clock thermostat type 30256 In situ fusing Observe Electrical data information table Mains 230 V AC Unit no 1 Unit no 2 Valve...

Page 44: ...ins 230 V 50 Hz Venkon XL electromechanical 00 Climate Controller type 148941 type 148942 In situ fusing Observe Electrical data information table Mains 230 V AC Unit no 1 Unit no 2 Mains 230 V AC Ref...

Page 45: ...W10 W11 W7 W9 W6 Climate Controller type 148941 type 148942 Support bracket by others Mains 230 V 50 Hz Venkon XL electromechanical 00 In situ fusing Observe Electrical data information table Mains 2...

Page 46: ...t KaControl unit in line with the wiring diagram The maximum bus length between the KaController and the KaControl master unit is 30 m The respective KaControl automatically becomes the master unit in...

Page 47: ...low voltage and bus cables Lay all BUS cables in a linear pattern Star shaped wiring is not permitted The KaController is connected via a bus connection to the respect ive control PCB on the unit Righ...

Page 48: ...high voltage lines If other types of cables are used they must be at least equivalent Length of the BUS line from the KaController to unit 1 max 30 m Maximum number of parallel units 6 units CAN bus c...

Page 49: ...2 V1 GND V2 GND Mains 230 V 50 Hz KaController type 321000x In situ fusing Observe Electrical data information table Mains 230 V AC Unit no 1 Electrical junction box PCB PUR EC01 Optional Room sensor...

Page 50: ...tion table Mains 230 V 50 Hz Venkon XL KaControl C1 Unit no 1 PCB PUR EC01 SmartBoard circuit board Electrical junction box Venkon EC KaControl C1 Unit no 2 PCB PUR EC01 SmartBoard circuit board Elect...

Page 51: ...nnected Fill pipes and unit with water and bleed Check whether all bleed screws are closed Check leak tightness pressure test and visual inspection Check whether the parts carrying water have been flu...

Page 52: ...per and trouble free operation of the equipment If there are signs of increased wear during regular checks shorten the required maintenance intervals to the actual wear and teat Contact the manufactur...

Page 53: ...rp edges Wear suitable protective gloves Loosen the screws of the filter cover Remove the filter cover Change filter When inserting the filter ensure that the arrow on the filter points in the directi...

Page 54: ...3 2 Visual checks Clean the heat exchanger Check the heat exchanger for soiling and carefully vacuum if necessary Avoid damage to the pipework and fins 9 3 3 Cleaning the main condensation tray Loosen...

Page 55: ...Venkon XL Assembly installation and operating instructions 55 Clean the main condensate tray 9 3 4 Cleaning the valve condensation tray Clean the valve condensate tray...

Page 56: ...o Clean the float switch Pull the yellow strainer out of the intake area clean it as well and reinsert it 9 3 6 Clean the inside of the unit Check all elements that come into contact with air internal...

Page 57: ...t properly installed Check the function of the condensate pump Check condensate drain clean if necessary Air conducting accessory components not properly insulated Check insulation Water leakage conde...

Page 58: ...ture sensor in the KaController faulty tAL3 Real time clock in the KaController faulty tAL4 EEPROM in the KaController faulty Cn Communication fault with the external control Tab 12 KaController alarm...

Page 59: ...Contact sensor limit value temperature to activate fan stages in cooling mode 18 0 255 C 18 P015 Function of input AI1 0 0 19 0 P016 Function of input AI2 0 0 19 0 P017 Function of input AI3 0 0 9 0...

Page 60: ...eed limit 0 0 1 1 P053 Valve activation by pulse width modulation of the valve switching cycle 15 10 30 min 15 P054 Configuration of bus system 0 0 2 0 P055 Display of heating cooling symbols in autom...

Page 61: ...f DIP switch 0 63 P098 0 10 V control valve switch on limit 30 0 100 V 10 40 P099 0 10 V control min switch on limit for fan speed 40 0 100 V 10 40 P100 0 10 V control max switch on limit for fan spee...

Page 62: ...set operating week counter 0 0 1 0 P129 Fan speed limiter activation in certain operating modes 0 0 1 0 P130 Absolute fan speed increase via contact 2 0 5 2 P131 External ventilation delay time 0 0 25...

Page 63: ...roller sensor 0 60 60 C t006 LCD display contrast 15 0 15 t007 BEEP setting 0 BEEP ON 1 BEEP OFF 0 0 1 t008 Password for KaController Parameter menu 11 0 999 t009 Minimum settable setpoint temperature...

Page 64: ...Model Articles No Type Mod le N d article Typ Model Nr artyku u Typ Model slo v robku auf das sich diese Erkl rung bezieht mit der den folgenden Norm en oder normativen Dokumenten bereinstimmt to whi...

Page 65: ...nie 2016 2281 EU Durchf hrungsverordnung f r Luftheizungsprodukte K hlungsprodukte Prozessk hler mit hoher Betriebstemperatur und Gebl sekonvektoren Frank Bolkenius Lingen Ems 06 03 2023 _____________...

Page 66: ...est tigt dabei insbesondere die Erf llung der Anforderungen aus Tabelle 7 der VDI 6022 Blatt 1 Ausgabe 2018 01 mit den laufenden Nummern 0 9 Herstellerinformationen zur Eignung von Reinigungs und Desi...

Page 67: ...entilator Prated c Prated c Prated h Pelec LWA kW kW kW kW dB A 6 9 2 8 10 6 0 231 72 4 0 1 6 6 1 0 170 73 13 9 5 8 21 4 0 469 73 10 8 4 4 16 5 0 411 75 Standard rating conditions for fan coil units a...

Page 68: ...ationsanforderungen f r Fan Coils gem Verordnung EU Nr 2016 2281 Standard rating conditions for fan coil units according to regulation EU No 2016 2281 Norm Pr fbedingungen f r Gebl sekonvektoren gem V...

Page 69: ...C for 4 pipe units Water temperature decrease 5 C for 2 pipe units 10 C for 4 pipe units 20 C Trockenkugel Wassertemperatur am Einlass 45 C f r 2 Rohrsysteme 65 C f r 4 Rohrsysteme Sinken der Wassert...

Page 70: ...C for 4 pipe units Water temperature decrease 5 C for 2 pipe units 10 C for 4 pipe units 20 C Trockenkugel Wassertemperatur am Einlass 45 C f r 2 Rohrsysteme 65 C f r 4 Rohrsysteme Sinken der Wasserte...

Page 71: ...sheet accessories 22 Tab 6 Valve seat accessories 28 Tab 7 Technical data for condensate pump 35 Tab 8 Maximum electrical rating values for Venkon XL KaControl C1 38 Tab 9 Maximum electrical rating va...

Page 72: ...up com hvac products fan coils venkon xl Land Kontakt Germany Kampmann GmbH Co KG Friedrich Ebert Str 128 130 49811 Lingen Ems T 49 591 7108 660 F 49 591 7108 173 E export kampmann de W Kampmann eu 07...

Reviews:

Related manuals for Venkon XL