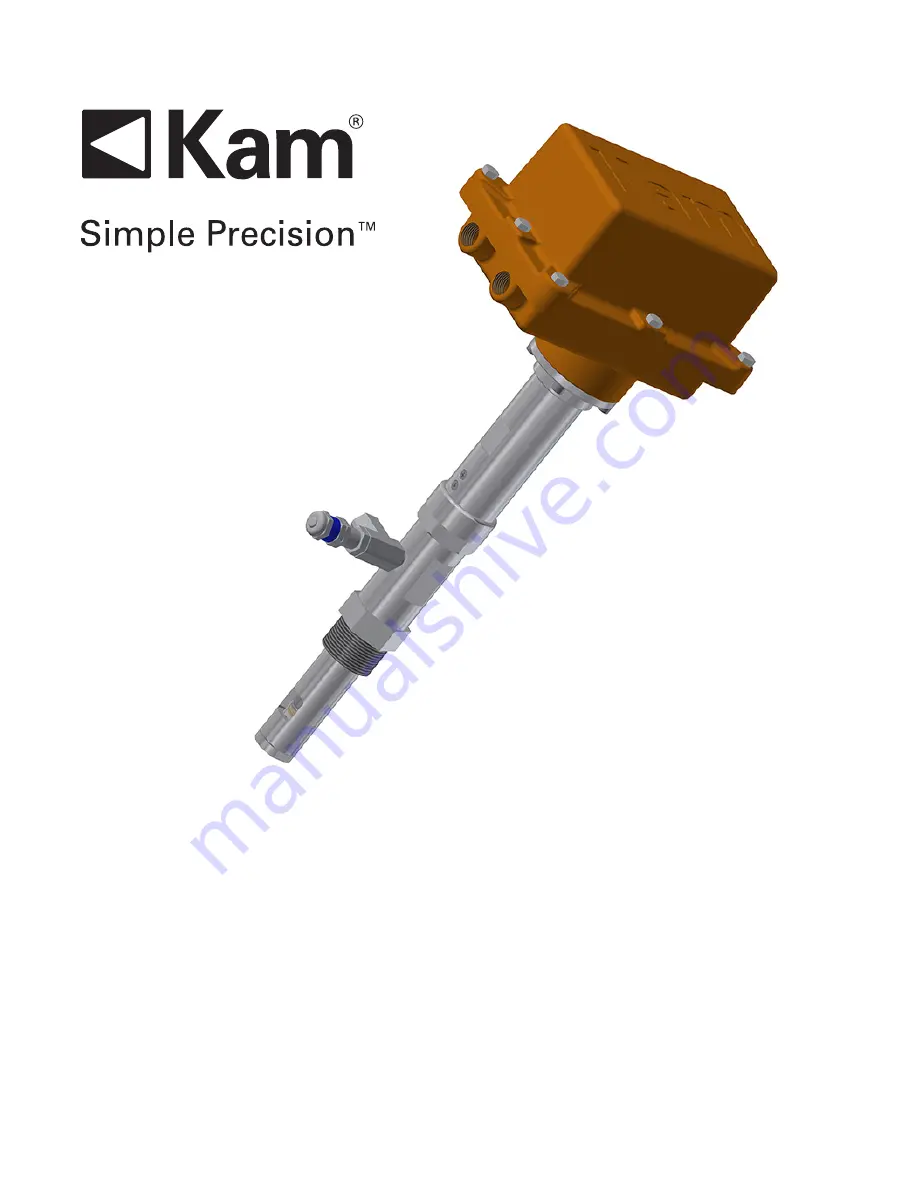
background image

KAM

®

 E-IAS™ 

ELECTRIC ISOKINETIC AUTOMATIC SAMPLER

TEL 

+1 713 784-0000  

FAX 

+1 713 784-0001  

Email

 [email protected]

KAM CONTROLS, INC.


3939 Ann Arbor Drive 

Houston, Texas 77063 USA

www.KAM.com

User Manual

PER API 8.2, ASTM D4177 

AND ISO 3171

An ISO 9001 certified company

EIASMANUAL0719

Summary of Contents for E-IAS

Page 1: ...TIC SAMPLER TEL 1 713 784 0000 FAX 1 713 784 0001 Email Sales Kam com KAM CONTROLS INC 3939 Ann Arbor Drive Houston Texas 77063 USA www KAM com User Manual PER API 8 2 ASTM D4177 AND ISO 3171 An ISO 9...

Page 2: ...ation 5 Wiring Diagram 10 4 Maintenance 11 Parts List 11 Replacing Seals and O rings 12 CAUTION When installing the E IAS sampler in a pipeline containing petroleum products petro chemicals waste wate...

Page 3: ...O D U C T I O N AVAILABLE MODELS and MOUNTING OPTIONS FIG 1 2 FIG 1 1 Option 1 Insertable retractable E IAS with 2 3 or 4 flanged seal housing or 2 MNPT Option 2 Fixed insertion E IAS with 1 25 NPT o...

Page 4: ...e Materials Wetted parts SS316 Peek Standard O rings Viton Bite size 0 5 1 1 5 or 2 cc Sample rate 20 samples minute max Viscosity 1 500 cSt Pipe size 1 36 Max pressure 285 psi Temperature 40 to 350 F...

Page 5: ...attaching motor housing to probe body If motor housing is attached at time of installation detach prior to installation by removing the 4 hex screws at the bottom of the housing with a 3 16 Allen wre...

Page 6: ...er allows the Sampler Probe to be inserted in and out of the pipe under pressure and flow conditions up to 100 psi INSERTABLE RETRACTABLE MODELS INSTALLATION I N S TA L L AT I O N Before mounting the...

Page 7: ...ocking Collar This will prevent the E IAS Sampler Shaft from sliding and the Probe will be protected inside the Seal Housing until and during installation Fig 3 4 Calculate the insertion distance usin...

Page 8: ...D into the Valve or connection in order to calculate TID You can do this by measuring the distance from the edge of the Valve or female connection to the top of the Seal Housing body and subtracting t...

Page 9: ...flowing stream This can be done by aligning the Flow Indicators in parallel with the main pipe The Flow Indicators are located at the bottom of the Actuator Housing Push the E IAS Sampler in until th...

Page 10: ...cking pres sure for the PRV by twisting the cap 8 turns counter clockwise The PRV is going to have the highest cracking pressure when the cap is screwed all the way in and the lowest cracking pressure...

Page 11: ...ND The pulse duration should be between 200 ms and 1000ms The minum time between pulses is 3 seconds The E IAS will start the actuation to take a sample with every pulse unless it receivea a pulse bef...

Page 12: ...0000 or faxing your request to 1 713 784 0001 M A I N T E N A N C E FIG 4 1 KAM E IAS SEAL KIT PART NUMBER 361300 1 1 2 2 A A B B V DO NOT SCALE DWG ls REVISION HISTORY REV DESCRIPTION DATE A New Dra...

Page 13: ...REPLACING SEALS AND O RINGS 1 2 3 4 FIG 4 3 FIG 4 4 Remove the sampling section of the probe by placing a 1 1 2 wrench on the wrench Flats of the sample chamber and turning the bottom section of the...

Page 14: ...Sample Chamber by turning it counterclockwise while holding the Linear Actuator with a 1 3 4 wrench Fig 4 6 NOTE There are 2 Seal Bushing Assemblies in either end of the Sample Chamber These may come...

Page 15: ...and may require some force Ensure that both Seal Bushing Assemblies are in place inside the Sample Chamber when done Apply Loctite 242 to the threads and tighten in place using 1 1 2 wrench and 1 3 4...

Page 16: ...nch remove the Cover hold ing the plunger seal Fig 4 11 Inspect the Spring and Check Valve for damage and replace if necessary Using solvent clean the inside threads of the Cover Place Check Valve and...

Page 17: ...Apply Loctite 242 to the Sample Chamber thread Screw the sampling section back on to the sample chamber by holding the sample chamber with 1 1 2 wrench and turning the bottom section of the probe clo...

Reviews: