KAIXIN
KX5600F
Full Digital Ultrasonic Diagnostic
Instruments (Vet)
User’s Manual
Xuzhou Kaixin Electronic Instrument Co., Ltd.
Page 1: ...KAIXIN KX5600F Full Digital Ultrasonic Diagnostic Instruments Vet User s Manual Xuzhou Kaixin Electronic Instrument Co Ltd...
Page 2: ...Symbols Description 3 2 Chapter 4 Installation and Check 4 1 4 1 System Installation 4 1 4 2 Ultrasonic Probe Installation 4 1 4 3 Shutter Release Installation 4 2 4 4 Video Recorder Installation 4 3...
Page 3: ...ce 7 1 7 1 Daily Maintenance 7 1 7 2 Use and Maintenance for the Rechargeable Lithium Ion Battery Pack 7 3 7 3 Replaceable Parts 7 5 7 4 Backup Data 7 5 7 5 Troubleshooting 7 5 7 6 Periodic Safety Che...
Page 4: ...ng requirements 1 Assembly expansion readjustment improve and repair are all performed by professionals recognized by Kaixin 2 All replacement parts and accessories consumables involved repairs are Ka...
Page 5: ...lteration or repair the system by non Kaixin designated personnel 6 This product is intended to provide clinical diagnostic data for the doctor The doctor shall be responsible for the diagnostic proce...
Page 6: ...result in light injury or property loss or affecting the use if not avoided Safety Symbols Symbols Description Type B applied part Indicates the need for the user to consult the instructions for use f...
Page 7: ...the equipment please immediately turn off the power and contact your service representative 6 Do not use a probe that has a damaged or scratched surface Immediately stop using the probe and contact yo...
Page 8: ...pment being damaged by lightening 21 Always keep the equipment dry Avoid transporting this equipment quickly from a cold place to a warm place otherwise condensation or water droplets may form allowin...
Page 9: ...o practice ALARA when operating ultrasound examination Minimize the acoustic power without compromising the quality of images 7 Clean and disinfect the probe before and after each examination 8 Thorou...
Page 10: ...c pressure 700hPa 1060hPa 1 3 Dimensions and Weight 1 Main unit dimension approx 285 143 35mm3 L W T 2 Main unit net weight 1 1kg excluding accessories Warning Do not use or store the equipment in the...
Page 11: ...1 PC 4 Power cable 1 PC 5 Shutter release 1 PC 6 Probe holder 1 PC 7 Strap 1 PC 8 Leather bag 1 PC 9 Plastic sealed box 1 PC 2 2 Optional Parts 1 3 5 MHz convex array probe 2 3 3 5MHz linear array lo...
Page 12: ...o ultrasonic signal based on principle of converse piezoelectric effect The ultrasonic signal after entering the human body is reflected as echo wave and converted to electric signal again The acousti...
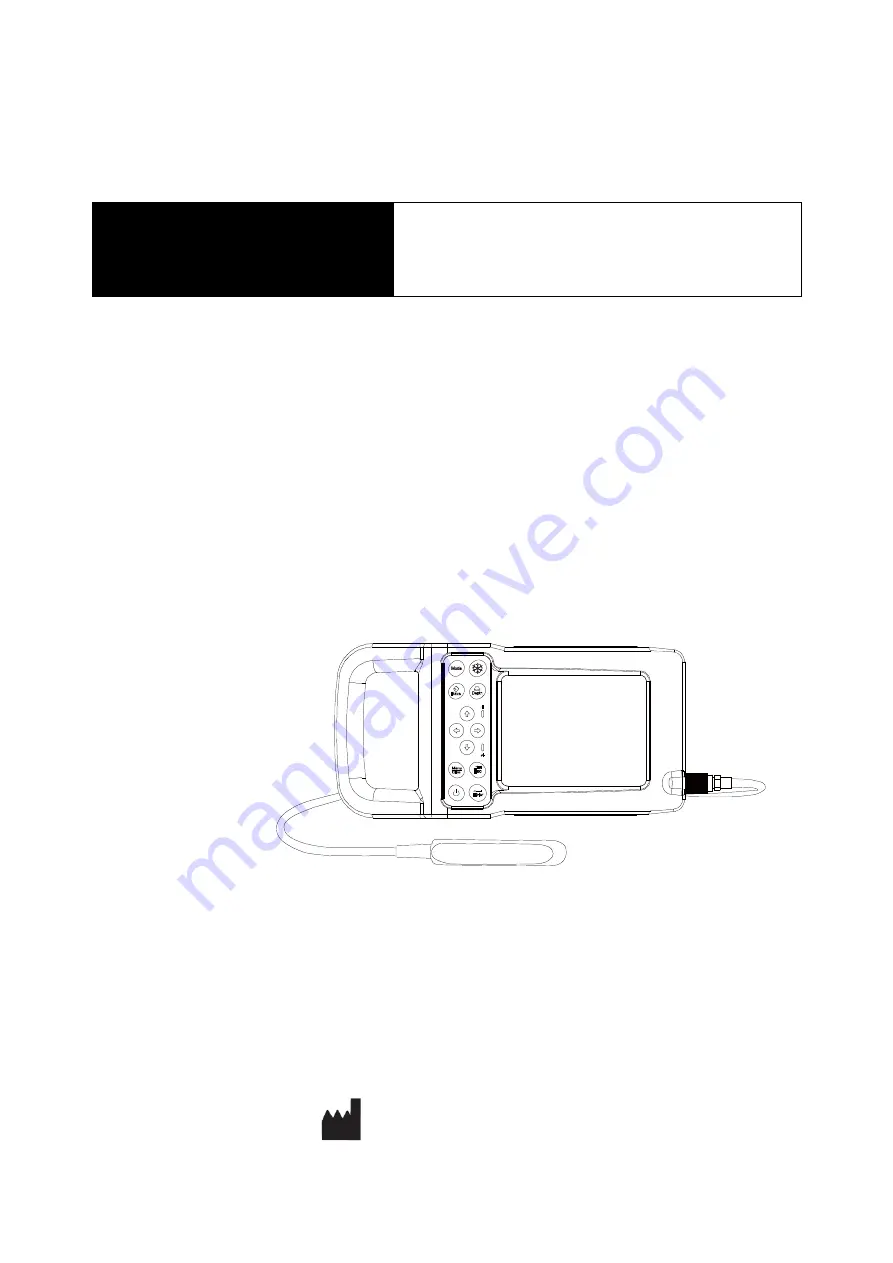
Page 13: ...ates 9 Power switch 3 5 Symbols Description This instrument uses the symbols listed in the following table and their descriptions are explained Symbols Description Type B applied part Indicates the ne...
Page 14: ...acking limit by number Temperature limits Storage and transport Humidity limitation Storage and transport Atmospheric pressure limitation Storage and transport Marking for the separate collection of e...
Page 15: ...the ultrasonic system before disconnecting the probe Disconnecting the probe with system power on may damage the system or probe 2 Before disconnecting the probe place the cable and probe on a stable...
Page 16: ...direction indicated on the label Before turning the ring clockwise be sure to push the probe connector into place and then rotate to prevent the ring from idling Probe connection schematic 4 2 2 Ultra...
Page 17: ...face of the main unit 2 Connect to the main power supply Insert the power plug jack furnished with the machine into power input socket of the power adapter the other end to the mains socket outlet The...
Page 18: ...f the machine for possible damage or blockage 10 Clean the field and environment 4 7 2 Inspection After Start up Check the following items after starting the machine 1 No abnormal voice strange smell...
Page 19: ...Day Hour and Min 4 When setting year month day hour and minute press direction key to increase value or press direction key to decrease value 5 Press key to confirm the time setting and quit setting i...
Page 20: ...D E F G H I J K L M Shift 5 6 7 8 9 N O P Q R S T U V W X Y Z Press direction keys to move cursor to point to Caps and then press key to achieve capital and small letter conversion If the cursor poin...
Page 21: ...5 3 8 WIFI Switch Setting 1 Press key to enter main menu press direction keys to move cursor to Setup 2 Press key to enter setting interface 3 Press direction keys to move the symbol to point to WIFI...
Page 22: ...s to move cursor to M Mode and then press direction keys to change the M scan mode 3 Change M scan speed Press key to enter main menu press direction keys to move cursor to M Speed and then press dire...
Page 23: ...ion keys to move cursor to Dyn in the display area Press direction key to increase the value of dynamic range and direction key to decrease the value of dynamic range so as to control the dynamic rang...
Page 24: ...ys to select L or R to achieve image left right reverse The image is flipped left right that is the probe scanning direction is changed The probe scanning direction is indicated by the arrow on the up...
Page 25: ...time status Note As the swine increases weight and age and if the measurement site is accurate two or three layers of backfat thickness can be measured the backfat measurement values for two or three...
Page 26: ...e image code need to be saved such as choose 003 4 Press key the current image is saved in the frame for coded 003 The saved image code is preceded with asterisk 5 Press key to quit saving status and...
Page 27: ...key to enter manual playback status in the manual playback status press direction keys to view images frame by frame continuously press key three times again to return to automatic playback status In...
Page 28: ...s and retype 5 13 Check List Management 5 13 1 Save and View Check List 1 Freeze the desired image 2 Record the ID and Result according to the method in section 5 11 Text Input press key to confirm an...
Page 29: ...6 to complete the multi group data measurement 8 Continuously press key twice to quit the measurement status 9 Press direction keys to choose Clear in display area and press key to clear all marks and...
Page 30: ...trace on the screen trace is automatically drawn along the order of marking point until close the beginning point and end point the measured circumference and area values are automatically displayed a...
Page 31: ...of the measurement 5 Press direction keys to move the mark to the end point of the measurement at the same time a lighted dotted line appears between the starting point and the end point as the dashe...
Page 32: ...s displayed in real time on the right part of the screen measure loin with distance measurement method the loin is displayed in real time on the right part of the screen press key to finish the loin m...
Page 33: ...performed by professional trained engineer or contact the Kaixin Company 2 For the system performance and safety you should perform periodical checks for the system 3 The following maintenance should...
Page 34: ...se or soak the probe connector or close to connector cable The soaking time of probe in the disinfectant is limited to the minimum time recommended by disinfectant manufacturer e g Cidex OPA manufactu...
Page 35: ...ower adapter cable for no wrinkles cracks or aging and check the surface of the power adapter free from cracks and expansion 2 Manual operation check the power plug connection is reliable no loose or...
Page 36: ...t capability or different model or different brand battery which will lead to the leakage explosion or fire 13 Do not use the abnormal battery with particular smell or abnormal heat or distortion or t...
Page 37: ...and the screen does not display when starting the machine 1 Check power supply 2 Check power supply cord and plug 3 Check power adapter 2 Character and gray scale are displayed but no ultrasonic image...
Page 38: ...ing 1 year When check the instrument please consult the International Trade Dept of Kaixin or its dealers as they need to have professional technology engineers Inspect sorts Inspect items Cleaning Sy...
Page 39: ...instrument case should have adequate space from ground walls and ceiling of the warehouse 2 Environment requirement Ambient temperature 20 55 Relative humidity 30 93 without condensation Atmospheric...
Page 40: ...eration in the presence of a flammable anesthetic mixture with air or oxygen or nitrous oxide Equipment not suitable for use in the presence of a flammable anesthetic mixture with air or oxygen or nit...
Page 41: ...n Mansion C 01 Economic Development Zone Xuzhou Jiangsu China Post Code 221004 Tel 86 516 87732932 87733758 Fax 86 516 87732932 87792848 Website http www kxele com E mail info kxele com Information co...