background image

~ 3 ~ 


Table of contents 


Preface 

1


Table of contents 

3


1 Introduction 

4


1.1 General 

4


1.2 Range of application 

4


1.3 Product description 

4


1.4 Technical specifications 

4


2 Safety 

5


2.1 General safety 

5


2.2 Safety instructions 

5


3 Transport and storage 

6


3.1 Transport 

6


3.2 Storage 

6


4 Installing and preparing for first use 

7


4.1 Installation 

7


4.1.1 Fitting the boiler 

7


4.1.2 Connection to the central heating system 

7


4.1.3 Connection of domestic hot water supply. 

8


4.1.4 Flue gas outlet 

9


4.1.5 Electrical connection 

12


4.1.6 Filling the central heating system 

13


4.1.7 Mounting the oil burner 

13


4.1.8 Mounting the oil filter and oil burner. 

14


4.2 Starting your system 

15


5 Operating the boiler 

16


5.1 Explanation of the dashboard 

17


5.2 Operation of the hot water on/ off switch 

15


6 Cleaning and maintenance 

16


6.1 Points for attention 

16


6.2 Cleaning and maintenance 

20


7 End of life of the boiler 

20


Appendix A Technical specifications 

21


Appendix B Electrical diagram 230 V 

22


Appendix C Troubleshooting 

24


Appendix E Boiler parts 

25


Appendix F Burnerparts 

25


Appendix G EC declaration 

26


Appendix H CE declaration 

27


Summary of Contents for HR Series

Page 1: ...1 Userguide HR HRE series Eng HRE CH HR CH HR Calorifier HR Combi...

Page 2: ...s shown below Tip A tip gives the user suggestions and advice to be able to carry out certain tasks more easily Note The user is given additional information here Any potential problems are also cover...

Page 3: ...y 8 4 1 4 Flue gas outlet 9 4 1 5 Electrical connection 12 4 1 6 Filling the central heating system 13 4 1 7 Mounting the oil burner 13 4 1 8 Mounting the oil filter and oil burner 14 4 2 Starting you...

Page 4: ...e space in which they are installed Heating only takes place using radiators a hot air system underfloor heating and or any custom made airco systems in which the Kabola boiler is integrated When usin...

Page 5: ...Kabola boiler MEASURES FOR SAFE INSTALLATION Do not place any flammable and or gaseous substances that may cause danger of explosion or fire in the space where the boiler is or is to be installed Inst...

Page 6: ...owing points must be observed Make sure that the casing cannot be damaged Use a blanket for example Transport the boiler upright with the base below 3 2 Storage When the boiler is to be stored for lon...

Page 7: ...with bolts or tack welding Make sure there is a distance between the outlet and the wall of at least 10 20 mm because of the heat transfer from the flue gas outlet Ensure sufficient space around the b...

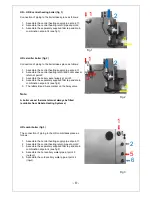
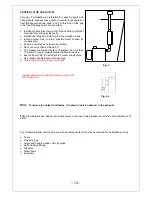
Page 8: ...Assemble the boiler vessel supply at point 3 4 Assemble the separately supplied filler tap and drain combination at point 4 see fig 2 5 The letters B and A are market on the 3way valve Note Fig 2 A b...

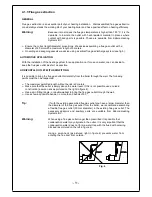
Page 9: ...the flue gas outlet horizontally from the boiler through the wall The following points must then be respected The maximum permitted length without bends is 3 meters Make sure that the outlet is amply...

Page 10: ...ws 90 The maximum allowed length is 10 meters At more than 10 meters in length always contact Kabola for advice Every elbow of 90 is equivalent to 1 meter straight pipe Use outside double walled chimn...

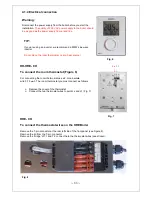
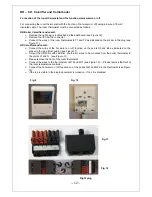
Page 11: ...Boiler Remove the 7 pin connector at the rear left side of the front panel see Figure 8 Remove the lid from the 7 pin connector Remove the bridge of T1 and T2 connect here the thermostat wires see sti...

Page 12: ...HR Calorifier and combi Connect the wires of the hot water on off function on the points S3 and B4 as indicated on the sticker in the plug frost guard see Figure 11 Only at the HR boiler with calorifi...

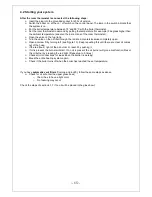
Page 13: ...her Set the on off switch button lights Put the heating pump in automatic venting position Control knob to 12 hours see Figure 9 Turn a quarter of a turn the red button after about 5 minutes to positi...

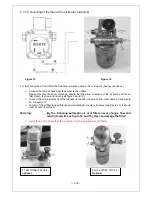
Page 14: ...4 and 15 Connect the oil line directly from the fuel tank to the filter no branch from other users oil see Figure 15 connector C Venting of the oil filter to pass through swivel rotating D counter clo...

Page 15: ...completely open Open airscrew D by turning left see Figure 15 Keep repeating this until there are clear oil comes out of the hose If the red fault light of the oil burner lit reset it by pushing it I...

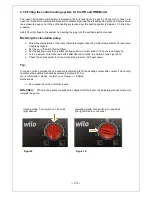
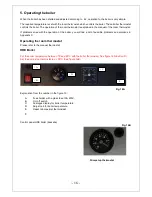
Page 16: ...r you will find a list of possible problems and solutions in Appendix C Operating the room thermostat Please refer to the manual thermostat HRE Boiler Put the boiler temperature between 75 and 80 C wi...

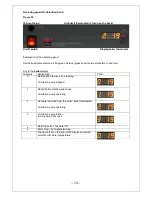
Page 17: ...l Set the boiler temperature to 80 degrees Celsius press boiler thermostat button in and turn Numbers Explanation Photo 0 Rest position boiler is on stand by Circulation pump stopped 1 Room thermostat...

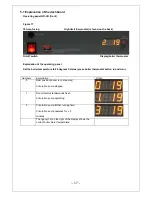
Page 18: ...ning time 0 seconds Flashing point hot water off Point lit up hot water stand by The figure 19 on the right of the display shows the current boiler water temperature Operating panel HR Calorifier fron...

Page 19: ...sition Boiler kept at temperature Flashing point hot water off Point lit up hot water stand by The figure 19 on the right of the display shows the current boiler water temperature HR combi boiler Oper...

Page 20: ...ler using a pipe cleaner Note Do not use any aggressive cleaning products when cleaning 1 5 Suck the heating boiler empty with a vacuum cleaner 1 6 Replace the boiler gasket 1 7 Replace the boiler doo...

Page 21: ...21...

Page 22: ...Appendix B Electrical diagram 230V HR HRE CH...

Page 23: ...Appendix B Electrical diagram 230 V...

Page 24: ...rrupted Clear chimney opening Boiler dirty Clean boiler Oil supply interrupted See above Nozzle defective Replace nozzle Burner shows error Reset burner once Low voltage Check voltage level Oil supply...

Page 25: ...Appendix E Burnerparts...

Page 26: ...onsibility that the product Boiler burner Kabola HR HRE 230 V version to which this declaration relates conforms with the following standards EN 303 1 EN 303 2 EN 304 EN 50081 1 EN 50082 1 EN 61010 ac...

Page 27: ...Appendix G CE declaration HR 300 HR 500 HRE 300 HRE 400 HRE 500...

Reviews: