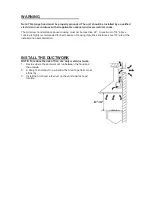
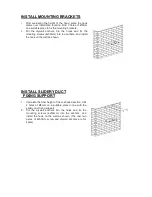
background image


INSTALL THE HOOD         


Note:  at  least  two  people  will  be  required  to  mount  the 
hood.   

1.  Raise the hood into its mounting position.   
2.  Align the rectangular opening on the back of the hood with 

the  wall-mounting  bracket.  Gently  lower  the  hood  until  it 
securely engages the bracket.   

3.  Open  the  Al.  filter  and  find  the  two 

φ

8 mm  holes    on  the 

back  of  the  hood.  Level  the  hood  with  2  mounting  screws 
(4*35mm) with washer. Use drywall anchors provided. 


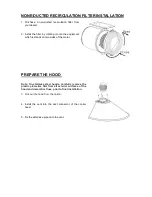
4.  Measure  the  height  of  the  glass  to  the  slidery  duct  fixing 

support.  Adjust  the  height  of  the  chimney  according  to  the 
height.  Then  use  the  duct  fixing  suppor  with  two  screws 
(4x8mm) to fix the chimneys. Shown as in the pic. 


5.  Put the chimney on the hood, use two screws(4x8mm)to fix 

the chimney to the slidery duct fixing support. 


6.Use  the  other  two  screws  (4x8mm)  to  fix  the  bottom  of 
chimney. 


7.  After  adjusting  the  position,  open  the  filter  and  fix  the  body 
inside with safety screws.   
Note: The two safety vents are positioned on the back casing, 
with diameter of 6mm. 


4x8mm 

Summary of Contents for K1005

Page 1: ...TIONS FOR DOMESTIC COOKING ONLY Installer Leave this manual with the homeowner Homeowner Cleaning Maintenance and Operating instructions on the coming pages RANGE HOOD ITEM NO K1005 K1005A REFERED MOD...

Page 2: ...ted fans must always be vented to the outdoors 7 Do not use this unit with any separate solid state speed control device 8 To reduce the risk of fire use only metal ductwork 9 This unit must be ground...

Page 3: ...erload which will automatically shut off the motor if it becomes overheated The motor will restart when it cools down If the motor continues to shut off and restart have the hood serviced 7 For best c...

Page 4: ...uct fixing support 2 Safety screw ST4mm x30mm 1 Slidery duct fixing support 7 Mounting Screws 4 x 40mm 8 Mounting Screws 4 x 8mm 9 Drywall Anchors 8 holes 2 Washer 4 x12 x1mm 1 Aluminum Flex Duct VENT...

Page 5: ...24 A maximum of 33 above cooktop is highly recommended for best capture of cooking impurities Distances over 33 are at the installer and users discretion INSTALL THE DUCTWORK NOTE To reduce the risk o...

Page 6: ...crews 4x50mm into the anchors and install the hook on the wall as shown INSTALL SLIDERY DUCT FIXING SUPPORT 1 Calculate the final height of the U shaped section drill 2 holes of 8mm on a suitable plac...

Page 7: ...t which is stands on two sides of the motor PREPARE THE HOOD Note On stainless steel hoods carefully remove the plastic protective film from all exterior surfaces of the hood and decorative flues prio...

Page 8: ...er Use drywall anchors provided 4 Measure the height of the glass to the slidery duct fixing support Adjust the height of the chimney according to the height Then use the duct fixing suppor with two s...

Page 9: ...r water Wipe dry with a clean soft cloth to avoid water marks l For discolorations or deposits that persist use a non scratching household cleanser or stainless steel polishing powder with a little wa...

Page 10: ...otor will stop 2 Push the Low button the buzzer will buzz once and the motor runs at low speed 3 Push the high button the buzzer will buzz once and the motor runs at mid speed 4 Push the High button t...

Page 11: ...COOL WARRANTY We will warrant this product free from defects in material and quality for one year and motor for 5 years If any problems occur from correct usage please contact the service department f...

Page 12: ...K Star International Group Inc K Star Electronic Appliance Inc Toll Free 800 893 2168 Email info kstarus com http www kstarus com...

Reviews: