


2
turning it toward the right (in the clockwise direction
as viewed from the front) (See Fig. 1).
䡬
If the sleeve becomes loose during operation, tighten
it further. The tightening force becomes stronger
when the sleeve is tightened.
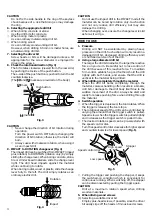
(2) Dismounting the bit
Firmly grasp the ring and loosen the sleeve by turning
it toward the left (in the counterclockwise direction
as viewed from the front) (See Fig. 1).
Fig. 1
NOTE
When the sleeve does not become loose any further,
fix the side handle to the sleeve. Then, strike the grip
of the side handle to the left in order to loosen the
sleeve,while holding the ring by hand (Fig. 2).
Fig. 2
Voltage (by areas)*
(110V, 230V)
Power input
550 W
No load speed
0–2900 min
-1
Steel
13 mm
Capacity
Concrete
16 mm
Wood
25 mm
Weight (without cord)
1.6 kg
STANDARD ACCESSORIES
(1) Side handle ................................................................. 1
(2) Depth stopper ............................................................. 1
(3) Plastic case .................................................................. 1
Standard accessories are subject to change without
notice.
APPLICATIONS
䡬
By combined actions of ROTATION and IMPACT:
Boring holes in concrete, marble, granite, tile, and
similar materials.
䡬
By ROTATIONAL action:
Boring holes in metal, wood and plastic.
Tightening wood screws.
PRIOR TO OPERATION
1. Power source
Ensure that the power source to be utilized conforms
to the power requirements specified on the product
nameplate.
2. Power switch
Ensure that the power switch is in the OFF position. If
the plug is connected to a receptacle while the power
switch is in the ON position, the power tool will start
operating immediately, inviting serious accident.
3. Extension cord
When the work area is removed from the power
source. Use an extension cord of sufficient thickness
and rated capacity. The extension cord should be
kept as short as practicable.
4. Fixing the side handle
Attach the side handle to the mounting part.
Rotate the side handle grip in a clockwise direction
to secure it.
Set the side handle to a position that is suited to the
operation and then securely tighten the side handle
grip.
5. Mounting and dismounting of the bit
(1) Mounting the bit
After inserting a driver bit, etc. into the keyless drill
chuck, firmly grasp the ring and tighten the sleeve by
SPECIFICATIONS
*Be sure to check the nameplate on product as it is subject to change by areas.
Additional rules for impact drills
- Wear ear protection
Exposure to noise can cause hearing loss.
- Use auxiliary handles supplied with the tool.
Loss of control can cause personal injury.
Ring Sleeve
Loosen
Tighten
Ring
Sleeve
Loosen
Side handle
Summary of Contents for EDH550VRE
Page 7: ...6 ...