background image

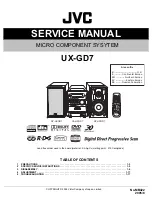
SERVICE MANUAL

COPYRIGHT © 2005 Victor Company of Japan, Limited

No.MB422

2005/8

MICRO COMPONENT SYSYTEM

MB422

2005

8

UX-GD7

Lead free solder used in the board (material : Sn-Ag-Cu, melting point : 219 Centigrade)

TABLE OF CONTENTS

1

PRECAUTIONS  . . . . . . . . . . . . . . . . . . . . . . . . . . . . . . . . . . . . . . . . . . . . . . . . . . . . . . . . . . . . . . . . . . . . . . .  1-3

2

SPECIFIC SERVICE INSTRUCTIONS . . . . . . . . . . . . . . . . . . . . . . . . . . . . . . . . . . . . . . . . . . . . . . . . . . . . . .  1-5

3

DISASSEMBLY  . . . . . . . . . . . . . . . . . . . . . . . . . . . . . . . . . . . . . . . . . . . . . . . . . . . . . . . . . . . . . . . . . . . . . . .  1-6

4

ADJUSTMENT . . . . . . . . . . . . . . . . . . . . . . . . . . . . . . . . . . . . . . . . . . . . . . . . . . . . . . . . . . . . . . . . . . . . . . .  1-17

5

TROUBLESHOOTING . . . . . . . . . . . . . . . . . . . . . . . . . . . . . . . . . . . . . . . . . . . . . . . . . . . . . . . . . . . . . . . . .  1-17

CA-UXGD7

SP-UXGD7

SP-UXGD7

Area suffix

B ------------------------------ U.K.
E ---------- Continental Europe
EN ----------- Northern Europe
EV ------------- Eastern Europe
EE -------- Russian Federation

Summary of Contents for UX-GD7

Page 1: ......

Page 2: ...ee solder used in the board material Sn Ag Cu melting point 219 Centigrade TABLE OF CONTENTS 1 PRECAUTIONS 1 3 2 SPECIFIC SERVICE INSTRUCTIONS 1 5 3 DISASSEMBLY 1 6 4 ADJUSTMENT 1 17 5 TROUBLESHOOTING 1 17 CA UXGD7 SP UXGD7 SP UXGD7 Area suffix B U K E Continental Europe EN Northern Europe EV Eastern Europe EE Russian Federation ...

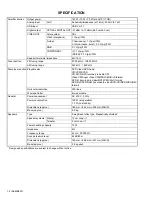
Page 3: ...ange 522 kHz 1 629 kHz Disc player section Playable disc DVD Video DVD Audio CD VCD SVCD CD R CD RW recorded in Audio CD Video CD Super Video CD MP3 JPEG DivX format DVD R recorded in video MP3 JPEG DivX format DVD RW DVD RAM recorded in video DVD VR MP3 JPEG DivX format Horizontal resolution 500 lines Wow and flutter Immeasurable General Power requirement AC 230 V 50 Hz Power consumption 150 W at...

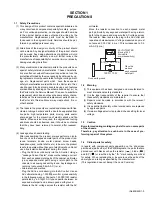
Page 4: ...jack control shafts etc to be sure the product is safe to operate without danger of electrical shock Do not use a line isolation transformer during this check Plug the AC line cord directly into the AC outlet Using a Leakage Current Tester measure the leakage current from each exposed metal parts of the cabinet particular ly any exposed metal part having a return path to the chassis to a known goo...

Page 5: ...same safety characteristics as the recommended replacement parts shown in the Parts List of the Service Manual and may create shock fire or other hazards 4 The leads in the products are routed and dressed with ties clamps tubings barriers and the like to be separated from live parts high temperature parts moving parts and or sharp edges for the prevention of electric shock and fire hazard When ser...

Page 6: ... No MB422 1 5 SECTION 2 SPECIFIC SERVICE INSTRUCTIONS This service manual does not describe SPECIFIC SERVICE INSTRUCTIONS ...

Page 7: ...ollowing procedure remove the rear cover 1 Replace the fuses inside Caution Be sure to use fuses with the specified ratings Fig C 3 1 2 Replacing the power IC See Fig D Prior to performing the following procedure remove the rear cover 1 Remove the two screws H from the heat sink between the power IC 2 Remove the solder fixing the power IC Fig D FUSE Location F901 Value T1 25AL 250V H ...

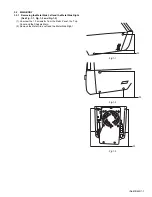
Page 8: ...g the Metal Side Left and the Metal Side Right See Fig 1 1 Fig 1 2 and Fig 1 3 1 Unscrew the 10 screws A from the Rear Panel the Top Cover and the Chassis Main 2 Remove the Metal Side Left and the Metal Side Right Fig 1 1 Fig 1 2 Fig 1 3 A A A ...

Page 9: ...1 8 No MB422 3 2 2 Removing the Top Cover See Fig 2 1 Fig 2 2 and Fig 2 3 1 Unscrew the 2 Screws B and 2 Screws C 2 Removing the Top Cover Fig 2 1 Fig 2 2 Fig 2 3 B B C ...

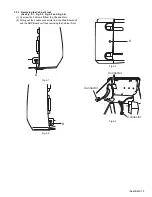
Page 10: ... Fig 3 2 Fig 3 3 and Fig 3 4 1 Unscrew the 3 Screws D from the Chassis Main 2 Pulling out the 3 cable connectors from the Main Board unit and the AMP Board unit then removing the Cabinet Front Fig 3 1 Fig 3 2 Fig 3 3 Fig 3 4 D D D Connector Connector Connector ...

Page 11: ...2 and Fig 4 3 1 Unscrew the 5 Screws E from the Chassis Main and the Rear Panel 2 Pulling out the cable connector from the AMP Board then removing the Cover Heat Sink and the Fan 3 Unscrew the 4 Screws M from the Fan 4 Removing the Fan Fig 4 1 Fig 4 2 Fig 4 3 E E E E E CONNECTOR M ...

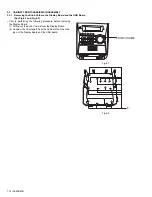
Page 12: ...1 Unscrew the 15 screws C from the Main Board unit the Tuner the Heat Sink the Chassis Main and the scart Board unit 2 Pulling out the 2 cable connectors from the AMP Board unit and the Power Board unit then removing the Panel Rear the Tuner and the Speaker Board Fig 5 1 Fig 5 2 Fig 5 3 C C CONNECTOR CONNECTOR ...

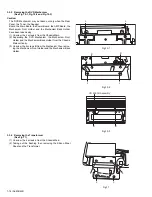
Page 13: ...and the USB Board See Fig 6 1 and Fig 6 2 Prior to performing the following procedure before removing the Display Board 1 Pulling out the Knob Volume from the Display Board 2 Unscrew the 15 screws F from the Cabinet Front then tak ing out the Display Board and the USB Board Fig 6 1 Fig 6 2 KNOB VOLUME F ...

Page 14: ...Fig 7 3 and Fig 7 4 1 Pulling out the 5 cable connectors from Main Board unit and the Power Board unit 2 Unscrew the 4 screws G from the Mechanism Holder 3 Separating the Main Board and the Power Board from the AMP Board vertically Fig 7 1 Fig 7 2 Fig 7 3 Fig 7 4 CONNECTOR CONNECTOR G G ...

Page 15: ... AMP Board and the Main Heat Sink See Fig 8 1 and Fig 8 2 1 Unscrew the 3 screws G and 1 screw C from the Mecha nism Holder then removing the AMP Board 2 Unscrew the 2 screws H then removing the Main Heat Sink Fig 8 1 Fig 8 2 G C H H ...

Page 16: ... No MB422 1 15 3 3 4 Removing the Mechanism Holder See Fig 9 1 and Fig 9 2 1 Unscrew the 4 screws I from the Mechanism Holder 2 Removing the Mechanism Holder Fig 9 1 Fig 9 2 I I I I ...

Page 17: ...4 screws J from the Chassis Main 2 Separating the DVD Mechanism the Mechanism Front Holder and the Mechanism Back Holder from the Chassis Main vertically 3 Unscrew the 4 screws K from the Mechanism then remov ing the Mechanism Front Holder and the Mechanism Back Holder Fig 10 1 Fig 10 2 Fig 10 3 3 3 6 Removing the Transformer See Fig 11 1 Unscrew the 4 screws L from the Chassis Main 2 Taking out t...

Page 18: ...ce the IF sweeper is a fixed device there is no need to adjust this sweeper 4 Since a ceramic oscillator is used there is no need to per form any MPX adjustment 5 Since a fixed coil is used there is no need to adjust the FM tracking 6 The input and output earth systems are separated In case of simultaneously measuring the voltage in both of the input and output systems with an electronic voltmeter...

Page 19: ... No MB422 AV MULTIMEDIA COMPANY AUDIO VIDEO SYSTEMS CATEGORY 10 1 1chome Ohwatari machi Maebashi city 371 8543 Japan Victor Company of Japan Limited VPT Printed in Japan ...

Page 20: ...arts Contents Exploded view of general assembly and parts list Block No M1 Electrical parts list Block No 01 05 Packing materials and accessories parts list Block No M3 UX GD7 3 2 3 5 3 12 Area suffix B U K E Continental Europe EN Northern Europe EV Eastern Europe EE Russian Federation MB422 ...

Page 21: ... view of general assembly and parts list Block No M M M 1 27 25 26 44 46 46 9 41 12 28 15 43 14 42 40 41 13 11 42 43 48 20 46 21 46 23 22 16 19 45 46 46 44 18 54 21 46 47 40 17 24 53 Power trans board Amp boa F901 ...

Page 22: ...3 3 46 43 9 41 40 37 28 14 42 11 33 1 2 38 8 3 36 43 46 46 43 44 37 35 42 6 4 5 7 39 10 34 38 39 30 32 31 44 29 8 Main board Front board Amp board The parts without symbol number are not service 38 ...

Page 23: ...W1 HEAT SINK HLDR SECC T 1 0mm x2 22 BI2029110101W1 REAR PANEL SECC T 0 8mm 23 BIZ25095401VV TUNER PACK 24 BI202966010101 SHEET SILICON STEEL T 0 5mm 25 BI202959010101 HEAT SINK AL 26 BI202958010101 HEAT SINK SMALL AL 27 BI1080899101V1 TOP COVER HIPS 8002 94V2 28 BI2029120101W1 MECH HOLDER SECC T 0 8mm 29 BI2029090101W1 SIDE PANEL R SECC T 0 6mm 30 BI1080870101V1 LCD HOLDER ABS T700 94HB 31 BI1670...

Page 24: ...PACITOR 100uF 16V C417 BICE107160MP11 E CAPACITOR 100uF 16V C418 BICC222500KA04 C CAPACITOR 2200pF 50V C419 BICC222500KA04 C CAPACITOR 2200pF 50V C420 BICE226250MP01 E CAPACITOR 22uF 25V C421 BICE226250MP01 E CAPACITOR 22uF 25V C422 BICM124101KP01 M CAPACITOR 0 12uF 100V C423 BICM124101KP01 M CAPACITOR 0 12uF 100V C424 BICE107160MP11 E CAPACITOR 100uF 16V C425 BICE107160MP11 E CAPACITOR 100uF 16V ...

Page 25: ...220105A00 C RESISTOR 2 2KΩ 1 10W Symbol No Part No Part Name Description Local R435 BIRC1220105A00 C RESISTOR 1 2KΩ 1 10W R436 BIRC1220105A00 C RESISTOR 1 2KΩ 1 10W R437 BIRC0000105A00 C RESISTOR 0Ω 1 10W R438 BIRC0000105A00 C RESISTOR 0Ω 1 10W R439 BIRC2220105A00 C RESISTOR 2 2KΩ 1 10W R440 BIRC2220105A00 C RESISTOR 2 2KΩ 1 10W R441 BIRC1040105A00 C RESISTOR 100KΩ 1 10W R442 BIRC1040105A00 C RESI...

Page 26: ... 1KΩ 1 10W R671 BIRC1020105A00 C RESISTOR 1KΩ 1 10W R672 BIRC1020105A00 C RESISTOR 1KΩ 1 10W R673 BIRC1020105A00 C RESISTOR 1KΩ 1 10W R674 BIRC1020105A00 C RESISTOR 1KΩ 1 10W Symbol No Part No Part Name Description Local R677 BIRC1030105A00 C RESISTOR 10KΩ 1 10W R678 BIRC1020085M00 C RESISTOR 1KΩ 1 8W J R679 BIRC1020105A00 C RESISTOR 1KΩ 1 10W R680 BIRC1030105A00 C RESISTOR 10KΩ 1 10W R681 BIRC102...

Page 27: ...0 1uF 50V C841 BICC103500KA04 C CAPACITOR 0 01uF 50V C850 BICC101500JA04 C CAPACITOR 100pF 50V C851 BICE107160MP01 E CAPACITOR 100uF 16V C853 BICC473500KA04 C CAPACITOR 0 047uF 50V C854 BICC473500KA04 C CAPACITOR 0 047uF 50V C856 BICE476250MP01 E CAPACITOR 47uF 25V C857 BICC104500KA04 C CAPACITOR 0 1uF 50V C861 BICC102500JA04 C CAPACITOR 1000pF 50V C862 BICC102500JA04 C CAPACITOR 1000pF 50V C863 B...

Page 28: ... SWITCH EVQ11G S817 BI8EVQ11G05P01 TOUCH SWITCH EVQ11G S821 BI8EVQ11G05P01 TOUCH SWITCH EVQ11G S822 BI8EVQ11G05P01 TOUCH SWITCH EVQ11G S823 BI8EVQ11G05P01 TOUCH SWITCH EVQ11G S824 BI8EVQ11G05P01 TOUCH SWITCH EVQ11G S825 BI8EVQ11G05P01 TOUCH SWITCH EVQ11G S826 BI8EVQ11G05P01 TOUCH SWITCH EVQ11G S827 BI8EVQ11G05P01 TOUCH SWITCH EVQ11G Symbol No Part No Part Name Description Local W865 BI11AT120B0V W...

Page 29: ... 27KΩ 1 10W R213 BIRC2230105A00 C RESISTOR 22KΩ 1 10W R214 BIRC2230105A00 C RESISTOR 22KΩ 1 10W R215 BIRC0000105A00 C RESISTOR 0Ω 1 10W R216 BIRC0000105A00 C RESISTOR 0Ω 1 10W R217 BIRC6810105A00 C RESISTOR 680Ω 1 10W R218 BIRC6810105A00 C RESISTOR 680Ω 1 10W R219 BIRM1010N15N00 M RESISTOR 100Ω 1W R220 BIRM1010N15N00 M RESISTOR 100Ω 1W R230 BIRC1030085M00 C RESISTOR 10KΩ 1 8W Symbol No Part No Par...

Page 30: ...0pF 100V C944 BICE33856M1Y E CAPACITOR 3300uF 56V C945 BICE33856M1Y E CAPACITOR 3300uF 56V C946 BICM682101JP01 M CAPACITOR 6800pF 100V C947 BICM682101JP01 M CAPACITOR 6800pF 100V C950 BICE475500MP01 E CAPACITOR 4 7uF 50V C951 BICE475500MP01 E CAPACITOR 4 7uF 50V R901 BIRC1220085M00 C RESISTOR 1 2KΩ 1 8W R902 BIRC4720085M00 C RESISTOR 4 7KΩ 1 8W J C R904 BIRC1000085M00 C RESISTOR 10Ω 1 8W R906 BIRC...

Page 31: ...3 12 Packing materials and accessories parts list P1 P6 P3 P5 P4 P7 A8 A4 A5 A6 A1 A2 A3 A7 P8 P11 P12 P13 P9 P2 P10 Block No M M M 3 No additional supplemental order of WARRANTY CARDs are available ...

Page 32: ... REGIST CARD A 4 BATTERY x2 A 5 BIAN01031V AM LOOP ANT A 6 BIAN01022V FM ANT WIRE A 7 BI600GD702SV0 REMOTE CONTROL A 8 BI644FSGD7202S SPEAKER BOX x2 P 1 BI430001905000 CARTON EE P 1 BI430001860000 CARTON B E EN EV P 2 BI420011041000 CARTON SPACER P 3 BI420011042000 CARTON SPACER P 4 BI470011031001 POLY BAG P 5 BI470011057001 POLY BAG P 6 BI450012010000 POLY FOAM Top P 7 BI450012011000 POLY FOAM Bo...

Page 33: ...1 CD ROM No SML200508 MICRO COMPONENT SYSTEM No MB422SCH 2005 8 COPYRIGHT 2005 Victor Company of Japan Limited Lead free solder used in the board material Sn Ag Cu melting point 219 Centigrade CA UXGD7 SP UXGD7 SP UXGD7 Area suffix B U K E Continental Europe EN Northern Europe EV Eastern Europe EE Russian Federation ...

Page 34: ...ponent parts appearing on the silk screen printed side parts side of the PWB diagrams the parts that are printed over with black such as the resistor diode and ICP or identified by the mark nearby are critical for safety ...

Page 35: ...2 1 Block diagram ...

Page 36: ...2 2 Parts are safety assurance parts When replacing those parts make sure to use the specified one Standard schematic diagrams Power supply section ...

Page 37: ...2 3 Amp section ...

Page 38: ...2 4 Function section ...

Page 39: ...2 5 Video section ...

Page 40: ...2 6 Micon section ...

Page 41: ...2 7 Front section ...

Page 42: ...2 8 Printed circuit boards Main board Lead free solder used in the board material Sn Ag Cu melting point 219 Centigrade Forward side ...

Page 43: ...2 9 Main board Lead free solder used in the board material Sn Ag Cu melting point 219 Centigrade Reverse side ...

Page 44: ...2 10 Amp board Lead free solder used in the board material Sn Ag Cu melting point 219 Centigrade Forward side Reverse side ...

Page 45: ...2 11 Trans board Lead free solder used in the board material Sn Ag Cu melting point 219 Centigrade ...

Page 46: ...Victor Company of Japan Limited No MB422SCH Printed in Japan VPT AV MULTIMEDIA COMPANY AUDIO VIDEO SYSTEMS CATEGORY 10 1 1chome Ohwatari machi Maebashi city 371 8543 Japan ...

Reviews: