background image

21

ENGLISH

22

1
2
3
4
5
6

EXT-1
EXT-2
EXT-3
EXT-4
HDMI
PC

EXT Mode

0

AV

>

EXT-1

Dubbing

EXT-2

EXT-4

EXT-3

EXT Setting

TV

>

EXT-1

Dubbing
EXT-2

EXT-4

EXT-3

EXT Setting

TV

>

EXT-1

Dubbing

EXT-2

EXT-4

EXT-3

EXT Setting

TV

ID List

VHS
S-VHS
DVC
CAM
SAT
STB
GAME
DVD
DVR

>

EXT-1

Dubbing

EXT-2

EXT-4

EXT-3

EXT Setting

TV

ID List

VHS
S-VHS
DVC
CAM
SAT
STB
GAME
DVD
DVR

>

EXT-1

Dubbing

EXT-2

EXT-4

EXT-3

EXT Setting

TV

>

EXT-1
DVD

Dubbing

EXT-2

EXT-4

EXT-3

EXT Setting

TV

>

EXT-1

Dubbing

EXT-2

EXT-4

EXT-3

EXT Setting

TV

>

EXT-1

Dubbing

EXT-2

EXT-4

EXT-3

EXT Setting

TV

Set Up

Set Up

Auto Program

Component Auto Select

Off

Off

HDMI Setting

Edit/Manual

Decoder(EXT-2)

EXT Setting

Language

PC Position

TV/AV

P

MENU

/OK

Set Up

Set Up

Auto Program

Component Auto Select

Off

Off

HDMI Setting

Edit/Manual

Decoder(EXT-2)

EXT Setting

Language

PC Position

IMPORT

ANT!

PREP

ARE

USE

SETTINGS

TROUBLE?

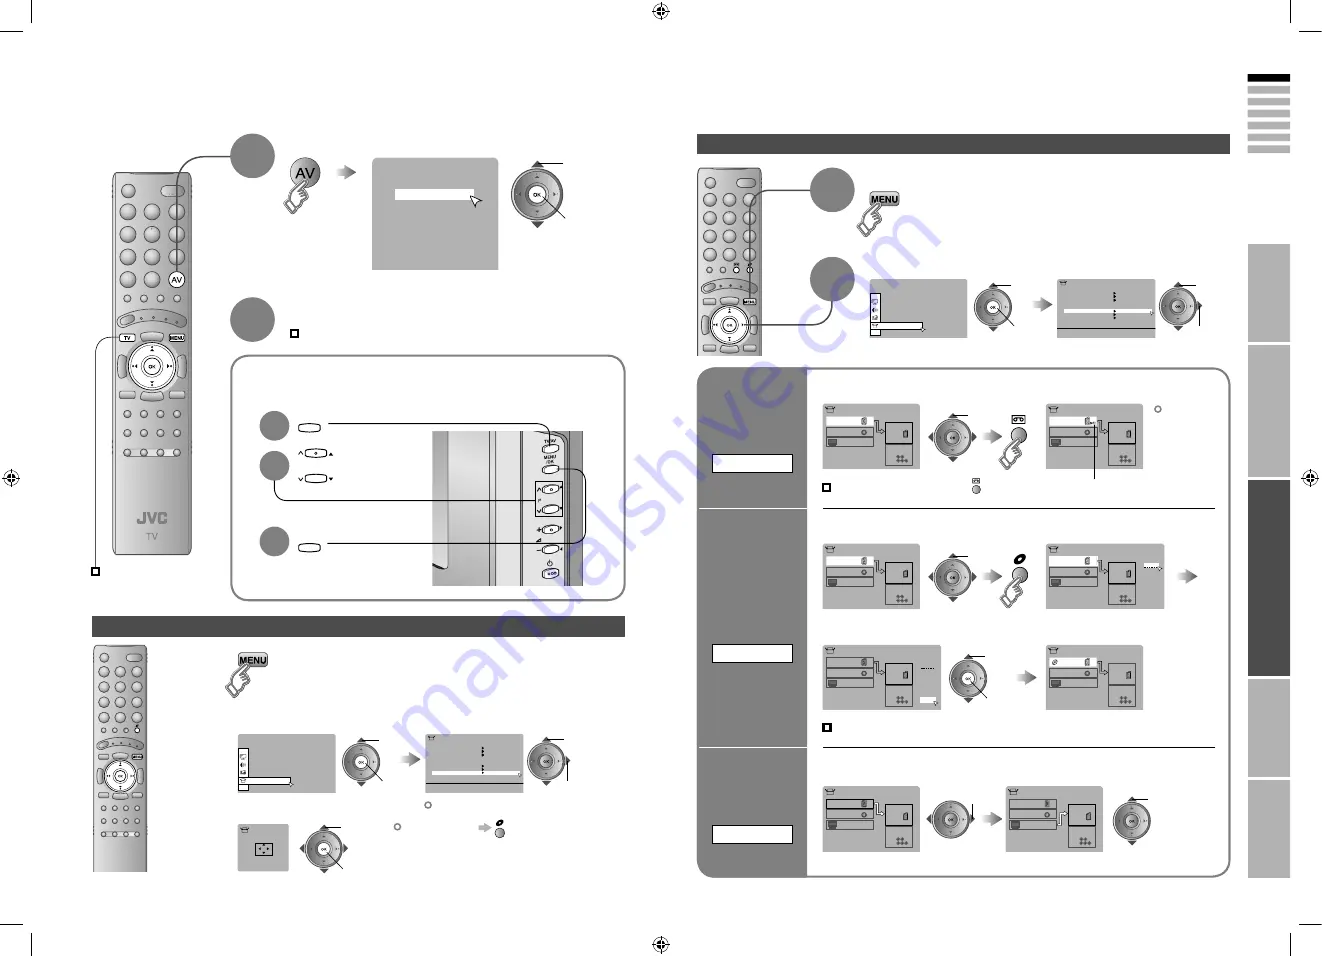
Operate the connected device and play a video

Select the video source

E.g. For EXT-1

1

Watching videos / DVDs

To TV

2

Display the menu bar

select

Select “Set Up”

Select “EXT Setting”

1

Switch 

to S-VIDEO 

input

S-IN

2

The device 

selection 

display will 

change from 

“E1” to “S1”.

Cancel this mode

Set up 

dubbing on 

“EXT-2”

DUBBING

Edit names 

of connected 

devices

ID LIST

1

 Select the “EXT” connected to S-VIDEO

2

 Set the S-VIDEO mode

1

 Select an “EXT” to assign a name to

2

 Show the name list

1

 Select the arrow

2

 Select the dubbing source

3

 Select a name from the list

select

select

2

 set

1

 select

select

y

1

 select

2

 next

1

 select

2

 next

Press “ ” in 

2

 again

Clear the name

Select the blank space in 

3

Advanced functions

Operate JVC recorders and other devices (P. 25)

Select the video source using 

the side buttons

1

Select the 

video source

2

3

2

 watch

1

 select

PC position adjustment

Display the menu bar

1

Select “Set Up”

Select “PC Position”

2

1

 select

2

 next

1

 select

2

 next

Shown only when “PC” is selected.

3

PC Position

2

 set

1

 adjust

Reset position

Summary of Contents for LT-26E70BU

Page 1: ...E MANUEL D INSTRUCTIONS BREEDBEELD LCD TV GEBRUIKSAANWIJZING TELEVISOR CON PANEL LCD PANORÁMICO MANUAL DE INSTRUCCIONES TV LCD WIDESCREEN ISTRUZIONI TELEVISOR COM ECRÃ PANORÂMICO DE CRISTAL LÍQUIDO INSTRUÇÕES LT 37R70BU SU LT 37E70BU LT 32R70BU SU LT 32E70BU LT 26R70BU SU LT 26E70BU LT 37ED6SU LT 32ED6SU LT 26ED6SU LT 26R70BU 2006 Victor Company of Japan Limited 0506KTH SW MU ...

Page 2: ...t Dit apparaat voldoet aan de geldende Europese normen en richtlijnen inzake elektromagnetische compatibiliteit en elektrische veiligheid JVC Manufacturing U K Limited 2 Glenburn Road College Milton Industrial Estate East Kilbride G74 5BA Verenigd Koninkrijk NEDERLANDS CASTELLANO Apreciado cliente Este aparato cumple con las normativas y normas europeas respecto a la seguridad eléctrica y a la com...

Page 3: ...en Union gültig Informations relatives à l élimination des appareils usagés à l intention des utilisateurs FRANÇAIS Union européenne Lorsque ce symbole figure sur un appareil électrique et électronique cela signifie qu il ne doit pas être éliminé en tant que déchet ménager à la fin de son cycle de vie Le produit doit être porté au point de pré collecte approprié au recyclage des appareils électriq...

Page 4: ...priato del prodotto Per ulteriori informazioni sul punto di raccolta e il riciclaggio di questo prodotto contattare la sede comunale locale il servizio di smaltimento rifiuti domestici o il negozio in cui si è acquistato il prodotto L utente è responsabile del conferimento dell apparecchio a fina vita alle appropriate strutture di raccolta pena le sanzioni previste dalla vigente legislazione sui r...

Page 5: ...hannels Connecting external devices 13 Let s try it out Enjoying your new TV 15 TV Teletext Video etc Watching TV 17 Viewing teletext 19 Watching videos DVDs 21 Try the advanced features Useful functions 23 Take a snapshot View and search in multi picture mode Sleep timer Child lock Operate JVC recorders and other devices 25 Just the way you like it Customising your TV 27 Advanced picture adjustme...

Page 6: ...use a fire Never insert objects into the cabinet openings It may cause a fatal electric shock Take care when children are near Unplug the power cord when going out The power buttons on the remote control and the TV unit cannot completely turn off the TV Make appropriate arrangements for bedridden people For more details on installation usage and safety Consult your retailer Make enough room for in...

Page 7: ... correct Channel information P 17 Display on screen menu P 27 Power On Off Remote control sensor Power lamp ON Lit Blue OFF Unlit Power lamp lights while the TV is on Power Lamp P 28 To headphones P 13 Display on screen menu set Switch between TV AV devices LT 26R70 E70 ED6 Remove the terminal cover Change the direction of TV Remote control RM C1900S AAA R03 Batteries Check accessories For confirm...

Page 8: ...tlet When attaching the TV to the wall use the optional JVC wall mounting unit Consult a qualified technician See the included manual on mounting procedures JVC assumes no responsibility for damage due to improper mounting 200mm 200mm mount which conforms to VESA standards Installation requirements To avoid overheating ensure the unit has ample room Please read the user manuals of each device care...

Page 9: ...What is T V LINK Connecting the TV to a T V LINK compatible device allows Channels on the TV to be instantly registered on the device The DIRECT REC function to be used Technical information P 34 T V LINK variations T V LINK JVC Q LINK Panasonic Megalogic Grundig Data Logic Metz SMARTLINK Sony Easy Link Philips Begin Select a language Select the country of installation Automatically register chann...

Page 10: ... CC CH 08 B G CC 06 ID 11 10 PR 12 13 14 15 16 17 18 19 CH CC CH 08 CC 06 Edit ID Manual 11 10 PR 12 13 14 15 16 17 18 19 CH CC CH 08 I CC 06 IMPORTANT PREPARE USE SETTINGS TROUBLE Display the menu bar Select Set Up Select Edit Manual Confirm settings Finish When coming from Initial settings P 9 skip to Select a row Edit Move a channel s position MOVE Editing channels Edit the channels registered ...

Page 11: ... IN Headphones R Headphone EXT 1 Watching videos Output Input Composite signal Sound L R Composite signal RGB S VIDEO Sound L R Use S VIDEO S IN P 22 EXT 2 Dubbing videos Using T V LINK Output Input Composite signal Sound L R Composite signal RGB S VIDEO Sound L R T V LINK Use S VIDEO S IN P 22 Select dubbing sources DUBBING P 22 Connect a decoder Decoder EXT 2 P 28 EXT 3 Watching videos Output In...

Page 12: ...D Cinema Sound Register your favourite channels Enlarge the text To the index page Hold the current page Switch briefly between teletext and TV Bookmark your favourite pages Reveal hidden pages Watching videos DVDs 21 PAGE 27 PAGE Personal preferences Watch high quality video S VIDEO Name connected devices Dub videos PC position adjustment Adjust the picture Adjust the sound Basic settings channel...

Page 13: ...nd Low For stereo sound when the sound distorts in High mode Mono For mono sound emulates a stereo like sound Off Turns off 3D Cinema Sound Press the number to register it on Hold down for 3 seconds Disappears after a few seconds Press the number you registered select delete select Select a page Channels registered in Initial settings will appear here Select and view a channel When set to Auto the...

Page 14: ...ext Move up or down a page Bookmark your favourite page LIST MODE Recall your favourite page 2 View sub pages Hold the current page Display hidden information answers to quizzes etc Returns to page 100 or a previously designated page Double the size of the displayed text Leave the current page open while you switch to watch TV Hold the current page HOLD Switch briefly from teletext to TV CANCEL Re...

Page 15: ...PREPARE USE SETTINGS TROUBLE Operate the connected device and play a video Select the video source E g For EXT 1 1 Watching videos DVDs To TV 2 Display the menu bar select Select Set Up Select EXT Setting 1 Switch to S VIDEO input S IN 2 The device selection display will change from E1 to S1 Cancel this mode Set up dubbing on EXT 2 DUBBING Edit names of connected devices ID LIST 1Select the EXT co...

Page 16: ...le for EXT 5 input Useful functions Cancel Press again or change the channel Not available when the SUB PICTURE is displayed or when in PC mode You cannot save or export the snapshot Select a channel in 12 screen mode All registered channels are displayed as still images Switch between the sound sources Change the channel Main Sub Watch in multi picture mode MULTI PICTURE 2set 1select 1select a ch...

Page 17: ...s are set to code C or 3 by default The included remote control can be used to operate JVC recorders and other devices VCRs DVD recorders HDD recorders Home theatre system DVD players TV P 6 TV DVD HC VCR DVR Code C or 3 Press and hold Press and hold Operate DVD HDD recorder menus Select VCR DVD recorder HDD recorder VCR HDD recorders DVD recorders Display the subtitle DVD HDD recorder mode Press ...

Page 18: ...m Normal Cool Features Finer picture adjustments P 29 Sound Stereo t u Mode Language v MONO s STEREO t SUB1 u SUB2 Bass Low tones Weaker Stronger Treble High tones Weaker Stronger Balance Speaker balance Left Stronger Right Stronger 3D Cinema Sound Ambience level High Low Mono Off Tone Correction Make the sound more clear On Off Features Sleep Timer Timer for turning off the TV P 24 Child Lock Sto...

Page 19: ...5 6 2next 1select 2next 1select 2next 1select 2set 1select For natural looking outlines For smooth cinema film Off Function is turned off On Auto Automatically adjusts Function is always on For natural looking pictures Off Function is turned off On Maintain a natural colour balance Fix bright dark pictures Off Function is turned off On Make it easier to view bright dark pictures When there is no c...

Page 20: ...ility of the signal there may be a time lag when changing channels Problem Actions page Unplug TV several minutes later plug it in again Remote control stops working Press to return to your settings Aspect ratio changes unintentionally 17 Unnatural colour Adjust Colour and Bright 1 Check your Colour System Noise Set to the following functions Picture Mode Standard Super DigiPure Max Dull picture S...

Page 21: ... x 768 XGA Vertical frequency Hz 60 0 60 0 What is T V LINK What is ACI Automatic Channel Installation Receivable broadcast systems PC Signals that can be displayed Connect DVI devices Problem Actions page Display Screen Functions HDMI Switch Size in HDMI Setting to 1 or 2 Wrong screen size 28 Use the cable marked with HDMI logo No picture no sound Check if the device is compliant with HDMI Switch...

Page 22: ...5 F35 CH 136 F36 CH 137 F37 CH 138 F38 CH 139 F39 CH 140 F40 CC Frequency MHz CC 110 116 124 CC 111 124 132 CC 112 132 140 CC 113 140 148 CC 114 148 156 CC 115 156 164 CC 116 164 172 CC 123 220 228 CC 124 228 236 CC 125 236 244 CC 126 244 252 CC 127 252 260 CC 128 260 268 CC 129 268 276 CC 130 276 284 CC 131 284 292 CC 132 292 300 CC 133 300 306 CC 141 306 311 CC 142 311 319 CC 143 319 327 CC 144 ...

Reviews: