background image

Setting up your TV

9

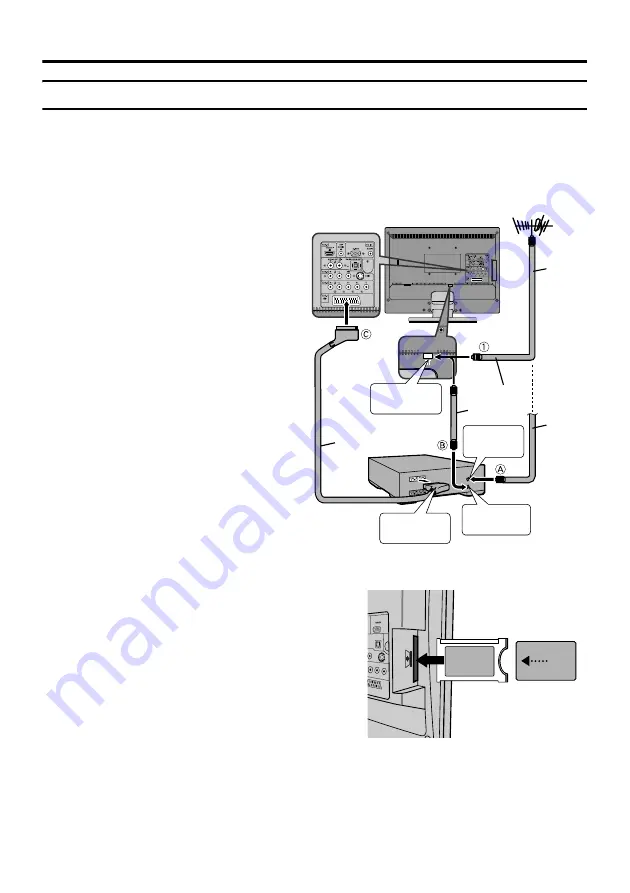
Connecting the aerial

Caution

• Turn off all the equipment including the TV before connecting anything.

„

If you connect via a device with an 

antenna terminal such as a VCR, 

follow 

A


B


C

 in the right 

diagram.

„

If you connect the antenna 

directly to the TV, follow 

1

.

• The connecting cables are not provided.
• To connect more equipment, see 

“Connecting external equipment” on 
page 49.

• To connect additional audio equipment, 

see “Connecting speakers/amplifier” on 

page 51.

• When connecting via a device with an 

antenna terminal such as a VCR, 
depending on the connection method, the 
signal may be weakened. If this happens, 

use a booster to increase the signal 
strength.

• In areas with a lot of radio communication 

such as near ports or airports, noise may 
be introduced into the picture or sound. In 
such cases, reception may be improved by 

using a high-performance antenna.

• Read the instruction manual of the 

devices which you connect to the TV.

Watching pay-TV digital channels

75-ohm 

Coaxial 

Cable

21-pin SCART 

Cable

75-ohm 

Coaxial 

Cable

AV IN/OUT 

Terminal

To Aerial 

Output

To Aerial 

Input

VCR

Aerial

75-ohm 

Coaxial 

Cable

To aerial 

socket

To watch pay-TV digital channels, you need to 
subscribe to a broadcasting company beforehand. A 

Viewing Card 

A

 will be sent by the broadcasting 

company after subscribing to it. It may be necessary 
for you to purchase a CAM (Conditional Access 

Module) 

B

 in addition to the Viewing Card. Consult 

your broadcasting company or retailer.

1.

Unplug the power cord.

2.

Insert 

A

 into 

B

.

3.

Insert 

B

.

4.

Plug the power cord, and turn the power on.

5.

Perform necessary settings (see “Common 

Interface” on page 33).

• Pay-TV analogue channels cannot be watched.

B

A

Summary of Contents for LT-19DK8WJ

Page 1: ...WIDE LCD PANEL TV INSTRUCTIONS LT 19DK8ZJ LT 19DK8WJ Trade Mark of the DVB Digital Video Broadcasting Project 1991 to 1996 Number 4845 ...

Page 2: ...ce care must be taken to ensure optimal results and operational safety Before attempting to use this equipment read the operating instructions thoroughly Ensure that all electrical connections including the mains plug extension leads etc have been made in accordance with the manufacturer s instructions If ever in doubt about the installation operation or safety of this equipment consult your deale...

Page 3: ...WLY AND CAREFULLY ONTO A FLAT SURFACE WARNING Fingers may be trapped under the TV causing injuries Hold the TV at the bottom in the middle and do not allow it to tilt up or down WARNING The TV may fall causing injuries Hold the bottom of the stand with your hand and tilt the TV up and down Do not allow children to hang from the TV place their elbows on the TV or lean against the TV Doing so may ca...

Page 4: ...0 240 V 50 60 Hz on the unit Avoid damaging the AC plug and power cord When you are not using this unit for a long period of time it is recommended that you disconnect the power cord from the main outlet Pixel defects LCDs use collections of fine points pixels to display images While there is no problem with more than 99 99 of these pixels please understand that a very small number of pixels may n...

Page 5: ... symbol is only valid in the European Union This symbol indicates that the electrical and electronic equipment should not be disposed as general household waste at its end of life Instead the product should be handed over to the applicable collection point for the recycling of electrical and electronic equipment for proper treatment recovery and recycling in accordance with your national legislati...

Page 6: ...ctives and standards regarding electromagnetic compatibility and electrical safety European representative of Victor Company of Japan Limited is JVC Technology Centre Europe GmbH Company name changed in JVC Technical Services Europe GmbH Postfach 10 05 52 61145 Friedberg Germany ...

Page 7: ...rmation function 23 Analogue Teletext function 24 Basic operation 24 Hold 24 Sub page 24 Reveal 25 Size 25 Index 25 Cancel 25 Operation with the DTV menu 26 Displaying the DTV menu 26 Setting the favourite TV channels and Radio stations 26 Locking unlocking channels 28 DTV Timer 29 Configuration 30 Parental Control 34 Setting the TV 37 Basic operation 37 Picture menu 38 Picture Mode 38 Bright 1 38...

Page 8: ...able top stand already attached This stand can be used to adjust the direction of the TV screen up and down Using the Ferrite cores There are two Ferrite cores in your TV s packaging These cores are used to prevent possible electromagnetic interferences through the audio cables Tilt the TV up and down While holding the bottom of the stand with one hand use your other hand to hold the middle of the...

Page 9: ...airports noise may be introduced into the picture or sound In such cases reception may be improved by using a high performance antenna Read the instruction manual of the devices which you connect to the TV Watching pay TV digital channels 75 ohm Coaxial Cable 21 pinSCART Cable 75 ohm Coaxial Cable AV IN OUT Terminal To Aerial Output To Aerial Input VCR Aerial 75 ohm Coaxial Cable To aerial socket ...

Page 10: ...rol The batteries supplied are only for setting up and testing your TV please replace them as soon as you need to If the remote control does not work properly replace the batteries Initial settings When the TV is first turned on it goes into the initial settings mode and the Quick Setup menu will appear Follow the instructions on the screen display to make the initial settings 1 Make sure to set t...

Page 11: ...he DTV channel installation is complete 5 Press the OK button The Digital terrestrial broadcasting DVB T channel full scan installation starts and channels which can be received are automatically registered 6 If Yes is chosen in step 4 the following screen will display If No is chosen in step 4 you will see the screen below Press the BACK button to skip Analogue TV search The first DTV programme p...

Page 12: ...it the Programme numbers Pr using the Program Edit function For details see Program Edit on page 42 If a TV channel you want to view is not set to a Programme number Pr you can set it using the Manual Program function For details see Manual Program on page 41 The Search function does not set the Programme number Pr 0 for your video cassette recorder You will need to set this using the Manual Progr...

Page 13: ...y 5 to 8 seconds for the TV to turn on or go into the standby mode after the Standby button on the remote control or the Standby button on the TV is pressed Choose a TV channel Press the P buttons to choose a programme number Pr You can choose to change the Digital terrestrial broadcasting DVB T or Analogue TV channels by pressing the TV AV OK button Watching images from external devices Press the...

Page 14: ...rs 2 Press the buttons while the volume level indicator is displayed Using the Menu Use the MENU button Refer to Setting the TV on page 37 for details of using the menu If the Digital terrestrial broadcasting DVB T picture is unnatural Remove and insert the power plug The picture may appear natural again ...

Page 15: ...tton 4 Colour buttons 5 TV DTV button 6 7 buttons 7 Text button 8 P buttons 9 VCR DVD Teletext control buttons 0 ZOOM button No function Standby button VCR TV DVD switch AV button MENU button OK button BACK button Volume buttons GUIDE button TV RADIO button Subtitle button No function ...

Page 16: ...Press the AV button to choose an EXT terminal When watching Analogue terrestrial broadcasting or EXT 1 and EXT 3 input images if you do not have a clear picture or no colour appears change the Colour System manually See Colour System on page 43 When watching Analogue terrestrial broadcasting if you cannot hear the normal sound even if the picture of the TV channel appears normally follow the descr...

Page 17: ...16 9 Full programme with Digital terrestrial broadcasting DVB T the aspect ratio is Full Regular Use to view a normal picture 4 3 aspect ratio as this is its original shape Panoramic This stretches the left and right sides of a normal picture 4 3 aspect ratio to fill the screen without making the picture appear unnatural This mode may result in information such as headlines or rolling text at the ...

Page 18: ...cted with the ZOOM button It can only be selected by changing the Aspect Ratio setting in the Feature menu The ZOOM mode may be automatically changed by the control signal from an external device When you want to return to the previous ZOOM mode choose the ZOOM mode again ...

Page 19: ...e 3 Current time 4 Current programme name 5 Current mode TV or Radio 6 Current Favourite list 7 Start end and elapsed time of current programme The longer the yellow bar the longer the time elapsed 8 Service indication icons These icons indicate service information or available additional functions you can use while watching the programme maturity rating of current programme see page 36 this progr...

Page 20: ...e Electronic Programme Guide EPG and choose to view the information of a different channel by pressing the P buttons the channel you are viewing will also be changed accordingly after the EPG is closed Choosing another day Press the 5 buttons and choose the programme guide for another day Viewing details of a programme Press the 6 buttons to choose a programme The programme name broadcast time and...

Page 21: ...o close the subtitle language selection screen If you want to hide the subtitles choose Disabled in step 2 above Choosing an audio language With Digital terrestrial broadcasting DVB T some programmes are broadcast in different audio languages These programmes are indicated by the icon in the programme information screen You can choose different audio languages when watching these programmes 1 Pres...

Page 22: ... 2 Operate it with the Colour buttons Number buttons 7 buttons BACK button and OK button The operation method may differ depending on the contents of the Digital Teletext Follow the instructions displayed on Digital Teletext screen When the Text button is pressed the TV returns to television broadcasting With Digital terrestrial broadcasting DVB T in addition to Digital Teletext broadcasting at th...

Page 23: ...ee the channel number of the programme you are watching The channel number and channel name when the channel name is registered of the programme you are watching or the EXT terminal name is displayed Press the Information button to display the information you want to see ...

Page 24: ...a Teletext programme Hold You can hold a Teletext page on the screen for as long as you want even while several other Teletext pages are being received Press the Hold button To cancel the Hold function Press Hold button again Sub page Some Teletext pages include sub pages that are automatically displayed 1 Choose a Teletext page that includes sub pages A Teletext page that includes sub pages is in...

Page 25: ...turns to page 100 or a previously specified page Cancel You can search for a Teletext page while watching TV 1 Press the Number button to enter a page number or press a Colour button The TV searches for a Teletext page 2 Press Cancel button The TV programme appears When the TV finds the Teletext page its page number appears in the upper left of the screen 3 Press Cancel button to return to a Telet...

Page 26: ... stations Channels and Radio stations that you often watch and listen to can be set as favourite channels and stations Once set you can choose from just those channels and stations when the P buttons are pressed After setting the favourite channels and stations set Favourite Mode see Favourite Mode on page 32 to On 1 Press the 6 buttons and choose Favourite Lists and then press the OK button The F...

Page 27: ... stations respectively The names of the Favourite lists for TV and Radio are fixed as FAV and RFAV and cannot be changed These lists cannot be modified except locking or unlocking channels see Locking unlocking channels on page 28 Checking and modifying a Favourite list 1 Press the 6 buttons and choose Check and Modify in the Favourite Lists menu and then press the OK button 2 Press the 6 and colo...

Page 28: ...If you haven t created any favourite lists yet choose TV 4 Press the 6 buttons and choose the channel you want to lock and press the red button to lock it The icon appears once the channel is set as locked 5 Repeat the step above if you want to lock other channels 6 Press the BACK button You will be asked if you want to save the changes 7 Press the 5 buttons to choose Yes and then press the OK but...

Page 29: ...for 12 00 AM Repeat Use the 5 buttons to choose the timer mode and then press the 4 button Day dd mm yy Set the date for the timer to work with the Number buttons When the 5 buttons are pressed the input position moves Press the 4 button Start Time Set the timer start time with the Number buttons When the 5 buttons are pressed the input position moves Press the 4 button Stop Time Set the timer sto...

Page 30: ...dio broadcasting Press the 6 buttons and choose Configuration in the DTV Menu and press the OK button The Configuration menu appears When the BACK button is pressed the previous screen is returned to When the MENU button is pressed the menu disappears Channels Installation Use when re registering channels or when registering new channels Press the 6 buttons and choose Channels Installation and pre...

Page 31: ...from the TV to the antenna Then press the 4 button Choose a suitable option according to the type of antenna you use for DVB T reception 3 Press the 5 buttons and choose the channel that you want to register and then press the OK button The search starts and the input channel is registered if it can be received User Settings You can use the options in this menu to change the settings of your TV wh...

Page 32: ...On or Off Dolby and the double D symbol are trademarks of Dolby Laboratories The Dolby Digital sound is only available when an external amplifier and sound speakers are connected to the TV see Connecting speakers amplifier on page 51 Menu Appearance Allows you to choose a desired style for displaying the DTV Menu 1 Press the 6 buttons and choose Menu Appearance 2 Press the 5 buttons and choose a t...

Page 33: ...th the Timers function Press the 5 buttons and choose a setting mode Auto Choose to let the TV set up time information automatically using the data from the Digital terrestrial broadcasting DVB T signal Manual Choose to set up time information manually Use the 7 buttons Number buttons and OK button to set the time When entering the time input 1200 for 12 00 PM 1500 for 3 00 PM and 0000 for 12 00 A...

Page 34: ...nless the correct PIN code is entered the lock cannot be released and the child cannot view the TV channel Additionally you can also use this function to lock out the DTV Menu to prevent the settings from being changed and set up maturity ratings for TV programmes and so on If you have not changed the PIN code see Changing PIN code on page 36 the factory set PIN code for the Parental Control funct...

Page 35: ...ke effect after the TV is restarted Enabling disabling Menu Lock If the Menu Lock is enabled whenever the DTV Menu is called a correct PIN code is required to unlock it This helps prevent unauthorised change of settings 1 Enable the Parental Control function See Enabling disabling the Parental Control function on page 34 2 In the Parental Control menu press the 6 buttons and choose Menu Lock then ...

Page 36: ...ss the OK button Changing PIN code You can use this function to change the PIN code for the Parental Control function If you have not changed the PIN code the factory set PIN code is 0000 If you forget your PIN code you need to reset the TV to Factory Settings see Factory Settings on page 33 and specify a new PIN code 1 Enable the Parental Control function See Enabling disabling the Parental Contr...

Page 37: ... menu Some menu items may not be operated or set depending on the TV status or other menu item settings Menu items that cannot be operated or set are displayed in grey in the menu and cannot be chosen Types of menus The menu will disappear after about one minute if no operation is performed Operation with the buttons on the TV You can also operate the menus using the buttons on the TV MENU OK BACK...

Page 38: ...sharper Picture Reset You can reset all settings in the Picture menu using this function Press the OK or 3 button to reset the settings This function is only available when the Picture Mode is set to Manual Picture Advanced Setting Choose Picture Advanced Setting and press the OK or 3 button to display the sub menu Hue You can adjust the picture hue 2 reddish 3 greenish You can change the Hue sett...

Page 39: ...ormal The normal white colour Warm A reddish white Using this mode when watching films allows you to enjoy colours that are characteristic of films Bright 2 You can adjust the back light Bright For viewing in environments with bright ambient lighting Normal For viewing in normal conditions Power Save For viewing in darker environments ...

Page 40: ...ound from Dual I sub I or Dual II sub II If you have poor reception on a stereo broadcast you can change from stereo to mono sound so that you can hear the broadcast more clearly and easily When you are viewing video from an EXT terminal you can also choose the sound from the left channel right channel or both Press the 2 and 3 buttons to choose a Sound Mode The sound mode you can choose differs d...

Page 41: ...anual Program then press the OK or 3 button The Manual Program menu appears 2 Press the 2 and 3 buttons to choose the Sound System broadcasting system for a TV channel you want to register For the Sound Systems in each country or region refer to the table below If the Sound System is set to Auto only DK BG and I systems can be correctly detected automatically 3 Press the 4 button to choose Program...

Page 42: ...ge 43 Swap This function changes the programme number Pr of a TV channel Delete This function deletes a TV channel you do not want to list Caution Using the Name Swap or Delete functions rewrites the current Programme numbers Pr list Therefore the Programme numbers Pr of some of the TV channels will change Basic operation 1 Choose Program Edit then press the OK or 3 button The Program Edit menu ap...

Page 43: ...TV channel picture is displayed in the background 3 Press the MENU button to hide the Program List Colour System The colour system is chosen automatically However if the picture is not clear or no colour appears choose the colour system manually 1 In the Install menu press the 1 and 4 buttons to choose Manual Program then press the OK or 3 button 2 Press the 1 and 4 buttons to choose Colour System...

Page 44: ...nu For colour system in your country or region refer to the table below Area Country or Region System Europe Russia etc SECAM Czech Republic Poland etc PAL Germany Holland Belgium etc PAL UK etc PAL France etc SECAM ...

Page 45: ... Timer function set the period of time to Off The Sleep Timer function cannot be used to turn off the TV s main power Child Lock You can use this function to prevent children changing programmes or adjustments etc without remote control Press the 2 and 3 buttons to turn the function on or off When Off is selected there will be no difference in the operation of your TV When On is selected the TV ca...

Page 46: ...ing in dot intensive presentations like spreadsheets or paragraphs or text in smaller fonts Press the 2 and 3 buttons to adjust the value Clock Phase Depending on the resolution and scan frequency of the PC input you may see a muddy or noisy picture on the screen In such case you can use this function to get a clear picture Press the 2 and 3 buttons to adjust the value H Position This function shi...

Page 47: ...r to install the Ferrite core on the audio cable See Using the Ferrite cores on page 8 Refer to the computer manual for a detailed explanation of the connections at the computer side Ensure that the connectors are facing the correct way when connecting After connecting the D SUB cable tighten the two screws to fix the connector in place Watching images from a computer After starting the computer p...

Page 48: ...epending on the quality of the synchronous signal Depending on the quality some pictures may not be displayed properly When a picture is not displayed Check the computer s refresh rate and set it according to the table on the previous page Refer to the computer s instruction manual Computers which cannot have compatible refresh rates cannot be used with this unit ...

Page 49: ...T terminals If you are connecting equipment not listed in the following connection diagram see the table to choose the best EXT terminal Connecting cables are not supplied Connecting the PC For details see Connecting to the computer on page 47 1 VCR composite signal 2 Decoder 3 DVD player composite signal 4 DVD player composite signal RGB signal 5 DVD player component signals Y Pb Pr 6 DVD player ...

Page 50: ...50 Additional preparation ...

Page 51: ... output Teletext programmes cannot be output Connecting speakers amplifier While referring to the audio equipment connection diagram connect the audio equipment you want to the TV You can use external front speakers to listen to the TV sound instead of the TV speakers Before connecting anything Read the manuals provided with the amplifier and speakers Turn the TV and amplifier off Note that connec...

Page 52: ...D player set the switch to the DVD position You can turn the DVD player on or off with the Standby button You can also press the MENU or TOP MENU button and display the DVD disc menu screen and then operate by pressing the 7 buttons 2 Press the VCR DVD control buttons to control your VCR or DVD player If your device is not made by JVC these buttons will not work Even if your device is made by JVC ...

Page 53: ...erial or aerial cable Check the following to try to solve the problem Have the TV and aerial been connected properly Has the aerial cable been damaged Is the aerial pointing in the right direction Is the aerial itself faulty Have you chosen an Analogue TV channel with very poor reception If so the Blue Back function will be activated the entire screen becomes blue and the sound is muted If you sti...

Page 54: ...turn to the ordinary TV programme and then try operating the menus If the TV suddenly stops responding disconnect the TV from the AC outlet Connect them to the AC outlet again to turn on the TV If the TV returns to a normal state it is not a failure Other issues When the Sleep Timer function operates the TV is automatically turned off If the TV suddenly turns off try to press the Standby button to...

Page 55: ...tput 2 W 2 W Speakers 3 4 cm oval 2 EXT 1 terminal Euroconnector 21 pin SCART Video input Audio L R inputs and RGB inputs are available TV broadcast outputs Video and Audio L R are available EXT 2 terminal RCA connectors 5 Component video Y Pb Pr input and Audio L R inputs are available 480i 525i 480p 525p 576i 625i 576p 625p 720p 750p and 1080i 1125i signals are available EXT 3 terminal RCA conne...

Page 56: ...P N 4J 0AE01 002 1007TKH BQ BQ ...

Reviews: