background image

Bluetooth Control

36


Ñ

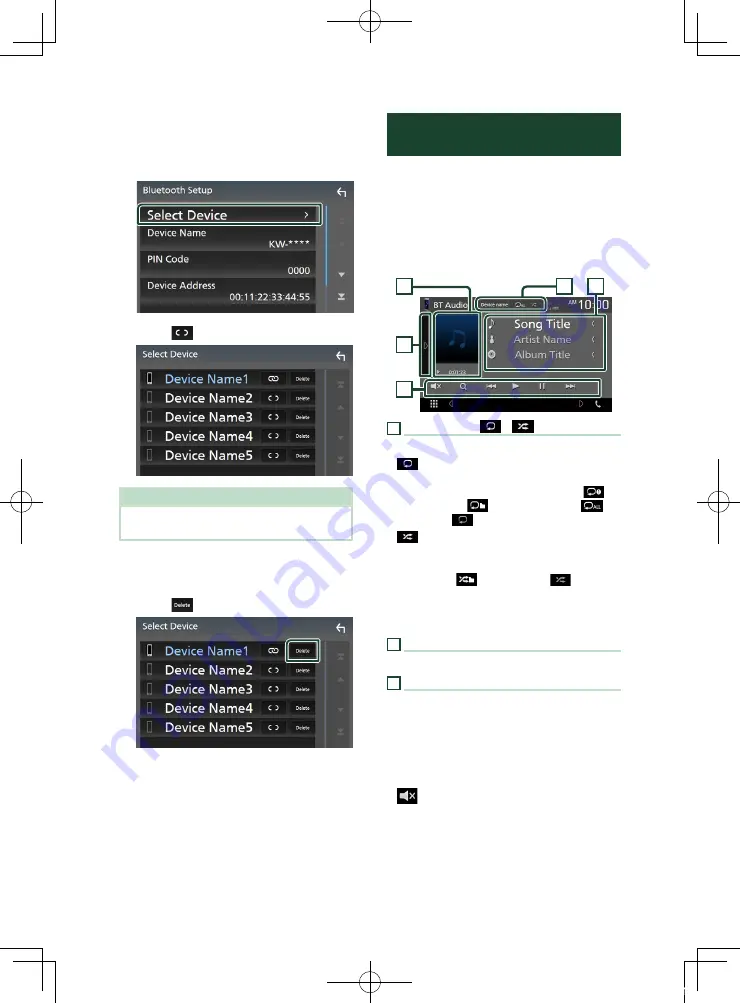
Connect the Bluetooth device

Touch 

[

Select Device

]

 in the Bluetooth 

SETUP screen.

Touch 

[

]

 you want to connect.

NOTE

•  If the icon is lighted, it means that the unit will 

use that device.

To delete the registered Bluetooth 

device

Touch 

[

]

.

h

h

Confirmation message appears.

Touch 

[

Yes

]

.

Playing Bluetooth Audio 

Device

Most function can be controlled from the 
source control screen.
To enter Bluetooth source, touch 

[

BT Audio

]


icon in the source selection screen. 

(P.10)


Ñ

Bluetooth basic operation

Control screen

3

4

5

2

1

1

 Device name/ 

[

]

 / 

[

]

• Connected device name.
• 

[

]

 : Repeats the current track/folder. Each 

time you touch the key, repeat mode switches 
in the following sequence; File repeat (

[

]

), 

Folder repeat (

[

]

), All songs repeat (

[

]

), 

Repeat off (

[

]

)

• 

[

]

 : Randomly plays all tracks in current 

folder. Each time you touch the key, random 
mode switches in the following sequence;  
All random (

[

]

), Random off (

[

]

)

• Operations and display indications may 

differ according to their availability on the 
connected device.

2

 Information display *

Displays the name of the track information. 

3

 Operation keys *

• 

[

1

]

: Searches file. Se

File search (P.37)

.

• 

[

E

]


[

F

]

: Searches the previous/next 

content. Touch and hold to fast forward or fast 
backward.

• 

[

D

]

: Plays.

• 

[

H

]

: Pauses.

• 

[

]

 : Touch to mute or not to mute. 

!B5H-0357-03_JVC_KWV_K_En.indb   36

2020/07/09   8:19

Summary of Contents for KW-V660BT

Page 1: ...tion KW V660BT KW V66BT MONITOR WITH DVD RECEIVER INSTRUCTION MANUAL Updated information the latest Instruction Manual system updates new functions etc is available from https www jvc net cs car B5H 0357 03_JVC_KWV_K_En indb 1 2020 07 09 8 19 ...

Page 2: ... 21 USB 22 Connecting a USB device 22 USB Basic Operation 22 Search Operation 24 Tuner 25 Tuner Basic Operation 25 Memory Operation 26 Selecting Operation 26 Traffic Information 27 Tuner Setup 27 SiriusXM 28 SiriusXM Basic Operation 28 Storing Channels in Preset Memory 29 Preset select 29 Direct search 30 Category Channel search 30 Replay 31 SiriusXM Setup 31 Bluetooth Control 34 Information for u...

Page 3: ...ote control 53 Functions of the Remote control Buttons 53 Connection Installation 54 Before Installation 54 Installing the unit 55 Troubleshooting 59 Problems and Solutions 59 Error Messages 59 Appendix 61 Playable Media and Files 61 Region Codes in the World 63 DVD Language Codes 64 Specifications 65 About this Unit 67 B5H 0357 03_JVC_KWV_K_En indb 3 2020 07 09 8 19 ...

Page 4: ...dly wipe the stain off with a cloth moistened with neutral cleaner then wipe it again with a clean soft dry cloth NOTE Applying spray cleaner directly to the unit may affect its mechanical parts Wiping the faceplate with a hard cloth or using a volatile liquid such as thinner or alcohol may scratch the surface or erase screened print Ñ Ñ How To Reset Your Unit If the unit or the connected unit fai...

Page 5: ...y a disc that has not been finalized For the finalization process see your writing software and your recorder s instruction manual Ñ Ñ Caution for Smartphone Users Simultaneously running multiple applications on your smartphone while screen sharing places heavy demand on the microprocessor of the phone potentially affecting communication and performance For best results while pairing with your JVC...

Page 6: ... The volume will go up until 15 when you keep pressing 5 Displays the HOME screen P 9 Pressing for 1 second turns the power off When the power off turns the power on 6 Reset If the unit or the connected unit fails to operate properly the unit returns to initial settings when this button is pressed 7 Disc insert slot A slot to insert a disc media P 13 Turning on the Unit The method of turning on is...

Page 7: ...7 Display Set the image on the screen 1 Touch Display 2 Touch Background 3 Select the image 4 Touch For detailed operation see Display Setup P 46 Camera Set the parameters for the camera 1 Touch Camera 2 Set each item and touch For detailed operation see Camera Setup P 42 DEMO Set the demonstration mode Default is ON 1 Touch DEMO and set ON or OFF 2 Touch Finish NOTE These settings can be set from...

Page 8: ...erform operations on the screen you need to touch touch and hold flick or swipe to select an item display setting menu screen or to change the page etc Touch Touch the screen gently to select an item on the screen Touch and hold Touch the screen and keep your finger in place until the display changes or a message is displayed Flick Slide your finger quickly to the left or right on the screen to ch...

Page 9: ... 1 5 6 1 2 3 1 1 Short cut playback source icons P 10 2 Current source information Touch to display the control screen of current source 3 Widget 4 Displays the source selection screen P 10 5 Displays the SETUP Menu screen P 44 6 Displays the Hands Free screen P 38 When connecting as Apple CarPlay or Android Auto it works as a phone provided in Apple CarPlay or Android Auto Display the HOME screen...

Page 10: ...le CarPlay Android Auto nor a Bluetooth Hands Free phone is connected displays Disconnected message in the TEL screen When connecting as Apple CarPlay or Android Auto it works as a phone provided in Apple CarPlay or Android Auto Switches to the Radio broadcast P 25 Plays a Bluetooth audio player P 34 Plays a disc P 13 Plays files on a USB device P 22 Switches to an external component connected to ...

Page 11: ...very time you touch it You can also change the Secondary screen by flicking left or right on the screen Indicators Displays the current source condition and so on MUTE The mute function is active LOUD The loudness control function is on Sub menu Operation when the icon is touched The first touch darkens the screen the second touch darkens the screen further and the third touch restores the screen ...

Page 12: ...isplayed Close the FUNCTION screen Turn off the screen 1 Select on the FUNCTION screen To turn on the screen 1 Touch the display List screen There are some common function keys in the list screens of most sources 6 1 2 3 4 5 1 Displays list type selection window 2 Displays music movie file list 3 Text scroll Scrolls the displayed text 4 etc Keys with various functions are displayed here Plays all ...

Page 13: ...r the message is displayed DVD VCD Basic Operation Most functions can be controlled from the source control screen and playback screen NOTE The screen shot below is for DVD It may be different from the one for VCD 1 When the operation buttons are not displayed on the screen touch 7 area Control screen 4 5 3 1 2 Video screen 6 7 8 1 Function panel Touch the left side of the screen to display the fu...

Page 14: ...nt Touch and hold to fast forward or fast backward the disc D H Plays or pauses Touch to mute or not to mute 5 Indicator Items IN Disc insertion status White A Disc is inside the unit Orange Disc player failure VCD 1chLL 2chLL Identifies the left audio output of channel 1 or 2 1chLR 2chLR Identifies the monaural audio output of channel 1 or 2 1chRR 2chRR Identifies the right audio output of channe...

Page 15: ...ion P 16 PBC VCD only Touch to turn Playback control PBC on or off Audio VCD only Touch to change audio output channels Music CD Disc media Basic Operation Most functions can be controlled from the source control screen and playback screen NOTE In this manual Music CD means a general CD which includes music tracks Disc media means a CD DVD disc which includes audio or video files The screen shot b...

Page 16: ...tion status White A Disc is inside the unit Orange Disc player failure Video screen 8 7 7 7 File search area Video file only Touch to search for the next previous file 8 Key display area Video file only Touch to display the control screen DVD Disc Menu Operation You can set up some functions using the DVD VIDEO disc menu 1 Touch the framed area during playback h h Menu Control screen appears 2 Per...

Page 17: ... you do not operate for a predetermined period of time DVD Setup You can set up the DVD playback functions 1 Touch the framed area during playback 2 Touch on the left side of the screen Touch SETUP h h DVD SETUP screen appears 3 Set each function as follows Menu Language Subtitle Language Audio Language See Language setup P 18 Dynamic Range Control Sets the dynamic range Wide The dynamic range is ...

Page 18: ...and left ends Ñ Ñ Language setup This setting is for the languages used for the menu subtitle and voice 1 Touch the desired item Menu Language Subtitle Language Audio Language h h Language Set screen appears 2 Select a language For language codes refer to DVD Language Codes P 64 Touch Close to set the entered language and return to the DVD SETUP screen NOTE To set the DVD s original language as th...

Page 19: ... compatible with Apple CarPlay is connected to the USB terminal the Bluetooth smartphone currently connected is disconnected 2 Unlock your iPhone Ñ Ñ Operation buttons and available Apps on the home screen of Apple CarPlay You can use the Apps of the connected iPhone The items displayed and the language used on the screen differ among the connected devices To enter Apple CarPlay mode touch Apple C...

Page 20: ...nnected via Bluetooth automatically and the Bluetooth smartphone currently connected is disconnected 2 Unlock your Android smartphone NOTE To use the Android Auto It is necessary to set Mode to Android Auto P 21 Ñ Ñ Operation buttons and available Apps on the Android Auto screen You can perform the operations of the Apps of the connected Android smartphone The items displayed on the screen differ ...

Page 21: ...ch Device 4 Touch Mode 5 Touch Mirroring for Android Ñ Ñ Compatible Android smartphone Android version 7 0 or later Linux Kernel version 3 5 or later Bluetooth support NOTE This unit may not work for some Android smartphone s Ñ Ñ Connecting an Android smartphone 1 Connect an Android smartphone via the USB terminal 2 Launch Mirroring App on your Android Smartphone Touch OK to start Mirroring App To...

Page 22: ...re it will not affect safe driving You cannot connect a USB device via a USB hub and Multi Card Reader Take backups of the audio files used with this unit The files can be erased depending on the operating conditions of the USB device We shall have no compensation for any damage arising from any erased data USB Basic Operation Most functions can be controlled from the source control screen and pla...

Page 23: ...he left side of the screen to display the function panel Touch again to close the panel Searches previous next folder ASPECT Only during video playback Select screen mode Full Changes the aspect ratio of video and displays fully on the screen Normal Display with 4 3 ratio Auto Displays video fully on vertical or horizontal with no ratio change 6 Operation keys 1 Searches track file For details on ...

Page 24: ...n the list Repeat this step until you find the desired file Ñ Ñ Link search You can search a file of same artist album genre as the current track 1 Touch Link Search 2 Touch the desired tag type You can select from artist album and genre h h The list corresponding to your selection appears 3 Touch desired item from the content list Ñ Ñ Folder search You can search a file according to hierarchy 1 T...

Page 25: ...e Touch to mute or not to mute 4 Preset list Touch on the right side of the screen to display the Preset list Touch again to close the list Recalls the memorized station When touched for 2 seconds stores the current receiving station in memory 5 Function panel Touch on the left side of the screen to display the function panel Touch again to close the panel TI FM only Sets the traffic information m...

Page 26: ...Touch FM 1 24 or AM 1 12 in which you want to store the station for 2 seconds Selecting Operation Ñ Ñ Preset select You can list and select memorized station 1 Touch on the right side of the screen Select a station from the list Ñ Ñ Search by program type FM only You can tune to a station with a specific program type when listening to FM 1 Touch on the left side of the screen Touch PTY h h PTY Sea...

Page 27: ...s 1 Touch 2 Touch on the left side of the screen Touch SETUP h h Tuner SETUP screen appears 3 Set each item as follows RDS CT FM only Synchronizing the Radio Data System station time data and this unit s clock ON Default OFF Area Setting The tuner channel interval changes depending on the area where you use this unit North America Default Select this when using in North America FM AM intervals are...

Page 28: ...o ID does not include the letters I O S or F Activate the SiriusXM Connect Vehicle Tuner using either one of the two methods below For users in U S A Online Visit www siriusxm com activatenow Phone Call SiriusXM Listener Care at 1 866 635 2349 For users in Canada Online Visit https www siriusxm ca help activation help Phone Call XM customer Care at 1 877 438 9677 NOTE To use SiriusXM Satellite Rad...

Page 29: ... Plays or pauses See Replay P 31 CHS CHR Selects a channel Touch to mute or not to mute 5 Preset list Touch of the screen to display the preset list Touch to close the list Recalls the memorized channel When touched for 2 seconds stores the currently being received channel in the memory Storing Channels in Preset Memory You can store the current channel in memory 1 Tune in the channel you wish to ...

Page 30: ...u entered touch BS Category Channel search You can specify the desired category and select a channel 1 Touch 1 2 Select a category h h Channel list appears 3 Select the desired content from the list 1 1 Select a desired item Info CH Name Artist Title NOTE All channels in the selected category appear Touching All Channels displays all channels B5H 0357 03_JVC_KWV_K_En indb 30 2020 07 09 8 19 ...

Page 31: ... the recorded data capacity and playback position D B etc Current play mode indicator To return to live music content 1 Touch the left side of the screen 2 Touch Live SiriusXM Setup 1 Touch on the left side of the screen Touch SETUP h h SiriusXM SETUP screen appears See the following sections for each setting Set up the Parental Code P 32 Set up the Parental Control P 32 Set up the Parental Lock C...

Page 32: ...e number is confirmed and the SiriusXM parental code is now set Ñ Ñ Parental Control The Parental Control feature allows you to limit access to any SiriusXM channels including those with mature content When enabled the Parental Control feature requires you to enter a Parental Code to tune to the locked channels 1 Touch Parental Control on the SiriusXM SETUP screen 2 Touch User Mature or OFF User L...

Page 33: ...ory Select screen appears 3 Touch the desired category in the list h h Displays all channels in the selected category NOTE Touch All Channels to display all channels To delete the parental lock channel setting touch Disable All and then touch Yes on the confirmation screen 4 Touch each channel on the list and set to ON or OFF ON Locks the channel OFF Unlocks the channel 1 1 Select a desired item I...

Page 34: ...f the device This unit may not work for some Bluetooth devices Connecting conditions may vary depending on your environment For some Bluetooth devices the device is disconnected when the unit is turned off Ñ Ñ About the cell phone and Bluetooth audio player This unit conforms to the following Bluetooth specifications Version Bluetooth Ver 4 1 Profile Cell phone HFP Hands Free Profile SPP Serial Po...

Page 35: ... on your smartphone cell phone 2 Search the unit KW V from your smartphone cell phone 3 Operate your smartphone cell phone according to the displayed messages Confirm the request on the smartphone cell phone If a PIN code is required enter the PIN code 0000 4 Touch Yes When data transmission and connection have completed the Bluetooth connection icon appears on the screen Bluetooth Setup 1 Press t...

Page 36: ...vice name Connected device name Repeats the current track folder Each time you touch the key repeat mode switches in the following sequence File repeat Folder repeat All songs repeat Repeat off Randomly plays all tracks in current folder Each time you touch the key random mode switches in the following sequence All random Random off Operations and display indications may differ according to their ...

Page 37: ...eration keys do not appear operate from the player Depending on your cell phone or audio player audio may be heard and controlled but text information may not appear If the volume is too low raise it on your cell phone or audio player Ñ Ñ Connect the Bluetooth audio Selects the device to connect via Bluetooth audio A2DP or APP SPP 1 Touch on the left side of the screen Touch BT DEVICE CHANGE 2 Tou...

Page 38: ...up to 1000 entries Up to 20 entries including dialed calls received calls and missed calls 2 Select a dialing method Call using call records Call using the phonebook Call using the preset number Call by entering a phone number Voice Recognition P 39 Bluetooth SETUP Bluetooth SETUP 1 Touch Bluetooth SETUP screen appears NOTE The status icons such as battery and antenna displayed may differ from tho...

Page 39: ...hing Download Phonebook Now will start downloading the Phonebook Ñ Ñ Voice Recognition You can access the voice recognition function of the cell phone connected to this unit You can search the cell phone phonebook by voice The functionality depends on the cell phone 1 Press the button h h Voice Recognition screen appears 2 Start speaking NOTE You can use voice recognition function by touching on t...

Page 40: ...e or button Output the dial tone Touch DTMF to display the tone input screen You can send tones by touching desired keys on the screen Switching the speaking voice output Touching each time switches the speaking voice output between cell phone and speaker Call waiting When you receive a call while talking on another call you can answer the newly received call by touching The current call is on hol...

Page 41: ...phonebook P 39 Add number direct Enter the telephone number directly and touch SET See Call by entering a phone number P 38 Delete To delete a preset number touch Delete and then touch Yes on the confirmation screen Ñ Ñ Phonebook transfer You can transfer the phonebook in your Bluetooth smartphone via PBAP 1 Touch 2 Touch h h The phonebook data transmission starts NOTE If the Phonebook contains mo...

Page 42: ...s 3 Adjust each item as follows 1 1 Camera off Touch to exit the camera screen Ñ Ñ Camera Setup 1 Press the FNC button h h FUNCTION screen appears 2 Touch h h SETUP Menu screen appears 3 Touch Camera h h Camera screen appears 4 Set each item as follows Parking Guidelines You can display parking guidelines to enable easier parking when you shift the gear to the reverse R position Default is ON Guid...

Page 43: ...ith the rear view camera When adjusting the parking guidelines make sure to use the parking brake to prevent the car from moving 1 Touch ON of Parking Guidelines in the Camera screen P 42 2 Touch Guidelines SETUP in the Camera screen 3 Adjust the parking guidelines by selecting the mark 4 Adjusting the position of the selected mark A B C D Make sure that A and B are horizontally parallel and that ...

Page 44: ...t Brightness Color Tint Adjusts each item NOTE Adjusting items are different depending on the current source System Setup 1 Press the FNC button h h FUNCTION screen appears 2 Touch h h See the following section for each setting Set up AV P 47 Set up display P 46 Set up the user interface P 45 Set up camera P 42 Set up special P 45 Set up Bluetooth P 35 Set up Device P 21 B5H 0357 03_JVC_KWV_K_En i...

Page 45: ...l Setup You can setup Special parameters 1 Press the FNC button h h FUNCTION screen appears 2 Touch h h SETUP screen appears 3 Touch Special h h Special screen appears 4 Set each item as follows DEMO Set the demonstration mode Default is ON Software Information Check the software version of this unit P 45 Open Source Licenses Displays the open source licenses Initialize Touch Initialize and then t...

Page 46: ... 44 Background Changing background image P 46 Ñ Ñ Change background image 1 Touch Background in the Display screen 2 Select an image 1 1 Select an original image in advance To register original image You can load an image from the connected USB device and set it for the background image Before operating this procedure it is necessary to connect the device which has the image to load 1 Touch User1 ...

Page 47: ...e AV IN USB video file and DISC DVD video source If display of the rear view camera image is selected when the AV IN source is being played no image is output from the VIDEO OUT terminal CarPlay Sidebar Select the position of the control bar left or right shown on the touch panel Left Default Right NOTE The setting is available when an iPhone is disconnected AV Color Adjust You can adjust image qu...

Page 48: ...ears 2 Touch h h Audio screen appears 3 Touch Speaker Xʼover 4 Select a car type You can setup the car type and speaker network etc If your car type is selected the Delay Time Alignment is set automatically for timing adjustment of sound output for each channel to have the highest surround effects 5 Touch the speaker 1 you wish to adjust and set each item 2 as follows 1 2 Speaker You can select a ...

Page 49: ...he front speaker rear speaker or subwoofer level TW Tweeter Gain 2 Adjusts the tweeter level When front is selected on Speaker Select screen Phase Inversion 3 Sets the phase of subwoofer output Check Phase Inversion to shift the phase 180 degrees When subwoofer is selected on Speaker Select screen 1 Only when LPF FREQ HPF FREQ is set to a mode other than Through in Xʼover 2 Only when Tweeter is se...

Page 50: ...in level by touching the each frequency bar You can select frequency bar and adjust its level by R S Preset Select Displays the screen to recall the preset equalizer curve Initialize The current EQ curve returns to flat Memory Saves the adjusted equalizer curve from User1 to User3 Bass EXT Bass Extend Settings When turned on the frequency lower than 62 5 Hz is set to the same gain level as 62 5 Hz...

Page 51: ...settings If you have increased the volume first then reduced the volume using the Volume Offset the sound generated if you suddenly switch to another source may be extremely loud Sound Effect You can set sound effects 1 Press the FNC button h h FUNCTION screen appears 2 Touch h h Audio screen appears 3 Touch Sound Effect 4 Set each item as follows Bass Boost Sets the amount of bass boost among OFF...

Page 52: ...ion DTA 4 Select listening position from Front R Right front Front L Left front Front All All front and All Position DTA control You can fine adjust your listening position 1 Touch Adjust 2 Touch Delay 3 Touch T or U to adjust the delay time of the selected speaker 4 Touch Level 5 Touch T or U to adjust the sound level of the selected speaker NOTE To return to the initial setting of Delay and Leve...

Page 53: ... For the USB BT audio Plays or pauses ANGLE Not used When a call comes in answers the call Key Name Function DIRECT Switches to the direct search mode For details on the direct search mode see Direct search mode P 53 ASPECT Changes the aspect ratio Numeric Keypad Specifies the number to search in direct search For details on the direct search mode see Direct search mode P 53 CLR Deletes a characte...

Page 54: ...hecked If your car s ignition does not have an ACC position connect the ignition wires to a power source that can be turned on and off with the ignition key If you connect the ignition wire to a power source with a constant voltage supply such as with battery wires the battery may be drained If the console has a lid make sure to install the unit so that the front panel will not hit the lid when cl...

Page 55: ...onnector A accessory 7 on the wiring harness and connect it to the external power connector on your vehicle 5 Connect the wiring harness connector to the unit 6 Install the unit in your car 7 Reconnect the terminal of the battery 8 Press the reset button Installing the unit Ñ Ñ Non Japanese cars Bend the tabs of the mounting sleeve with a screwdriver or similar utensil and attach it in place NOTE ...

Page 56: ...g the trim plate 1 Use the extraction key accessory 4 to lever out the six tabs three on the left part three on the right part 4 2 Pull the trim plate forward Ñ Ñ Removing the unit 1 Remove the trim plate by referring to step 1 in Removing the trim plate 2 Insert the extraction key accessory 9 deeply into the slot as shown The protrusion at the tip of the extraction key must face toward the unit 9...

Page 57: ... an exclusive remote adapter not supplied matched to your car Connect to vehicle s reverse lamp harness when using the optional rear view camera Light Blue Yellow Steering remote control wire Fuse 15A Ñ Ñ Connecting wires to terminals Subwoofer Preout Cap Cap FM AM antenna Connector A Connector B USB device 2 USB terminal 1 1 0 m 1 USB maximum power supply current DC 5 V 1 5 A 2 Sold separately Ac...

Page 58: ...her to the power control terminal when using the optional power amplifier or to the power terminal for the booster amplifier of the film type or short pole type antenna Max 150mA 12V White Black Gray Black Green Black Purple Black To car light control switch Speaker impedance 4 8 Ω Purple Green Gray White To front left speaker To front right speaker To rear left speaker To rear right speaker Red I...

Page 59: ...disc does not play but another one plays instead The disc is quite dirty Clean the disc See Precautions on handling discs P 5 The disc is severely scratched Try another disc instead The sound skips when an audio file is being played The disc is scratched or dirty Clean the disc See Precautions on handling discs P 5 The recording condition is bad Record the file again or use another disc Ñ Ñ Other ...

Page 60: ...that doesn t have data recorded that the unit can play See Playable Media and Files P 61 and try another USB device Ñ Ñ SiriusXM Check Tuner A SiriusXM tuner is not connected to this unit Verify that the SiriusXM Connect Vehicle Tuner cable is securely connected to the radio Subscription Updated Press Return To Continue The SiriusXM subscription has been renewed Touching Return on the popup screen...

Page 61: ...HDCD r Normal music CD sound quality CCCD CD ROM v Only CD DA format and Video CD format CD R v CD RW v Others Dualdisc Super audio CD r Only CD layer can be played v Playback is possible r Playback is partly possible Playback is impossible Use of DualDisc When playing a DualDisc on this unit the surface of the disc that is not played may be scratched while the disc is inserted or ejected Since th...

Page 62: ...ded that a car audio system should be configured with all High Resolution Audio compatible products from player to speaker to enjoy its high quality sound Acceptable Video files Profile Max Picture size Max bit rate Audio format MPEG 1 mpg mpeg 352 240 352 288 1 5 Mbps MPEG Audio Layer 2 MPEG 2 mpg mpeg MP ML 720 480 720 576 8 Mbps MPEG Audio Layer 2 H 264 MPEG 4 AVC mp4 m4v avi flv f4v Baseline P...

Page 63: ...s you can select a favorite angle 16 9 LB Indicates the type of screen for the image The left mark indicates that a wide image picture 16 9 is displayed on a standard TV set screen 4 3 with a black band at both the top and bottom of the screen letter box Operation regulatory marks With this DVD some functions of this unit such as the play function may be restricted depending on the location where ...

Page 64: ...da ko Korean ks Kashmiri ku Kurdish ky Kirghiz la Latin lb Luxembourgish ln Lingala lo Laotian lt Lithuanian lv Latvian Lettish mg Malagasy mi Maori mk Macedonian ml Malayalam mn Mongolian mo Moldavian mr Marathi ms Malay mt Maltese my Burmese na Nauru ne Nepali nl Dutch no Norwegian oc Occitan om Afan Oromo or Oriya pa Punjabi pl Polish ps Pashto Pushto pt Portuguese qu Quechua rm Rhaeto Romance ...

Page 65: ...1 48 96 kHz Quantifying Bit Number 16 20 24 bit USB interface section USB Standard USB 2 0 High Speed File System FAT 16 32 exFAT Maximum Power Supply Current DC 5 V 1 5 A D A Converter 24 bit Audio Decoder MP3 WMA AAC WAV FLAC Video Decoder MPEG1 MPEG2 MPEG4 WMV H 264 MKV Frequency Response 192 kHz 20 20 000 Hz 96 kHz 20 20 000 Hz 48 kHz 20 20 000 Hz 44 1 kHz 20 20 000 Hz Total Harmonic Distortio...

Page 66: ...0 dB Stereo Separation 35 dB 1 kHz AM tuner section Frequency Range step 530 1700 kHz 10 kHz Usable Sensitivity 99 μV 40 dBμ Video section Color System of External Video Input NTSC PAL External Video Input Level Mini jack 1 Vp p 75 Ω External Audio Max Input Level RCA jack 1 5 V 25 kΩ Video Output Level RCA jacks 1 Vp p 75 Ω Audio section Maximum Power Output Front Rear 45 W 4 Full Bandwidth Power...

Page 67: ...A CONSUMER ENGAGED IN A PERSONAL ACTIVITY AND OR WAS OBTAINED FROM A VIDEO PROVIDER LICENSED TO PROVIDE AVC VIDEO NO LICENSE IS GRANTED OR SHALL BE IMPLIED FOR ANY OTHER USE ADDITIONAL INFORMATION MAY BE OBTAINED FROM MPEG LA L L C SEE HTTP WWW MPEGLA COM THIS PRODUCT IS LICENSED UNDER THE MPEG 4 VISUAL PATENT PORTFOLIO LICENSE FOR THE PERSONAL AND NON COMMERCIAL USE OF A CONSUMER FOR ENCODING VID...

Page 68: ...NTRACT STRICT LIABILITY OR TORT INCLUDING NEGLIGENCE OR OTHERWISE ARISING IN ANY WAY OUT OF THE USE OF THIS SOFTWARE EVEN IF ADVISED OF THE POSSIBILITY OF SUCH DAMAGE libogg Copyright c 2002 Xiph org Foundation Redistribution and use in source and binary forms with or without modification are permitted provided that the following conditions are met Redistributions of source code must retain the ab...

Page 69: ...productions of labels on or inside the product relating to laser product safety JVCKENWOOD Corporation 2967 3 ISHIKAWA MACHI HACHIOJI SHI TOKYO JAPAN THIS PRODUCT COMPLIES WITH DHHS RULES 21 CFR SUBCHAPTER J IN EFFECT AT DATE OF MANUFACTURE Location Top plate This transmitter must not be co located or operated in conjunction with any other antenna or transmitter ISED CAUTION This device contains l...

Page 70: ...opriada ajudarão a conservar os recursos naturais ao mesmo tempo que prevenirão os efeitos prejudicais à nossa saúde e ao meio ambiente Para cumplimiento de la IFT La operación de este equipo esta sujeta a las siguientes dos condiciones 1 es posible que este equipo o dispositivo no cause interferencia perjudicial y 2 este equipo o dispositivo debe aceptar cualquier interferencia incluyendo la que ...

Page 71: ...bedded in this product are encouraged to read the terms of the corresponding license before use Because each individual license is prescribed by a third party other than JVCKENWOOD Corporation the original English of the license is presented EULA Ñ Ñ Software License Agreement JVCKENWOOD Corporation hereinafter called Licensor holds either the copyright to the embedded software or the right to sub...

Page 72: ...rom Licensor Article 8 Cancellation of the Agreement Licensor reserves the right to cancel this agreement forthwith and claim compensation from User for the damages caused by such cancellation when User 1 Breaches any of the provisions of this agreement or 2 Has received a petition for seizure provisional seizure provisional disposition or any other kind of compulsory execution Article 9 Destructi...

Page 73: ... B5H 0357 03_JVC_KWV_K_En indb 73 2020 07 09 8 19 ...

Page 74: ...system updates new functions etc is available from Les informations les plus récentes dernier mode d emploi mises à jour du système nouvelles fonctions etc sont disponibles sur Encontrará la información actualizada el Manual de instrucciones más reciente las actualizaciones del sistema las nuevas funciones etc en https www jvc net cs car B5H 0357 03 K 2020 JVCKENWOOD Corporation KW V660BT KW V66BT...

Page 75: ... this product are encouraged to read the terms of the corresponding license before use Because each individual license is prescribed by a third party other than JVCKENWOOD Corporation the original English of the license is presented EULA Ñ Ñ Software License Agreement JVCKENWOOD Corporation hereinafter called Licensor holds either the copyright to the embedded software or the right to sublicense i...

Page 76: ...icensor Article 8 Cancellation of the Agreement Licensor reserves the right to cancel this agreement forthwith and claim compensation from User for the damages caused by such cancellation when User 1 Breaches any of the provisions of this agreement or 2 Has received a petition for seizure provisional seizure provisional disposition or any other kind of compulsory execution Article 9 Destruction of...

Page 77: ...ect the indication language from the SETUP menu See Instruction Manual Before Use 4 About the Quick start guide 4 How to read this manual 4 Precautions 5 Basic Operations 7 Functions of the Buttons on the Front Panel 7 Turning on the Unit 7 Getting Started 8 Adjusting the volume 9 Touch screen operations 9 HOME screen descriptions 10 Source selection screen descriptions 10 Source control screen de...

Page 78: ... sharp tip Ñ Ñ Cleaning the unit If the faceplate of this unit is stained wipe it with a dry soft cloth such as a silicon cloth If the faceplate is stained badly wipe the stain off with a cloth moistened with neutral cleaner then wipe it again with a clean soft dry cloth NOTE Applying spray cleaner directly to the unit may affect its mechanical parts Wiping the faceplate with a hard cloth or using...

Page 79: ...loring on the recording surface or discs that are dirty cannot be used This unit can only play the following types of CDs This unit may not correctly play discs which do not have the mark You cannot play a disc that has not been finalized For the finalization process see your writing software and your recorder s instruction manual Ñ Ñ Caution for Smartphone Users Simultaneously running multiple ap...

Page 80: ...een 4 Volume Adjusts volume The volume will go up until 15 when you keep pressing 5 Displays the HOME screen P 10 Pressing for 1 second turns the power off When the power off turns the power on 6 Reset If the unit or the connected unit fails to operate properly the unit returns to initial settings when this button is pressed 7 Disc insert slot A slot to insert a disc media P 14 Turning on the Unit...

Page 81: ...ettings P 8 Display Set the image on the screen 1 Touch Display 2 Touch Background 3 Select the image 4 Touch For detailed operation see Instruction Manual Camera Set the parameters for the camera 1 Touch Camera 2 Set each item and touch For detailed operation see Instruction Manual DEMO Set the demonstration mode Default is ON 1 Touch DEMO and set ON or OFF 2 Touch Finish NOTE These settings can ...

Page 82: ...erform operations on the screen you need to touch touch and hold flick or swipe to select an item display setting menu screen or to change the page etc Touch Touch the screen gently to select an item on the screen Touch and hold Touch the screen and keep your finger in place until the display changes or a message is displayed Flick Slide your finger quickly to the left or right on the screen to ch...

Page 83: ...5 6 1 2 3 1 1 Short cut playback source icons P 11 2 Current source information Touch to display the control screen of current source 3 Widget 4 Displays the source selection screen P 11 5 Displays the SETUP Menu screen 6 Displays the Hands Free screen P 21 When connecting as Apple CarPlay or Android Auto it works as a phone provided in Apple CarPlay or Android Auto Display the HOME screen 1 Press...

Page 84: ...plication installed and to set Mode to Mirroring for Android Displays the Hands Free screen P 21 When neither Apple CarPlay Android Auto nor a Bluetooth Hands Free phone is connected displays Disconnected message in the TEL screen When connecting as Apple CarPlay or Android Auto it works as a phone provided in Apple CarPlay or Android Auto Switches to the Radio broadcast P 17 Plays a Bluetooth aud...

Page 85: ...urrent source condition and so on MUTE The mute function is active LOUD The loudness control function is on Sub menu Operation when the icon is touched The first touch darkens the screen the second touch darkens the screen further and the third touch restores the screen to its original brightness Displays the Graphic Equalizer screen P 25 Displays the APP Apple CarPlay Android Auto screen 4 Û Touc...

Page 86: ...lect on the FUNCTION screen To turn on the screen 1 Touch the display List screen There are some common function keys in the list screens of most sources 6 1 2 3 4 5 1 Displays list type selection window 2 Displays music movie file list 3 Text scroll Scrolls the displayed text 4 etc Keys with various functions are displayed here Plays all tracks in the folder containing the current track Moves to ...

Page 87: ...ntally DVD VCD Basic Operation NOTE The screen shot below is for DVD It may be different from the one for VCD 1 When the operation buttons are not displayed on the screen touch 4 area Control screen 2 1 Video screen 3 4 5 1 Function panel Touch the left side of the screen to display the function panel Touch again to close the panel For details on the keys see Function panel P 15 B5H 0357 03_QSG_JV...

Page 88: ...e DVD VIDEO disc menu control screen See DVD Disc Menu Operation P 15 PBC VCD only Touch to turn Playback control PBC on or off Audio VCD only Touch to change audio output channels DVD Disc Menu Operation You can set up some functions using the DVD VIDEO disc menu 1 Touch 5 area during playback h h Menu Control screen appears 2 Perform your desired operation as follows To display the top menu Touc...

Page 89: ...nd playback screen Control screen 2 3 1 1 Repeats the current track folder Each time you touch the key repeat mode switches in the following sequence File repeat Folder repeat Repeat all Randomly plays all tracks in current folder Each time you touch the key random mode switches in the following sequence File random Random off 2 Track information Displays the information of the current file 3 Oper...

Page 90: ...le Touch to mute or not to mute 4 Preset list Touch on the right side of the screen to display the Preset list Touch again to close the list Recalls the memorized station When touched for 2 seconds stores the current receiving station in memory 5 Function panel Touch on the left side of the screen to display the function panel Touch again to close the panel TI FM only Sets the traffic information ...

Page 91: ...iusXM Vehicle Tuner and Subscription are required For more information visit www siriusxm com To listen to the SiriusXM source touch the SiriusXM icon on the source selection screen P 11 Activating subscription Check your Radio ID The SiriusXM Satellite Radio ID is required for activation and can be found by tuning in Channel 0 as well as on the label found on the SiriusXM Connect tuner and its pa...

Page 92: ...function panel Touch to close the panel Direct Channel Touch and enter the desired number For details see Instruction Manual SETUP Touch to display the SiriusXM SETUP screen For details see Instruction Manual Replay Live Touch to turn on or off the replay mode See Instruction Manual 4 Operation keys 1 Display the Category search screen For details on search operation see Instruction Manual D H Pla...

Page 93: ...However it may be impossible for such units to communicate with your cell phone depending on its type Register from the Bluetooth device It is necessary to register the Bluetooth audio player or cell phone to this unit before using the Bluetooth function 1 Turn on the Bluetooth function on your smartphone cell phone 2 Search the unit KW from your smartphone cell phone 3 Operate your smartphone cel...

Page 94: ...uetooth Hands Free function cannot be used Only Apple CarPlay or Android Auto Hands Free function can be used Ñ Ñ Make a call 1 Touch Phone Û h h Hands Free screen appears 2 Select a dialing method Call using call records Call using the phonebook Call using the preset number Call by entering a phone number Voice Recognition Bluetooth SETUP Bluetooth SETUP 1 Touch Bluetooth SETUP screen appears NOT...

Page 95: ...ys 3 Touch Call using the preset number 1 Touch 2 Touch the Name or phone number Call using the phonebook 1 Touch 2 Select the person you want to call from the list 3 Select the phone number from the list NOTE If no Phonebook has been downloaded touching Download Phonebook Now will start downloading the Phonebook B5H 0357 03_QSG_JVC_KWV_K_EnFrEs indb 22 2020 06 03 13 13 ...

Page 96: ...e or button Output the dial tone Touch DTMF to display the tone input screen You can send tones by touching desired keys on the screen Switching the speaking voice output Touching each time switches the speaking voice output between cell phone and speaker Call waiting When you receive a call while talking on another call you can answer the newly received call by touching The current call is on hol...

Page 97: ...eneral Audio 1 Press the FNC button h h FUNCTION screen appears 2 Touch h h Audio screen appears 3 Touch Fader Balance 4 Set each item as follows Fader Balance Adjust the volume balance around the touched area C and D adjust the right and left volume balance R and S adjust the front and rear volume balance Center Clear the adjustment B5H 0357 03_QSG_JVC_KWV_K_EnFrEs indb 24 2020 06 03 13 13 ...

Page 98: ...ch OK on the confirmation screen Gain level dotted frame area Adjust the gain level by touching the each frequency bar You can select frequency bar and adjust its level by R S Preset Select Displays the screen to recall the preset equalizer curve Initialize The current EQ curve returns to flat Memory Saves the adjusted equalizer curve from User1 to User3 Bass EXT Bass Extend Settings When turned o...

Page 99: ...d If your car s ignition does not have an ACC position connect the ignition wires to a power source that can be turned on and off with the ignition key If you connect the ignition wire to a power source with a constant voltage supply such as with battery wires the battery may be drained If the console has a lid make sure to install the unit so that the front panel will not hit the lid when closing...

Page 100: ...ctor A accessory 7 on the wiring harness and connect it to the external power connector on your vehicle 5 Connect the wiring harness connector to the unit 6 Install the unit in your car 7 Reconnect the terminal of the battery 8 Press the reset button Installing the unit Ñ Ñ Non Japanese cars Bend the tabs of the mounting sleeve with a screwdriver or similar utensil and attach it in place NOTE Make...

Page 101: ...e trim plate 1 Use the extraction key accessory 4 to lever out the six tabs three on the left part three on the right part 4 2 Pull the trim plate forward Ñ Ñ Removing the unit 1 Remove the trim plate by referring to step 1 in Removing the trim plate 2 Insert the extraction key accessory 9 deeply into the slot as shown The protrusion at the tip of the extraction key must face toward the unit 9 3 W...

Page 102: ...emote control feature you need an exclusive remote adapter not supplied matched to your car Connect to vehicle s reverse lamp harness when using the optional rear view camera Light Blue Yellow Steering remote control wire Fuse 15A Subwoofer Preout Cap Cap FM AM antenna Connector A Connector B USB device 2 USB terminal 1 1 0 m 1 USB maximum power supply current DC 5 V 1 5 A 2 Sold separately Access...

Page 103: ... to the power control terminal when using the optional power amplifier or to the power terminal for the booster amplifier of the film type or short pole type antenna Max 150mA 12V White Black Gray Black Green Black Purple Black To car light control switch Speaker impedance 4 8 Ω Purple Green Gray White To front left speaker To front right speaker To rear left speaker To rear right speaker Red Igni...

Page 104: ...t is prohibited without a license from Microsoft Use of the Made for Apple badge means that an accessory has been designed to connect specifically to the Apple product s identified in the badge and has been certified by the developer to meet Apple performance standards Apple is not responsible for the operation of this device or its compliance with safety and regulatory standards Please note that ...

Page 105: ...tion Neither the name of the Xiph org Foundation nor the names of its contributors may be used to endorse or promote products derived from this software without specific prior written permission THIS SOFTWARE IS PROVIDED BY THE COPYRIGHT HOLDERS AND ONTRIBUTORS AS IS AND ANY EXPRESS OR IMPLIED WARRANTIES INCLUDING BUT NOT LIMITED TO THE IMPLIED WARRANTIES OF MERCHANTABILITY AND FITNESS FOR A PARTI...

Page 106: ...derived from this software without specific prior written permission THIS SOFTWARE IS PROVIDED BY THE COPYRIGHT HOLDERS AND CONTRIBUTORS AS IS AND ANY EXPRESS OR IMPLIED WARRANTIES INCLUDING BUT NOT LIMITED TO THE IMPLIED WARRANTIES OF MERCHANTABILITY AND FITNESS FOR A PARTICULAR PURPOSE ARE DISCLAIMED IN NO EVENT SHALL THE FOUNDATION OR CONTRIBUTORS BE LIABLE FOR ANY DIRECT INDIRECT INCIDENTAL SP...

Page 107: ...BCHAPTER J IN EFFECT AT DATE OF MANUFACTURE Location Top plate This transmitter must not be co located or operated in conjunction with any other antenna or transmitter ISED CAUTION This device contains licence exempt transmitter s receiver s that comply with Innovation Science and Economic Development Canada s licence exempt RSS s Operation is subject to the following two conditions 1 This device ...

Page 108: ... de pilhas Este produto não deve ser eliminado como lixo doméstico geral Devolva a pilha usada ao revendedor ou entidade autorizada para que a mesma seja devolvida ao fabricante ou importador A reciclagem e a eliminação de lixo de maneira apropriada ajudarão a conservar os recursos naturais ao mesmo tempo que prevenirão os efeitos prejudicais à nossa saúde e ao meio ambiente Para cumplimiento de l...

Page 109: ... B5H 0357 03_QSG_JVC_KWV_K_EnFrEs indb 96 2020 06 03 13 13 ...

Reviews: