


11
ENGLISH
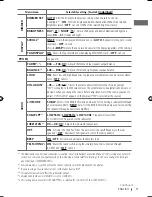
Menu item
Selectable setting, [Initial:
Underlined
]
DIMMER
DIMMER SET
AUTO
: Dims the display to the previous setting when you turn on the car
headlights. *
1
/
ON
: Dims the display and button illumination (50% of the selected
brightness level). /
OFF
: Cancels (100% of the selected brightness level).
BRIGHTNESS
DAY
[
31
] /
NIGHT
[
15
] : Selects the display and button illumination brightness
level [
00
—
31
] for day and night.
DISPLAY
SCROLL
*
2
ONCE
: Scrolls the displayed information once. /
AUTO
: Repeats scrolling (at 5-second
intervals). /
OFF
: Cancels.
(Pressing
DISP
for more than one second can scroll the display regardless of the setting.)
TAG DISPLAY
ON
: Shows the Tag information while playing MP3/WMA tracks. /
OFF
: Cancels.
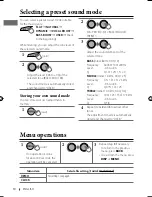
PRO EQ
See page 10.
AUDIO
FADER
*
3,
*
4
R06 — F06
[
00
] : Adjusts the front and rear speaker output balance.
BALANCE
*
4
L06 — R06
[
00
] : Adjusts the left and right speaker output balance.
LOUD
ON
: Boost low and high frequencies to produce a well-balanced sound at a low volume
level. /
OFF
: Cancels.
VOL ADJUST
–05 — +05
[
00
] : Presets the volume adjustment level of each source (except
“FM”), compared to the FM volume level. The volume level will automatically increase or
decrease when you change the source. Before adjustment, select the source you want to
adjust. (“VOL ADJ FIX” appears on the display if “FM” is selected as the source.)
L/O MODE
SUB.W
: Selects if the REAR/SW terminals are used for connecting a subwoofer (through
an external amplifier). /
REAR
: Selects if the REAR/SW terminals are used for connecting
the speakers (through an external amplifier).
SUB.W LPF
*
5
LOW 55Hz
/
LOW 85Hz
/
LOW 120Hz
: Frequencies lower than
55 Hz/85 Hz/120 Hz are sent to the subwoofer.
SUB.W LEVEL
*
5
00 — 08
[
04
] : Adjusts the subwoofer output level.
HPF
ON
: Activates the High Pass Filter. The unit selects the cutoff frequency to the rear
speakers. /
OFF
: Deactivates (all signals are sent to the rear speakers).
BEEP
ON
/
OFF
: Activates or deactivates the keypress tone.
TEL MUTING
*
6
ON
: Mutes the sounds while using the cellular phone (not connected through
KS-BTA100). /
OFF
: Cancels.
*
1
The illumination control lead connection is required. (See “Installation/Connection Manual.”) This setting may not work
correctly on some vehicles (particularly on those having a control dial for dimming). In this case, change the setting to
any other than <DIMMER AUTO>.
*
2
Some characters or symbols will not be shown correctly (or will be blanked) on the display.
*
3
If you are using a two-speaker system, set the fader level to “00.”
*
4
This adjustment will not affect the subwoofer output.
*
5
Displayed only when <L/O MODE> is set to <SUB.W>.
*
6
This setting does not work if <BT ADAPTER> is selected for <R-AUX> of the <SRC SELECT>.
Continued...
EN02-15_KD-R326_R325[U]_7.indd 11
EN02-15_KD-R326_R325[U]_7.indd 11
8/20/10 3:11:00 PM
8/20/10 3:11:00 PM