background image

16

Installation

Installing the unit


Ñ

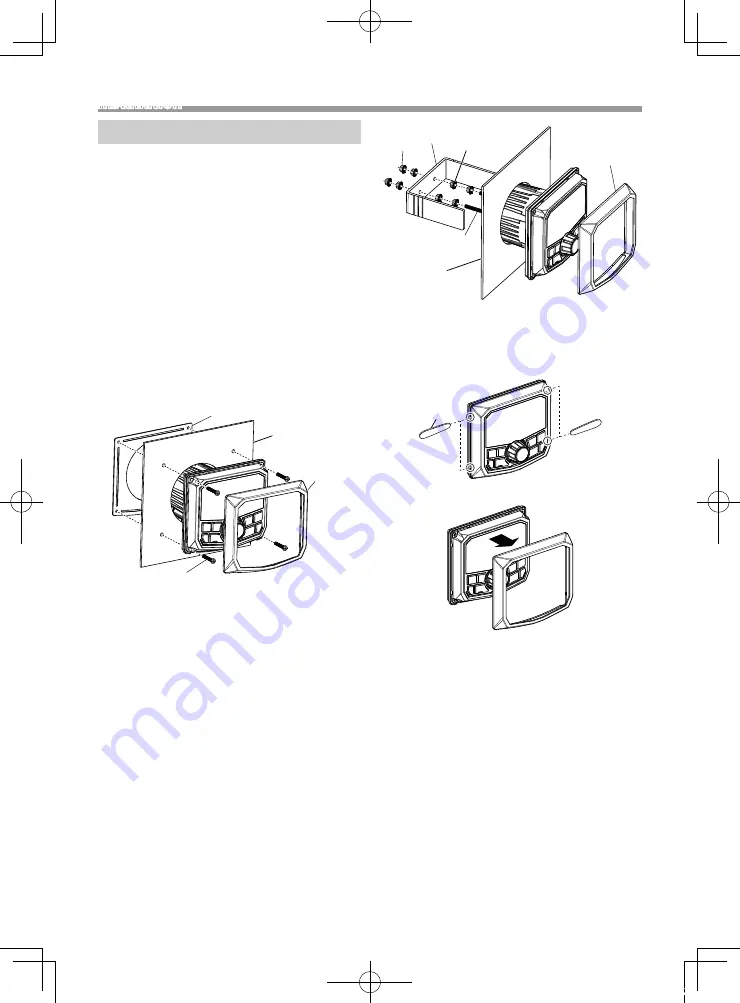
Mounting (Using Mounting Plate)

To mount the unit, you will need to find a flat surface 
with adequate clearance behind it that provides 
enough clearance for the unit and all it’s necessary 
wiring.
1) Once you have determined a mounting location, 

you will need to cut a circular hole 77 mm (3inch) 
in diameter.

2) After the hole is cut slide the unit and wiring 

through the hole.

3) Slide the mounting plate (accessory 

2

) over the 

backside of the unit and secure with the supplied 
screws (accessory 

4

).

4) Press on the trim plate (accessory 

1

) to the front 

side of the unit.

5) Plug in all wiring harnesses and cables. Refer to the 

wiring diagram for wire harness connection types.

4

 M3.5 × 25 mm

1

2

Panel 

(Max. 8 mm)


Ñ

Mounting (Using U Bracket)

To mount the unit, you will need to find a flat surface 
with adequate clearance behind it that provides 
enough clearance for the unit and all it’s necessary 
wiring.
1) Attach the screw with nut (accessory 

6

) to the 

back of the unit.

2) Once you have determined a mounting location, 

you will need to cut a circular hole 77 mm (3inch) 
in diameter.

3) After the hole is cut slide the unit and wiring 

through the hole.

4) Take the bracket (accessory 

3

) and slide over the 

two studs on the back of the unit. Tighten down 
with supplied nuts (accessory 

5

).

5) Press on the trim plate (accessory 

1

) to the front 

side of the unit.

6) Plug in all wiring harnesses and cables. Refer to the 

wiring diagram for wire harness connection types.

3

5

5

6

 M4 × 37 mm

Panel 

(Max. 15 mm)

1


Ñ

Removing the trim plate

1) Use the extraction key (accessory 

8

) to lever out 

the four tabs (two on the left part, two on the right 
part).

8

2) Pull the trim plate forward.

B5A-3196-30_KD-MR1BTS_K.indb   16

2019/04/02   17:22

Summary of Contents for KD-MR1BTS

Page 1: ...te http www jvc net cs car La información actualizada el Manual de instrucciones más actualizado etc está disponible desde http www jvc net cs car KD MR1BTS DIGITAL MEDIA RECEIVER INSTRUCTION MANUAL RÉCEPTEUR MÉDIA NUMÉRIQUE MODE D EMPLOI RECEPTOR DE MEDIOS DIGITALES MANUAL DE INSTRUCCIONES B5A 3196 30 K 2019 JVC KENWOOD Corporation B5A 3196 30_KD MR1BTS_K indb 1 2019 04 02 17 22 ...

Page 2: ...read this manual The panels shown in this guide are examples used to provide clear explanations of the operations For this reason they may be different from the actual panels In operation procedures bracket shape indicates the item you should control indicates the selected items or menu indicates the name of panel buttons Precautions WARNING Ñ Ñ To prevent injury or fire take the following precaut...

Page 3: ...stralia AM FM intervals 9 kHz 50 kHz Display Setting You can change the display design Night Default Auto Day AUX Input SiriusXM Default Set to SiriusXM when connecting the SiriusXM Satellite Radio Tuner AUX Set to AUX when connecting the Portable audio player Pre out Selects whether rear speakers or a subwoofer are connected to the preout terminals on the rear of the unit through an external ampl...

Page 4: ...splay the HOME screen HOME screen appears 2 Turn the volume knob to select the source then press the knob Switches to the FM tuner broadcast P 8 Switches to the AM tuner broadcast P 8 Switches to the WB Weather Band tuner broadcast P 8 USB Plays files on a USB device P 5 iPod Plays an iPod iPhone P 6 When iPod iPhone is connected Plays a Bluetooth audio player P 12 Switches to Pandora P 7 SiriusXM...

Page 5: ...ay time bar For confirmation of current playing position 2 Repeat playback mode indicator Random playback mode indicator 3 Displays the information of the current file Only a file name is displayed if there is no tag information Ñ Ñ Selecting a track in a list Searches file 1 Press to display the List screen 2 Turn the volume knob to select the desired folder then press the knob When you select a ...

Page 6: ... 3 2 List screen Source screen To Do this Play pause Press the volume knob Select a file Press E F repeatedly Fast backward Fast forward Press and hold E F Ñ Ñ Source screen 1 Playback status Playing time File number Play time bar For confirmation of current playing position 2 Repeat playback mode indicator Random playback mode indicator 3 Displays the information of the current file Ñ Ñ Selecting...

Page 7: ...o the registered date Sort A Z By alphabetical order To return to the previous layer press 4 Turn the volume knob to select the desired station then press the knob Ñ Ñ Bookmark current song information 1 Press to display the function menu 2 Turn the volume knob to select Bookmark then press the knob 3 Turn the volume knob to select item Artist Track then press the knob To return to the previous la...

Page 8: ... the volume knob to select a preset number then press the knob NOTE To exit press Function settings 1 Press to display the function menu 2 Turn the volume knob to select the item to set see the table below then press the knob to make a selection 3 Press Add Presets Stores a station manually to the current band While listening to a station you want to store turn the volume knob to select a preset n...

Page 9: ...t to SiriusXM in General Settings P 3 SiriusXM basic operations 1 Press to display the HOME screen 2 Turn the volume knob to select SiriusXM then press the knob 3 Press to display the function menu 4 Turn the volume knob to select CATEGORY then press the knob 5 Turn the volume knob to select a category then press the knob 6 Turn the volume knob to select a channel then press the knob or Press E F ...

Page 10: ...select Parental Contr then press the knob 4 Enter the initial parental code 1111 1 Turn the volume knob to select a number then press the knob 2 Repeat step 1 until the parental code is completed Ñ Ñ Parental Lock channel selection 1 Press to display the function menu 2 Turn the volume knob to select Parental Contr then press the knob 3 Turn the volume knob to select Lock Channels then press the k...

Page 11: ...omponent and start playing the source NOTE To select the AV IN source it is necessary to set AUX Input to AUX in General Settings P 3 Camera A reverse trigger is provided to activate the camera when putting the vehicle in reverse or you may select the camera from the source menu Ñ Ñ Displaying the picture from the camera The camera screen is displayed when you shift the gear to the reverse R posit...

Page 12: ... Device 1 Press to display the HOME screen 2 Turn the volume knob to select BT Audio then press the knob 1 3 2 List screen Source screen To Do this Play pause Press the volume knob Select a file Press E F repeatedly Fast backward Fast forward Press and hold E F NOTE Operations and display indications may differ according to their availability on the connected device Ñ Ñ Source screen 1 Playback st...

Page 13: ...a preset equalizer suitable to the music genre Flat Hard Rock Classical Pop Dance DRVN Hip Hop User Select User to use the settings made 1 Press the volume knob to select the frequency 2 Turn the volume knob to adjust the level 3 Press Loudness Sets the amounts of boost of low and high tones ON OFF Default X over You can set the crossover frequency of speakers 1 Press E F to select the speaker 2 P...

Page 14: ... 6 8 1 SRC Switches to the source to be played 2 3 2 3 Selects the track or file to be played During tuner source switches to broadcast stations received by the unit 4 5 R S During tuner source select FM AM band to be received 6 7 VOL Adjusts the volume 8 MUTE Tuner SiriusXM AUX Mutes restores the sound USB iPod Pandora Plays or pauses B5A 3196 30_KD MR1BTS_K indb 14 2019 04 02 17 22 ...

Page 15: ...ilar material To prevent a short circuit do not remove the caps on the ends of the unconnected wires or the terminals Secure the wires with cable clamps and wrap vinyl tape around the wires that comes into contact with metal parts to protect the wires and to prevent short circuit Connect the speaker wires correctly to the terminals to which they correspond The unit may be damaged or fail to work i...

Page 16: ...ket To mount the unit you will need to find a flat surface with adequate clearance behind it that provides enough clearance for the unit and all it s necessary wiring 1 Attach the screw with nut accessory 6 to the back of the unit 2 Once you have determined a mounting location you will need to cut a circular hole 77 mm 3inch in diameter 3 After the hole is cut slide the unit and wiring through the...

Page 17: ... A Reverse camera trigger input Remote control wire FM AM antenna Rear output Subwoofer output switchable Left White Right Red AUX Input SiriusXM Audio Input Left White Right Red AUX source SiriusXM source switchable P 3 SiriusXM Audio Output Left White Right Red 1 Connect when using SiriusXM source SiriusXM Connect Tuner connector For more information on how to install the SiriusXM Connect tuner ...

Page 18: ...ce is connected to this unit it can be charged through the USB cable Install the USB device in the place where it will not affect safe driving You cannot connect a USB device via a USB hub and Multi Card Reader Take backups of the audio files used with this unit The files may be erased depending on the operating conditions of the USB device We shall have no compensation for any damage arising from...

Page 19: ...arge the battery of iPod iPhone Reset the iPod iPhone Sound is distorted Deactivate the equalizer either on this unit or the iPod iPhone A lot of noise is generated Turn off uncheck VoiceOver on the iPod iPhone For details visit http www apple com Ñ Ñ Tuner Automatic presetting does not work Store stations manually P 8 Static noise while listening to the radio Connect the antenna firmly Ñ Ñ Blueto...

Page 20: ...re Simple Pairing Profile A2DP Advanced Audio Distribution Profile AVRCP V1 5 Audio Video Remote Control Profile Ñ Ñ FM tuner section Frequency Range step North America 87 9 MHz 107 9 MHz 200 kHz South America Europe Russia Asia Middle East Australia 87 5 MHz 108 MHz 50 kHz Japan 76 0 MHz 99 0 MHz 100 kHz Ñ Ñ AM tuner section Frequency Range step North America South America 530 kHz 1700 kHz 10 kHz...

Page 21: ... if not installed and used in accordance with the instructions may cause harmful interference to radio communications However there is no guarantee that interference will not occur in a particular installation If this equipment does cause harmful interference to radio or television reception which can be determined by turning the equipment off and on the user is encouraged to try to correct the in...

Page 22: ...rference including interference that may cause undesired operation of the device Cet appareil contient des émetteurs récepteurs exemptés de licence conformes aux RSS RSS d Innovation Sciences et Développement économique Canada 1 l appareil ne doit pas produire de brouillage et 2 l utilisateur de l appareil doit accepter tout brouillage radioélectrique subi même si le brouillage est susceptible d e...

Page 23: ...nect specifically to the Apple product s identified in the badge and has been certified by the developer to meet Apple performance standards Apple is not responsible for the operation of this device or its compliance with safety and regulatory standards Please note that the use of this accessory with an Apple product may affect wireless performance Apple iPhone iPod iPod touch and Lightning are tr...

Reviews: