background image

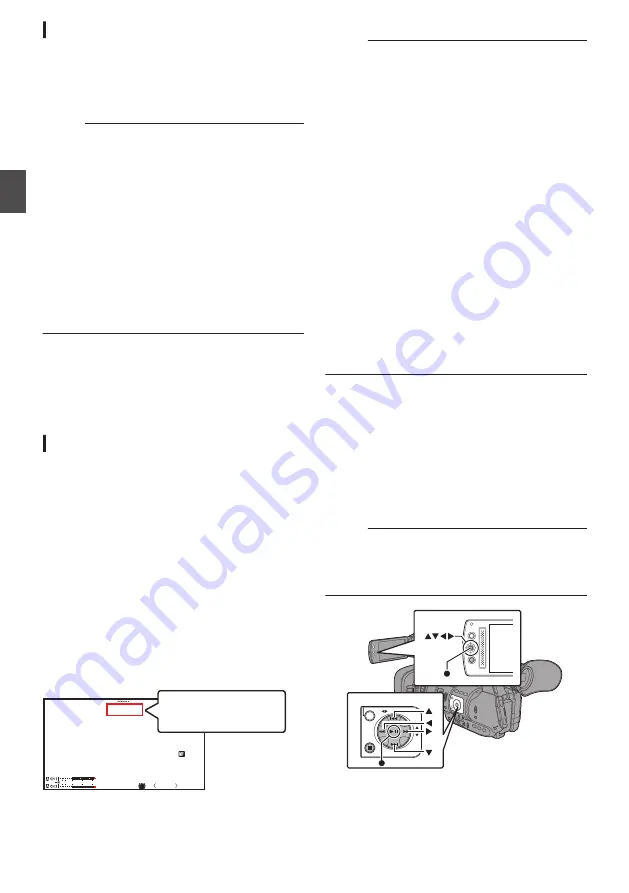
Focus Assist Function

0

When the [FOCUS ASSIST/1] button is pressed

during shooting, the focused area is displayed

in color. This enables easy and accurate

focusing.

0

Select the color (blue, red or green) in the menu.

Memo : 

0

To adjust focus with the focus/zoom ring while

the Focus Assist function is in operation, set the

[FOCUS/ZOOM] operation switch to “FOCUS”,

or set [Main Menu]


B


[Camera Function]


B


[AF

Assist]


B


[Ring] to “Focus”.

(

A

 P95 [ Ring ] )

0

Select the display color in [Main Menu]


B


[LCD/

VF]


B


[Shooting Assist]


B


[Focus Assist]


B

[Color].

(

A

 P95 [ Color ] )

0

If you use the zebra function and the Focus

Assist function at the same time, it may be

difficult to see the effect of the Focus Assist. In

this case, turn off the zebra function.

Setting Focus Assist Function to a User Button

You can assign the “Focus Assist” function to a user

button.

(

A

 P32 [Assignment of Functions to User

Buttons] )

Expanded Focus Function

Magnifies the image at the center. Doing so

enables precise focus to be established easily.

1

Assign the “Expanded Focus” function to

any of the user buttons.

(

A

 P32 [Assignment of Functions to User

Buttons] )

(

A

 P88 [USER1 to USER7, LCD KEY▲, LCD

KEY▶, LCD KEY▼, LCD KEY◀] )

2

Press the user button that is assigned with

the “Expanded Focus” function.

0

“EXPANDED” (yellow color) appears on the

screen, and the center part of the image is

enlarged.

0

Pressing the user button again restores the

image to the original size.

.

P

13000K

1/ 100

F1. 6

0

dB

AE

+

6

12 :34 : 56

Jan 24 , 2012

00: 00: 00.00

4030 20

10

0

        5 . 6f t

EXPANDED

EXPANDED

EXPANDED

EXPANDED

Memo : 

0

To set the operation when the button is pressed,

go to [Main Menu]


B


[Camera Function]


B


[User

Switch Set]


B


[Expanded Focus].

(

A

 P90 [ Expanded Focus ] )

0

To adjust focus with the focus/zoom ring while

the Expanded Focus function is in operation, set

the [FOCUS/ZOOM] operation switch to

“FOCUS”, or set [Main Menu]


B


[Camera

Function]


B


[User Switch Set]


B


[Expanded

Focus]


B


[Ring] to “Focus”.

(

A

 P90 [ Ring ] )

0

This function can be used together with the

Focus Assist function. When the functions are

used together, the focus can be adjusted using

the focus/zoom ring in the Focus Assist or

Expanded Focus function.

0

The magnification ratio varies with the format of

the record signals.

0

Magnifying an image does not alter the size of

the recorded image.

0

This function is unavailable when [Main Menu]

B


[System]


B


[Record Set]


B


[Record Format]

B


[System] is set to “SD”.

Adjusting the Focusing by

Face Detection

This function detects human faces and

automatically adjusts focus during Auto Focus.

It can also track moving objects.

When several faces are detected, you can select

one to focus on.
Memo : 

0

This function can also adjust the brightness

automatically according to the brightness of the

face detected.

(

A

 P89 [ Face Detect ] )

.

AE LEVEL

MENU/THUMB

CANCEL

MENU/THUMB

CANCEL

44

Focus Operation

Sh

ooting

Summary of Contents for JY-HM360AG

Page 1: ...you are outside you can refer to the instructions from your Android phone or iPhone http manual3 jvckenwood com pro mobile global You can view the Mobile User Guide using the browser on your Android phone or iPhone This product does not come with a battery pack When using a battery please purchase the recommended battery pack SSL JVC50 Thank you for purchasing this JVC product Before operating thi...

Page 2: ...2 ...

Page 3: ...e sure that it has sufficient space on all sides to allow for ventilation 10 cm or more on both sides on top and at the rear Do not block the ventilation holes If the ventilation holes are blocked by a newspaper or cloth etc the heat may not be able to get out No naked flame sources such as lighted candles should be placed on the apparatus When discarding batteries environmental problems must be c...

Page 4: ...n Union Battery Pack sold separately The battery pack is a lithium ion battery Before using the battery pack be sure to read the following cautions To avoid hazards do not burn do not short circuit the terminals Keep it away from metallic objects when not in use When transporting carry the battery in a plastic bag do not modify or disassemble do not expose the battery to temperatures exceeding 60 ...

Page 5: ...37 Operation Lock Feature 38 Shooting Basic Shooting Procedures 39 Selecting System Definition File Format and Video Format 40 Zoom Operation 41 Focus Operation 42 Adjusting the Focusing by Face Detection 44 Using Scene Select 46 Adjusting the Brightness 48 Adjusting the Iris 48 Setting the Gain 49 Setting the Electronic Shutter 50 Adjusting the White Balance 51 Adjusting the Camera Image 54 Using...

Page 6: ...06 Editing Favorites Menu 107 Display Status Screen Display Screen in Camera Mode 110 Display Screen in Media Mode 114 Status Screen 116 Camera Features Marker and Safety Zone Displays Camera Mode Only 117 Beautifying the Skin Tone Beautiful Skin Mode 117 Color Bar Output 117 Adjusting Color Matrix 118 Configuring Setup Files 119 Saving Setup Files 119 Loading a Setup File 120 Deleting Setup Files...

Page 7: ...egistered trademarks of their respective companies Marks such as and have been omitted in this manual Main Features 1 2 3 Inch Backlit CMOS Sensor with 18 91M Pixels and Bright F1 2 Lens This camera recorder is equipped with a backlit CMOS sensor with 18 91M pixels Together with the bright F1 2 JVC GT Lens high sensitivity shooting is achieved capturing videos of high resolution and 3D appearance ...

Page 8: ... amount of workload taken to edit wedding ceremonies and other long hour event shootings Auto Focus and Other Various Shooting Assist Functions When using auto focus and expanded focus the Focus Zoom ring can be forcibly set to Focus mode to further enhance assistance during shooting Professional Switch Layout and Various Video Parameter Settings Switches for Gain and White Balance are available o...

Page 9: ...nsportation o Do not drop or hit this unit against a hard object when transporting Power Saving o When this unit is not in use be sure to set the POWER ON OFF switch to OFF in order to reduce power consumption Maintenance o Turn off the power before performing any maintenance o Wipe the external cabinet of the unit with a soft cloth Do not wipe the body with benzene or thinner Doing so may cause t...

Page 10: ...sun with the doors and windows closed o Do not bend or drop the SD card or subject it to strong impact or vibration o Do not splash the SD card with water o Do not dismantle or modify the SD card o Do not touch the terminals with your hands or with a metal object o Do not allow dust dirt water or foreign objects to adhere to the terminals o Do not remove the labels or stick other labels or sticker...

Page 11: ...hers o Donotinsertobjectsotherthanthememorycard into the card slot o Do not block the vent on the unit Blocking of the vent causes internal heating and may lead to burns and fires o Do not put anything into the camera unit Metal and flammable items entering from the vent and connectors can result in fire or electric shock o Do not turn off the POWER ON OFF switch or remove the power cable during r...

Page 12: ... and hold MODE MODE Button Actions Execute Delete Clips File Deletion in Progress Exit Cancel File Delete Operation Successful Failed Stopped Trimming in Progress Exit Trimming Operation Successful Failed Stopped LOLUX 3 Button Execute Trim This Clip Media Mode Thumbnail Display USB Connection When the confirmation to change to USB mode appears and Change is selected USB Mass Storage Class USB Mod...

Page 13: ... the MODE selection button to enter Media mode when you are not shooting in Camera mode Once the camera recorder is in Media mode thumbnails of the selected media slot are displayed USB Mode 0 This mode allows you to connect to a PC and transfer the files on an SD card to the PC 0 When the camera recorder is connected to a USB cable the message Change to USB Mode appears Select Change and press th...

Page 14: ...ipod I REC Record Trigger Button Starts stops recording You can also change its function in the menu A P88 Front REC Memo 0 This button is interlocked with the REC button R on the grip and the REC HOLD button Z at the top of the handle J FOCUS ZOOM Operation Switch For focus operation using the Focus Zoom ring set the FOCUS ZOOM operation switch to FOCUS For zoom operation set it to ZOOM A P41 Zoo...

Page 15: ...l Microphone Cable Clamp A P21 Attaching an External Microphone Y INPUT1 INPUT2 Audio Input Terminal 1 2 XLR 3 pin x 2 A P21 Attaching an External Microphone Z REC HOLD Record Trigger Button Lock Switch Starts stops recording Set the switch to HOLD to lock the REC Trigger button Memo 0 This button is interlocked with the REC button R on the grip and the REC button I at the bottom of the lens 0 The...

Page 16: ...pressed You can also use it as a user button by assigning a specific feature in the menu setting to this button A P32 Assignment of Functions to User Buttons L ZEBRA 5 Zebra User 5 Button A P63 Setting Zebra Pattern You can also use it as a user button by assigning a specific feature in the menu setting to this button A P32 Assignment of Functions to User Buttons M MARKER 6 Marker User 6 Button Th...

Page 17: ...screen when the button is pressed during thumbnail display in the Media mode 0 Stops playback and displays the thumbnail screen when the button is pressed during playback screen display in the Media mode U CANCEL Cancel Button Cancels various settings and stops playback SD Slot A P33 SD Card A B C D A SD Card Cover B SLOT A B Card Slot Selection Button For switching the active card slot during sho...

Page 18: ...ls various settings and stops playback E CH1 CH2 CH1 CH2 Recording Level Adjustment Knob A P55 Audio Recording F LCD BRIGHT LCD Display Brightness Adjustment Button A P30 Adjusting the Brightness G PEAKING LCD VF Contour Adjustment Button A P31 Adjusting the Contour LCD A P31 Adjusting the Contour Viewfinder H DISPLAY Display Button 0 Press the DISPLAY button to switch to the display screen during...

Page 19: ...ching Detaching the Hood B Lens Cover Open Close Switch A P21 Opening Closing the Lens Cover C Focus Zoom Ring A P43 Focus Operation A P41 Zoom Operation For focus operation using the Focus Zoom ring set the FOCUS ZOOM operation switch to FOCUS For zoom operation set it to ZOOM D Iris Dial A P48 Adjusting the Iris To operate auto iris press the IRIS button on the side control panel a mark appears ...

Page 20: ...ase Tripod SDHC SDXC Memory Card SDHC SDXC Card Reader USB Cable Battery AC Adapter Remote Control Unit Non linear Editing System JY HM360AG Microphone Monitor Monitor Headphone Shoulder Belt JY HM360AG Standard Package AUX INPUT1 INPUT2 TC HDMI AV DC x 20 Basic System Diagram Introduction ...

Page 21: ... P55 Audio Recording Attaching the Tripod Use the screw hole at the bottom of this camera recorder 3 8 16UNC 1 4 20UNC Use the screw hole that suits the tripod To prevent the camera recorder from falling off which may result in injuries or damages read the INSTRUCTIONS of the tripod to be used and make sure that it is securely attached o Bottom Caution 0 If the camera recorder exceeds the weight l...

Page 22: ... supply that operates this camera recorder 0 This product does not come with a battery pack When using a battery please purchase the recommended battery pack SSL JVC50 Using a Battery Pack sold separately Charging the Battery Charge the battery immediately after purchase or when the battery power is running low 1 2 3 4 4 POWER CHG MODE POWER ON OFF 1 Hold down the lock button blue at the center of...

Page 23: ...corder Estimated Charging and Continuous Operating Times o Charging time Approx 4 hrs SSL JVC50 When the POWER ON OFF switch is set to OFF Memo 0 If you charge the battery immediately after using while the battery is still warm it may not be fully charged 0 For details refer to the INSTRUCTIONS of the battery o Continuous operating time Approx 6 hrs SSL JVC50 Memo 0 Actual operating times may diff...

Page 24: ... Setting screen then set the date time A P26 Initial Settings Power Status Display Viewfinder Screen and LCD Monitor The power status is displayed on the display and menu screens Display Description B 7 4V B 100min C 30 4 RES Currently powered by a battery When the battery power runs out the battery mark appears hollow and RES yellow is displayed Memo 0 You can set the display using LCD VF B Displ...

Page 25: ... the POWER ON OFF switch is set to ON Use the MODE button at the side of the camera recorder to switch mode A P12 Operation Modes TIME CODE MODE POWER ON OFF Turning Off the Power Sets the camera recorder to the recording standby or stop mode 1 Hold down the lock button blue at the center of the POWER ON OFF switch to set to OFF 2 Remove the battery and the power to the DC terminal when not in use...

Page 26: ...nitial Setting screen appears 2 Ensure that the lens cover is closed and press the Set button R 0 Self diagnosis starts 0 A progress bar appears and Complete Diagnosis appears when the diagnosis is complete Memo 0 It takes about 6 minutes to complete the diagnosis During the diagnosis do not operate or turn off the camera recorder 3 Press the Set button R after confirming the exit screen The Initi...

Page 27: ...and time A Move the cursor with the cross shaped button HI and select the setting item B Change the values with the cross shaped button JK 3 Press the Set button R after setting is complete The clock is set to 0 seconds of the input date time Changing the Display Style You can change the display style of the date time on the menu Setting the Date Display Date Style A P97 Date Style The date displa...

Page 28: ...S button to switch to the status screen Display 2 screen Display 1 screen Display 0 screen 100min 50min 282min P 13000K 1 100 F1 6 0dB AE 6 12 34 56 Jan 12 2016 00 00 00 00 1920x1080 60 i HQ 4030 20 10 0 5 6f t P 13000K 1 100 F1 6 0dB AE 6 12 34 56 Jan 12 2016 00 00 00 00 4030 20 10 0 5 6f t Display Screen VF LCD in Media Mode A P114 Display Screen in Media Mode 0 This is the screen display during...

Page 29: ...her than the Camera 1 Camera 2 screen to enter the setting screen 0 Use the cross shaped button HI to switch screens as follows These are screen examples The contents displayed are different depending on the settings USB Mode Screen This screen displays the USB mode Warning Display Warning display is displayed in the display screen Camera mode Media mode A P125 Error Messages and Actions P 13000K ...

Page 30: ...rd Tilt 180 degrees upward 1 Open the LCD cover 2 Incline the LCD monitor to a position that enables easy viewing Rotate the LCD monitor to adjust the angle 0 While the LCD monitor is open you can rotate it 180 degrees upward or 90 degrees downward 0 Rotating the LCD monitor 180 degrees upward enables you to see the screen from the lens side To display the image when it is viewed from the opposite...

Page 31: ...es when you blink your eyes This is not a malfunction It does not affect the recorded images VIDEO output or HDMI output 1 Incline the viewfinder vertically to a position that enables easy viewing 2 Turn the visibility adjustment lever to adjust the visibility Turn the visibility adjustment lever to sharpen the image on the viewfinder screen 3 Adjust the brightness contour and contrast of the view...

Page 32: ... Function B User Switch Set B USER1 USER7 LCD KEY LCD KEY LCD KEY LCD KEY A P88 User Switch Set Item Memo 0 Operations of the user buttons are interlocked with the menu settings 0 When the menu screen is displayed these buttons function as the menu operation buttons A P83 Basic Operations in Menu Screen Tally Lamp This is the indicator lamp for recording and warning The operation changes according...

Page 33: ...6 32 GB 135 156 200 380 672 64 GB SDXC 270 312 400 760 1344 128 GB SDXC 540 624 800 1520 2688 Unit minute QuickTime H 264 HD H 264 SD XHQ UHQ 1080i 1080p 1080i 576i 4 GB 9 12 47 8 GB 18 25 95 16 GB 36 50 190 32 GB 72 100 380 64 GB SDXC 145 200 760 128 GB SDXC 290 400 1520 Unit minute Memo 0 If the SD card contains files recorded by devices other than this camera recorder or files that are saved fr...

Page 34: ...s selected Removing the SD Card 1 Check that the SD card to be removed is not being accessed status indicator of the card slot lights up in red 2 Open the SD card cover 3 Push the SD card and remove it from the slot 4 Close the SD card cover Memo 0 When both slots are inserted with usable SD cards the previously selected slot is used Caution 0 Data may be lost if you turn off the power of the came...

Page 35: ...rmat the card using the camera recorder menu 0 Unformatted SD cards 0 SD cards formatted under different specifications For details of the menu operation refer to Basic Operations in Menu Screen A P 83 Caution 0 Be sure to format the SD card on this camera recorder SD cards formatted on a PC and other peripheral equipment cannot be used on this camera recorder 0 RESTORE appears at the remaining me...

Page 36: ...t requires restoring is inserted 1 Select System B Media B Restore Media A P101 Restore Media 2 Select the SD card to be restored and press the Set button R 2 3 Restoring starts 4 Restoring is complete 0 When restoring is complete Complete appears and the camera recorder returns to the Restore Media screen 0 When no media that requires restoring is inserted the camera recorder returns to the Media...

Page 37: ...d 0 An 8 character clip name is automatically generated for the recorded clip Clip Name Prefix Clip Number 0 When Main Menu B System B Record Set B Record Format B Format is set to AVCHD the clip name generated consists of only the Clip Number 5 digit number A P103 Format Example In the case of QuickTime MP4 ABCG0001 This is set to xxxG xxx denotes the last 3 digits of the serial number by default...

Page 38: ...ing remote operations are possible even when the operation lock feature is turned on On 0 Remote operation from the wired remote control connected to the REMOTE terminal 0 Remote operation of the camera through access via a browser on devices such as a smartphone tablet terminal or PC Operation lock does not apply to the following buttons and switches 0 POWER ON OFF switch 0 TC IN OUT selection sw...

Page 39: ...0 Setting the Gain A P 49 0 Setting the Electronic Shutter A P 50 0 Adjusting the White Balance A P 51 0 Adjusting Audio Recording Level A P 56 2 Press the REC button to start recording to the SD card This camera recorder has three REC buttons Any of the REC buttons can be used to start stop recording by default The tally lamp lights up in red during recording 0 Zoom Operation A P41 Zoom Operation...

Page 40: ... Video Format 0 Select a Record Format from the list of formats The selectable Frame Bit Rate changes according to the settings of System Format and Resolution 0 The recording bit rate video is 50 Mbps in XHQ 35 Mbps VBR in UHQ and HQ and 18 3 Mbps 25 Mbps in the case of 1080i CBR in SP 0 The recording bit rate system rate is as follows when Format is set to AVCHD 0 HQ 60p 50p 28 Mbps VBR 0 HQ 60i...

Page 41: ...oom 0 The zoom speed changes according to the extent the zoom lever is being pushed 0 Zooms into wide angle and increases the angle of view when W is pressed 0 Zooms into telephoto and decreases the angle of view when T is pressed 0 A zoom bar appears during zoom operation P 13000K P 13000K 1 100 1 100 F1 6 F1 6 0dB 0dB AE 6 AE 6 12 34 56 12 34 56 Jan 12 2016 Jan 12 2016 00 00 00 00 00 00 00 00 40...

Page 42: ...reset Zoom Speed A P89 Preset Zoom Speed 0 Operating other zoom maneuvers during a zoom position recall will cancel the recall Focus Operation TIME CODE FOCUS MANU LOCK FOCUSASSIST 1 TIME CODE AUTO AUTO ZOOM FOCUS Adjusting Focus Automatically Set the FOCUS AUTO MANU BAUTO focus switch to AUTO There is no icon display in Auto Focus mode Memo 0 If Main Menu B Camera Function B AF Assist issetto Are...

Page 43: ...P44 Focus Assist Function A P44 Expanded Focus Function 0 While in Manual Focus mode pressing the FOCUS AUTO MANU BAUTO focus switch to BAUTO will shift the camera recorder to the One Push Auto Focus mode Continue to hold down to BAUTO to enter the Push Auto Focus mode A P42 One Push Auto Focus A P43 Setting to Auto Focus Temporarily Push Auto Focus AF Assist Function During auto focus you can shi...

Page 44: ... the image is enlarged 0 Pressing the user button again restores the image to the original size P 13000K 1 100 F1 6 0dB AE 6 12 34 56 Jan 24 2012 00 00 00 00 4030 20 10 0 5 6f t EXPANDED EXPANDED EXPANDED EXPANDED Memo 0 To set the operation when the button is pressed go to Main Menu B Camera Function B User Switch Set B Expanded Focus A P90 Expanded Focus 0 To adjust focus with the focus zoom rin...

Page 45: ...48 Adjusting the Brightness Automatically A P48 Auto Iris Automatic Adjustment Mode A P49 Automatic Gain Mode Automatic Gain Adjustment A P50 Automatic Shutter Mode Automatic Shutter Adjustment Selecting Specific Person from Several Persons 1 Hold down the user button that is assigned with Face Detect 0 The camera recorder will enter face selection mode and the face detection icon q will blink 0 A...

Page 46: ... R 0 Iconsbeingselectedareindicatedbyacheck mark P Press the Set button again to remove the check mark 0 When a check mark appears beside an icon select i Adjust and press the Set button to display the Adjust screen You can adjust the selected shooting mode A P47 Detailed Settings for Shooting Mode 4 Press the MENU THUMB button Returns to the normal screen Memo 0 The Scene Select mode operates reg...

Page 47: ... same time 2 Bright and Dark cannot be selected at the same time Detailed Settings for Shooting Mode 1 Adjust the setting values A Select the item to adjust Select the item to adjust using the cross shaped button JK and press the Set button R B Select the setting value Change the setting value using the cross shaped button JK and press the Set button R The settable items and their values are as fo...

Page 48: ... Level setting is temporarily disabled 0 Settings for AE Level are disabled during the Scene Select mode Adjusting the Iris You can adjust the aperture of the lens iris manually or automatically according to the brightness of the object TIME CODE IRIS PUSH AUTO FULL AUTO ON OFF Auto Iris Automatic Adjustment Mode 1 Set the FULL AUTO ON OFF switch to OFF to turn off the Full Auto mode 2 Set the SCE...

Page 49: ...ing conditions TIME CODE GAIN L M H FULL AUTO ON OFF Automatic Gain Mode Automatic Gain Adjustment 1 Set the FULL AUTO ON OFF switch to OFF to turn off the Full Auto mode 2 Set the SCENE SELECT switch to OFF to turn off the Scene Select mode 3 Press the GAIN button to set to the Automatic Gain mode Thesensitivityvalue indB willnotbedisplayed in the Auto Gain mode Memo 0 Set the FULL AUTO ON OFF sw...

Page 50: ... the SHUTTER button to set to the Manual Shutter mode 0 The shutter speed appears on the screen 0 Use the Set button R to switch between the shutter modes and the cross shaped button JK to switch between the speeds Switching Shutter Mode Press the Set button center of the cross shaped button to turn ON OFF the shutter Memo 0 When the shutter is ON Step or Variable may be selected in Camera Functio...

Page 51: ...witching with the WHT BAL B A PRESET selection switch is disabled Caution 0 The accuracy of FAW is inferior to that of Auto White Balance 0 When the power of the camera recorder is turned on with the FAW mode selected it takes about 15 seconds for the colors to stabilize Memo 0 When Main Menu B Camera Function B User Switch Set B AE Lock is set to AE WB the white balance when the user button that ...

Page 52: ... You can change both the color temperature settings in the Preset mode in the menu 1 Open the Preset Temp or Alternative Temp menu 0 Select Main Menu B Camera Process B White Balance B Preset Temp and Alternative Temp and press the Set button R 0 The Color Temperature setting screen appears ColorTemperature Detailed Selection Screen Color Temperature Selection Screen 2 Select the color temperature...

Page 53: ...rrent color temperature is displayed 100min 50min 282min A 1 100 F1 6 0dB AE 6 5 6f t 12 34 56 Jan 12 2016 00 00 00 00 1920x1080 60 i HQ 4030 20 10 0 100min 50min 282min A 1 100 F1 6 0dB AE 6 5 6f t 12 34 56 Jan 12 2016 00 00 00 00 1920x1080 60 i HQ 4030 20 10 0 3700K Result Display AWB Activating White Detection Frame Blinking Caution 0 Do not use highly reflective objects such as metals Doing so...

Page 54: ...leared even when y is selected A P92 Clear Paint After AWB 0 If White Balance has been assigned to the user button pressing the assigned user button will display the AWB Paint Adjustment screen A P32 Assignment of Functions to User Buttons Adjusting the Camera Image The picture quality of the camera can be set using the Camera Process menu As the adjustments are shown on the screen you can adjust ...

Page 55: ... image stabilizer function is turned ON High Audio Recording You can record audio from the two channels CH1 CH2 in synchronization with video images on this camera recorder Select from the four options below to record the audio 0 Built in Microphone 0 Microphone connected to AUX terminal 0 Microphone connected to INPUT1 terminal 0 Microphone connected to INPUT2 terminal FULL AUTO ON OFF CH1 INT IN...

Page 56: ...a microphone is not connected to the INPUT1 INPUT2 terminal set the INPUT1 INPUT2 mode switch to LINE or adjust the volume with the CH1 CH2 recording level adjustment knob Adjusting Audio Recording Level You can select to adjust the audio recording levels for the two channels CH1 CH2 manually or automatically FULL AUTO ON OFF CH1 INT INPUT1 INPUT2 AUTO MANUAL CH2 LC CH2 CH1 Manual Adjustment Mode ...

Page 57: ... automatic adjustment mode the limiter operates at 5 dBFS 0 If Limiter is set to other than Off the limiter operates according to the value set A P99 Limiter 0 When A V Set B Audio Set B Audio On FULL AUTO is set to SW Set you can switch the audio recording mode with the CH1 CH2 AUTO MANUAL selection switch on the camera recorder even when the FULL AUTO ON OFF switch is set to ON A P101 Audio On F...

Page 58: ...e time code operates in the run mode at all times regardless of the recording status It continues to run even when the power of the camera recorder is turned off Free Run The time code operates in the run mode at all times regardless of the recording status It continues to run even when the power of the camera recorder is turned off Rec Run The time code operates in the run mode during recording I...

Page 59: ...ly when the frame rate setting is 60 Set using Main Menu B TC UB B Drop Frame A P93 Drop Frame 0 Drop Sets the run mode of the time code generator to drop frame mode Use this setting when placing emphasis on the recording time 0 Non Drop Sets the run mode of the time code generator to non drop frame mode Use this setting when placing emphasis on the number of frames Memo Drop frame non drop frame ...

Page 60: ... 4 Press the MENU THUMB button Returns to the normal screen Setting Time Code without Opening the Menu AE LEVEL MENU THUMB CANCEL MENU THUMB CANCEL FOCUSASSIST 1 OIS 2 TIME CODE Memo 0 Settings cannot be made in the following cases 0 TC UB B TC Generator has been set to Regen 0 Menu screen is displayed 0 The camera recorder is not in the Camera mode Setting Time Code 1 Set TC UB B TC Generator to ...

Page 61: ...dy recorded on the SD card and records the new time code in continuation of that value 0 The same data as the user s bit already recorded on the SD card is recorded Memo 0 When TC UB B TC Generator is set to Regen the framing mode of the time code follows the setting in TC UB B Drop Frame instead of the clip settings A P93 Drop Frame Setting the User s Bit You can add the date time or an 8 digit h...

Page 62: ... the values and press the Set button R 0 The user s bit is set and the screen returns to TC UB 0 To cancel the setting press the CANCEL button 5 Press the MENU THUMB button Returns to the normal screen Synchronizing Time Code on Another Camera This camera recorder is equipped with a time code input output terminal TC terminal Connect another camera recorder to the TC terminal and synchronize to th...

Page 63: ... is being changed A P98 HDMI out Setting Zebra Pattern When the luminance level range for displaying zebra patterns is specified diagonal lines zebra pattern are displayed at areas with the specified luminance levels during shooting FIX VAR OFF AE LEV EL LOCK IRIS TIME CODE ZEBRA 5 1 Set the zebra display pattern Select the display pattern in LCD VF B Shooting Assist B Zebra 2 Specify the brightne...

Page 64: ...ec the last 5 seconds of the clip is played back A P88 Clip Review 0 When playback is complete the camera recorder exits Clip Review and returns to STBY recording standby mode Caution 0 During Clip Review only the CANCEL and REC buttons are enabled Press the CANCEL button to cancel clip review and return to STBY recording standby mode Press the REC button to cancel clip review and enter recording ...

Page 65: ...de is set to Backup 0 Available only when System is set to HD or SD A P67 Backup Rec 0 This item cannot be used when Rec Mode is set to a value other than Normal or Pre Rec A P104 Rec Mode 0 The split clips are recorded seamlessly without interruptions in the video Series Rec 0 Series Rec mode is specified in the factory default Main Menu B System B Record Set B Slot Mode is set to Series A P104 S...

Page 66: ...red P 13000K 1 100 F1 6 0dB AE 6 12 34 56 Jan 1 2 2016 00 00 00 00 4030 20 10 0 5 6f t 100min 50min REC Lit in red 3 Stop recording 0 Press the REC button again 0 Recording to both slots stops and both the card slot marks turn white 0 The same clips are recorded to both cards P 13000K 1 100 F1 6 0dB AE 6 12 34 56 Jan 1 2 2016 00 00 00 00 4030 20 10 0 5 6f t 100min 50min White Memo 0 During recordi...

Page 67: ...t will continue However repair of the accidentally removed card by the recovery function may fail 0 If an error occurs on one of the cards while recording is in progress in the Dual Rec mode recording of the erroneous card stops while that of the other card continues 0 Operations on clips recorded in the Dual Rec mode such as clip deletion in the Media mode or appending of OK marks can only be per...

Page 68: ... 6 12 34 56 Jan 12 2016 00 00 00 00 4030 20 10 0 5 6f t 100min 50min 100min 50min Red selected Red 3 Start normal recording normal recording into slot A 0 Press any of the REC buttons 0 Recording into the media in slot A starts The characters RREC appear in red 0 The card icon of slot A turns red unselected state and the status indicator of slot A blinks in red P 13000K 1 100 F1 6 0dB AE 6 12 34 5...

Page 69: ... since they are recorded seamlessly 0 Clip Cutter Trig cannot be performed during backup recording A P65 Splitting the Clips Freely Clip Cutter Trig 0 When Slot Mode is set to Backup Rec Mode can only be set to Normal A P104 Rec Mode Special Recording Besides the normal recording mode four special recording methods are available in this camera recorder They are Pre Rec Clip Continuous Frame Rec an...

Page 70: ...ard 0 This mode allows you to consolidate several rounds of startstop recording into one clip Example In normal recording three clips are generated as Recording 1 Recording 2 and Recording 3 However recording in this mode generates only one clip Recorded video and audio Completed Clip Recording 3 Recording 2 Recording 1 Recording 3 Recording 2 Recording 1 Recording stops Press and hold REC Recordi...

Page 71: ... becomes full during recording recording stops and STOP is displayed 0 When the POWER ON OFF switch is turned off during recording or recording pause recording stops and power is cut off after a clip is generated Caution 0 If the power is cut off due to low battery power a proper clip may not be generated Frame Rec In normal recording when the recording stops the image and accompanying data from t...

Page 72: ...vel meter display A P111 Audio Level Meter Interval Rec In normal recording when the recording stops the image and accompanying data from the start till the end of the recording are recorded as one clip on the SD card In this mode recording and pause are performed repeatedly at the specified time interval Only the specified number of frames is recorded The recording can be written to the media as ...

Page 73: ... B STBYN red text 0 The card slot status indicator blinks in green 5 Press and hold the REC button 0 The card slot status indicator lights up in green 0 The display becomes STBYN Caution 0 Do not remove the SD card during recording RRECN red text or recording pause STBYN yellow text 0 To remove the SD card during Interval Rec pressthe CANCEL button checkthat STBYN white text is displayed and the c...

Page 74: ...rk of the clip selected by the cursor 0 If an OK mark has been appended it will be deleted Otherwise an OK mark will be appended F OIS 2 Button 0 Switches the selection status of the clip selected by the cursor 0 Clips being selected are displayed with check mark G LOLUX 3 Button Enters the action selection screen H DISPLAY Button Switches between the Standard Screen and Detailed Screen I STATUS B...

Page 75: ...yed in thumbnail with the current video format settings It cannot be played back even if you press the Set Play button Memo 0 Depends on the Main Menu B System B Record Set B Record Format B System Resolution and Frame Bit Rate settings A P103 System A P103 Frame Bit Rate 0 When Record Format B Format is set to AVCHD you may not be able to play back files recorded on a camera recorder other than t...

Page 76: ...elects all clips appended with OK mark Select Range Specifies the range when selecting multiple clips A P80 Selecting Multiple Clips Randomly Deselect All Clears all clip selections Item Description Add OK Mark Appends an OK mark 0 This Clip Appends an OK mark to the clip pointed by the cursor 0 Selected Clips Appends an OK mark to the clips selected appended with check mark 0 All Clips Appends an...

Page 77: ...direction While paused Frame by frame playback in the reverse or forward direction C o Button Stops playback 1 In the thumbnail screen move the cursor to the clip to be played back Move the cursor to the clip to be played back using the cross shaped button JKH I 2 Press the playback pause button Playback of the selected clip starts Audio Output during Playback 0 You can confirm the playback sound ...

Page 78: ...tion selection screen is displayed 3 Select Delete Clips B This Clip and press the Set button R A screen to confirm deletion appears 3 4 Select Delete using the cross shaped button JK and press the Set button R Deleting starts 4 Selecting and Deleting Multiple Clips To select and delete multiple clips refer to Selecting and Performing Operations on Multiple Clips A P 80 Deleting All Clips Delete a...

Page 79: ...th an OK mark the OK mark will be deleted OK Mark During Playback or Pause Screen 1 Press FOCUS ASSIST 1 button during clip playback 0 If the clip does not have an OK mark an OK mark will be appended 0 If the clip is appended with an OK mark the OK mark will be deleted 1000 2000 12 34 56 12 34 56 Jan 12 2016 Jan 12 2016 00 00 00 00 00 00 00 00 40 4030 30 20 20 10 10 0 282min 282min 1920x1080 1920x...

Page 80: ...d OK Mark B Selected Clips 0 Deletes OK mark together Delete OK Mark B Selected Clips 0 Deletes selected clips together Delete Clips B Selected Clips Memo 0 Selecting clips appended with check mark and pressing the OIS 2 button will cancel the selection 0 If the operation is performed on multiple clips at the same time a progress bar appears You can stoptheoperationbypressingtheSetbutton R while t...

Page 81: ...leted Trimming Recorded Clips You can extract trim the necessary parts of a clip recorded in the SD card The trimmed clip is saved as a new file on the same SD card as the original clip No changes are made to the original clip 1 Switch to Media mode Switch the mode using the MODE selection button on the side control panel 2 Move the cursor to the clip to be trimmed Move the cursor to the clip to b...

Page 82: ...h as O N or S T to move the video to the in point A P77 Playing back 0 Press the USER1 button at the point you want to start trimming to specify the in point 6 Specify the out point 0 Operate buttons such as O N or S T to move the video to the out point A P77 Playing back 0 Press the USER2 button at the point you want to end trimming to specify the out point 7 Perform trimming Press the USER3 butt...

Page 83: ...THUMB CANCEL DISPLAY A D B C A B C D E F G A MENU THUMB Button 0 Displays the menu screen The Main Menu screen is displayed by default 0 During normal usage Main Menu is displayed if the previous menu operation ended at Main Menu and Favorites Menu if the previous menu operation ended at Favorites Menu 0 Press this button to close the menu screen during menu display and return to the normal screen...

Page 84: ...gscreen H Remaining Battery Power A P24 Power Status Display Memo 0 If the battery in use is not a recommended one the battery mark which indicates the battery level may not appear I Menu Title Title of the currently displayed menu Changing Setting Values D F A C B E A Menu Item to Change Menu item to be changed A list of setting values F appears in a pop up B Operation Guide Guide for the current...

Page 85: ...he key cursor D to the character you want to enter D Key Cursor Indicates the currently selected character or item Use the cross shaped button JKHI to move the cursor E Confirmation Buttons 0 Select Set Store and press the Set button R to confirm the title 0 Select Cancel and press the Set button R on the side control panel of the camera recorder to abort character input and return to the previous...

Page 86: ...enerator A P 93 TC Preset A P 93 UB Mode A P 93 Drop Frame A P 93 LCD VF A P 94 Shooting Assist A P 95 Marker Settings A P 95 Display Settings A P 96 LCD VF A P 94 VF Bright A P 94 VF Contrast A P 94 LCD Contrast A P 94 LCD Backlight A P 94 LCD Mirror A P 94 A V Set A P 98 Video Set A P 98 Audio Set A P 99 System A P 101 Record Set A P 102 Media A P 101 Setup File A P 101 Auto Power Off A P 102 Ta...

Page 87: ... adjusted using the cross shaped button HI on the right side Setting Values 6 to 6 R0 AE Speed ForsettingtheconvergencespeedduringAE Auto Exposure Setting Values RFast Middle Slow AGC Limit For setting the maximum gain value of AGC which electrically boosts the sensitivity level according to the brightness automatically Setting Values R24dB 18dB Smooth Trans For setting the shock reduction functio...

Page 88: ...CK 4 ZEBRA 5 MARKER 6 C REVIEW 7 buttons or the cross shaped buttons on the LCD monitor these buttons can be used to control the assigned function on off start switch Set according to the shooting conditions Usable only in the Camera mode Setting Values None Bars Lolux AE Lock Beautiful Skin Face Detect OIS One Push Iris Push AF AF Lock Preset Zoom1 Preset Zoom2 Preset Zoom3 White Balance Zebra Ma...

Page 89: ...to Fast to select another object immediately if the face on the screen is lost Set to Slow to operate at the same position for some time even if the face on the screen is lost Setting Values Fast RMiddle Slow AE Lock For specifying the operation when any of the USER1 USER7 LCD KEY LCD KEY LCD KEY or LCD KEY items is set to AE Lock 0 AE Use this feature to fix a value to the Auto function of Gain I...

Page 90: ...edia mode and Scene Select mode Detail For adjusting the contour detail enhancement level Increasing the value increases the sharpness of the contour Setting Values 10 to 10 Off R0 9 Adjust For specifying the detailed settings of the contour detail A P92 Detail Adjust Item Memo 0 This item cannot be selected when Detail is set to Off Master Black For adjusting the pedestal level master black that ...

Page 91: ...s deteriorates 0 Decrease the number Enhances the gradation of bright areas However the gradation of black deteriorates Setting Values 5 to 5 R 0 White Balance Menu for adjusting white balance A P92 White Balance Item For details refer to Adjusting the White Balance A P 51 Color Matrix For setting the color matrix 0 Cinema Subdued Sets to a subdued color matrix that is similar to the screen charac...

Page 92: ... refer to Adjusting the White Balance A P 51 0 Increase the number Strengthens the red blue 0 Decrease the number Weakens the red blue Setting Values 32 to 32 R 0 Memo 0 This item is selectable when the WHT BAL switch on the right of the camera recorder is set to A or B When PRESET is set this item appears as and cannot be selected 0 Different values can be specified for A and B 0 After the y Auto...

Page 93: ...ng the time code hour minute second frame Display Drop setting 02 02 25 20 Non Drop setting 02 02 25 20 UB Mode For setting the recording mode of the user s bit 0 Date Records the date 0 Time Records the time 0 Preset Records according to the preset setting A P61 Setting the User s Bit Setting Values Date Time RPreset Memo 0 If UB Mode is set to Time the user s bit operates in the 24 hour format e...

Page 94: ...s turned on Setting Values On ROff VF Bright For setting the brightness of the viewfinder screen Increasing the value increases the brightness Setting Values 10 to 10 R 0 VF Contrast For setting the difference in luminance between the darkest and brightness areas in the viewfinder screen Increasing the value increases the contrast Setting Values 10 to 10 R 0 LCD Contrast For setting the difference...

Page 95: ... corrected Focus Assist Zebra For selecting the operation when Focus Assist and Zebra are used simultaneously 0 Standard The focus assist outlines will overlapped the zebra pattern 0 ALT The focus assist outlines will not overlapped the zebra pattern however flicker may occur on the zebra area Setting Values Standard RALT Marker Settings Item For setting the marker and safety zone which are useful...

Page 96: ... is used to set the displays on the LCD monitor and viewfinder screen Zoom For setting the display method of the zoom position 0 Number Displays the zoom position in numbers 0 99 0 Bar Displays the zoom position in a bar 0 Off Does not display the zoom position Setting Values Number RBar Off Focus For setting the display method of the approximate distance to the subject in focus during manual focu...

Page 97: ...and below D R 11 to 30 C Q 31 to 70 B P 71 to 100 0 When the remaining battery power is low RES instead of the value is displayed Replace the battery as soon as possible 0 The remaining battery power and remaining time are intended as reference values for the shooting duration 0 The time capacity or voltage will not be displayed during charging Date Time For specifying whether to display the date ...

Page 98: ...igger For setting whether to superimpose trigger signals in tandem with the HDMI terminal as well as the REC button on the camera body When a compatible device is connected recording stop control signals are output in tandem with the operation of the REC button The record trigger output status to the connected device is indicated by REC B STBYB on the display screen 0 On Superimposes the trigger s...

Page 99: ...T1 selection switch is set to MIC or MIC 48V Setting Values 62dB 56dB R 50dB 44dB 38dB 32dB Input2 Mic Ref For setting the reference input level when the INPUT2 selection switch is set to MIC or MIC 48V Setting Values 62dB 56dB R 50dB 44dB 38dB 32dB Int Mic Gain Forsettingthesensitivityofthebuilt inmicrophone Setting Values 12dB 6dB R0dB AUX Gain For setting the sensitivity of the AUX terminal inp...

Page 100: ...t Tone For specifying whether to output the audio test signals 1 kHz during color bar output Setting Values On ROff INPUT1 2 Wind Cut For selecting whether to cut the low frequencies of theaudioinputsignals low cut whenthe INPUT1 INPUT2 switch is set to MIC or MIC 48V Set this item to reduce wind noise from the microphone 0 Both Enables low cut on both the INPUT1 and INPUT2 terminals 0 INPUT2 Enab...

Page 101: ...elated settings For specifying recording settings formatting and restoring of SD card tally lamp setting date time time zone and other settings It can also be used to reset the menu settings to their default values Record Set For specifying recorded video related settings A P102 Record Set Item Media 9 Format Media For formatting initializing an SD card Select a card slot A or B select Format from...

Page 102: ...dia mode Date Time For setting the year month day hour and minute Memo 0 The display order of the date year month day follows the setting in Display Settings B Date Style However the 24 hour format is used for the hour display regardless of the Time Style setting A P97 Date Style Time Zone For setting the UTC time difference in units of 30 minutes Setting Values UTC 12 00 UTC 00 30 UTC UTC 00 30 U...

Page 103: ...s A and B 0 When System is set to SD this item is fixed at 720x576 0 The selectable values of Frame Bit Rate vary according to the setting of this item 9 Frame Bit Rate For selecting the recording frame rate and encoding bit rate for the SD card inserted into slot A The selectable options vary according to the settings of the following items Resolution Format Frame Bit Rate 1920x1080 AVCHD Setting...

Page 104: ...the two slots at the same time A P66 Dual Rec 0 Backup Mode that enables recording to slot B without using the REC button This item is selectable only when Rec Mode is set to Normal Start or stop the recording using the Backup Rec menu or press the USER1 to USER7 LCD KEY LCD KEY LCD KEY LCD KEY button that is assigned with Backup Trig A P67 Backup Rec Memo 0 When this is set to Series and recordab...

Page 105: ...e display style can be changed in LCD VF B Display Settings B Date Style Time Style A P97 Date Style A P97 Time Style 0 When the date time is hidden while the menu screen status screen or other screen is displayed the date time during this period will not be recorded to the video A confirmation screen appears if you try to display the menu screen or status screen during recording Clip Set 9 Clip N...

Page 106: ...ng AE LEVEL MENU THUMB CANCEL FOCUSASSIST 1 OIS 2 TIME CODE MENU THUMB CANCEL DISPLAY Adding Menu Items to Favorites Menu 1 Press the MENU THUMB button to open the Main Menu screen 2 Select the menu or submenu item to add 2 Memo 0 Adding items to Favorites Menu cannot be performed in the following cases USER1 Add is displayed in gray in the operation guide 0 Selected item is already added to Favor...

Page 107: ...te 3 4 Press the OIS 2 button A delete mark b appears at the beginning of the menu item Memo 0 When the OIS 2 button is pressed again while the menu item with the delete mark b is selected the menu item will be excluded from the items to be deleted and the delete mark b disappears 5 Press the FOCUS ASSIST 1 button The option menu to exit the Favorites Menu editing mode appears 6 Select Save Exit a...

Page 108: ...ng mode is activated 2 Header Magenta 3 Select the menu or submenu item to move and press the Set button R The moving mode is activated and a position selection bar for the move appears 3 Position Selection Bar 4 Select the position to move to with the cross shaped button JK Move the position selection bar with the cross shaped button JK and select a position to move to 5 Press the Set button R Th...

Page 109: ... press the Set button R 7 Memo 0 Moving is not complete until the changes are saved with Save Exit 0 To exit the editing mode without saving any changes select Exit without Saving 0 To return to the editing mode select Cancel Adding Editing Frequently Used Menu Items Favorites Menu 109 Menu Display and Detailed Settings ...

Page 110: ...of the SD cards in slot A and slot B separately W Currently selected slot White card W z Write protect switch of SD card is set W INVALID SD card cannot be read or written to or restored W FORMAT SD card requires formatting W RESTORE SD card requires restoring W INCORRECT 0 When Record Set is set to other than AVCHD SD with a Class 4 SD card inserted 0 When the SD card is not supported 0 When an S...

Page 111: ...A or SCN B A P46 Using Scene Select 0 If the SCENE SELECT switch is set to OFF and the FULL AUTO ON OFF switch is set to ON the a icon appears J Image Stabilizer Mark Displayed when the image stabilizer is ON i When Level of OIS is set to Normal j When Level of OIS is set to High Memo 0 If image stabilizer is set to OFF when the Display 0 screen is displayed h appears for 3 seconds 0 Displayed in ...

Page 112: ...B LCD VF B Display Settings B Focus This item will not be displayed when Off is selected A P96 Focus 0 Displayed in the Display 0 screen only when there is a change R Zebra pattern During zebra pattern display zebra icon is displayed on the display screen in Camera mode A P63 Setting Zebra Pattern S Focus Assist 0 FOCUS is displayed when auto focus is activated A P95 Focus Assist Memo 0 Displayed ...

Page 113: ...e Rec recording A P69 Pre Rec STBY C Clip Continuous Rec recording standby A P70 Clip Continuous Rec RRECC Clip Continuous Rec recording A P70 Clip Continuous Rec STBYC displayed in yellow Clip Continuous Rec recording pause A P70 Clip Continuous Rec STBY N Interval Rec recording standby A P72 Interval Rec STBYN displayed in red Interval recording pause RRECN Interval Rec recording A P72 Interval ...

Page 114: ...n the Media Display 0 screen during warnings only C Resolution Displays the video image resolution D Frame Rate Bit Rate Displays the frame rate and bit rate in pairs E Operation Guide Displays a guide for the current operation buttons F Audio Level Meter Displays the audio levels of CH1 and CH2 4030 20 10 0 Memo 0 This item is not displayed when Main Menu B LCD VF B Display Settings B Audio Meter...

Page 115: ...her to display the time code user s bit or turn off the display in TC UB of Main Menu B LCD VF B Display Settings A P96 TC UB K Event Warning Display Area Displays error messages A P125 Error Messages and Actions L Media Status PLAY Playing STILL Still picture playback mode FWD High speed playback in the forward direction playback speed 5x 15x 60x or 360x REV High speed playback in the reverse dir...

Page 116: ...tatus functions assigned of the user buttons A P32 Assignment of Functions to User Buttons Audio Screen For checking the settings related to audio input A P99 Audio Set Item Audio Level Screen For checking audio related information such as microphone volume level A P55 Audio Recording Video Screen For checking the settings related to video output A P98 Video Set Item 116 Status Screen Display Stat...

Page 117: ...th Beautiful Skin mode you can beautify the skin tone to make it look dewy and smooth 1 Assign the Beautiful Skin function to any of the user buttons A P32 Assignment of Functions to User Buttons 2 Press the user button that is assigned with the Beautiful Skin function 0 e appears when Beautiful Skin is in operation The Beautiful Skin mode toggles On and Off each time the button is pressed Color B...

Page 118: ...on J rotates the hue in the clockwise direction on the vector scope 0 Pressing the cross shaped button K rotates the hue in the anti clockwise direction on the vector scope R Cy B G Y I Mg R Cy B G Y I Mg R Cy B G Y I Mg R Cy B G Y I Mg R Cy B G Y I Mg R Cy B G Y I Mg Magenta Green Blue Yellow Cyan Red 3 Adjust Saturation 0 Press the cross shaped button I to move the cursor to Saturation 0 Each of...

Page 119: ...M1 to CAM4 SD slot A W 1 to W 8 SD slot B Y 1 to Y 8 o User File All File Camera recorder CAM1 to CAM2 SD slot A W 1 to W 8 SD slot B Y 1 to Y 8 Saving Setup Files 1 Display the Setup File menu Select Main Menu B System B Setup File and press the Set button R A P101 Setup File 2 Select Store File and press the Set button R 3 Select Picture File User File or All File and press the Set button R The ...

Page 120: ... and press the Set button R 3 Select Picture File User File or All File and press the Set button R The existing files are displayed 4 Select the file to load using the cross shaped button JK and press the Set button R 4 Memo 0 When the write protect switch of the inserted SD card is set a z mark appears beside the SD card icon Setup files can be loaded from an SD card even if the write protect swi...

Page 121: ...et button R The existing files are displayed 4 Select the file to delete using the cross shaped button JK and press the Set button R 4 Memo 0 User File saved on the SD card cannot be deleted 5 Select Delete on the confirmation screen and press the Set button R Deletion starts and Deleting appears on the screen 5 6 Deletion is complete After file deletion is complete Complete appears on the screen ...

Page 122: ...automatically such as when playback stops Disconnecting 0 Disable the connection on the PC then remove the USB cable from the camera recorder 0 Doing so exits the USB mode and switches the camera recorder to Camera mode Memo 0 The procedure for disabling the USB connection varies according to the PC in use For details refer to the INSTRUCTIONS of the PC When your PC cannot recognize the SD card Co...

Page 123: ... DEVICE AV A BATT RELEASE POW ER CHG B HDMI REMOTE DC REC AV DEVICE DC REMOTE Audio Lch Audio Rch Video GND HDMI AV input Select the output signal in A V Set B HDMI out A P98 HDMI out To display the menu screen or display screen on an external monitor set A V Set B Video Set B Display On TV to On A P98 Display On TV Setting the Aspect 0 For setting the mode to convert images with a 16 9 aspect rat...

Page 124: ...OR selection switch has been set to BOTH stereo sound is output from the x terminal regardless of the Monitor setting Connecting Wired Remote Control You can operate the functions of this unit with a wired remote control Memo 0 When the switches of the camera recorder and remote control unit are operated at the same time the switch operation of the remote control unit takes priority over that of t...

Page 125: ...ery 0 If the error persists please contact the local dealers in your area Rec Inhibited REC button is pressed when the write protect switch of the SD card is set Turn off the write protect switch of the SD card or insert a recordable SD card A P33 SD Card Lost Media Info 0 Card is removed while recording is in progress 0 Card is removed while formatting is in progress 0 Card is removed while resto...

Page 126: ...tically To continue recording press the REC button again Blinking of the Tally Lamp The tally lamp start blinking when the remaining space on the SD card is running out during recording or when the battery power is running low Blinking Mode Remaining Battery Power SD Card Space Blinks slowly once every second 0 Battery power is low 0 Remaining recording time on SD card is less than 3 minutes durin...

Page 127: ...es Playback does not start after selecting a clip thumbnail and pressing the Set button R 0 Is the selected clip a playable clip Playback is not possible if the clip has a different video format setting Images on the LCD monitor and viewfinder screen appear dark or blurred 0 Readjust the brightness of the LCD monitor and viewfinder 0 Is the iris closed 0 Is the shutter speed setting too high 0 Is ...

Page 128: ...amp set to On To display the date and time set it to Off A P105 Time Stamp Incorrect display on the viewfinder 0 Is the LCD monitor used with LCD VF B LCD VF set to Off A P94 LCD VF The actual recording time is shorter than the estimated time 0 The recordable time may be shorter depending on the shooting conditions or the subject The two camera recorders are not synchronized even though the time c...

Page 129: ... 1 0 V p p Audio signal 8 dBu during reference level input 1 kK unbalanced x terminal Φ3 5 mm mini jack stereo REMOTE terminal Φ2 5 mm mini jack stereo U terminal DEVICE Mini USB B type USB 2 0 slave function mass storage class only TC terminal IN 1 0 V p p to 4 0 V p p high impedance OUT 2 0 1 0 V p p low impedance DC terminal DC jack for the supplied AC adapter Lens Section Item Description Lens...

Page 130: ...kHz 16 Bit 256 kbps HQ Mode Progressive 1920x1080 59 94p 50p 28 Mbps Max HQ mode 1920x1080 59 94i 50i 24 Mbps Max SP mode 1920x1080 59 94i 50i 18 Mbps Max LP mode 1440x1080 59 94i 50i 9 Mbps EP mode 1440x1080 59 94i 50i 5 Mbps HD mode MOV H 264 Video recording file format QuickTime File Format Video XHQ Mode MPEG 4 AVC H 264 50 Mbps Max 1920 1080 59 94p 59 94i 50p 50i UHQ Mode MPEG 4 AVC H 264 35 ...

Page 131: ...ine Drawing Unit mm 57 HOOD 346 403 416 140 156 5 177 5 148 5 173 197 270 The specifications and appearance of this product are subject to changes for further improvement without prior notice Specifications 131 Others ...

Page 132: ...48 L LCD monitor 9 24 28 30 Lens cover 21 M Marker display 117 Media mode 13 28 114 Menu 83 84 86 O OK mark 79 One push auto focus 42 P Picture file 119 Picture quality setting 54 Power 24 25 Pre rec 69 Preset zoom 42 Push auto focus 43 R Recordable time 33 Resolution 40 Restoring SD card 36 S Safety zone display 117 SD SDHC SDXC card 10 33 Selecting multiple clips 80 Setting the date time 27 Setu...

Page 133: ... related materials updates and upgrades on condition that no original copies or related materials continue in the possession of the User and that the User shall cause the transferee to comply with this Software License Agreement 2 The User shall not carry out reverse engineering disassembling decompiling or any other code analysis works in connection with the Licensed Software Article 4 Right pert...

Page 134: ...tware covers those corresponding to free software and as a condition of distribution of the software component in executable format which is based on the license granted under the GNU General Public License or Lesser General Public License hereinafter GPL LGPL it requires an availability of the source code for the relevant component Please refer to the following URL concerning the distribution of ...

Page 135: ...135 ...

Page 136: ... JY HM360AG HD MEMORY CARD CAMERA RECORDER 2016 JVC KENWOOD Corporation B5A 1539 00 ...

Reviews: