EN
35
Master Page: Right-start
AD
V
A
NCED FE
A
TURE
S
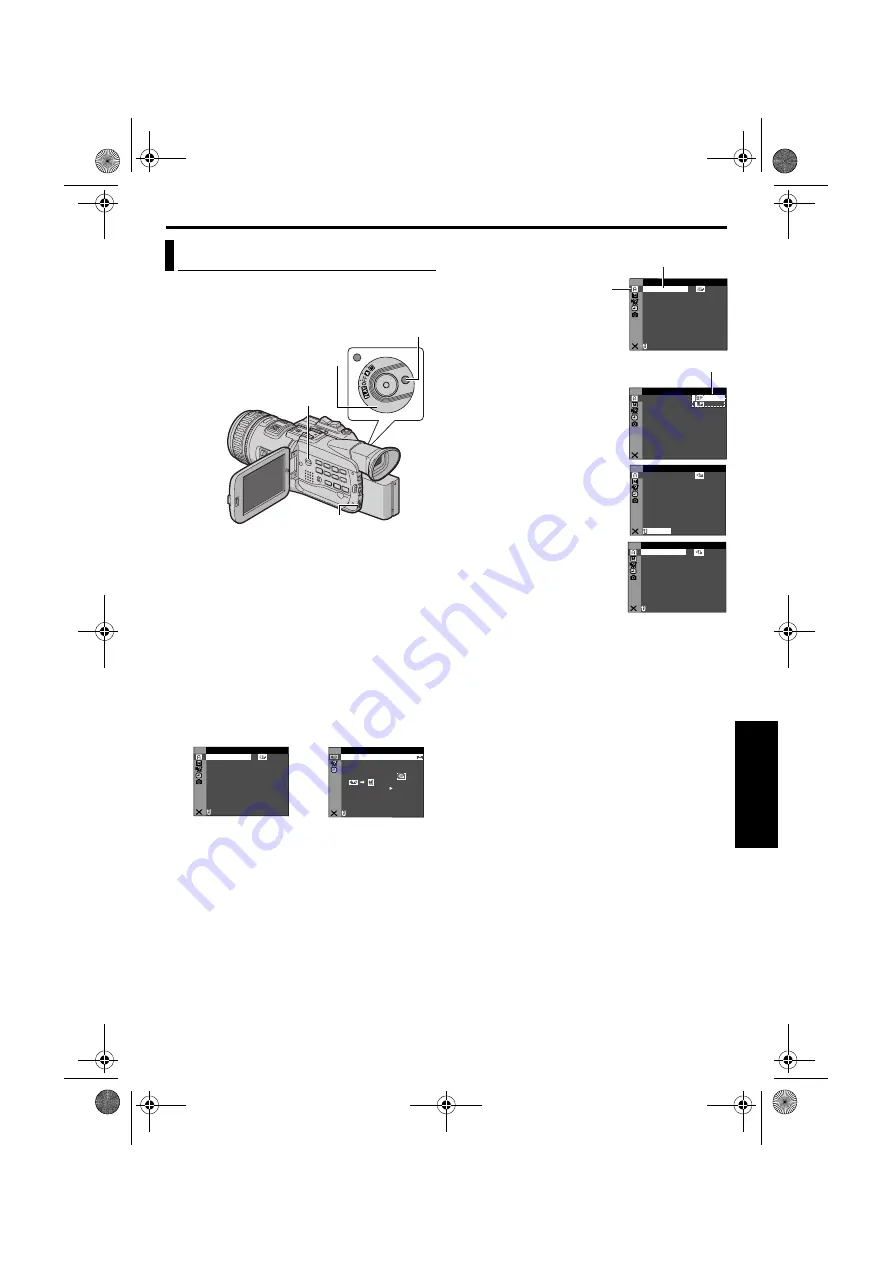
MENUS FOR DETAILED ADJUSTMENT
This camcorder is equipped with an easy-to-use, on-
screen menu system that simplifies many of the
more detailed camcorder settings. (
1
For Video and D.S.C. Recording Menus:
Set the Power Switch to “
M
” while pressing down
the Lock Button located on the switch.
For Video Playback Menus:
1)
Set the Playback Mode Switch to “VIDEO”.
2)
Set the Power Switch to “
P
” while pressing
down the Lock Button located on the switch.
For D.S.C. Playback Menus:
For details, refer to “D.S.C. PLAYBACK”
(
2
Open the LCD monitor fully, or pull out the
viewfinder fully.
3
Press the
MENU
Wheel in. The Menu Screen
appears.
4
Rotate the
MENU
Wheel to select the desired
function, and press it. The selected function
menu appears.
5
Rotate the
MENU
Wheel to select the desired
function, and press it. The Sub Menu appears.
Example:
m
CAMERA Menu
6
Rotate the
MENU
Wheel to
select the desired
parameter.
7
Press the
MENU
Wheel in.
Selection is complete.
●
Repeat the procedure if
you wish to set other
function menus.
8
Press the
MENU
Wheel in.
The Menu Screen returns.
●
Repeat the procedure if
you wish to set other
function menus.
9
Press the
MENU
Wheel in
again. The Menu Screen closes.
NOTES:
●
The “
m
” settings are effective when the Power
Switch is set to both “
A
” and “
M
”. However, the
menu settings can be changed only when the
Power Switch is set to “
M
”.
●
The “
q
” settings are effective only when the
Power Switch is set to “
M
”.
●
The “
s
” functions which are set when the Power
Switch is set to “
M
” are also applied when the
Power Switch is set to “
P
”.
●
The “
n
” (CAMERA DISPLAY) settings are
effective even when the Power Switch is set to
“
A
”. However, the menu settings can be changed
only when the Power Switch is set to “
M
”.
●
The “
n
” (CAMERA DISPLAY) settings are
effective only for shooting except “BRIGHT”.
●
The “
n
” (VIDEO DISPLAY) settings are effective
only for video playback except “BRIGHT”.
●
The date indication can also be turned on/off by
pressing the
DISPLAY
Button on the remote
control (provided). (
Changing The Menu Settings
Power Switch
Lock Button
Playback Mode Switch
MENU Wheel
ME
A
CA
R
–
1 2
D
–
OUN
DV S
t
i
b
4 0
O
–
ZO M
x
AG
I
–
UP
GA N
C
MA
I O
V
–
GAT
NA I
N
A
U
N
L
N
RETUR
C MOD
RE
E
I D
O
V
E
OF
.
–
ARR
DV N
F
± 0
N
–
HRO
SY C
0
.
E
C
–
MOD
RE
OF
CO
Y
P
F
–
OF
PU
A
I N
S / V
T
F
–
N
RETUR
D
U D M
SO N
E
O
L .
V . DE
NA I
ST R
E
–
EO
Menu Screen for Video
and D.S.C. Recording
Menu
Menu Screen for Video
Playback Menu
ME
A
CA
R
–
1 2
D
–
OUN
DV S
t
i
b
4 0
O
–
ZO M
x
AG
I
–
UP
GA N
C
MA
I O
V
–
GAT
NA I
N
A
U
N
L
N
RETUR
C MOD
RE
E
Selected menu icon blinks.
Selected function
ME
A
CA
R
–
C MOD
RE
E
N
RETUR
Sub Menu
ME
A
CA
R
–
1 2
D
–
OUN
DV S
t
i
b
4 0
O
–
ZO M
x
AG
I
–
UP
GA N
C
MA
I O
V
–
GAT
NA I
N
A
U
N
L
C MOD
RE
E
N
RETUR
ME
A
CA
R
–
1 2
D
–
OUN
DV S
t
i
b
4 0
O
–
ZO M
x
AG
I
–
UP
GA N
C
MA
I O
V
–
GAT
NA I
N
A
U
N
L
N
RETUR
C MOD
RE
E
JY-HD10US.book Page 35 Tuesday, April 22, 2003 8:18 AM


